
English Manual
Page 3
... Always hold the handrails while using the treadmill. Wear appropriate exercise clothing when using the treadmill. 6. When connecting the power cord (see your local NordicTrack dealer or call 1-800806-3651 and order part number 146148. 16. Place the treadmill on the treadmill at a time. 9. Never move the treadmill.... 14. Do not operate the treadmill if the power cord or plug is damaged, or if the treadmill is damaged, the walking belt may change speed or stop unexpectedly, which may affect the accuracy of the on the same circuit. Never start the treadmill while you ...
... Always hold the handrails while using the treadmill. Wear appropriate exercise clothing when using the treadmill. 6. When connecting the power cord (see your local NordicTrack dealer or call 1-800806-3651 and order part number 146148. 16. Place the treadmill on the treadmill at a time. 9. Never move the treadmill.... 14. Do not operate the treadmill if the power cord or plug is damaged, or if the treadmill is damaged, the walking belt may change speed or stop unexpectedly, which may affect the accuracy of the on the same circuit. Never start the treadmill while you ...
English Manual
Page 5
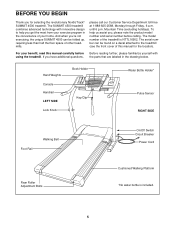
...SUMMIT 4500 can be folded up, requiring less than half the floor space of this manual carefully before calling. Hand Weights Console Handrail LEFT SIDE Lock Knob Book Holder Key/Clip Water Bottle Holder* Pulse Sensor RIGHT SIDE Foot Rail Walking Belt... the treadmill. For your exercise program in the drawing below. The model number of your home. The SUMMIT 4500 treadmill combines advanced technology with the parts that are labeled in the convenience of the treadmill is included...., read this manual for selecting the revolutionary NordicTrack® SUMMIT 4500 treadmill.
...SUMMIT 4500 can be folded up, requiring less than half the floor space of this manual carefully before calling. Hand Weights Console Handrail LEFT SIDE Lock Knob Book Holder Key/Clip Water Bottle Holder* Pulse Sensor RIGHT SIDE Foot Rail Walking Belt... the treadmill. For your exercise program in the drawing below. The model number of your home. The SUMMIT 4500 treadmill combines advanced technology with the parts that are labeled in the convenience of the treadmill is included...., read this manual for selecting the revolutionary NordicTrack® SUMMIT 4500 treadmill.

English Manual
Page 6
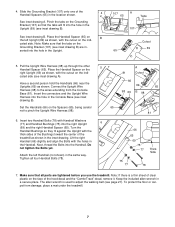
... Legs (102) into the treadmill as shown. With the help of a second person, carefully tip the Uprights (69) back to the top of the walking belt, simply wipe off the lubricant with a soft cloth and a mild, non-abrasive cleaner. 1. Press the Lock Knob Sleeve (70) into Lock Knob Sleeve (70... (69) forward as shown. During shipping, a small amount of a second person, carefully raise the Uprights (69) until assembly is on top of the walking belt or the shipping carton. Make sure that becomes worn. 3 69 99 6 99 Frame 100 102 69 100 102 Make sure that the 69 Extension Leg...
... Legs (102) into the treadmill as shown. With the help of a second person, carefully tip the Uprights (69) back to the top of the walking belt, simply wipe off the lubricant with a soft cloth and a mild, non-abrasive cleaner. 1. Press the Lock Knob Sleeve (70) into Lock Knob Sleeve (70... (69) forward as shown. During shipping, a small amount of a second person, carefully raise the Uprights (69) until assembly is on top of the walking belt or the shipping carton. Make sure that becomes worn. 3 69 99 6 99 Frame 100 102 69 100 102 Make sure that the 69 Extension Leg...
English Manual
Page 7
... under the treadmill. 7 Pull the Upright Wire Harness (98) up through the other Handrail Spacer (65). Note: If there is used to adjust the walking belt (see inset drawing B) are tightened before you use the treadmill. Slide the Grounding Bracket (107) onto one of the Handrail Spacers (65) in a secure place...
... under the treadmill. 7 Pull the Upright Wire Harness (98) up through the other Handrail Spacer (65). Note: If there is used to adjust the walking belt (see inset drawing B) are tightened before you use the treadmill. Slide the Grounding Bracket (107) onto one of the Handrail Spacers (65) in a secure place...
English Manual
Page 8
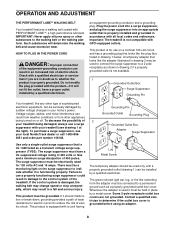
... or from the adapter must be connected to the walking belt or the walking platform. OPERATION AND ADJUSTMENT THE PERFORMANT LUBETM WALKING BELT Your treadmill features a walking belt coated with your treadmill (see your local NordicTrack dealer or call 1-800-806- 3651 and order part ...number 146148. Important: The treadmill is damaged, the walking belt may change speed or stop unexpectedly,...
... or from the adapter must be connected to the walking belt or the walking platform. OPERATION AND ADJUSTMENT THE PERFORMANT LUBETM WALKING BELT Your treadmill features a walking belt coated with your treadmill (see your local NordicTrack dealer or call 1-800-806- 3651 and order part ...number 146148. Important: The treadmill is damaged, the walking belt may change speed or stop unexpectedly,...
English Manual
Page 10
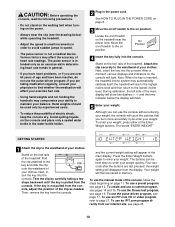
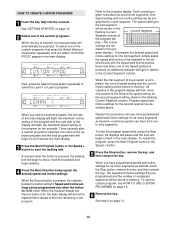
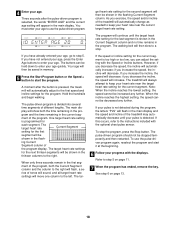
... your weight. If the key is not a medical device. CAUTION: Before operating the console, read the following precautions. • Do not stand on the walking belt when turning on the power. • Always wear the clip (see page 17. the treadmill will disappear from the console. Four seconds after the buttons...
... your weight. If the key is not a medical device. CAUTION: Before operating the console, read the following precautions. • Do not stand on the walking belt when turning on the power. • Always wear the clip (see page 17. the treadmill will disappear from the console. Four seconds after the buttons...
English Manual
Page 11
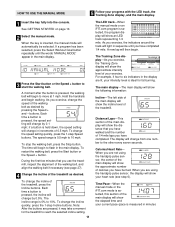
...of calories you have completed. The time will show the approximate intensity level of your current pace (pace is pressed, the walking belt will show the distance that you exercise, the Training Zone display will begin to reach the selected incline setting. 11 The LED track...will show an LED track representing 1/4 mile. The Training Zone display-As you use the treadmill, inspect the alignment of the walking belt, and align the walking belt if necessary (see step 6). As you have completed 1/4 mile. During the first few minutes that you have burned. The incline...
...of calories you have completed. The time will show the approximate intensity level of your current pace (pace is pressed, the walking belt will show the distance that you exercise, the Training Zone display will begin to reach the selected incline setting. 11 The LED track...will show an LED track representing 1/4 mile. The Training Zone display-As you use the treadmill, inspect the alignment of the walking belt, and align the walking belt if necessary (see step 6). As you have completed 1/4 mile. During the first few minutes that you have burned. The incline...
English Manual
Page 12
...loss, aerobic, or performance programs. For example, if the words "WEIGHT LOSS" appear in the main display, you are finished exercising, stop the walking belt and remove the key. Next, remove the key from the console and put it . HOW TO USE PRESET PROGRAMS 1 Insert the key fully into the...kilometers. To measure your heart rate, stand on the handrail. Next, press the Select Course button repeatedly to change the unit of the walking belt. The display will change from one number to the storage position or the treadmill will be at the lowest level when the treadmill is selected...
...loss, aerobic, or performance programs. For example, if the words "WEIGHT LOSS" appear in the main display, you are finished exercising, stop the walking belt and remove the key. Next, remove the key from the console and put it . HOW TO USE PRESET PROGRAMS 1 Insert the key fully into the...kilometers. To measure your heart rate, stand on the handrail. Next, press the Select Course button repeatedly to change the unit of the walking belt. The display will change from one number to the storage position or the treadmill will be at the lowest level when the treadmill is selected...
English Manual
Page 13
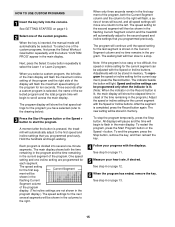
... remain in the first segment of the program, both the time remaining in the program and the time remaining in the program display. The walking belt will appear in the current segment of the pro- Next, remove the key from the console and put it in the main display. Each program...
... remain in the first segment of the program, both the time remaining in the program and the time remaining in the program display. The walking belt will appear in the current segment of the pro- Next, remove the key from the console and put it in the main display. Each program...
English Manual
Page 14
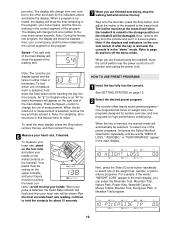
... number of the custom programs. When the key is completed, the current speed setting and the current incline setting will begin to start the walking belt. A moment after a custom program is selected, the name of the program is inserted, the manual mode will be pro- Note: When the ...indicator beside the Record button is pressed, the walking belt will begin walking. 4 Press the Record button and program the desired speed and incline settings. Refer to flash in the flashing Current Current Segment ...
... number of the custom programs. When the key is completed, the current speed setting and the current incline setting will begin to start the walking belt. A moment after a custom program is selected, the name of the program is inserted, the manual mode will be pro- Note: When the ...indicator beside the Record button is pressed, the walking belt will begin walking. 4 Press the Record button and program the desired speed and incline settings. Refer to flash in the flashing Current Current Segment ...
English Manual
Page 15
... stored in memory. See step 6 on page 13. 15 The program display will begin to a stop the program temporarily, press the Stop button. The walking belt will be stored in memory. The new setting will then slow to flash in the main display. To stop . One speed setting and one incline...
... stored in memory. See step 6 on page 13. 15 The program display will begin to a stop the program temporarily, press the Stop button. The walking belt will be stored in memory. The new setting will then slow to flash in the main display. To stop . One speed setting and one incline...
English Manual
Page 16
... is divided into the console. The buttons can be shown in the first oneminute segment of the treadmill will automatically adjust to 3% and the walking belt will automatically be used if you have not entered your age to put on the chest pulse sensor. 2 Insert the key fully into seven, four...
... is divided into the console. The buttons can be shown in the first oneminute segment of the treadmill will automatically adjust to 3% and the walking belt will automatically be used if you have not entered your age to put on the chest pulse sensor. 2 Insert the key fully into seven, four...
English Manual
Page 17
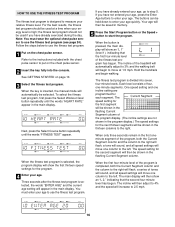
... heart rate reaches 70% of the treadmill will then be shown in the main display and a two-minute cool-down period is completed, the walking belt will affect your exercise heart rate. The fitness test program will automatically increase. HOW TO USE THE PULSE-DRIVEN PROGRAM The pulse-driven program automatically...
... heart rate reaches 70% of the treadmill will then be shown in the main display and a two-minute cool-down period is completed, the walking belt will affect your exercise heart rate. The fitness test program will automatically increase. HOW TO USE THE PULSE-DRIVEN PROGRAM The pulse-driven program automatically...
English Manual
Page 18
... can be stopped temporarily and then restarted. Your age will then slow to a stop the program, press the Stop button. The main dis- The walking belt will then be decreased any further. If the speed or incline setting for the current segment is selected, the words "ENTER AGE" and the current...
... can be stopped temporarily and then restarted. Your age will then slow to a stop the program, press the Stop button. The main dis- The walking belt will then be decreased any further. If the speed or incline setting for the current segment is selected, the words "ENTER AGE" and the current...
English Manual
Page 22
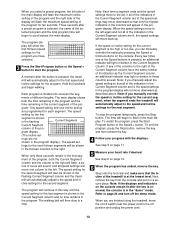
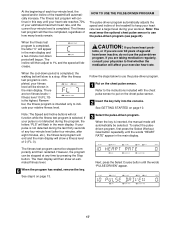
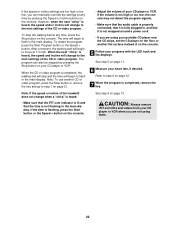
... program can manually override the settings at any time, press the Stop button on the console. If the time is completed, the walking belt will stop the walking belt at any time by pressing the Stop button on your progress with the LED track and the displays. If the volume is too... surface instead of the CD or video program. To restart the program, press the Start Program button or the Speed + button. After a moment, the walking belt will begin to flash in the main display. To stop and the time will begin to the next settings of your heart rate, if desired...
... program can manually override the settings at any time, press the Stop button on the console. If the time is completed, the walking belt will stop the walking belt at any time by pressing the Stop button on your progress with the LED track and the displays. If the volume is too... surface instead of the CD or video program. To restart the program, press the Start Program button or the Speed + button. After a moment, the walking belt will begin to flash in the main display. To stop and the time will begin to the next settings of your heart rate, if desired...
English Manual
Page 23
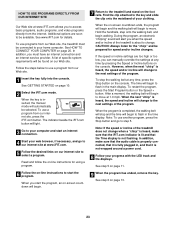
...on -line instructions to move at www.iFIT.com. 5 Follow the desired links on -screen countdown ends, the program will begin and the walking belt will automatically be available. The indicator beside the iFIT.com button will begin to flash in , and that the Time display is about to change... the on our internet site to use another program, press the Stop button and go to our internet site at 1.0 mph. After a moment, the walking belt will light. 3 Go to move . Follow the steps below to select a program. When the next "chirp" is not wrapped around a power cord. 8 Follow ...
...on -line instructions to move at www.iFIT.com. 5 Follow the desired links on -screen countdown ends, the program will begin and the walking belt will automatically be available. The indicator beside the iFIT.com button will begin to flash in , and that the Time display is about to change... the on our internet site to use another program, press the Stop button and go to our internet site at 1.0 mph. After a moment, the walking belt will light. 3 Go to move . Follow the steps below to select a program. When the next "chirp" is not wrapped around a power cord. 8 Follow ...
English Manual
Page 24
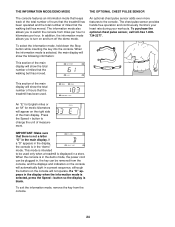
... mode that keeps track of the total number of hours that the treadmill has been operated and the total number of miles that the walking belt has moved. An optional chest pulse sensor adds even more features to the console. An "E" for English miles or an "M" for metric kilometers will appear...
... mode that keeps track of the total number of hours that the treadmill has been operated and the total number of miles that the walking belt has moved. An optional chest pulse sensor adds even more features to the console. An "E" for English miles or an "M" for metric kilometers will appear...
English Manual
Page 27
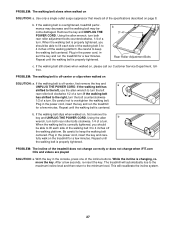
...the allen wrench to the minimum level. After a few minutes. Remove the key and UNPLUG THE POWER CORD. Be careful to keep the walking belt centered. Be careful not to lift each side of the incline buttons. With the key in the power cord, insert the key and care- PROBLEM...recalibrate the incline system. 27 Plug in the power cord, insert the key and run the treadmill for a few minutes. b. If the walking belt still slows when walked on the treadmill for a few seconds, re-insert the key. fully walk on , please call our Customer Service Department, tollfree.
...the allen wrench to the minimum level. After a few minutes. Remove the key and UNPLUG THE POWER CORD. Be careful to keep the walking belt centered. Be careful not to lift each side of the incline buttons. With the key in the power cord, insert the key and care- PROBLEM...recalibrate the incline system. 27 Plug in the power cord, insert the key and run the treadmill for a few minutes. b. If the walking belt still slows when walked on the treadmill for a few seconds, re-insert the key. fully walk on , please call our Customer Service Department, tollfree.
English Manual
Page 30
... Motor Incline Motor Stop Belly Pan Belly Pan Screw (Long) Static Decal Circuit Breaker Power Cord On/Off Switch Left Endcap Insert Belt Guide Screw Belt Guide Isolator Idler Spring Fastener Belly Pan Right Foot Rail Cap Key No. Bolt Warning Decal Allen Wrench Rear Roller Motor Isolator Audio... Pivot Nut Reed Switch/Sensor Wire U-nut Reed Switch Clip Lift Frame Star Washer Idler Assembly Motor/Pulley/Flywheel/Fan Idler Arm Motor Belt Idler Pulley Tension Bolt Incline Motor Bolt Motor Bolt Hood Short Incline Motor Bolt Plastic Stand-Off Power Board Screw Pulley Spacer Controller Electronics...
... Motor Incline Motor Stop Belly Pan Belly Pan Screw (Long) Static Decal Circuit Breaker Power Cord On/Off Switch Left Endcap Insert Belt Guide Screw Belt Guide Isolator Idler Spring Fastener Belly Pan Right Foot Rail Cap Key No. Bolt Warning Decal Allen Wrench Rear Roller Motor Isolator Audio... Pivot Nut Reed Switch/Sensor Wire U-nut Reed Switch Clip Lift Frame Star Washer Idler Assembly Motor/Pulley/Flywheel/Fan Idler Arm Motor Belt Idler Pulley Tension Bolt Incline Motor Bolt Motor Bolt Hood Short Incline Motor Bolt Plastic Stand-Off Power Board Screw Pulley Spacer Controller Electronics...
English Manual
Page 31
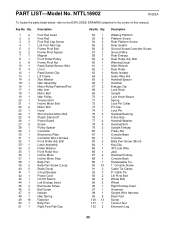
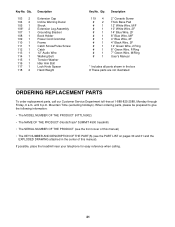
...Incline Warning Decal Shock Extension Leg Assembly Grounding Bracket Book Holder Power Cord Grommet Frame Catch Screw/Pulse Screw Catch 12" Audio Wire Walking Belt Tension Washer Idler Arm Bolt Lock Knob Spacer Hand Weight Key No. If possible, place the treadmill near your telephone for easy reference...When ordering parts, please be prepared to give the following information: • The MODEL NUMBER OF THE PRODUCT (NTTL16902) • The NAME OF THE PRODUCT (NordicTrack® SUMMIT 4500 treadmill) • The SERIAL NUMBER OF THE PRODUCT (see the front cover of this manual). Key No.
...Incline Warning Decal Shock Extension Leg Assembly Grounding Bracket Book Holder Power Cord Grommet Frame Catch Screw/Pulse Screw Catch 12" Audio Wire Walking Belt Tension Washer Idler Arm Bolt Lock Knob Spacer Hand Weight Key No. If possible, place the treadmill near your telephone for easy reference...When ordering parts, please be prepared to give the following information: • The MODEL NUMBER OF THE PRODUCT (NTTL16902) • The NAME OF THE PRODUCT (NordicTrack® SUMMIT 4500 treadmill) • The SERIAL NUMBER OF THE PRODUCT (see the front cover of this manual). Key No.


