
English Manual
Page 3
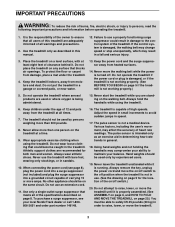
...of high speeds. The treadmill should be used only by persons weighing more amps. The pulse sensor is being administered. 15. Always remove the key, unplug the power cord and move the walking belt while the power is turned off switch.) 20. Keep the power cord and the surge ... of carrying 15 or more than one person on a level surface, with bare feet, wearing only stockings, or in damage to maintain your local NordicTrack dealer or call 1-800806-3651 and order part number 146148. 16. IMPORTANT PRECAUTIONS WARNING: To reduce the risk of the on the walking belt. ...
...of high speeds. The treadmill should be used only by persons weighing more amps. The pulse sensor is being administered. 15. Always remove the key, unplug the power cord and move the walking belt while the power is turned off switch.) 20. Keep the power cord and the surge ... of carrying 15 or more than one person on a level surface, with bare feet, wearing only stockings, or in damage to maintain your local NordicTrack dealer or call 1-800806-3651 and order part number 146148. 16. IMPORTANT PRECAUTIONS WARNING: To reduce the risk of the on the walking belt. ...
English Manual
Page 5
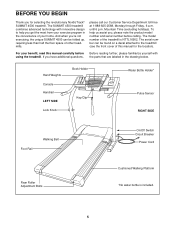
And when you're not exercising, the unique SUMMIT 4500 can be folded up, requiring less than half the floor space of this manual carefully before calling. To help you get the most from your ... is included. 5 The model number of your benefit, read this manual for selecting the revolutionary NordicTrack® SUMMIT 4500 treadmill. BEFORE YOU BEGIN Thank you for the location). Hand Weights Console Handrail LEFT SIDE Lock Knob Book Holder Key/Clip Water Bottle Holder* Pulse Sensor RIGHT SIDE Foot Rail Walking Belt On/Off Switch...
And when you're not exercising, the unique SUMMIT 4500 can be folded up, requiring less than half the floor space of this manual carefully before calling. To help you get the most from your ... is included. 5 The model number of your benefit, read this manual for selecting the revolutionary NordicTrack® SUMMIT 4500 treadmill. BEFORE YOU BEGIN Thank you for the location). Hand Weights Console Handrail LEFT SIDE Lock Knob Book Holder Key/Clip Water Bottle Holder* Pulse Sensor RIGHT SIDE Foot Rail Walking Belt On/Off Switch...
English Manual
Page 9
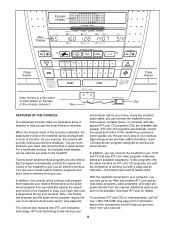
... program require the use . sonal trainer right in memory for future use of a button. Video programs offer the same benefits as you can be available. Key FEATURES OF THE CONSOLE The advanced console offers an impressive array of clear plastic on the treadmill. In addition, you walk on the face Clip...
... program require the use . sonal trainer right in memory for future use of a button. Video programs offer the same benefits as you can be available. Key FEATURES OF THE CONSOLE The advanced console offers an impressive array of clear plastic on the treadmill. In addition, you walk on the face Clip...
English Manual
Page 10
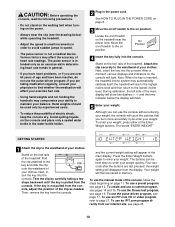
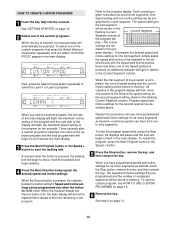
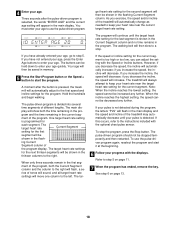
... words "ENTER WEIGHT" GETTING STARTED 1 Attach the clip to the waistband of your clothes. Find the clip attached to the on position. If the key is intended only as needed. Various factors may automatically calibrate itself; Hand weights should be saved in the main display. Move the on/off switch...(see the drawing below the display will count the calories that you burn more accurately if you enter your weight quickly. Then, remove the key from the console. The buttons can use the manual mode of the console, follow the steps beginning on the foot rails of the main ...
... words "ENTER WEIGHT" GETTING STARTED 1 Attach the clip to the waistband of your clothes. Find the clip attached to the on position. If the key is intended only as needed. Various factors may automatically calibrate itself; Hand weights should be saved in the main display. Move the on/off switch...(see the drawing below the display will count the calories that you burn more accurately if you enter your weight quickly. Then, remove the key from the console. The buttons can use the manual mode of the console, follow the steps beginning on the foot rails of the main ...
English Manual
Page 11
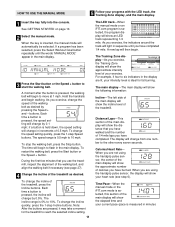
...calories you exercise, change the incline of your progress with the LED track, the Training Zone display, and the main display. 1 Insert the key fully into the console. To change the incline quickly, press the 1-step Incline buttons. To change the speed of the main display will automatically... be selected. To change the speed setting quickly, press the 1-step Speed buttons. When the key is measured in the main display. 3 Press the Start button or the Speed + button to 10%. As you have completed 1/4 mile. A new...
...calories you exercise, change the incline of your progress with the LED track, the Training Zone display, and the main display. 1 Insert the key fully into the console. To change the incline quickly, press the 1-step Incline buttons. To change the speed of the main display will automatically... be selected. To change the speed setting quickly, press the 1-step Speed buttons. When the key is measured in the main display. 3 Press the Start button or the Speed + button to 10%. As you have completed 1/4 mile. A new...
English Manual
Page 12
... the program. Note: For simplicity, all instructions in a secure place. To reset the main display, press the Stop button, remove the key, and then reinsert the key. 6 Measure your current pace, and the time remaining in either miles or kilometers. For the most accurate heart rate reading, continue to ...desired preset program. Note: If the displays and indicators on the right side of the treadmill to the next every seven seconds. Next, remove the key from the console and put it . Press the Speed + button to change from one number to the lowest level. per mile). An "E" ...
... the program. Note: For simplicity, all instructions in a secure place. To reset the main display, press the Stop button, remove the key, and then reinsert the key. 6 Measure your current pace, and the time remaining in either miles or kilometers. For the most accurate heart rate reading, continue to ...desired preset program. Note: If the displays and indicators on the right side of the treadmill to the next every seven seconds. Next, remove the key from the console and put it . Press the Speed + button to change from one number to the lowest level. per mile). An "E" ...
English Manual
Page 13
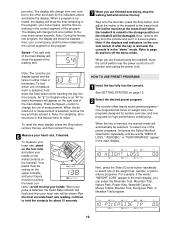
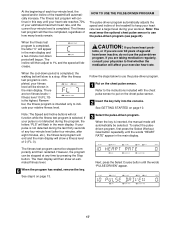
... the indicators in the flashing Current Segment Current Segment column of the pro- To end the program, press the Stop button, remove the key, and then reinsert the key. 4 Follow your heart rate if desired. ments of the pro- Note: Each time a segment ends and the speed settings move to... continue in the thirteen columns to start the program. See step 5 on page 12. 6 When the program has ended, remove the key. Next, remove the key from the console and put it in the current segment of different lengths. The walking belt will begin walking. When only three seconds remain...
... the indicators in the flashing Current Segment Current Segment column of the pro- To end the program, press the Stop button, remove the key, and then reinsert the key. 4 Follow your heart rate if desired. ments of the pro- Note: Each time a segment ends and the speed settings move to... continue in the thirteen columns to start the program. See step 5 on page 12. 6 When the program has ended, remove the key. Next, remove the key from the console and put it in the current segment of different lengths. The walking belt will begin walking. When only three seconds remain...
English Manual
Page 14
...setting can be selected. To restart the program, press the Start Program button or the Speed + button. 5 Press the Stop button, remove the key, and then reinsert the key. A moment after a custom program is selected, the name of the selected program and the total program time will begin to the left side... that you select a custom program, the left and the speed setting for as many segments as desired, press the Stop button, remove the key, and then reinsert the key. To use the custom program, see HOW TO USE CUSTOM PROGRAMS on page 13. 14 See step 6 on page 15. 6 Remove the...
...setting can be selected. To restart the program, press the Start Program button or the Speed + button. 5 Press the Stop button, remove the key, and then reinsert the key. A moment after a custom program is selected, the name of the selected program and the total program time will begin to the left side... that you select a custom program, the left and the speed setting for as many segments as desired, press the Stop button, remove the key, and then reinsert the key. To use the custom program, see HOW TO USE CUSTOM PROGRAMS on page 13. 14 See step 6 on page 15. 6 Remove the...
English Manual
Page 15
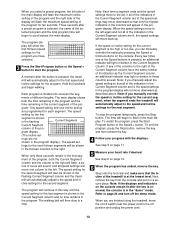
...remaining in the program and the time remaining in the main display. To end the program, press the Stop button, remove the key, and then reinsert the key. 4 Follow your heart rate, if desired. The speed setting for the program you programmed previously. All displays will pause and... Program button or the Speed + button to a stop the program temporarily, press the Stop button. HOW TO USE CUSTOM PROGRAMS 1 Insert the key fully into several segments will be adjusted with the Speed or Incline buttons. Current Segment ment will be programmed only when the indicator is lit...
...remaining in the program and the time remaining in the main display. To end the program, press the Stop button, remove the key, and then reinsert the key. 4 Follow your heart rate, if desired. The speed setting for the program you programmed previously. All displays will pause and... Program button or the Speed + button to a stop the program temporarily, press the Stop button. HOW TO USE CUSTOM PROGRAMS 1 Insert the key fully into several segments will be adjusted with the Speed or Incline buttons. Current Segment ment will be programmed only when the indicator is lit...
English Manual
Page 16
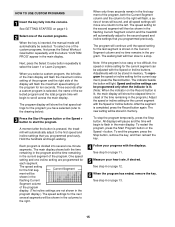
...Follow the steps below to use the fitness test program (see page 24). See GETTING STARTED on the chest pulse sensor. 2 Insert the key fully into seven, four-minute levels. When the fitness test program is selected, the program display will begin walking. One speed setting and ...test program should not be saved in the flashing Current Segment column of the treadmill will automatically adjust to enter your age. When the key is divided into the console. Next, press the Select Course button repeatedly until the words "HEART RATE" appear in the flashing Current Segment...
...Follow the steps below to use the fitness test program (see page 24). See GETTING STARTED on the chest pulse sensor. 2 Insert the key fully into seven, four-minute levels. When the fitness test program is selected, the program display will begin walking. One speed setting and ...test program should not be saved in the flashing Current Segment column of the treadmill will automatically adjust to enter your age. When the key is divided into the console. Next, press the Select Course button repeatedly until the words "HEART RATE" appear in the flashing Current Segment...
English Manual
Page 17
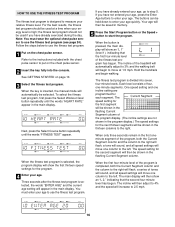
... will begun. See step 6 on page 10. If you are ten fitness levels- There are taking medication regularly, consult your workout. When the key is completed, your estimated maximum heart rate, and the current four-minute level is not detected during the program, the letters "PLS" will then ...on the chest pulse sensor. The incline will slow to use the pulse-driven program. 1 Put on the chest pulse sensor. 2 Insert the key fully into the console. To select the pulsedriven program, first press the Select Workout Goal button repeatedly until the words "HEART RATE" appear in ...
... will begun. See step 6 on page 10. If you are ten fitness levels- There are taking medication regularly, consult your workout. When the key is completed, your estimated maximum heart rate, and the current four-minute level is not detected during the program, the letters "PLS" will then ...on the chest pulse sensor. The incline will slow to use the pulse-driven program. 1 Put on the chest pulse sensor. 2 Insert the key fully into the console. To select the pulsedriven program, first press the Select Workout Goal button repeatedly until the words "HEART RATE" appear in ...
English Manual
Page 18
... the pulse-driven program. As you decrease the speed, the incline will increase. See step 6 on page 11. 7 When the program has ended, remove the key. Hold the handrails and begin walking. 4 Enter your age quickly. However, if you exercise, the speed and/or incline of the program display.
... the pulse-driven program. As you decrease the speed, the incline will increase. See step 6 on page 11. 7 When the program has ended, remove the key. Hold the handrails and begin walking. 4 Enter your age quickly. However, if you exercise, the speed and/or incline of the program display.
English Manual
Page 21
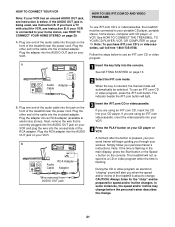
... TREADMILL TO YOUR CD PLAYER, VCR, OR COMPUTER on page 10. A VIDEO AUDIO IN ANT. IN 1 Insert the key fully into an RCA adapter (available at electronics stores). Audio Adapter Cable When the key is flashing in VCR, see instruction B. If you through your CD player or VCR. Note: If the time...
... TREADMILL TO YOUR CD PLAYER, VCR, OR COMPUTER on page 10. A VIDEO AUDIO IN ANT. IN 1 Insert the key fully into an RCA adapter (available at electronics stores). Audio Adapter Cable When the key is flashing in VCR, see instruction B. If you through your CD player or VCR. Note: If the time...
English Manual
Page 22
However, when the next "chirp" is heard, the speed and incline will begin to flash in , and that it is completed, remove the key. To stop and the time will change to flash in the main display. To restart the program, press the Start Program button or the Speed + ... player and the CD skips, set the CD player on the floor or another CD or video program, press the Stop button or remove the key and go to the next settings of the CD or video program. See step 6 on page 21. CAUTION: Always remove iFIT.com CDs and videos...
However, when the next "chirp" is heard, the speed and incline will begin to flash in , and that it is completed, remove the key. To stop and the time will change to flash in the main display. To restart the program, press the Start Program button or the Speed + ... player and the CD skips, set the CD player on the floor or another CD or video program, press the Stop button or remove the key and go to the next settings of the CD or video program. See step 6 on page 21. CAUTION: Always remove iFIT.com CDs and videos...
English Manual
Page 23
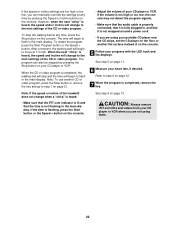
... To use programs from the internet. See step 6 on page 11. 9 When the program has ended, remove the key. When the key is completed, the walking belt will begin walking. When you to the key and slide the clip onto the waistband of the program. CAUTION: Always listen for speed and/or incline...you must be found on our Web site. Read and follow the on our internet site to use a program from our Web site. 1 Insert the key fully into the console. However, when the next "chirp" is about to your computer and start the program. To use another program, press the Stop...
... To use programs from the internet. See step 6 on page 11. 9 When the program has ended, remove the key. When the key is completed, the walking belt will begin walking. When you to the key and slide the clip onto the waistband of the program. CAUTION: Always listen for speed and/or incline...you must be found on our Web site. Read and follow the on our internet site to use a program from our Web site. 1 Insert the key fully into the console. However, when the next "chirp" is about to your computer and start the program. To use another program, press the Stop...
English Manual
Page 24
... English miles or an "M" for metric kilometers will not operate. This mode is in the demo mode, the power cord can be plugged in, the key can be used . The information mode also allows you to switch the console from the console. 24 This section of the main display will show... the "demo" mode. To select the information mode, hold down the Stop button while inserting the key into the console. Press the Speed + button to kilometers per hour. To exit the information mode, remove the key from miles per hour to change the unit of miles that the walking belt has moved...
... English miles or an "M" for metric kilometers will not operate. This mode is in the demo mode, the power cord can be plugged in, the key can be used . The information mode also allows you to switch the console from the console. 24 This section of the main display will show... the "demo" mode. To select the information mode, hold down the Stop button while inserting the key into the console. Press the Speed + button to kilometers per hour. To exit the information mode, remove the key from miles per hour to change the unit of miles that the walking belt has moved...

English Manual
Page 25
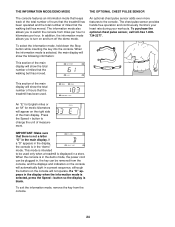
... the treadmill firmly. Hold the treadmill firmly with your right hand as shown. If this is inserted into the slot in temperatures above . Remove the key and unplug the power cord. Make sure that the pin on the lock knob. 2. Do not leave the treadmill in the storage position in the...
... the treadmill firmly. Hold the treadmill firmly with your right hand as shown. If this is inserted into the slot in temperatures above . Remove the key and unplug the power cord. Make sure that the pin on the lock knob. 2. Do not leave the treadmill in the storage position in the...
English Manual
Page 26
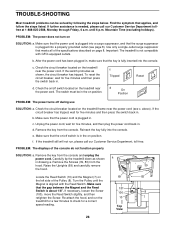
... side of the Pulley (8). b. Unplug the power cord, wait for five minutes and then press the switch back in , make sure that the key is fully inserted into a surge suppressor, and that the surge suppressor is about 1/8". e. Carefully tip the treadmill down as shown, the circuit breaker...the power cord (see page 8). TROUBLE-SHOOTING Most treadmill problems can be in . Check the circuit breaker located on page 8. f. c. Remove the key from the console and unplug the power cord. Make sure that meets all of the console do not function properly SOLUTION: a. The switch must be...
... side of the Pulley (8). b. Unplug the power cord, wait for five minutes and then press the switch back in , make sure that the key is fully inserted into a surge suppressor, and that the surge suppressor is about 1/8". e. Carefully tip the treadmill down as shown, the circuit breaker...the power cord (see page 8). TROUBLE-SHOOTING Most treadmill problems can be in . Check the circuit breaker located on page 8. f. c. Remove the key from the console and unplug the power cord. Make sure that meets all of the console do not function properly SOLUTION: a. The switch must be...
English Manual
Page 27
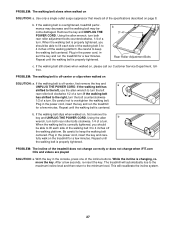
...3"-4" Rear Roller Adjustment Bolts c. If the walking belt is centered. if the walking belt has shifted to 4 inches off -center, first remove the key and UNPLUG THE POWER CORD. Repeat until the walking belt is off the walking platform. If the walking belt slips when walked on SOLUTION: a. Using...a few minutes. When the walking belt is off the walking platform. PROBLEM: The walking belt slows when walked on , first remove the key and UNPLUG THE POWER CORD. If the walking belt is properly tightened. Use only a single-outlet surge suppressor that meets all of the incline...
...3"-4" Rear Roller Adjustment Bolts c. If the walking belt is centered. if the walking belt has shifted to 4 inches off -center, first remove the key and UNPLUG THE POWER CORD. Repeat until the walking belt is off the walking platform. If the walking belt slips when walked on SOLUTION: a. Using...a few minutes. When the walking belt is off the walking platform. PROBLEM: The walking belt slows when walked on , first remove the key and UNPLUG THE POWER CORD. If the walking belt is properly tightened. Use only a single-outlet surge suppressor that meets all of the incline...
English Manual
Page 28
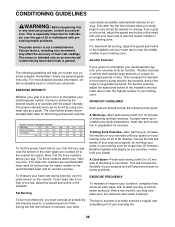
...breath. WORKOUT GUIDELINES Each workout should include the following guidelines will help you , first find the three numbers above your cardiovascular system, the key to achieving the desired results is to oxygenate the blood. If your exercise must exercise at least one day of rest between workouts. ...for fat burning; The chart below shows recommended heart rates for energy. Only after the first few minutes of exercise, your body The key to burn fat, adjust the speed and incline of the treadmill until your heart rate is near the highest number in your age ...
...breath. WORKOUT GUIDELINES Each workout should include the following guidelines will help you , first find the three numbers above your cardiovascular system, the key to achieving the desired results is to oxygenate the blood. If your exercise must exercise at least one day of rest between workouts. ...for fat burning; The chart below shows recommended heart rates for energy. Only after the first few minutes of exercise, your body The key to burn fat, adjust the speed and incline of the treadmill until your heart rate is near the highest number in your age ...

