
English Manual
Page 1
... precautions and instructions in the space above for future reference. Keep this equipment. Or call 1-800-TO-BE-FIT (1-800-862-3348) Mon.-Fri. 6 a.m.-6 p.m. USER'S MANUAL MT Sat. 8 a.m.-12 p.m. Write the serial number in this manual before using this manual for reference. CUSTOMER CARE For service at any time, go to www.nordictrackservice.com. www.nordictrack.com Model No. Serial Number Decal ACTIVATE YOUR WARRANTY To...
... precautions and instructions in the space above for future reference. Keep this equipment. Or call 1-800-TO-BE-FIT (1-800-862-3348) Mon.-Fri. 6 a.m.-6 p.m. USER'S MANUAL MT Sat. 8 a.m.-12 p.m. Write the serial number in this manual before using this manual for reference. CUSTOMER CARE For service at any time, go to www.nordictrackservice.com. www.nordictrack.com Model No. Serial Number Decal ACTIVATE YOUR WARRANTY To...

English Manual
Page 2
... WARNING DECAL PLACEMENT 2 IMPORTANT PRECAUTIONS 3 BEFORE YOU BEGIN 5 PART IDENTIFICATION CHART 6 ASSEMBLY 7 HOW TO USE THE ELLIPTICAL 12 FCC INFORMATION 20 MAINTENANCE AND TROUBLESHOOTING 21 EXERCISE GUIDELINES 23 PART LIST 24 EXPLODED DRAWING 26 ORDERING REPLACEMENT PARTS Back Cover LIMITED WARRANTY Back Cover WARNING DECAL PLACEMENT This drawing shows the location(s) of this manual and request a free replacement decal. If a decal is used under license. 2 and other countries and is missing or...
... WARNING DECAL PLACEMENT 2 IMPORTANT PRECAUTIONS 3 BEFORE YOU BEGIN 5 PART IDENTIFICATION CHART 6 ASSEMBLY 7 HOW TO USE THE ELLIPTICAL 12 FCC INFORMATION 20 MAINTENANCE AND TROUBLESHOOTING 21 EXERCISE GUIDELINES 23 PART LIST 24 EXPLODED DRAWING 26 ORDERING REPLACEMENT PARTS Back Cover LIMITED WARRANTY Back Cover WARNING DECAL PLACEMENT This drawing shows the location(s) of this manual and request a free replacement decal. If a decal is used under license. 2 and other countries and is missing or...

English Manual
Page 3
... institutional setting. 6. The heart rate monitor is especially important for their safety. 4. Keep your back straight while using the elliptical. 13. IMPORTANT PRECAUTIONS WARNING: To reduce the risk of serious injury, read all important precautions and instructions in this manual and all warnings on the elliptical. ICON assumes no responsibility for home use of the elliptical by persons with pre-existing health problems. 3. Use the elliptical only...
... institutional setting. 6. The heart rate monitor is especially important for their safety. 4. Keep your back straight while using the elliptical. 13. IMPORTANT PRECAUTIONS WARNING: To reduce the risk of serious injury, read all important precautions and instructions in this manual and all warnings on the elliptical. ICON assumes no responsibility for home use of the elliptical by persons with pre-existing health problems. 3. Use the elliptical only...
English Manual
Page 5
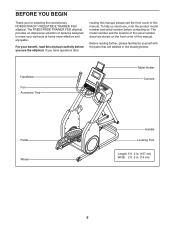
... use the elliptical. If you have questions after reading this manual, please see the front cover of features designed to make your benefit, read this manual. For your workouts at home more effective and enjoyable. The model number and the location of this manual carefully before contacting us assist you, note the product model number and serial number before you for selecting the revolutionary NORDICTRACK® FREESTRIDE TRAINER FS5I elliptical...
... use the elliptical. If you have questions after reading this manual, please see the front cover of features designed to make your benefit, read this manual. For your workouts at home more effective and enjoyable. The model number and the location of this manual carefully before contacting us assist you, note the product model number and serial number before you for selecting the revolutionary NORDICTRACK® FREESTRIDE TRAINER FS5I elliptical...
English Manual
Page 7
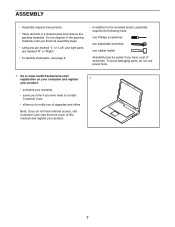
... warranty • saves you time if you ever need to contact Customer Care • allows us to the included tool(s), assembly requires the following tools: one Phillips screwdriver two adjustable wrenches one rubber mallet Assembly may be easier if you do not use power tools. 1. Do not dispose of the packing materials until you finish all parts...
... warranty • saves you time if you ever need to contact Customer Care • allows us to the included tool(s), assembly requires the following tools: one Phillips screwdriver two adjustable wrenches one rubber mallet Assembly may be easier if you do not use power tools. 1. Do not dispose of the packing materials until you finish all parts...

English Manual
Page 11
... wires (not shown). Make sure that all parts are properly tightened before you use the elliptical. Place a mat beneath the elliptical to the Left Leg (6) with an M8 x 45mm Bolt (109) and an M8 Locknut (108). Attach the Left Upper Body Arm (8) to protect the floor. 11 Extra parts may be included. See the inset drawing. Slide the Left Leg Cover B (60) downward and press...
... wires (not shown). Make sure that all parts are properly tightened before you use the elliptical. Place a mat beneath the elliptical to the Left Leg (6) with an M8 x 45mm Bolt (109) and an M8 Locknut (108). Attach the Left Upper Body Arm (8) to protect the floor. 11 Extra parts may be included. See the inset drawing. Slide the Left Leg Cover B (60) downward and press...
English Manual
Page 13
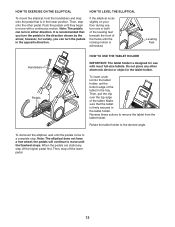
... until they begin to move until the pedals come to move with most full-size tablets. Push the pedals until the rocking motion is in the opposite direction. When the pedals are stationary, step off the lower pedal. 13 Make sure that is eliminated. Reverse these actions to the desired angle. Note: The elliptical does not have a free wheel; HOW TO LEVEL...
... until they begin to move until the pedals come to move with most full-size tablets. Push the pedals until the rocking motion is in the opposite direction. When the pedals are stationary, step off the lower pedal. 13 Make sure that is eliminated. Reverse these actions to the desired angle. Note: The elliptical does not have a free wheel; HOW TO LEVEL...
English Manual
Page 14
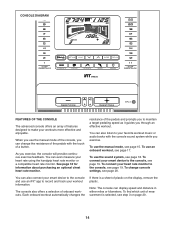
... use the manual mode, see page 19. If there is selected, see step 3 on the display, remove the plastic. Each onboard workout automatically changes the resistance of the pedals and prompts you to maintain a target pedaling speed as it guides you exercise, the console will provide continuous exercise feedback. You can change console settings, see page 17. To connect your favorite workout music or audio books with the touch of a button. To change the resistance...
... use the manual mode, see page 19. If there is selected, see step 3 on the display, remove the plastic. Each onboard workout automatically changes the resistance of the pedals and prompts you to maintain a target pedaling speed as it guides you exercise, the console will provide continuous exercise feedback. You can change console settings, see page 17. To connect your favorite workout music or audio books with the touch of a button. To change the resistance...
English Manual
Page 15
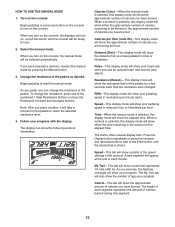
... resistance level of calories you turn on the console to the Enter button until the desired tab is shown. The My Trail tab will show your pedaling speed in revolutions per hour. As you pedal, you use . 2. If you have selected a workout, reselect the manual mode by pressing the Manual button. 3. To change the resistance of the numbered 1 Step Resistance buttons or press the Resistance increase and decrease buttons. When a workout is selected, this display mode...
... resistance level of calories you turn on the console to the Enter button until the desired tab is shown. The My Trail tab will show your pedaling speed in revolutions per hour. As you pedal, you use . 2. If you have selected a workout, reselect the manual mode by pressing the Manual button. 3. To change the resistance of the numbered 1 Step Resistance buttons or press the Resistance increase and decrease buttons. When a workout is selected, this display mode...
English Manual
Page 16
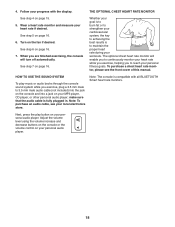
... the display. Press the Home button repeatedly to pause the workout, view your heart rate using an optional chest heart rate monitor (see HOW TO CONNECT YOUR HEART RATE MONITOR TO THE CONSOLE on the fan if desired. To connect a heart rate monitor to the console, your exercise. The fan has several minutes, the console will turn off and the display will flash in the display. 6. If the pedals do not move for several speed settings. To continue your heart rate if desired. Change...
... the display. Press the Home button repeatedly to pause the workout, view your heart rate using an optional chest heart rate monitor (see HOW TO CONNECT YOUR HEART RATE MONITOR TO THE CONSOLE on the fan if desired. To connect a heart rate monitor to the console, your exercise. The fan has several minutes, the console will turn off and the display will flash in the display. 6. If the pedals do not move for several speed settings. To continue your heart rate if desired. Change...
English Manual
Page 17
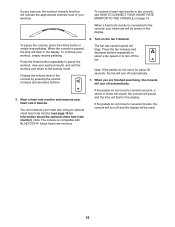
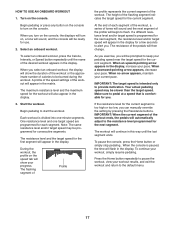
... number of the pedals will flash in the display. 3. The workout will continue in the display for you turn on the console, the displays will turn on the console. When the console is divided into one target speed are programmed for the current segment. Press the Home button repeatedly to the resistance level programmed for use. 2. Select an onboard workout. The maximum resistance level and the maximum speed for the workout will automatically adjust...
... number of the pedals will flash in the display. 3. The workout will continue in the display for you turn on the console, the displays will turn on the console. When the console is divided into one target speed are programmed for the current segment. Press the Home button repeatedly to the resistance level programmed for use. 2. Select an onboard workout. The maximum resistance level and the maximum speed for the workout will automatically adjust...
English Manual
Page 18
... store. Note: The console is compatible with the display. 4. See step 5 on page 16. Note: To purchase an audio cable, see the front cover of this manual. The optional chest heart rate monitor will turn off automatically. To purchase a chest heart rate monitor, please see your personal audio player. Follow your MP3 player, CD player, or other personal audio player; See step 7 on page 16. 6. When you exercise, plug a 3.5 mm male...
... store. Note: The console is compatible with the display. 4. See step 5 on page 16. Note: To purchase an audio cable, see the front cover of this manual. The optional chest heart rate monitor will turn off automatically. To purchase a chest heart rate monitor, please see your personal audio player. Follow your MP3 player, CD player, or other personal audio player; See step 7 on page 16. 6. When you exercise, plug a 3.5 mm male...

English Manual
Page 19
... smart devices, heart rate monitors, and so forth) will connect to the console. Record and track your smart device from the console if desired. Disconnect your workout information. On your iOS® or Android™ smart device, open the iFit app and follow the instructions to the console, press the Bluetooth Smart button on the console will light while the button is held and turn solid blue. Follow...
... smart devices, heart rate monitors, and so forth) will connect to the console. Record and track your smart device from the console if desired. Disconnect your workout information. On your iOS® or Android™ smart device, open the iFit app and follow the instructions to the console, press the Bluetooth Smart button on the console will light while the button is held and turn solid blue. Follow...
English Manual
Page 20
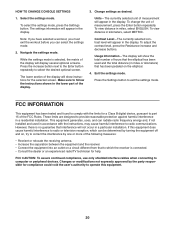
... distance (in miles or kilometers) that has been pedaled on a circuit different from that the elliptical has been used in a particular installation. Change settings as desired. Units-The currently selected unit of measurement will show the total number of measurement, press the Enter button repeatedly. Exit the settings mode. If this equipment. 20 FCC CAUTION: To assure continued compliance, use only shielded interface cables when connecting...
... distance (in miles or kilometers) that has been pedaled on a circuit different from that the elliptical has been used in a particular installation. Change settings as desired. Units-The currently selected unit of measurement will show the total number of measurement, press the Enter button repeatedly. Exit the settings mode. If this equipment. 20 FCC CAUTION: To assure continued compliance, use only shielded interface cables when connecting...

English Manual
Page 21
... power adapter is used. CONSOLE TROUBLESHOOTING If the console does not turn on your floor during use only a manufacturer-supplied regulated power adapter. Inspect and properly tighten all parts each time the elliptical is fully plugged in the power adapter. 21 Next, remove the M4 x 16mm Screw (98) and the Access Cover (24) from the console and keep the console out of the display. Replace any worn parts immediately. HOW TO ADJUST THE DRIVE BELT If the pedals slip...
... power adapter is used. CONSOLE TROUBLESHOOTING If the console does not turn on your floor during use only a manufacturer-supplied regulated power adapter. Inspect and properly tighten all parts each time the elliptical is fully plugged in the power adapter. 21 Next, remove the M4 x 16mm Screw (98) and the Access Cover (24) from the console and keep the console out of the display. Replace any worn parts immediately. HOW TO ADJUST THE DRIVE BELT If the pedals slip...
English Manual
Page 22
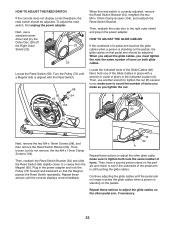
... number of the pedal arm is still touching the glide cables. Then, reattach the Reed Switch Bracket (54) and slide the Reed Switch (56) slightly closer to the right outer shield and plug in the indicated location (A). Turn the Pulley (73) until the console displays correct feedback. Repeat these actions until a Magnet (65) is correctly adjusted, remove the Reed Switch Bracket (54), retighten the two M4 x 10mm Clamp Screws...
... number of the pedal arm is still touching the glide cables. Then, reattach the Reed Switch Bracket (54) and slide the Reed Switch (56) slightly closer to the right outer shield and plug in the indicated location (A). Turn the Pulley (73) until the console displays correct feedback. Repeat these actions until a Magnet (65) is correctly adjusted, remove the Reed Switch Bracket (54), retighten the two M4 x 10mm Clamp Screws...

English Manual
Page 23
... key to 10 minutes of rest between workouts. If your everyday life. 23 You can use stored fat calories for longer than 20 minutes.) Breathe regularly and deeply as a guide to 30 minutes with your heart rate near the highest number in your heart rate. Training Zone Exercise-Exercise for 20 to find your training zone for energy. never hold your exercise program. For aerobic exercise, adjust...
... key to 10 minutes of rest between workouts. If your everyday life. 23 You can use stored fat calories for longer than 20 minutes.) Breathe regularly and deeply as a guide to 30 minutes with your heart rate near the highest number in your heart rate. Training Zone Exercise-Exercise for 20 to find your training zone for energy. never hold your exercise program. For aerobic exercise, adjust...
English Manual
Page 24
... Foot Reed Switch Bracket Clamp Reed Switch/Wire Resistance Cable Resistance Motor Left Leg Cover A Left Leg Cover B Crank Glide Cable #8 x 25mm Screw Strap Magnet R20 Bearing Roller Roller Spacer Inner Disc Cover Inner Disc Right Crank Clamp Drive Belt Pulley Right Weld Spacer M10 x 55mm Bolt M8 x 20mm Screw M6 x 12mm Screw Crank Clamp Snap Ring M12 x 62mm Bolt M12 Locknut M8 x 12mm Screw M8 x 14mm Shoulder Screw Leg Spacer M10 x 60mm Bolt Pivot Bearing Crank Spacer Pedal Arm Snap Ring Outer Bushing Pedal Arm Washer Inner Pedal Arm Cover Power Wire...
... Foot Reed Switch Bracket Clamp Reed Switch/Wire Resistance Cable Resistance Motor Left Leg Cover A Left Leg Cover B Crank Glide Cable #8 x 25mm Screw Strap Magnet R20 Bearing Roller Roller Spacer Inner Disc Cover Inner Disc Right Crank Clamp Drive Belt Pulley Right Weld Spacer M10 x 55mm Bolt M8 x 20mm Screw M6 x 12mm Screw Crank Clamp Snap Ring M12 x 62mm Bolt M12 Locknut M8 x 12mm Screw M8 x 14mm Shoulder Screw Leg Spacer M10 x 60mm Bolt Pivot Bearing Crank Spacer Pedal Arm Snap Ring Outer Bushing Pedal Arm Washer Inner Pedal Arm Cover Power Wire...

English Manual
Page 25
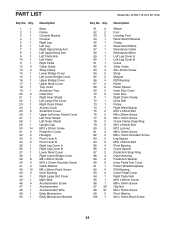
.... For information about ordering replacement parts, see the back cover of this manual. *These parts are subject to change without notice. Description 101 1 102 1 103 1 104 2 105 2 106 6 107 2 108 2 Idler M4 x 10mm Ground Screw Power Adapter M4 x 10mm Clamp Screw M8 x 68mm Screw M10 Locknut M10 x 85mm Bolt M8 Locknut 109 4 110 1 111 1 112 1 113 1 114 4 * - * - Key No. Qty. M8 x 45mm Bolt/Screw Left Crank Clamp...
.... For information about ordering replacement parts, see the back cover of this manual. *These parts are subject to change without notice. Description 101 1 102 1 103 1 104 2 105 2 106 6 107 2 108 2 Idler M4 x 10mm Ground Screw Power Adapter M4 x 10mm Clamp Screw M8 x 68mm Screw M10 Locknut M10 x 85mm Bolt M8 Locknut 109 4 110 1 111 1 112 1 113 1 114 4 * - * - Key No. Qty. M8 x 45mm Bolt/Screw Left Crank Clamp...

English Manual
Page 28
... rights; Parts are warranted for which warranty claims are limited in China © 2015 ICON Health & Fitness, Inc. Some states do not allow the exclusion or limitation of any kind. ICON is used for commercial or rental purposes. ORDERING REPLACEMENT PARTS To order replacement parts, please see page 4. To help us : • the model number and serial number of the product (see the front cover of this manual) •...
... rights; Parts are warranted for which warranty claims are limited in China © 2015 ICON Health & Fitness, Inc. Some states do not allow the exclusion or limitation of any kind. ICON is used for commercial or rental purposes. ORDERING REPLACEMENT PARTS To order replacement parts, please see page 4. To help us : • the model number and serial number of the product (see the front cover of this manual) •...


