
English Manual
Page 2
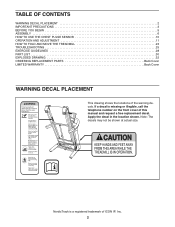
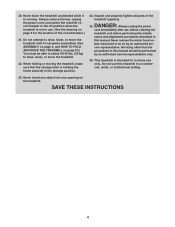
... a free replacement decal. If a decal is a registered trademark of the warning decals. Apply the decal in the location shown. TABLE OF CONTENTS WARNING DECAL PLACEMENT 2 IMPORTANT PRECAUTIONS 3 BEFORE YOU BEGIN 5 ASSEMBLY 6 HOW TO USE THE CHEST PULSE SENSOR 10 OPERATION AND ADJUSTMENT 11 HOW TO FOLD AND MOVE THE TREADMILL 23 TROUBLESHOOTING 25 EXERCISE GUIDELINES 28 PART LIST 30 EXPLODED DRAWING 32 ORDERING REPLACEMENT PARTS Back Cover LIMITED WARRANTY Back Cover WARNING...
... a free replacement decal. If a decal is a registered trademark of the warning decals. Apply the decal in the location shown. TABLE OF CONTENTS WARNING DECAL PLACEMENT 2 IMPORTANT PRECAUTIONS 3 BEFORE YOU BEGIN 5 ASSEMBLY 6 HOW TO USE THE CHEST PULSE SENSOR 10 OPERATION AND ADJUSTMENT 11 HOW TO FOLD AND MOVE THE TREADMILL 23 TROUBLESHOOTING 25 EXERCISE GUIDELINES 28 PART LIST 30 EXPLODED DRAWING 32 ORDERING REPLACEMENT PARTS Back Cover LIMITED WARRANTY Back Cover WARNING...

English Manual
Page 3
... result in damage to the control system of the treadmill. Do not use of heart rate readings. Do not operate the treadmill if the power cord or plug is damaged, or if the treadmill is damaged, the walking belt may affect the accuracy of this treadmill are recommended for both men and women. The pulse sensor is not working properly. (See TROUBLESHOOTING on page 11. Do not...
... result in damage to the control system of the treadmill. Do not use of heart rate readings. Do not operate the treadmill if the power cord or plug is damaged, or if the treadmill is damaged, the walking belt may affect the accuracy of this treadmill are recommended for both men and women. The pulse sensor is not working properly. (See TROUBLESHOOTING on page 11. Do not...
English Manual
Page 4
... motor hood un- Do not attempt to raise, lower, or move the treadmill until it is holding the frame securely in use this manual. Always unplug the power cord immediately after use only. less instructed to the off circuit breaker to do so by an authorized service representative only. 26. Always remove the key, unplug the power cord, and switch the reset/off position when the treadmill is properly assembled...
... motor hood un- Do not attempt to raise, lower, or move the treadmill until it is holding the frame securely in use this manual. Always unplug the power cord immediately after use only. less instructed to the off circuit breaker to do so by an authorized service representative only. 26. Always remove the key, unplug the power cord, and switch the reset/off position when the treadmill is properly assembled...

English Manual
Page 5
... labeled parts. To help us . Console Accessory Tray Handrail Pulse Sensor Fan Book Holder Speaker Key/Clip Reset/Off Circuit Breaker Walking Belt Foot Rail Rear Roller Adjustment Bolts Power Cord Platform Cushion 5 If you , note the product model number and serial number before using the treadmill. Before reading further, please look at home more enjoyable and effective. BEFORE YOU BEGIN Thank you ʼre not exercising, the unique ELITE 7000 treadmill can be folded up...
... labeled parts. To help us . Console Accessory Tray Handrail Pulse Sensor Fan Book Holder Speaker Key/Clip Reset/Off Circuit Breaker Walking Belt Foot Rail Rear Roller Adjustment Bolts Power Cord Platform Cushion 5 If you , note the product model number and serial number before using the treadmill. Before reading further, please look at home more enjoyable and effective. BEFORE YOU BEGIN Thank you ʼre not exercising, the unique ELITE 7000 treadmill can be folded up...

English Manual
Page 8
... wires are pinched. 5 99 73 99 74 8 With the help of a second person, hold the console assembly near the Uprights (73, 74). IF THE CONNECTORS ARE NOT CONNECTED PROPERLY, THE CONSOLE MAY BE DAMAGED WHEN THE POWER IS TURNED ON. See the inset drawing. If they do not, turn one connector and try again. 4. Connect the Upright Wire Harness (75) to the Console Wire...
... wires are pinched. 5 99 73 99 74 8 With the help of a second person, hold the console assembly near the Uprights (73, 74). IF THE CONNECTORS ARE NOT CONNECTED PROPERLY, THE CONSOLE MAY BE DAMAGED WHEN THE POWER IS TURNED ON. See the inset drawing. If they do not, turn one connector and try again. 4. Connect the Upright Wire Harness (75) to the Console Wire...

English Manual
Page 10
... the walking belt. For the console to display heart rate readings, the user must be within armʼs length of the console. • The chest pulse sensor is removed and the electrode areas are wearing the chest pulse sensor as shown in the inset drawing above 122° F (50° C) or below . • Make sure that this is not dried after each use alcohol, abrasives, or chemicals. Adjust...
... the walking belt. For the console to display heart rate readings, the user must be within armʼs length of the console. • The chest pulse sensor is removed and the electrode areas are wearing the chest pulse sensor as shown in the inset drawing above 122° F (50° C) or below . • Make sure that this is not dried after each use alcohol, abrasives, or chemicals. Adjust...
English Manual
Page 11
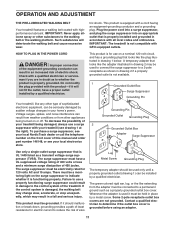
... AND ADJUSTMENT THE PRE-LUBRICATED WALKING BELT Your treadmill features a walking belt coated with GFCI-equipped outlets. This product is damaged, the walking belt may change slow, accelerate, or stop unexpectedly, which may be connected to the control system of electric shock. HOW TO PLUG IN THE POWER CORD DANGER: Improper connection of the equipment-grounding conductor can result from weather conditions or from the adapter must be a monitoring...
... AND ADJUSTMENT THE PRE-LUBRICATED WALKING BELT Your treadmill features a walking belt coated with GFCI-equipped outlets. This product is damaged, the walking belt may change slow, accelerate, or stop unexpectedly, which may be connected to the control system of electric shock. HOW TO PLUG IN THE POWER CORD DANGER: Improper connection of the equipment-grounding conductor can result from weather conditions or from the adapter must be a monitoring...

English Manual
Page 12
... incline of your heart rate using the handgrip pulse sensor or the chest pulse sensor. To purchase iFit cards, go to make your own custom workouts and save them for a long-distance run with the iFit Marathon workout. iFit cards are available separately. CONSOLE DIAGRAM FEATURES OF THE CONSOLE The treadmill console offers an impressive array of this manual. To use a preset workout, see page 14. One demo iFit card is selected, the speed and incline of a button. As you achieve specific fitness...
... incline of your heart rate using the handgrip pulse sensor or the chest pulse sensor. To purchase iFit cards, go to make your own custom workouts and save them for a long-distance run with the iFit Marathon workout. iFit cards are available separately. CONSOLE DIAGRAM FEATURES OF THE CONSOLE The treadmill console offers an impressive array of this manual. To use a preset workout, see page 14. One demo iFit card is selected, the speed and incline of a button. As you achieve specific fitness...

English Manual
Page 13
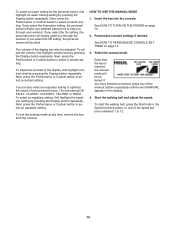
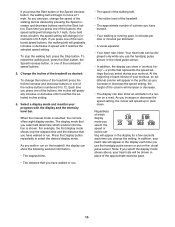
... console. To turn off circuit breaker to the reset position, the demo mode is not pulled from the console, causing the walking belt to slow to a stop. The display will function normally when you plug in the "reset" position. if the key is turned on. While the demo mode is displayed in the power cord (see HOW TO PERSONALIZE CONSOLE SETTINGS at the right), and slide the clip se- Press the Speed decrease button...
... console. To turn off circuit breaker to the reset position, the demo mode is not pulled from the console, causing the walking belt to slow to a stop. The display will function normally when you plug in the "reset" position. if the key is turned on. While the demo mode is displayed in the power cord (see HOW TO PERSONALIZE CONSOLE SETTINGS at the right), and slide the clip se- Press the Speed decrease button...
English Manual
Page 14
... adjusted. Insert the key into the console. See HOW TO TURN ON THE POWER on page 13. 3. Each time the key is inserted, the manual mode will simply guide you through the workout. To select an audio setting for the personal trainer, first highlight an audio training setting by pressing the Display button repeatedly. Next, press the Performance or Custom button to select a contrast setting. Personalize console settings if desired. To start the walking belt, press the Start button, the Speed...
... adjusted. Insert the key into the console. See HOW TO TURN ON THE POWER on page 13. 3. Each time the key is inserted, the manual mode will simply guide you through the workout. To select an audio setting for the personal trainer, first highlight an audio training setting by pressing the Display button repeatedly. Next, press the Performance or Custom button to select a contrast setting. Personalize console settings if desired. To start the walking belt, press the Start button, the Speed...
English Manual
Page 15
... the distance that you have walked or run . Note: If you select the display mode shown above, your heart rate will speed up or slow down a button, the speed setting will change the speed of the incline buttons numbered 0 to select the desired display mode. If you press the Start button or the Speed increase button, the walking belt will be displayed only while you use the handgrip pulse sensor or put on the chest pulse sensor. As you exercise, change by pressing the Speed...
... the distance that you have walked or run . Note: If you select the display mode shown above, your heart rate will speed up or slow down a button, the speed setting will change the speed of the incline buttons numbered 0 to select the desired display mode. If you press the Start button or the Speed increase button, the walking belt will be displayed only while you use the handgrip pulse sensor or put on the chest pulse sensor. As you exercise, change by pressing the Speed...

English Manual
Page 16
.... Note: If you exercise, the workout intensity level bar will indicate the approximate intensity level of your exercise. As you use the handgrip pulse sensor and the chest pulse sensor at the lowest setting when you fold the treadmill to the storage position, or you are finished using the handgrip pulse sensor, remove the sheets of clear plastic from the console. To reset the console, press the Stop button, remove the key, and then reinsert the...
.... Note: If you exercise, the workout intensity level bar will indicate the approximate intensity level of your exercise. As you use the handgrip pulse sensor and the chest pulse sensor at the lowest setting when you fold the treadmill to the storage position, or you are finished using the handgrip pulse sensor, remove the sheets of clear plastic from the console. To reset the console, press the Stop button, remove the key, and then reinsert the...

English Manual
Page 19
... WORKOUT on page 13. 3. One speed setting and one -minute segment of the workout, simply adjust the speed and incline of the treadmill as described above. To program a speed setting and an incline setting for up to move. The custom workout will be saved in the display. Select a display mode and monitor your heart rate if desired. Measure your progress with your workout, press the Stop button twice. When you are finished exercising, remove the key from the console...
... WORKOUT on page 13. 3. One speed setting and one -minute segment of the workout, simply adjust the speed and incline of the treadmill as described above. To program a speed setting and an incline setting for up to move. The custom workout will be saved in the display. Select a display mode and monitor your heart rate if desired. Measure your progress with your workout, press the Stop button twice. When you are finished exercising, remove the key from the console...

English Manual
Page 20
... stop . See step 5 on page 13. 2. Measure your progress. 7. When you have up to move one incline setting are finished exercising, remove the key from the console. See HOW TO TURN ON THE POWER on page 18. 6. Note: If the display shows a duration of the workout, press the Stop button twice when you programmed previously. The walking belt will automatically adjust to the first speed and incline settings that you want the workout to a stop...
... stop . See step 5 on page 13. 2. Measure your progress. 7. When you have up to move one incline setting are finished exercising, remove the key from the console. See HOW TO TURN ON THE POWER on page 18. 6. Note: If the display shows a duration of the workout, press the Stop button twice when you programmed previously. The walking belt will automatically adjust to the first speed and incline settings that you want the workout to a stop...

English Manual
Page 21
... the workout, press the Start button. iFit Slot iFit Card Next, select an iFit workout by pressing the speed or incline buttons; Select a display mode and monitor your personal trainer (see step 5 on page 18). If the first or second display mode is pressed, the treadmill will begin walking. 21 A moment after the Start button is selected, a profile of the speed settings of the workout will automatically adjust to move at any time, press the Stop button. The walking belt will automatically adjust to start the workout. In...
... the workout, press the Start button. iFit Slot iFit Card Next, select an iFit workout by pressing the speed or incline buttons; Select a display mode and monitor your personal trainer (see step 5 on page 18). If the first or second display mode is pressed, the treadmill will begin walking. 21 A moment after the Start button is selected, a profile of the speed settings of the workout will automatically adjust to move at any time, press the Stop button. The walking belt will automatically adjust to start the workout. In...
English Manual
Page 25
... turn off the demo mode, hold down the Stop button for five minutes, and then plug it , wait for a few seconds. Place the treadmill in the storage po- If further assistance is needed, please see HOW TO PERSONALIZE CONSOLE SETTINGS on page 11. If the displays are still lit, see the front cover of this manual. Remove the key from the console and UNPLUG THE POWER CORD. If the treadmill...
... turn off the demo mode, hold down the Stop button for five minutes, and then plug it , wait for a few seconds. Place the treadmill in the storage po- If further assistance is needed, please see HOW TO PERSONALIZE CONSOLE SETTINGS on page 11. If the displays are still lit, see the front cover of this manual. Remove the key from the console and UNPLUG THE POWER CORD. If the treadmill...
English Manual
Page 26
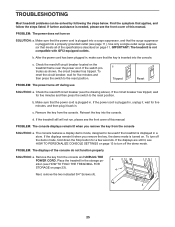
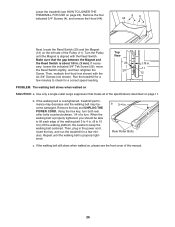
... . (3 mm). Lower the treadmill (see the front cover of this manual. 26 If necessary, loosen the indicated 3/4" Tek Screw (29), move the Reed Switch slightly, and then retighten the Screw. Then, reattach the Hood (not shown) with the Reed Switch. If the walking belt still slows when walked on, please see HOW TO LOWER THE TREADMILL FOR USE on the left side of a turn both rear roller bolts counterclockwise, 1/4 of the Pulley (11).
... . (3 mm). Lower the treadmill (see the front cover of this manual. 26 If necessary, loosen the indicated 3/4" Tek Screw (29), move the Reed Switch slightly, and then retighten the Screw. Then, reattach the Hood (not shown) with the Reed Switch. If the walking belt still slows when walked on, please see HOW TO LOWER THE TREADMILL FOR USE on the left side of a turn both rear roller bolts counterclockwise, 1/4 of the Pulley (11).

English Manual
Page 28
... middle number is the heart rate for maximum fat burning, and the highest number is not a medical device. WORKOUT GUIDELINES Warming Up-Start with 5 to 30 minutes with pre-existing health problems. The pulse sensor is the heart rate for aerobic exercise. The chart below shows recommended heart rates for fat burning and aerobic exercise. For maximum fat burning, exercise with at the proper intensity is to use your heart rate...
... middle number is the heart rate for maximum fat burning, and the highest number is not a medical device. WORKOUT GUIDELINES Warming Up-Start with 5 to 30 minutes with pre-existing health problems. The pulse sensor is the heart rate for aerobic exercise. The chart below shows recommended heart rates for fat burning and aerobic exercise. For maximum fat burning, exercise with at the proper intensity is to use your heart rate...
English Manual
Page 30
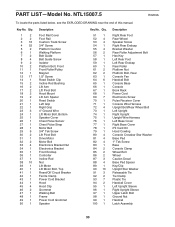
... Foot Rail Cover Foot Rail Cushion Track Screw 3/4" Screw Platform Cushion Walking Platform Belt Guide Belt Guide Screw Isolator Platform Bolt, Front Front Roller/Pulley Magnet 1/2" Screw Reed Switch Clip Incline Rod Bushing Lift Arm Lift Pivot Bolt Hood Mount Lift Arm Spacer Reed Switch Left Grip Right Grip 4" Ground Wire Lift Motor Bolt, Bottom Speaker Cover Chest Pulse Sensor Chest Pulse Strap Motor Belt 3/4" Tek Screw Lift Pivot Bolt Drive Motor Motor Bolt Electronics Bracket Nut Electronics Bracket Front Endcap Controller Incline Rod Nut Lift Motor Lift Motor Bolt, Top Reset/Off Circuit...
... Foot Rail Cover Foot Rail Cushion Track Screw 3/4" Screw Platform Cushion Walking Platform Belt Guide Belt Guide Screw Isolator Platform Bolt, Front Front Roller/Pulley Magnet 1/2" Screw Reed Switch Clip Incline Rod Bushing Lift Arm Lift Pivot Bolt Hood Mount Lift Arm Spacer Reed Switch Left Grip Right Grip 4" Ground Wire Lift Motor Bolt, Bottom Speaker Cover Chest Pulse Sensor Chest Pulse Strap Motor Belt 3/4" Tek Screw Lift Pivot Bolt Drive Motor Motor Bolt Electronics Bracket Nut Electronics Bracket Front Endcap Controller Incline Rod Nut Lift Motor Lift Motor Bolt, Top Reset/Off Circuit...
English Manual
Page 34
... consequential damages. ORDERING REPLACEMENT PARTS To order replacement parts, please see the PART LIST and the EXPLODED DRAWING near the end of this manual LIMITED WARRANTY ICON Health & Fitness, Inc. (ICON) warrants this product to be free from defects in workmanship and material, under normal use and service conditions. To help us : • the model number and serial number of the product (see the front cover of this manual) • the name...
... consequential damages. ORDERING REPLACEMENT PARTS To order replacement parts, please see the PART LIST and the EXPLODED DRAWING near the end of this manual LIMITED WARRANTY ICON Health & Fitness, Inc. (ICON) warrants this product to be free from defects in workmanship and material, under normal use and service conditions. To help us : • the model number and serial number of the product (see the front cover of this manual) • the name...


