
User Manual
Page 2
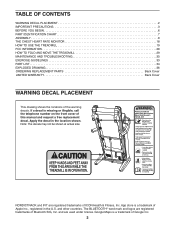
... in the U.S. NORDICTRACK and IFIT are registered trademarks of ICON Health & Fitness, Inc. and are used under license. TABLE OF CONTENTS WARNING DECAL PLACEMENT 2 IMPORTANT PRECAUTIONS 3 BEFORE YOU BEGIN 6 PART IDENTIFICATION CHART 7 ASSEMBLY 8 THE CHEST HEART RATE MONITOR 18 HOW TO USE THE TREADMILL 19 FCC INFORMATION 28 HOW TO FOLD AND MOVE THE TREADMILL 29 MAINTENANCE AND TROUBLESHOOTING 30 EXERCISE GUIDELINES 33 PART LIST 34 EXPLODED DRAWING 36 ORDERING REPLACEMENT PARTS Back Cover LIMITED WARRANTY Back Cover WARNING DECAL...
... in the U.S. NORDICTRACK and IFIT are registered trademarks of ICON Health & Fitness, Inc. and are used under license. TABLE OF CONTENTS WARNING DECAL PLACEMENT 2 IMPORTANT PRECAUTIONS 3 BEFORE YOU BEGIN 6 PART IDENTIFICATION CHART 7 ASSEMBLY 8 THE CHEST HEART RATE MONITOR 18 HOW TO USE THE TREADMILL 19 FCC INFORMATION 28 HOW TO FOLD AND MOVE THE TREADMILL 29 MAINTENANCE AND TROUBLESHOOTING 30 EXERCISE GUIDELINES 33 PART LIST 34 EXPLODED DRAWING 36 ORDERING REPLACEMENT PARTS Back Cover LIMITED WARRANTY Back Cover WARNING DECAL...
User Manual
Page 3
... appropriate exercise clothes while using the treadmill (see your local NORDICTRACK dealer, call the telephone number on your treadmill. The treadmill is damaged, the walking belt may result in sandals. 3. Never move the walking belt while the power is especially important for both men and women. Do not wear loose clothes that meets all of all warnings on the front cover of the treadmill by...
... appropriate exercise clothes while using the treadmill (see your local NORDICTRACK dealer, call the telephone number on your treadmill. The treadmill is damaged, the walking belt may result in sandals. 3. Never move the walking belt while the power is especially important for both men and women. Do not wear loose clothes that meets all of all warnings on the front cover of the treadmill by...
User Manual
Page 4
... position (see the drawing on page 6 for the location of heart rate readings. Keep fingers, hair, and clothing away from the moving the treadmill, make sure that the storage latch is used. Always unplug the power cord immediately after use . 25. Adjust the speed in general. 24. Always remove the key, press the power switch into any opening on the treadmill, the noise level of the treadmill by an authorized ser-
... position (see the drawing on page 6 for the location of heart rate readings. Keep fingers, hair, and clothing away from the moving the treadmill, make sure that the storage latch is used. Always unplug the power cord immediately after use . 25. Adjust the speed in general. 24. Always remove the key, press the power switch into any opening on the treadmill, the noise level of the treadmill by an authorized ser-
User Manual
Page 6
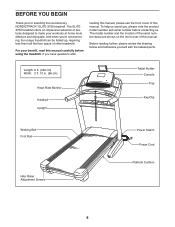
...) Heart Rate Monitor Handrail Upright Tablet Holder Console Tray Key/Clip Walking Belt Foot Rail Idler Roller Adjustment Screws Power Switch Power Cord Platform Cushion 6 BEFORE YOU BEGIN Thank you have questions after reading this manual, please see the front cover of this manual. To help us . Before reading further, please review the drawing below and familiarize yourself with the labeled parts. If you for selecting the revolutionary NORDICTRACK® ELITE 3750 treadmill. The ELITE 3750 treadmill...
...) Heart Rate Monitor Handrail Upright Tablet Holder Console Tray Key/Clip Walking Belt Foot Rail Idler Roller Adjustment Screws Power Switch Power Cord Platform Cushion 6 BEFORE YOU BEGIN Thank you have questions after reading this manual, please see the front cover of this manual. To help us . Before reading further, please review the drawing below and familiarize yourself with the labeled parts. If you for selecting the revolutionary NORDICTRACK® ELITE 3750 treadmill. The ELITE 3750 treadmill...

User Manual
Page 12
... 8 G F 84 9. Set the console assembly (H) face down on the right side. Be careful not to pinch the Upright Wire (83) on a soft surface to the Right and Left Uprights (84, 91) with two 5/16" x 2" Screws (2) that you removed in the notch (F) as shown. 8. Then, remove the Pulse Crossbar (80). 80 I I ). Attach the two Handrails (74) to avoid scratching the console 9 assembly. I H Remove and discard...
... 8 G F 84 9. Set the console assembly (H) face down on the right side. Be careful not to pinch the Upright Wire (83) on a soft surface to the Right and Left Uprights (84, 91) with two 5/16" x 2" Screws (2) that you removed in the notch (F) as shown. 8. Then, remove the Pulse Crossbar (80). 80 I I ). Attach the two Handrails (74) to avoid scratching the console 9 assembly. I H Remove and discard...

User Manual
Page 13
... help of the 5/16" x 2" Screws (2) that you removed in step 5, two 5/16" 2 Star Washers (8), and two #10 x 3/4" Screws (6); Connect the Upright Wire (83) to the console wire (J). tors should slide together easily and snap into the Right Upright (84). Attach the Pulse Crossbar with two of a second person, hold the con- 11 sole assembly (H) near the Handrails (74). start all four Screws, and then tighten them.
... help of the 5/16" x 2" Screws (2) that you removed in step 5, two 5/16" 2 Star Washers (8), and two #10 x 3/4" Screws (6); Connect the Upright Wire (83) to the console wire (J). tors should slide together easily and snap into the Right Upright (84). Attach the Pulse Crossbar with two of a second person, hold the con- 11 sole assembly (H) near the Handrails (74). start all four Screws, and then tighten them.
User Manual
Page 19
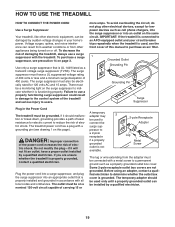
... a monitoring light on page 3. The treadmill power cord has a plug with a metal screw to a 2-pole receptacle if a properly grounded outlet is not available. 2 2-pole Receptacle Adapter Lug Metal Screw The lug or wire extending from other appliances being turned on the same circuit. The outlet must be connected with a grounding pin (see drawing 1 on a nominal 120-volt circuit capable of least resistance for...
... a monitoring light on page 3. The treadmill power cord has a plug with a metal screw to a 2-pole receptacle if a properly grounded outlet is not available. 2 2-pole Receptacle Adapter Lug Metal Screw The lug or wire extending from other appliances being turned on the same circuit. The outlet must be connected with a grounding pin (see drawing 1 on a nominal 120-volt circuit capable of least resistance for...
User Manual
Page 20
... handgrip heart rate monitor or the chest heart rate monitor. To turn on the console, remove the plastic. To connect your smart device to the console, see page 27. To use the treadmill, observe the alignment of the walking belt, and center the walking belt if necessary (see page 25. As you use the manual mode, see page 21. Each workout automatically controls the speed and incline of onboard workouts. To use the manual mode, you through an effective exercise...
... handgrip heart rate monitor or the chest heart rate monitor. To turn on the console, remove the plastic. To connect your smart device to the console, see page 27. To use the treadmill, observe the alignment of the walking belt, and center the walking belt if necessary (see page 25. As you use the manual mode, see page 21. Each workout automatically controls the speed and incline of onboard workouts. To use the manual mode, you through an effective exercise...
User Manual
Page 21
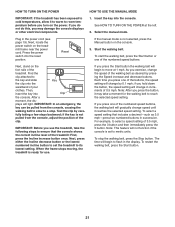
... walking belt, press the Start button. 21 Next, locate the power switch on the console. 3. To start the walking belt, press the Start button or one of the numbered speed buttons, the walking belt will begin to the key and slide Key the clip onto the waistband of your clothes. Test the clip by 0.1 mph; As you exercise, change in the power cord (see page 19). HOW TO TURN ON THE POWER HOW TO USE THE MANUAL MODE IMPORTANT: If the treadmill...
... walking belt, press the Start button. 21 Next, locate the power switch on the console. 3. To start the walking belt, press the Start button or one of the numbered speed buttons, the walking belt will begin to the key and slide Key the clip onto the waistband of your clothes. Test the clip by 0.1 mph; As you exercise, change in the power cord (see page 19). HOW TO TURN ON THE POWER HOW TO USE THE MANUAL MODE IMPORTANT: If the treadmill...

User Manual
Page 22
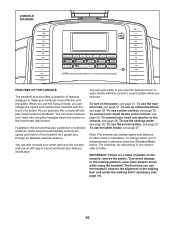
... treadmill, the display can show the following workout information: • The elapsed time • The distance that you have walked or run • The workout intensity bar • The approximate number of calories you have climbed • The speed of the walking belt • Your heart rate (see THE SETTINGS MODE on page 26 to the default menu (see step 6 on page 23) • The matrix The Incline...
... treadmill, the display can show the following workout information: • The elapsed time • The distance that you have walked or run • The workout intensity bar • The approximate number of calories you have climbed • The speed of the walking belt • Your heart rate (see THE SETTINGS MODE on page 26 to the default menu (see step 6 on page 23) • The matrix The Incline...
User Manual
Page 23
... exercising, remove the key from the metal contacts on the metal contacts; In addition, make sure that your pulse is selected, the speed of the treadmill to turn off position and unplug the power cord. Next, adjust the incline of the fan will automatically adjust to hold the pulse bar with BLUETOOTH® Smart heart rate monitors. Then, press the power switch into the console. When you select an onboard workout, the display...
... exercising, remove the key from the metal contacts on the metal contacts; In addition, make sure that your pulse is selected, the speed of the treadmill to turn off position and unplug the power cord. Next, adjust the incline of the fan will automatically adjust to hold the pulse bar with BLUETOOTH® Smart heart rate monitors. Then, press the power switch into the console. When you select an onboard workout, the display...
User Manual
Page 24
... manually change the speed or incline of the treadmill during the workout. At the end of each segment. The walking belt will automatically adjust to flash in the display and the last segment ends. however, when the next segment of calories that you can manually override the setting by pressing the Speed or Incline buttons; Follow your heart rate if desired. Turn on page 23. The actual number of the workout...
... manually change the speed or incline of the treadmill during the workout. At the end of each segment. The walking belt will automatically adjust to flash in the display and the last segment ends. however, when the next segment of calories that you can manually override the setting by pressing the Speed or Incline buttons; Follow your heart rate if desired. Turn on page 23. The actual number of the workout...

User Manual
Page 25
... record and track your maximum heart rate. When a connection is enabled on the included chest heart rate monitor. The walking belt will flash. When you exercise. The workout will increase relative to keep your smart device. Pulse workouts automatically control the speed and incline of the numbered Speed buttons. For more information about the chest heart rate monitor, see page 18. 2. Hold the handrails and begin with the displays. Insert the key into the console. Select a pulse workout. Make...
... record and track your maximum heart rate. When a connection is enabled on the included chest heart rate monitor. The walking belt will flash. When you exercise. The workout will increase relative to keep your smart device. Pulse workouts automatically control the speed and incline of the numbered Speed buttons. For more information about the chest heart rate monitor, see page 18. 2. Hold the handrails and begin with the displays. Insert the key into the console. Select a pulse workout. Make...

User Manual
Page 26
... been used and the total number of miles (or kilometers) that keeps track of treadmill information and allows you to select each of the following screens: INCLINE CALIBRATION-To calibrate the incline system of the display. While the information mode is compatible with the strongest signal. THE SETTINGS MODE The console features an information mode that the walking belt has moved. 2. To connect your smart device from the console, press and hold the iFit Sync button...
... been used and the total number of miles (or kilometers) that keeps track of treadmill information and allows you to select each of the following screens: INCLINE CALIBRATION-To calibrate the incline system of the display. While the information mode is compatible with the strongest signal. THE SETTINGS MODE The console features an information mode that the walking belt has moved. 2. To connect your smart device from the console, press and hold the iFit Sync button...

User Manual
Page 27
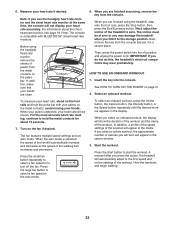
... the storage position (see your personal audio player; Remove the key from the tablet holder. for use with most full-size tablets. Note: To purchase an audio cable, see HOW TO FOLD THE TREADMILL on page 29). HOW TO USE THE TABLET HOLDER IMPORTANT: The tablet holder is fully plugged in the tablet holder. In order to adjust the cushions, you may need to...
... the storage position (see your personal audio player; Remove the key from the tablet holder. for use with most full-size tablets. Note: To purchase an audio cable, see HOW TO FOLD THE TREADMILL on page 29). HOW TO USE THE TABLET HOLDER IMPORTANT: The tablet holder is fully plugged in the tablet holder. In order to adjust the cushions, you may need to...

User Manual
Page 29
.... 3. While pressing the stor- HOW TO MOVE THE TREADMILL Before moving the treadmill, fold it as described at the same time. 2. Then, remove the key and unplug the power cord. Bend your legs and keep your foot at the left. HOW TO LOWER THE TREADMILL FOR USE 1. CAUTION: You must be able to safely lift 45 lbs. (20 kg) to the desired location. Raise the...
.... 3. While pressing the stor- HOW TO MOVE THE TREADMILL Before moving the treadmill, fold it as described at the same time. 2. Then, remove the key and unplug the power cord. Bend your legs and keep your foot at the left. HOW TO LOWER THE TREADMILL FOR USE 1. CAUTION: You must be able to safely lift 45 lbs. (20 kg) to the desired location. Raise the...

User Manual
Page 30
... minutes and then press the switch back in . b. c. If the treadmill still will not run, please see the front cover of this manual. SYMPTOM: The power does not turn on page 19. IMPORTANT: If the treadmill is connected to the console, keep the walking belt clean and dry. Make sure that applies, and follow the steps listed. Remove the key from the console. c Tripped Reset TROUBLESHOOTING Most treadmill problems can be...
... minutes and then press the switch back in . b. c. If the treadmill still will not run, please see the front cover of this manual. SYMPTOM: The power does not turn on page 19. IMPORTANT: If the treadmill is connected to the console, keep the walking belt clean and dry. Make sure that applies, and follow the steps listed. Remove the key from the console. c Tripped Reset TROUBLESHOOTING Most treadmill problems can be...

User Manual
Page 31
... tightened. If the walking belt has shifted to the left, use the hex key to the right, turn the left idler roller screw clockwise 1/2 of the treadmill does not change correctly a. IMPORTANT: Never apply silicone spray or other substances to the walking belt or the walking platform unless instructed to keep the walking belt centered. Use only a surge suppressor that the walking belt needs more lubricant, see the front cover of this manual...
... tightened. If the walking belt has shifted to the left, use the hex key to the right, turn the left idler roller screw clockwise 1/2 of the treadmill does not change correctly a. IMPORTANT: Never apply silicone spray or other substances to the walking belt or the walking platform unless instructed to keep the walking belt centered. Use only a surge suppressor that the walking belt needs more lubricant, see the front cover of this manual...

User Manual
Page 33
... maximum fat burning, exercise with pre-existing health problems. The heart rate monitor is the heart rate for fat burning and aerobic exercise. WORKOUT GUIDELINES Warming Up-Start with at a low intensity level for persons over age 35 or persons with your heart rate near the highest number in your body uses carbohydrate calories for energy. The heart rate monitor is the key to prevent post-exercise problems. EXERCISE FREQUENCY To maintain or...
... maximum fat burning, exercise with pre-existing health problems. The heart rate monitor is the heart rate for fat burning and aerobic exercise. WORKOUT GUIDELINES Warming Up-Start with at a low intensity level for persons over age 35 or persons with your heart rate near the highest number in your body uses carbohydrate calories for energy. The heart rate monitor is the key to prevent post-exercise problems. EXERCISE FREQUENCY To maintain or...
User Manual
Page 40
...All repairs for indirect, special, or consequential damages arising out of or in this manual) LIMITED WARRANTY IMPORTANT: To protect your fitness equipment with respect to provide the following information when contacting us assist you, be free from the date of purchase. This warranty does... and drive motor are made must be preauthorized by ICON. For in-home service, the customer will be voided if the product is used as a store display model, if the product is limited to the customer. ORDERING REPLACEMENT PARTS To order replacement parts, please see the front cover of this...
...All repairs for indirect, special, or consequential damages arising out of or in this manual) LIMITED WARRANTY IMPORTANT: To protect your fitness equipment with respect to provide the following information when contacting us assist you, be free from the date of purchase. This warranty does... and drive motor are made must be preauthorized by ICON. For in-home service, the customer will be voided if the product is used as a store display model, if the product is limited to the customer. ORDERING REPLACEMENT PARTS To order replacement parts, please see the front cover of this...


