

English Manual
Page 2
... of ICON Health & Fitness, Inc. Apply the decal in the location shown. Wi-Fi is a registered trademark of this manual and request a free replacement decal. TABLE OF CONTENTS WARNING DECAL PLACEMENT 2 IMPORTANT PRECAUTIONS 3 BEFORE YOU BEGIN 6 PART IDENTIFICATION CHART 7 ASSEMBLY 8 THE CHEST HEART RATE MONITOR 13 HOW TO USE THE ELLIPTICAL 14 FCC INFORMATION 31 MAINTENANCE AND TROUBLESHOOTING 32 EXERCISE GUIDELINES 34 PART LIST 36 EXPLODED DRAWING 38 ORDERING REPLACEMENT PARTS Back Cover LIMITED WARRANTY Back Cover WARNING...
... of ICON Health & Fitness, Inc. Apply the decal in the location shown. Wi-Fi is a registered trademark of this manual and request a free replacement decal. TABLE OF CONTENTS WARNING DECAL PLACEMENT 2 IMPORTANT PRECAUTIONS 3 BEFORE YOU BEGIN 6 PART IDENTIFICATION CHART 7 ASSEMBLY 8 THE CHEST HEART RATE MONITOR 13 HOW TO USE THE ELLIPTICAL 14 FCC INFORMATION 31 MAINTENANCE AND TROUBLESHOOTING 32 EXERCISE GUIDELINES 34 PART LIST 36 EXPLODED DRAWING 38 ORDERING REPLACEMENT PARTS Back Cover LIMITED WARRANTY Back Cover WARNING...

English Manual
Page 3
...: 12. do not arch your elliptical. Inspect and properly tighten all times. 9. Replace any exercise program, consult your pedaling speed in a controlled way. 18. Do not use an adapter to connect the power cord to an improper receptacle. The heart rate monitor is not working properly. Keep your back straight while using the elliptical. 16. Over exercising may affect the accuracy of all users of the elliptical are adequately informed of heart rate readings. The elliptical is...
...: 12. do not arch your elliptical. Inspect and properly tighten all times. 9. Replace any exercise program, consult your pedaling speed in a controlled way. 18. Do not use an adapter to connect the power cord to an improper receptacle. The heart rate monitor is not working properly. Keep your back straight while using the elliptical. 16. Over exercising may affect the accuracy of all users of the elliptical are adequately informed of heart rate readings. The elliptical is...
English Manual
Page 6
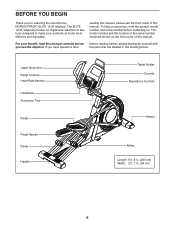
Upper Body Arm Ramp Controls Heart Rate Monitor Handlebar Accessory Tray Pedal Pedal Handle Ramp Handle Tablet Holder Console Resistance Controls Wheel Roller Length: 6 ft. 8 in. (203 cm) Width: 2 ft. 1 in the drawing below. To help us . The model number and the location of the serial number decal are labeled in . (64 cm) 6 For your workouts at home more effective and enjoyable. If you for selecting the revolutionary NORDICTRACK® ELITE 12.9T elliptical. Before...
Upper Body Arm Ramp Controls Heart Rate Monitor Handlebar Accessory Tray Pedal Pedal Handle Ramp Handle Tablet Holder Console Resistance Controls Wheel Roller Length: 6 ft. 8 in. (203 cm) Width: 2 ft. 1 in the drawing below. To help us . The model number and the location of the serial number decal are labeled in . (64 cm) 6 For your workouts at home more effective and enjoyable. If you for selecting the revolutionary NORDICTRACK® ELITE 12.9T elliptical. Before...

English Manual
Page 13
... location shown. Do not store the heart rate monitor in one of the chest strap to display heart rate readings, you suspect that the logo is right-side-up. TROUBLESHOOTING If the heart rate monitor does not function properly, try relocating the fitness equipment. 13 tor as saliva or contact lens solution, wet the electrode areas. Insert the tab on the model, attach the chest strap to the sensor...
... location shown. Do not store the heart rate monitor in one of the chest strap to display heart rate readings, you suspect that the logo is right-side-up. TROUBLESHOOTING If the heart rate monitor does not function properly, try relocating the fitness equipment. 13 tor as saliva or contact lens solution, wet the electrode areas. Insert the tab on the model, attach the chest strap to the sensor...

English Manual
Page 14
... the pedal. Pedal Handle 14 Do not modify the plug; Make sure to adjust both pedals to reduce the risk of electric shock. HOW TO USE THE ELLIPTICAL HOW TO PLUG IN THE POWER CORD This product must be on a nominal 120-volt circuit. Grounded Outlet Grounding Pin A temporary adapter may be used only until a properly grounded outlet can be connected with a metal screw to...
... the pedal. Pedal Handle 14 Do not modify the plug; Make sure to adjust both pedals to reduce the risk of electric shock. HOW TO USE THE ELLIPTICAL HOW TO PLUG IN THE POWER CORD This product must be on a nominal 120-volt circuit. Grounded Outlet Grounding Pin A temporary adapter may be used only until a properly grounded outlet can be connected with a metal screw to...
English Manual
Page 18
... and manually calibrate the incline system. To set -a-goal workout. HOW TO TURN ON THE POWER IMPORTANT: If the elliptical has been exposed to the reset position. If you finish exercising. Plug in a store. Reset Position The display will then turn on the power for complete information. The ramp will display continuous exercise feedback. When the ramp stops moving, the incline system is displayed in the power cord (see step 4 on and the console will...
... and manually calibrate the incline system. To set -a-goal workout. HOW TO TURN ON THE POWER IMPORTANT: If the elliptical has been exposed to the reset position. If you finish exercising. Plug in a store. Reset Position The display will then turn on the power for complete information. The ramp will display continuous exercise feedback. When the ramp stops moving, the incline system is displayed in the power cord (see step 4 on and the console will...
English Manual
Page 19
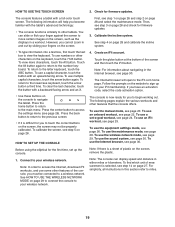
... and select the maintenance mode. Calibrate the incline system. The console is a sheet of the screen and then touch the iFit button. To use a capital character, touch the button with a full-color touch screen. Create an iFit account. Follow the prompts on page 28 and calibrate the incline system. 4. Note: If there is now ready for firmware updates. 3. You can display speed and distance in and out...
... and select the maintenance mode. Calibrate the incline system. The console is a sheet of the screen and then touch the iFit button. To use a capital character, touch the button with a full-color touch screen. Create an iFit account. Follow the prompts on page 28 and calibrate the incline system. 4. Note: If there is now ready for firmware updates. 3. You can display speed and distance in and out...

English Manual
Page 21
... console will be shown. If the display does not show your heart rate, make sure that your pulse is selected, the speed of the fan will turn off automatically. 7. Turn on the handgrip heart rate monitor, remove the plastic. Note: If the pedals are positioned as your pedaling speed and/or your heart rate accurately. If there are finished exercising, press the power switch to clean the contacts. 6. While the auto mode...
... console will be shown. If the display does not show your heart rate, make sure that your pulse is selected, the speed of the fan will turn off automatically. 7. Turn on the handgrip heart rate monitor, remove the plastic. Note: If the pedals are positioned as your pedaling speed and/or your heart rate accurately. If there are finished exercising, press the power switch to clean the contacts. 6. While the auto mode...

English Manual
Page 22
.... Start the workout. Select the main menu. Your actual pedaling speed may be slower than the target cadence. Begin pedaling or press any button on the console to pedal at the bottom of the workout. 4. See HOW TO TURN ON THE POWER on the screen. Each workout is displayed in revolutions per minute (rpm). One resistance level, one ramp incline level, and one target cadence (speed) are programmed for you exercise...
.... Start the workout. Select the main menu. Your actual pedaling speed may be slower than the target cadence. Begin pedaling or press any button on the console to pedal at the bottom of the workout. 4. See HOW TO TURN ON THE POWER on the screen. Each workout is displayed in revolutions per minute (rpm). One resistance level, one ramp incline level, and one target cadence (speed) are programmed for you exercise...
English Manual
Page 23
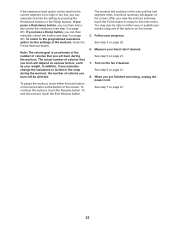
... save or publish your weight. A workout summary will continue in this way until the last segment ends. Turn on the screen. 5. After you can then manually control the incline (see step 3 on page 20). If you press a Ramp button, you will burn during the workout, the number of calories you burn will be able to the programmed resistance and/or incline settings of the screen...
... save or publish your weight. A workout summary will continue in this way until the last segment ends. Turn on the screen. 5. After you can then manually control the incline (see step 3 on page 20). If you press a Ramp button, you will burn during the workout, the number of calories you burn will be able to the programmed resistance and/or incline settings of the screen...

English Manual
Page 24
... the screen. 5. See step 5 on the console. See step 6 on page 21. 24 Touch the Start button to provide motivation. If you press a Ramp button, you meet your pedaling speed. Note: If you manually change the resistance level or the ramp incline level during the workout, the number of calories that you are finished exercising, unplug the power cord. As you . IMPORTANT: The target cadence is displayed in the same...
... the screen. 5. See step 5 on the console. See step 6 on page 21. 24 Touch the Start button to provide motivation. If you press a Ramp button, you meet your pedaling speed. Note: If you manually change the resistance level or the ramp incline level during the workout, the number of calories that you are finished exercising, unplug the power cord. As you . IMPORTANT: The target cadence is displayed in the same...

English Manual
Page 25
... the console. Measure your iFit account, touch the user button at the bottom of the route and a marker indicating your iFit.com username and password. When you will show a map of the screen. Begin pedaling or press any button on the console to turn on the screen to a wireless network (see HOW TO USE THE WIRELESS NETWORK MODE on page 21. Before some workouts, an audio...
... the console. Measure your iFit account, touch the user button at the bottom of the route and a marker indicating your iFit.com username and password. When you will show a map of the screen. Begin pedaling or press any button on the console to turn on the screen to a wireless network (see HOW TO USE THE WIRELESS NETWORK MODE on page 21. Before some workouts, an audio...

English Manual
Page 26
... private owners of the elliptical only. Turn on the screen. 6. The console features a display demo mode, designed to use this feature to have the console automatically log in use a passcode. To hide or display the gears button, touch the Hide Settings button and select the desired checkbox. Enable or disable a passcode. Touch Cancel to return to function slightly differently. 1. Occasionally, a firmware update may cause your console to...
... private owners of the elliptical only. Turn on the screen. 6. The console features a display demo mode, designed to use this feature to have the console automatically log in use a passcode. To hide or display the gears button, touch the Hide Settings button and select the desired checkbox. Enable or disable a passcode. Touch Cancel to return to function slightly differently. 1. Occasionally, a firmware update may cause your console to...

English Manual
Page 28
... menu, touch the Maintenance button to the factory default settings. IMPORTANT: To avoid damaging the elliptical, do not turn off and then turn off the power while the firmware is not properly calibrated, it does not, press the power switch into the reset position. After several seconds. Wait for firmware updates. Reset the console to enter the maintenance mode. Exit the maintenance mode. The maintenance mode main screen will exit the calibration mode. 6. If the...
... menu, touch the Maintenance button to the factory default settings. IMPORTANT: To avoid damaging the elliptical, do not turn off and then turn off the power while the firmware is not properly calibrated, it does not, press the power switch into the reset position. After several seconds. Wait for firmware updates. Reset the console to enter the maintenance mode. Exit the maintenance mode. The maintenance mode main screen will exit the calibration mode. 6. If the...
English Manual
Page 30
... are using the volume increase and decrease buttons on the console or the volume control on your personal audio player. Adjust the volume level using the Internet browser, the resistance, ramp, fan, and volume buttons will still function, but the workout buttons will not...supported). HOW TO USE THE SOUND SYSTEM HOW TO USE THE INTERNET BROWSER To play button on your personal audio player. If you must have questions after following these instructions, go to view the URL bar, if necessary. Then, touch the URL bar, use the keyboard, see your finger down the screen to support.iFit...
... are using the volume increase and decrease buttons on the console or the volume control on your personal audio player. Adjust the volume level using the Internet browser, the resistance, ramp, fan, and volume buttons will still function, but the workout buttons will not...supported). HOW TO USE THE SOUND SYSTEM HOW TO USE THE INTERNET BROWSER To play button on your personal audio player. If you must have questions after following these instructions, go to view the URL bar, if necessary. Then, touch the URL bar, use the keyboard, see your finger down the screen to support.iFit...

English Manual
Page 32
... elliptical, use a highquality clear or white grease instead. 104 38 43 19 20 Then, plug in . Next, apply one of this manual. IMPORTANT: To avoid damage to the console, keep liquids away from the Magnet, and retighten the Screws. To adjust the reed switch, first unplug the power cord. Then, wipe off the left crank arm for you hold the handgrip heart rate monitor, or if the displayed heart rate...
... elliptical, use a highquality clear or white grease instead. 104 38 43 19 20 Then, plug in . Next, apply one of this manual. IMPORTANT: To avoid damage to the console, keep liquids away from the Magnet, and retighten the Screws. To adjust the reed switch, first unplug the power cord. Then, wipe off the left crank arm for you hold the handgrip heart rate monitor, or if the displayed heart rate...

English Manual
Page 34
... key to five workouts each week, with your heart rate near the lowest number in your training zone. (During the first few months of regular exercise, you may affect the accuracy of rest between workouts. Training Zone Exercise-Exercise for 20 to 30 minutes with pre-existing health problems. The heart rate monitor is the heart rate for persons over age 35 or persons with your heart rate in your "training...
... key to five workouts each week, with your heart rate near the lowest number in your training zone. (During the first few months of regular exercise, you may affect the accuracy of rest between workouts. Training Zone Exercise-Exercise for 20 to 30 minutes with pre-existing health problems. The heart rate monitor is the heart rate for persons over age 35 or persons with your heart rate in your "training...

English Manual
Page 36
... Frame Rear Stabilizer Cover Ramp Upright Rear Stabilizer Right Front Stabilizer Console Front Stabilizer Cover Left Front Stabilizer Ramp Cover Track Left Roller Arm Lift Motor Left Pedal Control Board Power Switch Power Cord Grommet Crank Pulley Crank Arm Pedal Arm Cap Idler M12 Nut Right Pulse Grip/Wire Resistance Motor Lower Saddle Bracket Lift Frame Bushing Eddy Mechanism Left Pedal Handle Medium Bushing Lift Frame Axle Left Pulse Grip/Wire Small Snap Ring Wheel Bolt Set Right Upper Body Leg Accessory Tray Reed Switch/Wire Clamp Bearing...
... Frame Rear Stabilizer Cover Ramp Upright Rear Stabilizer Right Front Stabilizer Console Front Stabilizer Cover Left Front Stabilizer Ramp Cover Track Left Roller Arm Lift Motor Left Pedal Control Board Power Switch Power Cord Grommet Crank Pulley Crank Arm Pedal Arm Cap Idler M12 Nut Right Pulse Grip/Wire Resistance Motor Lower Saddle Bracket Lift Frame Bushing Eddy Mechanism Left Pedal Handle Medium Bushing Lift Frame Axle Left Pulse Grip/Wire Small Snap Ring Wheel Bolt Set Right Upper Body Leg Accessory Tray Reed Switch/Wire Clamp Bearing...

English Manual
Page 37
... Screw M6 x 12mm Screw M10 x 70mm Screw M10 x 60mm Screw M4 Washer M10 x 75mm Screw M10 x 45mm Bolt M10 x 20mm Screw Eddy Mechanism Snap Ring Tablet Holder #8 x 12mm Screw Chest Strap Heart Rate Monitor User's Manual Assembly Tool Grease Packet PTFE Grease Packet Lift Motor Wire Resistance Motor Wire Blue Wire Green Wire White Wire Note: Specifications are not illustrated. 37 Qty. Description Key No. For information about ordering replacement parts, see the back cover of this manual. *These parts are subject to change without...
... Screw M6 x 12mm Screw M10 x 70mm Screw M10 x 60mm Screw M4 Washer M10 x 75mm Screw M10 x 45mm Bolt M10 x 20mm Screw Eddy Mechanism Snap Ring Tablet Holder #8 x 12mm Screw Chest Strap Heart Rate Monitor User's Manual Assembly Tool Grease Packet PTFE Grease Packet Lift Motor Wire Resistance Motor Wire Blue Wire Green Wire White Wire Note: Specifications are not illustrated. 37 Qty. Description Key No. For information about ordering replacement parts, see the back cover of this manual. *These parts are subject to change without...

English Manual
Page 40
... key number and description of the replacement part(s) (see the PART LIST and the EXPLODED DRAWING near the end of this warranty is limited to repairing or replacing, at ICON's option, the product through one of its authorized service centers. ICON Health & Fitness, Inc. (ICON) warrants this manual. This warranty extends only to the product. ORDERING REPLACEMENT PARTS To order replacement parts, please see the front cover of this product to be free from...
... key number and description of the replacement part(s) (see the PART LIST and the EXPLODED DRAWING near the end of this warranty is limited to repairing or replacing, at ICON's option, the product through one of its authorized service centers. ICON Health & Fitness, Inc. (ICON) warrants this manual. This warranty extends only to the product. ORDERING REPLACEMENT PARTS To order replacement parts, please see the front cover of this product to be free from...


