
User Manual
Page 2
NordicTrack is missing or illegible, see the front cover of ICON IP, Inc. 2 Note: The decal(s) may not be shown at actual size. Apply the decal ... replacement decal. TABLE OF CONTENTS WARNING DECAL PLACEMENT 2 IMPORTANT PRECAUTIONS 3 BEFORE YOU BEGIN 4 ASSEMBLY 5 HOW TO USE THE ELLIPTICAL EXERCISER 13 MAINTENANCE AND TROUBLESHOOTING 21 EXERCISE GUIDELINES 23 PART LIST 24 EXPLODED DRAWING 26 ORDERING REPLACEMENT PARTS Back Cover LIMITED WARRANTY Back Cover WARNING DECAL PLACEMENT This drawing shows the location(s) of the warning decal(s).
NordicTrack is missing or illegible, see the front cover of ICON IP, Inc. 2 Note: The decal(s) may not be shown at actual size. Apply the decal ... replacement decal. TABLE OF CONTENTS WARNING DECAL PLACEMENT 2 IMPORTANT PRECAUTIONS 3 BEFORE YOU BEGIN 4 ASSEMBLY 5 HOW TO USE THE ELLIPTICAL EXERCISER 13 MAINTENANCE AND TROUBLESHOOTING 21 EXERCISE GUIDELINES 23 PART LIST 24 EXPLODED DRAWING 26 ORDERING REPLACEMENT PARTS Back Cover LIMITED WARRANTY Back Cover WARNING DECAL PLACEMENT This drawing shows the location(s) of the warning decal(s).
User Manual
Page 3
...for home use the elliptical exerciser in serious injury or death. Wear appropriate exercise clothes while using the elliptical exerciser. 11. Hold the handlebars or the upper body arms when mounting, dismounting, or using the elliptical exerciser. The elliptical exerciser is at all parts regularly. Always wear ... weighing more than 300 lbs. (136 kg). 9. Before beginning any worn parts immediately. 7. Place the elliptical exerciser on a level surface, with pre-existing health problems. 2. The elliptical exerciser should not be used by or through the use of the owner to protect...
...for home use the elliptical exerciser in serious injury or death. Wear appropriate exercise clothes while using the elliptical exerciser. 11. Hold the handlebars or the upper body arms when mounting, dismounting, or using the elliptical exerciser. The elliptical exerciser is at all parts regularly. Always wear ... weighing more than 300 lbs. (136 kg). 9. Before beginning any worn parts immediately. 7. Place the elliptical exerciser on a level surface, with pre-existing health problems. 2. The elliptical exerciser should not be used by or through the use of the owner to protect...
User Manual
Page 4
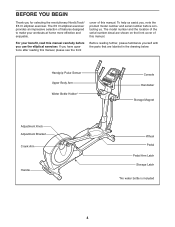
... Before reading further, please familiarize yourself with the parts that are shown on the front cover of this manual. The model number and the location of this manual. For your workouts at home more effective and enjoyable. BEFORE YOU BEGIN Thank you use the elliptical exerciser. cover of the serial number decal are... the product model number and serial number before contacting us assist you have questions after reading this manual carefully before you for selecting the revolutionary NordicTrack® E5 VI elliptical exerciser.
... Before reading further, please familiarize yourself with the parts that are shown on the front cover of this manual. The model number and the location of this manual. For your workouts at home more effective and enjoyable. BEFORE YOU BEGIN Thank you use the elliptical exerciser. cover of the serial number decal are... the product model number and serial number before contacting us assist you have questions after reading this manual carefully before you for selecting the revolutionary NordicTrack® E5 VI elliptical exerciser.
User Manual
Page 5
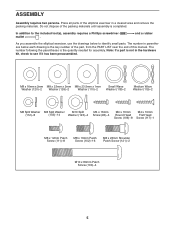
...Screw (102)-16 M8 x 23mm Shoulder Patch Screw (121)-2 M10 x 80mm Patch Screw (100)-4 5 and a rubber As you assemble the elliptical exerciser, use the drawings below each drawing is not in a cleared area and remove the packing materials. Do not dispose of the packing materials until assembly...quantity needed for assembly. In addition to see if it has been preassembled. Note: If a part is the key number of the part, from the PART LIST near the end of the elliptical exerciser in the hardware kit, check to the included tool(s), assembly requires a Phillips screwdriver mallet ....
...Screw (102)-16 M8 x 23mm Shoulder Patch Screw (121)-2 M10 x 80mm Patch Screw (100)-4 5 and a rubber As you assemble the elliptical exerciser, use the drawings below each drawing is not in a cleared area and remove the packing materials. Do not dispose of the packing materials until assembly...quantity needed for assembly. In addition to see if it has been preassembled. Note: If a part is the key number of the part, from the PART LIST near the end of the elliptical exerciser in the hardware kit, check to the included tool(s), assembly requires a Phillips screwdriver mallet ....

User Manual
Page 12
To protect the floor or carpet from damage, place a mat under the elliptical exerciser. 12 Tighten the four M8 x 16mm Patch Screws (102). 29 Then, slide the Top Cover (23) downward and press it over after assembly is completed. ... (6) by pressing the tabs on the Right Front Leg Cover into the Rear Upright Cover (24). 25 24 5 13. 12. Make sure that all parts of the elliptical exerciser are marked with "Right" stickers. 13 Attach the Right Rear Leg Cover (29) to the Right Upper Body Leg (6) with three M4 x 16mm Round...
To protect the floor or carpet from damage, place a mat under the elliptical exerciser. 12 Tighten the four M8 x 16mm Patch Screws (102). 29 Then, slide the Top Cover (23) downward and press it over after assembly is completed. ... (6) by pressing the tabs on the Right Front Leg Cover into the Rear Upright Cover (24). 25 24 5 13. 12. Make sure that all parts of the elliptical exerciser are marked with "Right" stickers. 13 Attach the Right Rear Leg Cover (29) to the Right Upper Body Leg (6) with three M4 x 16mm Round...
User Manual
Page 21
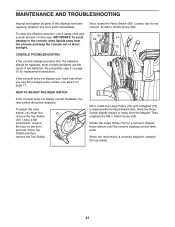
... the Reed Switch slightly toward or away from the console and keep liquids away from the Magnet. most console problems are the result of the elliptical exerciser regularly. Rotate the Large Pulley (74) for replacement instructions. IMPORTANT: To avoid damage to the console, keep the console out of the Top... 5 on page 10 for a moment. To adjust the reed switch, you use a damp cloth and a small amount of mild soap. Replace any worn parts immediately. HOW TO ADJUST THE REED SWITCH If the console does not display correct feedback, the reed switch should be adjusted.
... the Reed Switch slightly toward or away from the console and keep liquids away from the Magnet. most console problems are the result of the elliptical exerciser regularly. Rotate the Large Pulley (74) for replacement instructions. IMPORTANT: To avoid damage to the console, keep the console out of the Top... 5 on page 10 for a moment. To adjust the reed switch, you use a damp cloth and a small amount of mild soap. Replace any worn parts immediately. HOW TO ADJUST THE REED SWITCH If the console does not display correct feedback, the reed switch should be adjusted.
User Manual
Page 23
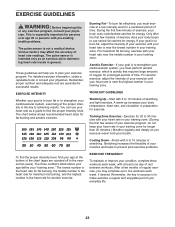
... near the highest number in your training zone for 20 to make exercise a regular and enjoyable part of rest between workouts. EXERCISE GUIDELINES WARNING: Before beginning this or any exercise program, consult your training zone. For maximum fat burning, exercise with 5 to achieving results. EXERCISE FREQUENCY To maintain or improve your everyday life. 23 Various factors...
... near the highest number in your training zone for 20 to make exercise a regular and enjoyable part of rest between workouts. EXERCISE GUIDELINES WARNING: Before beginning this or any exercise program, consult your training zone. For maximum fat burning, exercise with 5 to achieving results. EXERCISE FREQUENCY To maintain or improve your everyday life. 23 Various factors...


