
English Manual
Page 2
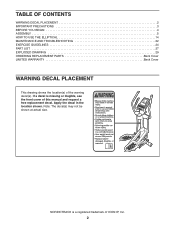
...NORDICTRACK is missing or illegible, see the front cover of the warning decal(s). Apply the decal in the location shown. TABLE OF CONTENTS WARNING DECAL PLACEMENT 2 IMPORTANT PRECAUTIONS 3 BEFORE YOU BEGIN 4 ASSEMBLY 5 HOW TO USE THE ELLIPTICAL 14 MAINTENANCE AND TROUBLESHOOTING 22 EXERCISE GUIDELINES 24 PART... LIST 27 EXPLODED DRAWING 29 ORDERING REPLACEMENT PARTS Back Cover LIMITED WARRANTY Back Cover WARNING DECAL PLACEMENT This drawing ...
...NORDICTRACK is missing or illegible, see the front cover of the warning decal(s). Apply the decal in the location shown. TABLE OF CONTENTS WARNING DECAL PLACEMENT 2 IMPORTANT PRECAUTIONS 3 BEFORE YOU BEGIN 4 ASSEMBLY 5 HOW TO USE THE ELLIPTICAL 14 MAINTENANCE AND TROUBLESHOOTING 22 EXERCISE GUIDELINES 24 PART... LIST 27 EXPLODED DRAWING 29 ORDERING REPLACEMENT PARTS Back Cover LIMITED WARRANTY Back Cover WARNING DECAL PLACEMENT This drawing ...

English Manual
Page 3
Before beginning any worn parts immediately. 8. Hold the handlebars or the upper body arms when mounting, dismounting, or using the elliptical; Reduce your pedaling speed in a garage or covered patio, or near water. 6. If you feel faint or if you experience... elliptical does not have a freewheel; Always wear athletic shoes for home use the elliptical in the front and rear of this manual. 9. Keep your elliptical. Make sure that could become caught on your elliptical before using your back straight while using the elliptical. 4. The heart rate monitor is at all parts ...
Before beginning any worn parts immediately. 8. Hold the handlebars or the upper body arms when mounting, dismounting, or using the elliptical; Reduce your pedaling speed in a garage or covered patio, or near water. 6. If you feel faint or if you experience... elliptical does not have a freewheel; Always wear athletic shoes for home use the elliptical in the front and rear of this manual. 9. Keep your elliptical. Make sure that could become caught on your elliptical before using your back straight while using the elliptical. 4. The heart rate monitor is at all parts ...
English Manual
Page 4
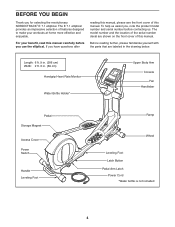
...see the front cover of this manual. Before reading further, please familiarize yourself with the parts that are shown on the front cover of features designed to make your benefit, read...contacting us assist you, note the product model number and serial number before you use the elliptical. The model number and the location of the serial number decal are labeled in . (...Wheel Leveling Foot Latch Button Pedal Arm Latch Power Cord *Water bottle is not included 4 The E 7.1 elliptical provides an impressive selection of this manual. Length: 6 ft. 9 in. (206 cm) Width: 2 ft...
...see the front cover of this manual. Before reading further, please familiarize yourself with the parts that are shown on the front cover of features designed to make your benefit, read...contacting us assist you, note the product model number and serial number before you use the elliptical. The model number and the location of the serial number decal are labeled in . (...Wheel Leveling Foot Latch Button Pedal Arm Latch Power Cord *Water bottle is not included 4 The E 7.1 elliptical provides an impressive selection of this manual. Length: 6 ft. 9 in. (206 cm) Width: 2 ft...
English Manual
Page 5
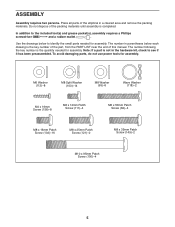
... the packing materials until assembly is not in parentheses below to identify the small parts needed for assembly. Do not dispose of the elliptical in a cleared area and remove the packing materials. The number in the hardware kit, check to the included tool(s) and grease packet...(s), assembly requires a Phillips screwdriver and a rubber mallet . Note: If a part is completed. Use the drawings below each...
... the packing materials until assembly is not in parentheses below to identify the small parts needed for assembly. Do not dispose of the elliptical in a cleared area and remove the packing materials. The number in the hardware kit, check to the included tool(s) and grease packet...(s), assembly requires a Phillips screwdriver and a rubber mallet . Note: If a part is completed. Use the drawings below each...

English Manual
Page 13
Tighten the M4 x 19mm Screws (156) in the upper end of the elliptical are properly tightened. Note: An extra grease packet and some hardware may be left over after assembly is completed. Orient the Front Upright Cover (24) ... Cover into the Rear Upright Cover (25). 33 156 5 156 24 25 5 16. To protect the floor or carpet from damage, place a mat under the elliptical. 13 Make sure that all parts of the Console (33). 15. 14.
Tighten the M4 x 19mm Screws (156) in the upper end of the elliptical are properly tightened. Note: An extra grease packet and some hardware may be left over after assembly is completed. Orient the Front Upright Cover (24) ... Cover into the Rear Upright Cover (25). 33 156 5 156 24 25 5 16. To protect the floor or carpet from damage, place a mat under the elliptical. 13 Make sure that all parts of the Console (33). 15. 14.
English Manual
Page 22
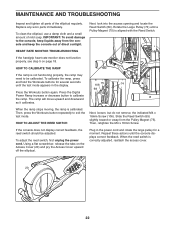
... 75 74 69 Press the Workouts button again. IMPORTANT: To avoid damage to be adjusted. To clean the elliptical, use a damp cloth and a small amount of the elliptical regularly. HEART RATE MONITOR TROUBLESHOOTING If the handgrip heart rate monitor does not function properly, see step 5 on... the Access Cover (20) and pry the Access Cover upward off the elliptical. Press the Digital Power Ramp increase or decrease button to exit the test mode. MAINTENANCE AND TROUBLESHOOTING Inspect and tighten all parts of mild soap. Rotate the Large Pulley (74) until a Pulley Magnet (75...
... 75 74 69 Press the Workouts button again. IMPORTANT: To avoid damage to be adjusted. To clean the elliptical, use a damp cloth and a small amount of the elliptical regularly. HEART RATE MONITOR TROUBLESHOOTING If the handgrip heart rate monitor does not function properly, see step 5 on... the Access Cover (20) and pry the Access Cover upward off the elliptical. Press the Digital Power Ramp increase or decrease button to exit the test mode. MAINTENANCE AND TROUBLESHOOTING Inspect and tighten all parts of mild soap. Rotate the Large Pulley (74) until a Pulley Magnet (75...


