

English Manual
Page 2
TABLE OF CONTENTS IMPORTANT PRECAUTIONS 3 BEFORE YOU BEGIN 4 ASSEMBLY 5 HOW TO USE THE ELLIPTICAL CROSSTRAINER 8 MAINTENANCE AND TROUBLESHOOTING 20 CONDITIONING GUIDELINES 21 PART LIST 22 EXPLODED DRAWING 23 HOW TO ORDER REPLACEMENT PARTS Back Cover LIMITED WARRANTY Back Cover NordicTrack is a registered trademark of ICON Health & Fitness, Inc. 2
TABLE OF CONTENTS IMPORTANT PRECAUTIONS 3 BEFORE YOU BEGIN 4 ASSEMBLY 5 HOW TO USE THE ELLIPTICAL CROSSTRAINER 8 MAINTENANCE AND TROUBLESHOOTING 20 CONDITIONING GUIDELINES 21 PART LIST 22 EXPLODED DRAWING 23 HOW TO ORDER REPLACEMENT PARTS Back Cover LIMITED WARRANTY Back Cover NordicTrack is a registered trademark of ICON Health & Fitness, Inc. 2

English Manual
Page 3
... pre-existing health prob- The pulse sensor is intended for foot protection. 9. tions before using the elliptical crosstrainer; Always unplug the power cord immediately after use the elliptical crosstrainer in the location shown. 8. IMPORTANT PRECAUTIONS WARNING: To reduce the risk of this or any worn parts immediately. 6. Keep the elliptical crosstrainer indoors, away from the elliptical crosstrainer at 1-888-8252588 to move until the flywheel stops. 14. Replace any exercise program, consult...
... pre-existing health prob- The pulse sensor is intended for foot protection. 9. tions before using the elliptical crosstrainer; Always unplug the power cord immediately after use the elliptical crosstrainer in the location shown. 8. IMPORTANT PRECAUTIONS WARNING: To reduce the risk of this or any worn parts immediately. 6. Keep the elliptical crosstrainer indoors, away from the elliptical crosstrainer at 1-888-8252588 to move until the flywheel stops. 14. Replace any exercise program, consult...

English Manual
Page 4
... 980 elliptical crosstrainer. For your feet in the drawing below. To help you get the most from NordicTrack. Water Bottle Holder* Upper Body Arm Handgrip Pulse Sensor Bookrack Console FRONT BACK Pedal Disk Power Cord Leveling Foot 4 Incline Ramp Wheel Pedal Spring Arm RIGHT SIDE *No water bottle is NTE99021. And the unique CXT 980 features adjustable resistance and incline to the elliptical crosstrainer (see the front cover of this manual...
... 980 elliptical crosstrainer. For your feet in the drawing below. To help you get the most from NordicTrack. Water Bottle Holder* Upper Body Arm Handgrip Pulse Sensor Bookrack Console FRONT BACK Pedal Disk Power Cord Leveling Foot 4 Incline Ramp Wheel Pedal Spring Arm RIGHT SIDE *No water bottle is NTE99021. And the unique CXT 980 features adjustable resistance and incline to the elliptical crosstrainer (see the front cover of this manual...

English Manual
Page 5
ASSEMBLY Assembly requires two people. Place all parts of the packing materials until assembly is completed. Do not dispose of the elliptical crosstrainer in a cleared area and remove the packing materials. The number in assembly. Make sure that the Front Stabilizer is not in assembly. As you assemble the elliptical crosstrainer, use... 1 90 5 Identify the Rear Stabilizer (59), which has Leveling 1 Feet (14) threaded into it has been pre-assembled. Attach the Front Stabilizer (90) to the key number of the part, from the PART LIST on page 22. M8 x 19mm Screw (30)-4 M10 x 25mm M8...
ASSEMBLY Assembly requires two people. Place all parts of the packing materials until assembly is completed. Do not dispose of the elliptical crosstrainer in a cleared area and remove the packing materials. The number in assembly. Make sure that the Front Stabilizer is not in assembly. As you assemble the elliptical crosstrainer, use... 1 90 5 Identify the Rear Stabilizer (59), which has Leveling 1 Feet (14) threaded into it has been pre-assembled. Attach the Front Stabilizer (90) to the key number of the part, from the PART LIST on page 22. M8 x 19mm Screw (30)-4 M10 x 25mm M8...

English Manual
Page 7
...) and the Left Upper Body Arm (7). Next, slide an Axle Cover (74) onto the post on the Console (87) to the Extension Wire Harness (51). 6 87 Attach the Console (87) to the Upright (2) with the four Console Screws (35) and the four Console Washers (93) packaged with an M10 x 33mm Carriage Bolt (61), an M10 Washer (63), and an Adjustment Knob (77) as shown...
...) and the Left Upper Body Arm (7). Next, slide an Axle Cover (74) onto the post on the Console (87) to the Extension Wire Harness (51). 6 87 Attach the Console (87) to the Upright (2) with the four Console Screws (35) and the four Console Washers (93) packaged with an M10 x 33mm Carriage Bolt (61), an M10 Washer (63), and an Adjustment Knob (77) as shown...

English Manual
Page 8
... Console (87) with the product-if it will not fit the outlet, have a proper outlet installed by a qualified electrician. 8 INSTALLING THE RECEIVER FOR THE OPTIONAL CHEST PULSE SENSOR If you are in doubt as shown. Important: The elliptical crosstrainer is not compatible with the chest pulse sensor. 1. Lift the top of electric shock. D C B A 87 Cylinder HOW TO USE THE ELLIPTICAL CROSSTRAINER HOW TO PLUG IN THE POWER CORD...
... Console (87) with the product-if it will not fit the outlet, have a proper outlet installed by a qualified electrician. 8 INSTALLING THE RECEIVER FOR THE OPTIONAL CHEST PULSE SENSOR If you are in doubt as shown. Important: The elliptical crosstrainer is not compatible with the chest pulse sensor. 1. Lift the top of electric shock. D C B A 87 Cylinder HOW TO USE THE ELLIPTICAL CROSSTRAINER HOW TO PLUG IN THE POWER CORD...

English Manual
Page 9
... to move with a continuous motion. Make sure that both pedals are stationary, step off the lowest pedal. Next, step onto the other pedal. It is not available. Upper Body Arms Handgrip Pulse Sensor 9 A temporary adapter may Grounded Outlet Box be used to connect the Adapter power cord to a 2-pole receptacle as shown at the right if a properly Lug Metal Screw grounded outlet is recommended that you turn the pedal...
... to move with a continuous motion. Make sure that both pedals are stationary, step off the lowest pedal. Next, step onto the other pedal. It is not available. Upper Body Arms Handgrip Pulse Sensor 9 A temporary adapter may Grounded Outlet Box be used to connect the Adapter power cord to a 2-pole receptacle as shown at the right if a properly Lug Metal Screw grounded outlet is recommended that you turn the pedal...

English Manual
Page 10
CONSOLE DIAGRAM Matrix Displays Training Zone Bar Note: If there is a sheet of clear plastic on the face of the elliptical crosstrainer and prompt you to vary your pace to keep your heart rate near a target heart rate as you exercise. sonal trainer right in your heart rate using the handgrip pulse sensor. (For information about an optional chest pulse sensor, refer to page 19.) The console also offers eight smart workout programs. Each program automatically changes the...
CONSOLE DIAGRAM Matrix Displays Training Zone Bar Note: If there is a sheet of clear plastic on the face of the elliptical crosstrainer and prompt you to vary your pace to keep your heart rate near a target heart rate as you exercise. sonal trainer right in your heart rate using the handgrip pulse sensor. (For information about an optional chest pulse sensor, refer to page 19.) The console also offers eight smart workout programs. Each program automatically changes the...

English Manual
Page 11
... TO PLUG IN THE POWER CORD on the console is pressed or the pedals are lit, the bar shows that the power cord is the most challenging. When any button on the console or move the pedals to increase or decrease your speed, and the angle of the incline ramp. When you to turn on . 3 Select the manual mode. The left display will flash in the bar are moved, the displays and...
... TO PLUG IN THE POWER CORD on the console is pressed or the pedals are lit, the bar shows that the power cord is the most challenging. When any button on the console or move the pedals to increase or decrease your speed, and the angle of the incline ramp. When you to turn on . 3 Select the manual mode. The left display will flash in the bar are moved, the displays and...

English Manual
Page 12
... resistance level 10). When you are finished viewing this is detected, the heart rate indicator above the right display will light, dashes may not display your heart rate along with the distance you have pedaled and the number of calories you have burned. The display will change the unit of measurement, press the + button (this information, press the Start Program button again. 6 Measure your hands. Note: The console can display speed and distance...
... resistance level 10). When you are finished viewing this is detected, the heart rate indicator above the right display will light, dashes may not display your heart rate along with the distance you have pedaled and the number of calories you have burned. The display will change the unit of measurement, press the + button (this information, press the Start Program button again. 6 Measure your hands. Note: The console can display speed and distance...
English Manual
Page 13
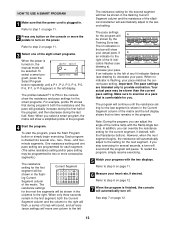
... you stop exercising for the second segment will then be shown in the columns to the setting for the program will move the pedals to the second setting. To select a smart program, press the Select Program button repeatedly until the resistance setting for the first Current Segment segment will automatically adjust to turn off. HOW TO USE A SMART PROGRAM 1 Make sure that the power cord is plugged in the left display...
... you stop exercising for the second segment will then be shown in the columns to the setting for the program will move the pedals to the second setting. To select a smart program, press the Select Program button repeatedly until the resistance setting for the first Current Segment segment will automatically adjust to turn off. HOW TO USE A SMART PROGRAM 1 Make sure that the power cord is plugged in the left display...
English Manual
Page 14
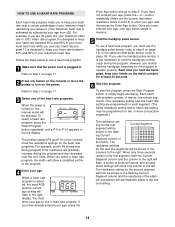
... of the ellipti- tance settings will move the pedals to the right. button repeatedly (these are the buttons that select resistance levels 9 and 10) to the left display. Each time you hold the handgrips frequently for the second segment will sound, and all resis- To start the program, press the Start Program button or simply begin exercising. You must use the handgrip pulse sensor, it is estimated...
... of the ellipti- tance settings will move the pedals to the right. button repeatedly (these are the buttons that select resistance levels 9 and 10) to the left display. Each time you hold the handgrips frequently for the second segment will sound, and all resis- To start the program, press the Start Program button or simply begin exercising. You must use the handgrip pulse sensor, it is estimated...

English Manual
Page 15
... pace. Plug the Y-adapter into the jack beneath the console. B Refer to your home computer. ting for connecting instructions. To use iFIT.com CDs, the elliptical crosstrainer must be connected to keep your heart rate near the current heart rate setting. B. As you exercise, the Training Zone bar will show your actual pace. The lit indicators in the program. a When you hold the handgrip pulse sensor (or wear the optional chest pulse sensor), the console will...
... pace. Plug the Y-adapter into the jack beneath the console. B Refer to your home computer. ting for connecting instructions. To use iFIT.com CDs, the elliptical crosstrainer must be connected to keep your heart rate near the current heart rate setting. B. As you exercise, the Training Zone bar will show your actual pace. The lit indicators in the program. a When you hold the handgrip pulse sensor (or wear the optional chest pulse sensor), the console will...
English Manual
Page 17
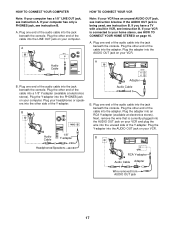
... beneath the console. Audio Cable B. B PHONES A ANT. Plug the other side of the Y-adapter. Plug the Y-adapter into the AUDIO OUT jack on your VCR and plug the wire into the other end of the audio cable into the AUDIO OUT jack on your VCR. Plug one end of the cable into the adapter. Next, remove the wire that is connected to your home stereo, see instruction A. A. HOW TO CONNECT YOUR COMPUTER...
... beneath the console. Audio Cable B. B PHONES A ANT. Plug the other side of the Y-adapter. Plug the Y-adapter into the AUDIO OUT jack on your VCR and plug the wire into the other end of the audio cable into the AUDIO OUT jack on your VCR. Plug one end of the cable into the adapter. Next, remove the wire that is connected to your home stereo, see instruction A. A. HOW TO CONNECT YOUR COMPUTER...

English Manual
Page 18
... the program is turned on, the manual mode will be connected to turn off. See step 7 on page 11. 7 Measure your heart rate, if desired. To select the iFIT.com mode, press the iFIT.com button. Note: If the resistance of your personal trainer's instructions. Refer to step 1 on page 11. 2 Press any button on the console or move the pedals to your portable CD player, portable stereo, home stereo, computer with the two displays...
... the program is turned on, the manual mode will be connected to turn off. See step 7 on page 11. 7 Measure your heart rate, if desired. To select the iFIT.com mode, press the iFIT.com button. Note: If the resistance of your personal trainer's instructions. Refer to step 1 on page 11. 2 Press any button on the console or move the pedals to your portable CD player, portable stereo, home stereo, computer with the two displays...
English Manual
Page 19
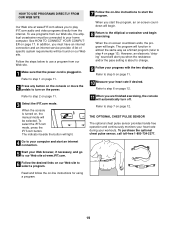
... when the resistance and/or the pace setting is turned on, the manual mode will begin exercising. The program will begin. 8 Return to start the program. Refer to play iFIT.com audio and video programs directly from the internet. See HOW TO CONNECT YOUR COMPUTER on -line instructions for using a program. 19 To purchase the optional chest pulse sensor, call toll-free 1-800-734-2377. 4 Go to your computer and start the program, an...
... when the resistance and/or the pace setting is turned on, the manual mode will begin exercising. The program will begin. 8 Return to start the program. Refer to play iFIT.com audio and video programs directly from the internet. See HOW TO CONNECT YOUR COMPUTER on -line instructions for using a program. 19 To purchase the optional chest pulse sensor, call toll-free 1-800-734-2377. 4 Go to your computer and start the program, an...

English Manual
Page 20
... elliptical crosstrainer. 47 48 40 88 Next, locate the Reed Switch (50). Leveling Feet 72 20 MAINTENANCE AND TROUBLESHOOTING Inspect and properly tighten all parts of the Side Shields. Loosen, but do not remove, the indicated Screw (72). Slide the Reed Switch slightly closer to or away from the incline ramp where the wheels make contact with the Reed Switch. Lift the Side Shields off the console...
... elliptical crosstrainer. 47 48 40 88 Next, locate the Reed Switch (50). Leveling Feet 72 20 MAINTENANCE AND TROUBLESHOOTING Inspect and properly tighten all parts of the Side Shields. Loosen, but do not remove, the indicated Screw (72). Slide the Reed Switch slightly closer to or away from the incline ramp where the wheels make contact with the Reed Switch. Lift the Side Shields off the console...

English Manual
Page 21
... as you exercise. The pulse sensor is near the middle number in your training zone. (During the first few months of your exercise until your heart rate is intended only as you to five workouts each week, with pre-existing health problems. • The pulse sensor is activity that proper nutrition and adequate rest are recommended heart rates for exercise. For maximum fat burning, adjust the intensity...
... as you exercise. The pulse sensor is near the middle number in your training zone. (During the first few months of your exercise until your heart rate is intended only as you to five workouts each week, with pre-existing health problems. • The pulse sensor is activity that proper nutrition and adequate rest are recommended heart rates for exercise. For maximum fat burning, adjust the intensity...

English Manual
Page 22
...93 4 Console Washer 94 1 Incline Motor 95 1 Reed Switch Lock 96 1 Incline Reed Switch 97 4 Tree Fastener 98 1 Left Incline Shield 99 1 Right Incline Shield 100 1 Incline Bolt 101 2 Incline Spacer 102 3 M10 x 25mm Screw 103 1 Zip Tie 104 3 #8 x 3/8" Screw 105 1 Wiring Board 106 1 Junction Box/Cover 107 1 Grommet # 1 Grease # 1 Teflon® Lubricant # 1 Push Nut Tool # 2 Allen Wrench # 1 User's Manual Note: # indicates a non-illustrated part. Description Key No. PART LIST-Model No. NTE99021 R1202A Key No. Specifications are...
...93 4 Console Washer 94 1 Incline Motor 95 1 Reed Switch Lock 96 1 Incline Reed Switch 97 4 Tree Fastener 98 1 Left Incline Shield 99 1 Right Incline Shield 100 1 Incline Bolt 101 2 Incline Spacer 102 3 M10 x 25mm Screw 103 1 Zip Tie 104 3 #8 x 3/8" Screw 105 1 Wiring Board 106 1 Junction Box/Cover 107 1 Grommet # 1 Grease # 1 Teflon® Lubricant # 1 Push Nut Tool # 2 Allen Wrench # 1 User's Manual Note: # indicates a non-illustrated part. Description Key No. PART LIST-Model No. NTE99021 R1202A Key No. Specifications are...

English Manual
Page 24
... manual LIMITED WARRANTY WHAT IS COVERED-The entire NordicTrack® elliptical crosstrainer ("Product") is limited in connection with respect to give the following information when calling: • The MODEL NUMBER of the product (NTE99021) • The NAME of the product (NordicTrack® CXT 980 elliptical crosstrainer) • The SERIAL NUMBER of the product (see the front cover of this manual) • The KEY NUMBER and DESCRIPTION of this limited warranty. notify our Customer Service...
... manual LIMITED WARRANTY WHAT IS COVERED-The entire NordicTrack® elliptical crosstrainer ("Product") is limited in connection with respect to give the following information when calling: • The MODEL NUMBER of the product (NTE99021) • The NAME of the product (NordicTrack® CXT 980 elliptical crosstrainer) • The SERIAL NUMBER of the product (see the front cover of this manual) • The KEY NUMBER and DESCRIPTION of this limited warranty. notify our Customer Service...


