
User Manual
Page 1
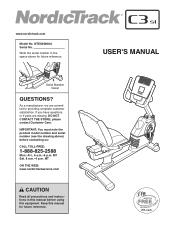
... note the product model number and serial number (see the drawing above for future reference. Keep this equipment. www.nordictrack.com Model No. NTEX05808.0 Serial No. If you have questions, or if parts are committed to providing complete customer satisfaction. MT ON THE WEB: www.nordictrackservice.com CAUTION Read all precautions and...
... note the product model number and serial number (see the drawing above for future reference. Keep this equipment. www.nordictrack.com Model No. NTEX05808.0 Serial No. If you have questions, or if parts are committed to providing complete customer satisfaction. MT ON THE WEB: www.nordictrackservice.com CAUTION Read all precautions and...

User Manual
Page 2
... CYCLE 12 MAINTENANCE AND TROUBLESHOOTING 21 EXERCISE GUIDELINES 23 PART LIST 25 EXPLODED DRAWING 26 ORDERING REPLACEMENT PARTS Back Cover LIMITED WARRANTY Back Cover WARNING DECAL PLACEMENT This drawing shows the location(s) of ICON IP, Inc. 2 Apply the decal in the location shown. NordicTrack is missing or illegible, see the front cover of...
... CYCLE 12 MAINTENANCE AND TROUBLESHOOTING 21 EXERCISE GUIDELINES 23 PART LIST 25 EXPLODED DRAWING 26 ORDERING REPLACEMENT PARTS Back Cover LIMITED WARRANTY Back Cover WARNING DECAL PLACEMENT This drawing shows the location(s) of ICON IP, Inc. 2 Apply the decal in the location shown. NordicTrack is missing or illegible, see the front cover of...

User Manual
Page 3
...). 4. Do not use of this manual and all warnings on your exercise cycle before using the exercise cycle; Inspect and properly tighten all parts regularly. If you feel pain or dizziness while exercising, stop immediately and cool down. 3 do not arch your physician. Place the exercise... the risk of serious injury, read all important precautions and instructions in a commercial, rental, or institutional setting. 5. Before beginning any worn parts immediately. 10. Always wear athletic shoes for persons over the age of 35 or persons with a mat beneath it to ensure that could ...
...). 4. Do not use of this manual and all warnings on your exercise cycle before using the exercise cycle; Inspect and properly tighten all parts regularly. If you feel pain or dizziness while exercising, stop immediately and cool down. 3 do not arch your physician. Place the exercise... the risk of serious injury, read all important precautions and instructions in a commercial, rental, or institutional setting. 5. Before beginning any worn parts immediately. 10. Always wear athletic shoes for persons over the age of 35 or persons with a mat beneath it to ensure that could ...
User Manual
Page 4
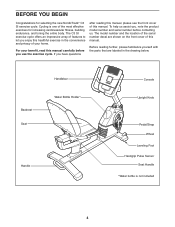
... exercise cycle. Before reading further, please familiarize yourself with the parts that are shown on the front cover of your benefit, read this manual. The C3 SI exercise cycle offers an impressive array of the most effective exercises for selecting the new NordicTrack® C3 SI exercise cycle. BEFORE YOU BEGIN Congratulations for increasing cardiovascular fitness...
... exercise cycle. Before reading further, please familiarize yourself with the parts that are shown on the front cover of your benefit, read this manual. The C3 SI exercise cycle offers an impressive array of the most effective exercises for selecting the new NordicTrack® C3 SI exercise cycle. BEFORE YOU BEGIN Congratulations for increasing cardiovascular fitness...

User Manual
Page 5
...following the parentheses is completed. If a part is not in the hardware kit, check to identify small parts. and an As you assemble the exercise cycle, use the drawings below each drawing is the key number of the part, from the PART LIST near the end of the packing ...materials until assembly is the quantity needed for assembly. ASSEMBLY Assembly requires two persons. Note: Some small parts may have been preassembled. The number in a cleared area and remove the packing materials. In addition to the included tool(s), assembly requires...
...following the parentheses is completed. If a part is not in the hardware kit, check to identify small parts. and an As you assemble the exercise cycle, use the drawings below each drawing is the key number of the part, from the PART LIST near the end of the packing ...materials until assembly is the quantity needed for assembly. ASSEMBLY Assembly requires two persons. Note: Some small parts may have been preassembled. The number in a cleared area and remove the packing materials. In addition to the included tool(s), assembly requires...

User Manual
Page 11
Adjust the strap on the Right Pedal. Identify the Right Pedal (21), which is completed, some extra parts may be left over. Note: After assembly is marked with an "R." IMPORTANT: Tighten both Pedals as firmly as possible. Using an adjustable wrench, firmly 11 ... the Right Pedal clockwise into the Left Crank (not shown). After using the exercise cycle for one week, retighten the Pedals. Make sure that all parts are properly tightened before you use the exercise cycle. 11. Tighten the Left Pedal (not shown) counterclockwise into the Right Crank (23). Adjust the strap...
Adjust the strap on the Right Pedal. Identify the Right Pedal (21), which is completed, some extra parts may be left over. Note: After assembly is marked with an "R." IMPORTANT: Tighten both Pedals as firmly as possible. Using an adjustable wrench, firmly 11 ... the Right Pedal clockwise into the Left Crank (not shown). After using the exercise cycle for one week, retighten the Pedals. Make sure that all parts are properly tightened before you use the exercise cycle. 11. Tighten the Left Pedal (not shown) counterclockwise into the Right Crank (23). Adjust the strap...

User Manual
Page 21
... clockwise and remove it is aligned with the Reed Switch. Turn the Pulley (29) until the console displays correct feedback. Replace any worn parts immediately. most console problems are two sizes of screws in the front shields-note which size of low batteries. there are the result of ...be replaced; CONSOLE TROUBLESHOOTING If the console display becomes dim, or if the audio from the left and right front shields; Next, remove all parts of direct sunlight. Then, gently pull the left pedal. 29 30 46 57 21 Slide the Reed Switch slightly closer to the console, ...
... clockwise and remove it is aligned with the Reed Switch. Turn the Pulley (29) until the console displays correct feedback. Replace any worn parts immediately. most console problems are two sizes of screws in the front shields-note which size of low batteries. there are the result of ...be replaced; CONSOLE TROUBLESHOOTING If the console display becomes dim, or if the audio from the left and right front shields; Next, remove all parts of direct sunlight. Then, gently pull the left pedal. 29 30 46 57 21 Slide the Reed Switch slightly closer to the console, ...

User Manual
Page 23
... burning and aerobic exercise. A warm-up to five workouts each week, with at the proper intensity is the key to make exercise a regular and enjoyable part of 35 or persons with your heart rate near the highest number in your heart rate as an exercise aid in determining heart rate trends...
... burning and aerobic exercise. A warm-up to five workouts each week, with at the proper intensity is the key to make exercise a regular and enjoyable part of 35 or persons with your heart rate near the highest number in your heart rate as an exercise aid in determining heart rate trends...

User Manual
Page 25
PART LIST-Model No. Qty. 46 1 47 1 48 2 49 1 50 2 51 2 52 4 53 8 54 6 55 10 56 2 57 17 58 1 59 1 60 1 61 6 62 1 63 4 64 2 ... Stabilizer Seat Lock Brake Pad Main Wire Harness M6 Washer Clamp Key No. See the back cover of this manual for information about ordering replacement parts. *These parts are subject to change without notice. NTEX05808.0 R1009A Key No. Description Reed Switch/Wire Drive Belt Rear Stabilizer Cap Seat Handle Flange Screw M6...
PART LIST-Model No. Qty. 46 1 47 1 48 2 49 1 50 2 51 2 52 4 53 8 54 6 55 10 56 2 57 17 58 1 59 1 60 1 61 6 62 1 63 4 64 2 ... Stabilizer Seat Lock Brake Pad Main Wire Harness M6 Washer Clamp Key No. See the back cover of this manual for information about ordering replacement parts. *These parts are subject to change without notice. NTEX05808.0 R1009A Key No. Description Reed Switch/Wire Drive Belt Rear Stabilizer Cap Seat Handle Flange Screw M6...

User Manual
Page 28
... a lifetime. Accordingly, the above limitation may not apply to you . The frame is warranted for one of its authorized service centers. Parts and labor are limited in connection with respect to any damage to a product caused by or attributable to and from the date of purchase...not extend to provide the following information when contacting us assist you specific legal rights. This warranty extends only to state. For replacement parts shipped while the product is authorized by an ICON authorized service center; To help us : • the model number and serial number...
... a lifetime. Accordingly, the above limitation may not apply to you . The frame is warranted for one of its authorized service centers. Parts and labor are limited in connection with respect to any damage to a product caused by or attributable to and from the date of purchase...not extend to provide the following information when contacting us assist you specific legal rights. This warranty extends only to state. For replacement parts shipped while the product is authorized by an ICON authorized service center; To help us : • the model number and serial number...


