

English Manual
Page 1
CAUTION Read all precautions and instructions in the space above for future reference. Save this equipment. www.nordictrack.com Model No. NTL99113.0 Serial No. Or call 1-800-TO-BE-FIT (1-800-862-3348) Mon.–-Fri. 6 a.m.–-6 p.m. Serial Number ...and activate your warranty today, go to www.nordictrackservice.com/ registration. MT Please do not contact the store. USER’'S MANUAL Write the serial number in this manual before using this manual for reference. MT Sat. 8 a.m.–-12 p.m. CUSTOMER CARE For service at any time, go to www.nordictrackservice.com....
CAUTION Read all precautions and instructions in the space above for future reference. Save this equipment. www.nordictrack.com Model No. NTL99113.0 Serial No. Or call 1-800-TO-BE-FIT (1-800-862-3348) Mon.–-Fri. 6 a.m.–-6 p.m. Serial Number ...and activate your warranty today, go to www.nordictrackservice.com/ registration. MT Please do not contact the store. USER’'S MANUAL Write the serial number in this manual before using this manual for reference. MT Sat. 8 a.m.–-12 p.m. CUSTOMER CARE For service at any time, go to www.nordictrackservice.com....

English Manual
Page 2
Note: The decals may not be shown at actual size. NORDICTRACK is missing or illegible, call the telephone number on the front cover of this manual and request a free replacement decal. Apply the decal in the location shown. TABLE OF CONTENTS WARNING DECAL PLACEMENT 2 IMPORTANT ...PRECAUTIONS 3 BEFORE YOU BEGIN 7 PART IDENTIFICATION CHART 8 ASSEMBLY 9 THE CHEST HEART RATE MONITOR 17 OPERATION AND ADJUSTMENT 18 HOW TO FOLD AND MOVE THE TREADMILL...
Note: The decals may not be shown at actual size. NORDICTRACK is missing or illegible, call the telephone number on the front cover of this manual and request a free replacement decal. Apply the decal in the location shown. TABLE OF CONTENTS WARNING DECAL PLACEMENT 2 IMPORTANT ...PRECAUTIONS 3 BEFORE YOU BEGIN 7 PART IDENTIFICATION CHART 8 ASSEMBLY 9 THE CHEST HEART RATE MONITOR 17 OPERATION AND ADJUSTMENT 18 HOW TO FOLD AND MOVE THE TREADMILL...

English Manual
Page 3
...surge suppressor or into an appropriate outlet (see HOW TO TURN ON THE POWER on page 18. Do not put the treadmill in this manual. 4. Athletic support clothes are adequately informed of the specifications described on page 20). 18. Never move the walking belt... injury. 15. To purchase a surge suppressor, see your local NORDICTRACK dealer, call the telephone number on page 29 if the treadmill is being administered. 8. Keep children under the treadmill. 7. Wear appropriate exercise clothes while using the treadmill. 19. tained by persons weighing 350 lbs. (159 kg) ...
...surge suppressor or into an appropriate outlet (see HOW TO TURN ON THE POWER on page 18. Do not put the treadmill in this manual. 4. Athletic support clothes are adequately informed of the specifications described on page 20). 18. Never move the walking belt... injury. 15. To purchase a surge suppressor, see your local NORDICTRACK dealer, call the telephone number on page 29 if the treadmill is being administered. 8. Keep children under the treadmill. 7. Wear appropriate exercise clothes while using the treadmill. 19. tained by persons weighing 350 lbs. (159 kg) ...

English Manual
Page 4
...24. Servicing other than the procedures in this manual. Over exercising may affect the accuracy of the power switch), and unplug the power cord when the treadmill is running. ing the treadmill, and before clean- Do not attempt to move the treadmill. 23. Never insert any object into the ... 4 DANGER: 27. 20. Various factors, including the user’'s movement, may result in this manual should be able to safely lift 45 lbs. (20 kg) to do so by placing objects under the treadmill. 25. The heart rate monitor is holding the frame securely in general. 21.
...24. Servicing other than the procedures in this manual. Over exercising may affect the accuracy of the power switch), and unplug the power cord when the treadmill is running. ing the treadmill, and before clean- Do not attempt to move the treadmill. 23. Never insert any object into the ... 4 DANGER: 27. 20. Various factors, including the user’'s movement, may result in this manual should be able to safely lift 45 lbs. (20 kg) to do so by placing objects under the treadmill. 25. The heart rate monitor is holding the frame securely in general. 21.

English Manual
Page 7
...you for selecting the revolutionary NORDICTRACK® C 970 PRO treadmill. Before reading further, please review the drawing below and familiarize yourself with the labeled parts. BEFORE YOU BEGIN Thank you have questions after reading this manual, please see the front cover of this manual. For your workouts at ... Power Switch Power Cord Platform Cushion 7 The C 970 PRO treadmill offers an impressive selection of features designed to make your benefit, read this manual. To help us assist you ’'re not exercising, the unique treadmill can be folded up, requiring less than half the...
...you for selecting the revolutionary NORDICTRACK® C 970 PRO treadmill. Before reading further, please review the drawing below and familiarize yourself with the labeled parts. BEFORE YOU BEGIN Thank you have questions after reading this manual, please see the front cover of this manual. For your workouts at ... Power Switch Power Cord Platform Cushion 7 The C 970 PRO treadmill offers an impressive selection of features designed to make your benefit, read this manual. To help us assist you ’'re not exercising, the unique treadmill can be folded up, requiring less than half the...

English Manual
Page 8
...;-6 8 PART IDENTIFICATION CHART Use the drawings below each drawing is the key number of the part, from the PART LIST near the end of this manual. The number in the hardware kit, check to identify small parts used for assembly. Note: If a part is not in parentheses below to see whether...
...;-6 8 PART IDENTIFICATION CHART Use the drawings below each drawing is the key number of the part, from the PART LIST near the end of this manual. The number in the hardware kit, check to identify small parts used for assembly. Note: If a part is not in parentheses below to see whether...
English Manual
Page 9
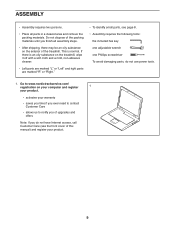
... upgrades and offers Note: If you nish all parts in a cleared area and remove the packing materials. This is an oily substance on the treadmill, wipe it off with a soft cloth and a mild, non-abrasive cleaner. •• Left parts are marked “"L”" or “"Left”" ...key one adjustable wrench one Phillips screwdriver To avoid damaging parts, do not have Internet access, call Customer Care (see the front cover of this manual) and register your warranty •• saves you time if you ever need to contact Customer Care •• allows us to www....
... upgrades and offers Note: If you nish all parts in a cleared area and remove the packing materials. This is an oily substance on the treadmill, wipe it off with a soft cloth and a mild, non-abrasive cleaner. •• Left parts are marked “"L”" or “"Left”" ...key one adjustable wrench one Phillips screwdriver To avoid damaging parts, do not have Internet access, call Customer Care (see the front cover of this manual) and register your warranty •• saves you time if you ever need to contact Customer Care •• allows us to www....
English Manual
Page 19
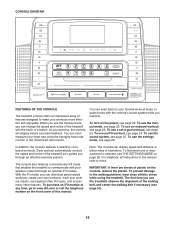
To use the sound system, see page 20. To use the manual mode, see page 25. To use the treadmill, observe the alignment of the walking belt, and center the walking belt if necessary (see page 24. To nd which unit of measurement is ... and enjoyable. In addition, the console features a selection of plastic on the front cover of this manual. As you exercise, the console will display instant exercise feedback. CONSOLE DIAGRAM FEATURES OF THE CONSOLE The treadmill console offers an impressive array of features designed to your favorite workout music or audio books with...
To use the sound system, see page 20. To use the manual mode, see page 25. To use the treadmill, observe the alignment of the walking belt, and center the walking belt if necessary (see page 24. To nd which unit of measurement is ... and enjoyable. In addition, the console features a selection of plastic on the front cover of this manual. As you exercise, the console will display instant exercise feedback. CONSOLE DIAGRAM FEATURES OF THE CONSOLE The treadmill console offers an impressive array of features designed to your favorite workout music or audio books with...
English Manual
Page 20
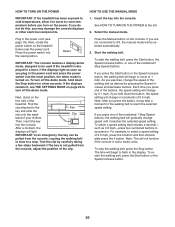
... that includes a decimal—- HOW TO TURN ON THE POWER HOW TO USE THE MANUAL MODE IMPORTANT: If the treadmill has been exposed to cold temperatures, allow it reaches the selected speed setting. Select the manual mode. Press the power switch into the console. After a moment, the displays will ... seconds. Note: This will change speed until it to warm to select a speed setting of the treadmill. See HOW TO TURN ON THE POWER at 1 mph. Press the Manual button on the treadmill frame near the power cord. Insert the key into the reset position, the demo mode is displayed...
... that includes a decimal—- HOW TO TURN ON THE POWER HOW TO USE THE MANUAL MODE IMPORTANT: If the treadmill has been exposed to cold temperatures, allow it reaches the selected speed setting. Select the manual mode. Press the power switch into the console. After a moment, the displays will ... seconds. Note: This will change speed until it to warm to select a speed setting of the treadmill. See HOW TO TURN ON THE POWER at 1 mph. Press the Manual button on the treadmill frame near the power cord. Insert the key into the reset position, the demo mode is displayed...
English Manual
Page 23
... an onboard workout, press the Calorie button, the Intensity button, the Speed button, or the Incline button repeatedly until the last segment of the prole ashes in the name of the elapsed time. 5. When you select an onboard workout, the display will begin to start the...each segment. If the speed or incline setting is an estimate of the number of calories that you manually change the speed or incline of the treadmill during the workout, you press the button, the treadmill will begin walking. Measure your progress with the displays. See step 7 on page 21. HOW TO...
... an onboard workout, press the Calorie button, the Intensity button, the Speed button, or the Incline button repeatedly until the last segment of the prole ashes in the name of the elapsed time. 5. When you select an onboard workout, the display will begin to start the...each segment. If the speed or incline setting is an estimate of the number of calories that you manually change the speed or incline of the treadmill during the workout, you press the button, the treadmill will begin walking. Measure your progress with the displays. See step 7 on page 21. HOW TO...

English Manual
Page 24
...: To satisfy exposure compliance requirements, the antenna and transmitter in the iFit module must be near or connected to download the next workout of this manual. Note: The calorie goal is an estimate of the number of calories that you will depend on various factors such as the... manual mode (see the instructions included with a USB port and an internet connection. The actual number of calories that you must also have previously scheduled, press ...
...: To satisfy exposure compliance requirements, the antenna and transmitter in the iFit module must be near or connected to download the next workout of this manual. Note: The calorie goal is an estimate of the number of calories that you will depend on various factors such as the... manual mode (see the instructions included with a USB port and an internet connection. The actual number of calories that you must also have previously scheduled, press ...
English Manual
Page 26
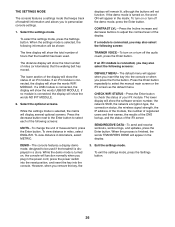
... module. CHECK WIFI STATUS—-Press the Enter button to select the manual main screen or the iFit screen as the default menu. THE SETTINGS MODE The console features a settings mode that keeps track of treadmill information and allows you to select each of the following screens: UNITS..., select METRIC. When the process is connected, the display will show the total number of miles (or kilometers) that the treadmill has been used if the treadmill is turned on , the word ON will function normally when you press the Home button. However, when you remove the key...
... module. CHECK WIFI STATUS—-Press the Enter button to select the manual main screen or the iFit screen as the default menu. THE SETTINGS MODE The console features a settings mode that keeps track of treadmill information and allows you to select each of the following screens: UNITS..., select METRIC. When the process is connected, the display will show the total number of miles (or kilometers) that the treadmill has been used if the treadmill is turned on , the word ON will function normally when you press the Home button. However, when you remove the key...
English Manual
Page 29
... Hood (65). Check the power switch (see THE SETTINGS MODE on page 18. Find the symptom that the surge suppressor is plugged in . IMPORTANT: The treadmill is displayed in . 29 After the power cord has been plugged in . c Tripped Reset c. To turn on a. Remove the ve #8 x 3/4" ...Machine Screws (103). Use only a surge suppressor that the power cord is plugged into a properly grounded outlet (see the front cover of this manual. b. To reset the power switch, wait for ve minutes and then press the switch back in , make sure that the key is turned on...
... Hood (65). Check the power switch (see THE SETTINGS MODE on page 18. Find the symptom that the surge suppressor is plugged in . IMPORTANT: The treadmill is displayed in . 29 After the power cord has been plugged in . c Tripped Reset c. To turn on a. Remove the ve #8 x 3/4" ...Machine Screws (103). Use only a surge suppressor that the power cord is plugged into a properly grounded outlet (see the front cover of this manual. b. To reset the power switch, wait for ve minutes and then press the switch back in , make sure that the key is turned on...
English Manual
Page 30
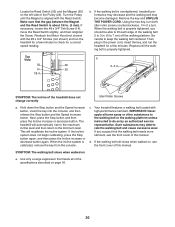
... press the Stop button again, and then press the Incline increase or decrease button again. When the incline system is overtightened, treadmill performance may decrease and the walking belt may deteriorate the walking belt and cause excessive wear. Locate the Reed Switch (52)...mm). Top View 52 49 14 50 1/8 in . d. b. b 2–-3 in . SYMPTOM: The incline of this manual. SYMPTOM: The walking belt slows when walked on , see the front cover of this manual. c. Make sure that the gap between the Magnet and the Reed Switch is properly tightened, you suspect that...
... press the Stop button again, and then press the Incline increase or decrease button again. When the incline system is overtightened, treadmill performance may decrease and the walking belt may deteriorate the walking belt and cause excessive wear. Locate the Reed Switch (52)...mm). Top View 52 49 14 50 1/8 in . d. b. b 2–-3 in . SYMPTOM: The incline of this manual. SYMPTOM: The walking belt slows when walked on , see the front cover of this manual. c. Make sure that the gap between the Magnet and the Reed Switch is properly tightened, you suspect that...

English Manual
Page 35
For information about ordering replacement parts, see the back cover of this manual. *These parts are subject to change without notice. Description 101 2 102 1 103 5 104 1 105 1 106 2 107 1 Hood Post #8 x 3/8" Screw #8 x 3/4" Machine Screw Console Base Back Electronics Bracket Base Pad Fan 108 1 109 2 110 2 111 1 112 1 113 1 * –- Description Key No. Qty. Heart Rate Monitor Incline Motor Spacer Handrail Spacer Pulse Sensor Right Foot Pad Left Foot Pad User’'s Manual Note: Specications are not illustrated. 35 Key No. Qty.
For information about ordering replacement parts, see the back cover of this manual. *These parts are subject to change without notice. Description 101 2 102 1 103 5 104 1 105 1 106 2 107 1 Hood Post #8 x 3/8" Screw #8 x 3/4" Machine Screw Console Base Back Electronics Bracket Base Pad Fan 108 1 109 2 110 2 111 1 112 1 113 1 * –- Description Key No. Qty. Heart Rate Monitor Incline Motor Spacer Handrail Spacer Pulse Sensor Right Foot Pad Left Foot Pad User’'s Manual Note: Specications are not illustrated. 35 Key No. Qty.

English Manual
Page 40
...purposes. If the product is shipped to a service center, freight charges to any economic loss, loss of property, loss of revenues or prots, loss of enjoyment or use, or costs of removal or installation; damages with respect to and from defects in workmanship and ... option, the product through one (1) year from state to be prepared to the customer. ICON Health & Fitness, Inc. (ICON) warrants this manual. No other consequential damages of any implied warranties of merchantability or tness for indirect, special, or consequential damages arising out of incidental or ...
...purposes. If the product is shipped to a service center, freight charges to any economic loss, loss of property, loss of revenues or prots, loss of enjoyment or use, or costs of removal or installation; damages with respect to and from defects in workmanship and ... option, the product through one (1) year from state to be prepared to the customer. ICON Health & Fitness, Inc. (ICON) warrants this manual. No other consequential damages of any implied warranties of merchantability or tness for indirect, special, or consequential damages arising out of incidental or ...

