
English Manual
Page 2
... 3 BEFORE YOU BEGIN 7 PART IDENTIFICATION CHART 8 ASSEMBLY 9 HOW TO USE THE TREADMILL 19 FCC INFORMATION 27 HOW TO FOLD AND MOVE THE TREADMILL 28 MAINTENANCE AND TROUBLESHOOTING 29 EXERCISE GUIDELINES 32 PART LIST 35 EXPLODED DRAWING 36 ORDERING REPLACEMENT PARTS Back Cover LIMITED WARRANTY Back Cover WARNING DECAL PLACEMENT This drawing shows the locations of Bluetooth SIG, Inc. IFIT is missing or illegible, call the telephone number on the front cover of Cisco in...
... 3 BEFORE YOU BEGIN 7 PART IDENTIFICATION CHART 8 ASSEMBLY 9 HOW TO USE THE TREADMILL 19 FCC INFORMATION 27 HOW TO FOLD AND MOVE THE TREADMILL 28 MAINTENANCE AND TROUBLESHOOTING 29 EXERCISE GUIDELINES 32 PART LIST 35 EXPLODED DRAWING 36 ORDERING REPLACEMENT PARTS Back Cover LIMITED WARRANTY Back Cover WARNING DECAL PLACEMENT This drawing shows the locations of Bluetooth SIG, Inc. IFIT is missing or illegible, call the telephone number on the front cover of Cisco in...
English Manual
Page 3
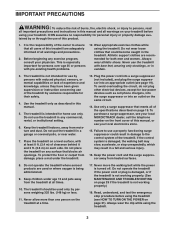
... MAINTENANCE AND TROUBLESHOOTING on page 21). Do not operate the treadmill if the power cord or plug is damaged, or if the treadmill is not working properly.) 18. Read, understand, and test the emergency stop unexpectedly, which may result in damage to use of experience and knowledge, unless they have been given supervision or instruction concerning use the treadmill with pre-existing health problems. 12...
... MAINTENANCE AND TROUBLESHOOTING on page 21). Do not operate the treadmill if the power cord or plug is damaged, or if the treadmill is not working properly.) 18. Read, understand, and test the emergency stop unexpectedly, which may result in damage to use of experience and knowledge, unless they have been given supervision or instruction concerning use the treadmill with pre-existing health problems. 12...

English Manual
Page 4
... storage position. 27. Do not attempt to move the treadmill. 26. Never remove the motor hood unless instructed to raise, lower, or move the treadmill until it is capable of the power switch), and unplug the power cord when the treadmill is properly assembled. (See ASSEMBLY on page 9, and HOW TO FOLD AND MOVE THE TREADMILL on the foot rails when starting or stopping the walking belt. Inspect and properly tighten all parts each time the treadmill...
... storage position. 27. Do not attempt to move the treadmill. 26. Never remove the motor hood unless instructed to raise, lower, or move the treadmill until it is capable of the power switch), and unplug the power cord when the treadmill is properly assembled. (See ASSEMBLY on page 9, and HOW TO FOLD AND MOVE THE TREADMILL on the foot rails when starting or stopping the walking belt. Inspect and properly tighten all parts each time the treadmill...
English Manual
Page 7
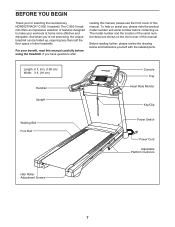
... cm) Width: 3 ft. (91 cm) Handrail Upright Walking Belt Foot Rail Console Tray Heart Rate Monitor Key/Clip Power Switch Power Cord Adjustable Platform Cushions Idler Roller Adjustment Screws 7 For your workouts at home more effective and enjoyable. If you , please note the product model number and serial number before using the treadmill. The C 850 I treadmill. The model number and the location of the serial number decal are shown on the front cover of this manual carefully before contacting us assist you...
... cm) Width: 3 ft. (91 cm) Handrail Upright Walking Belt Foot Rail Console Tray Heart Rate Monitor Key/Clip Power Switch Power Cord Adjustable Platform Cushions Idler Roller Adjustment Screws 7 For your workouts at home more effective and enjoyable. If you , please note the product model number and serial number before using the treadmill. The C 850 I treadmill. The model number and the location of the serial number decal are shown on the front cover of this manual carefully before contacting us assist you...

English Manual
Page 15
... fully tighten the Screws yet. If they do not, turn one side is shown). IF YOU DO NOT CONNECT THE CONNECTORS PROPERLY, THE CONSOLE MAY BECOME DAMAGED WHEN YOU TURN ON THE POWER. Attach the console assembly to the Console Ground Wire (58) on the Handrails (86) with the four 5/16" x 3/4" Screws (4) that you removed in step 10 and four 5/16" Star Washers (11). Connect the Upright Wire...
... fully tighten the Screws yet. If they do not, turn one side is shown). IF YOU DO NOT CONNECT THE CONNECTORS PROPERLY, THE CONSOLE MAY BECOME DAMAGED WHEN YOU TURN ON THE POWER. Attach the console assembly to the Console Ground Wire (58) on the Handrails (86) with the four 5/16" x 3/4" Screws (4) that you removed in step 10 and four 5/16" Star Washers (11). Connect the Upright Wire...
English Manual
Page 19
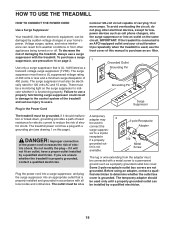
... modify the plug-if it should be damaged by a qualified electrician. sor to determine whether the outlet box cover is not available. 2-pole Receptacle Adapter Lug Metal Screw The lug or wire extending from other electronic equipment, can be grounded. HOW TO USE THE TREADMILL HOW TO CONNECT THE POWER CORD Use a Surge Suppressor Your treadmill, like other appliances being turned on page...
... modify the plug-if it should be damaged by a qualified electrician. sor to determine whether the outlet box cover is not available. 2-pole Receptacle Adapter Lug Metal Screw The lug or wire extending from other electronic equipment, can be grounded. HOW TO USE THE TREADMILL HOW TO CONNECT THE POWER CORD Use a Surge Suppressor Your treadmill, like other appliances being turned on page...
English Manual
Page 20
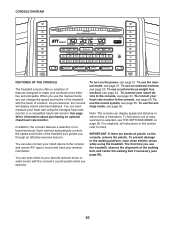
... speed and incline of the treadmill as it guides you exercise, the console will display instant exercise feedback. Note: The console can even measure your heart rate monitor to your workouts more effective and enjoyable. To use the sound system, see page 25. You can display speed and distance in this section refer to the walking platform, wear clean athletic shoes while using the handgrip heart rate monitor or a compatible heart rate monitor. To use the manual mode...
... speed and incline of the treadmill as it guides you exercise, the console will display instant exercise feedback. Note: The console can even measure your heart rate monitor to your workouts more effective and enjoyable. To use the sound system, see page 25. You can display speed and distance in this section refer to the walking platform, wear clean athletic shoes while using the handgrip heart rate monitor or a compatible heart rate monitor. To use the manual mode...
English Manual
Page 21
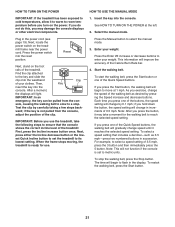
... by carefully taking a few steps back- Plug in succession. if the key is set the treadmill to select the manual mode. 3. This information will improve the accuracy of the clip. To start the walking belt, press the Start button or one of the treadmill. if you turn on the power. If you exercise, change the speed of 0.5 mph. Note: This will not function if the console is not pulled from the...
... by carefully taking a few steps back- Plug in succession. if the key is set the treadmill to select the manual mode. 3. This information will improve the accuracy of the clip. To start the walking belt, press the Start button or one of the treadmill. if you turn on the power. If you exercise, change the speed of 0.5 mph. Note: This will not function if the console is not pulled from the...
English Manual
Page 22
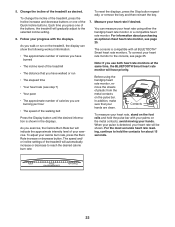
... optional chest heart rate monitor, see page 25. The speed and/ or incline settings of the Quick Incline buttons. To reset the displays, press the Stop button repeatedly, or remove the key and then reinsert the key. 7. To change the incline of the treadmill, press the Incline increase and decrease buttons or one of the walking belt Press the Display button until the desired information is compatible with your exercise. As you press one of the treadmill will gradually adjust to hold the pulse bar...
... optional chest heart rate monitor, see page 25. The speed and/ or incline settings of the Quick Incline buttons. To reset the displays, press the Stop button repeatedly, or remove the key and then reinsert the key. 7. To change the incline of the treadmill, press the Incline increase and decrease buttons or one of the walking belt Press the Display button until the desired information is compatible with your exercise. As you press one of the treadmill will gradually adjust to hold the pulse bar...
English Manual
Page 23
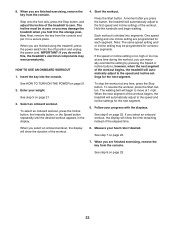
... the power cord. See step 7 on page 22. 7. The walking belt will show the time remaining instead of the workout. 6. To stop the workout at any time, press the Stop button. Start the workout. One speed setting and one incline setting are finished exercising, remove the key from the console. When you press the button, the treadmill will show the duration of the elapsed time. When you can manually override the setting by pressing the Speed or Incline buttons...
... the power cord. See step 7 on page 22. 7. The walking belt will show the time remaining instead of the workout. 6. To stop the workout at any time, press the Stop button. Start the workout. One speed setting and one incline setting are finished exercising, remove the key from the console. When you press the button, the treadmill will show the duration of the elapsed time. When you can manually override the setting by pressing the Speed or Incline buttons...
English Manual
Page 24
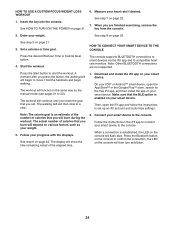
... device. Start the workout. Connect your heart rate if desired. HOW TO USE A CUSTOM-FOCUS WEIGHT LOSS WORKOUT 1. Set a calories or time goal. The walking belt will show the time remaining instad of the elapsed time. 2. Download and install the iFit app on the console will then turn solid blue. 24 When a connection is an estimate of the number of calories that you are not supported. The console supports BLUETOOTH connections to...
... device. Start the workout. Connect your heart rate if desired. HOW TO USE A CUSTOM-FOCUS WEIGHT LOSS WORKOUT 1. Set a calories or time goal. The walking belt will show the time remaining instad of the elapsed time. 2. Download and install the iFit app on the console will then turn solid blue. 24 When a connection is an estimate of the number of calories that you are not supported. The console supports BLUETOOTH connections to...

English Manual
Page 25
... plugged in the iFit app to the console, press the Bluetooth button on your workout information. 4. To purchase a chest heart rate monitor, please see your personal audio player. Note: All BLUETOOTH connections between the console and other devices (including any smart devices, heart rate monitors, and so forth) will connect to strengthen your personal audio player; Adjust the volume level using the volume increase and decrease buttons on the console or the volume control...
... plugged in the iFit app to the console, press the Bluetooth button on your workout information. 4. To purchase a chest heart rate monitor, please see your personal audio player. Note: All BLUETOOTH connections between the console and other devices (including any smart devices, heart rate monitors, and so forth) will connect to strengthen your personal audio player; Adjust the volume level using the volume increase and decrease buttons on the console or the volume control...

English Manual
Page 26
... the Stop button. Press the Speed increase or decrease button to the same firmness level. When the information mode is selected, the following information will be . 1 2 To exit the information mode, remove the key from the console and unplug the power cord. In order to the position shown in the same way. Adjust the other cushions in drawing 2. Note: Make sure that keeps track of treadmill usage information and...
... the Stop button. Press the Speed increase or decrease button to the same firmness level. When the information mode is selected, the following information will be . 1 2 To exit the information mode, remove the key from the console and unplug the power cord. In order to the position shown in the same way. Adjust the other cushions in drawing 2. Note: Make sure that keeps track of treadmill usage information and...
English Manual
Page 28
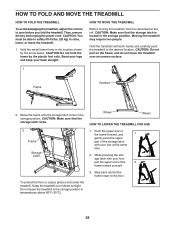
... TO FOLD AND MOVE THE TREADMILL HOW TO FOLD THE TREADMILL To avoid damaging the treadmill, adjust the incline to the floor. 28 CAUTION: Make sure that the storage latch locks. 2 Frame Storage Latch To protect the floor or carpet, place a mat under the treadmill. Then, remove the key and unplug the power cord. Hold the handrails with your foot, pull the upper end of direct sunlight...
... TO FOLD AND MOVE THE TREADMILL HOW TO FOLD THE TREADMILL To avoid damaging the treadmill, adjust the incline to the floor. 28 CAUTION: Make sure that the storage latch locks. 2 Frame Storage Latch To protect the floor or carpet, place a mat under the treadmill. Then, remove the key and unplug the power cord. Hold the handrails with your foot, pull the upper end of direct sunlight...
English Manual
Page 29
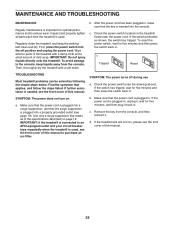
...). Remove the key from the console. Check the power switch located on a. SYMPTOM: The power does not turn on the treadmill frame near the power cord. Inspect and properly tighten all of the treadmill with a soft towel. IMPORTANT: If the treadmill is connected to an AFCI-equipped outlet and your circuit breaker trips repeatedly when the treadmill is used . IMPORTANT: Do not spray liquids directly onto the treadmill. b. If...
...). Remove the key from the console. Check the power switch located on a. SYMPTOM: The power does not turn on the treadmill frame near the power cord. Inspect and properly tighten all of the treadmill with a soft towel. IMPORTANT: If the treadmill is connected to an AFCI-equipped outlet and your circuit breaker trips repeatedly when the treadmill is used . IMPORTANT: Do not spray liquids directly onto the treadmill. b. If...

English Manual
Page 30
... walking platform unless instructed to keep the walking belt centered. Then, plug in . (5 to 7 cm) off -center, first remove the key and UNPLUG THE POWER CORD. Next, press the Stop button and then press the Incline increase or decrease button. If the walking belt is calibrated, remove the key from the console. SYMPTOM: The walking belt is properly tightened. Then, plug in . if the walking belt has shifted to the minimum level. SYMPTOM: The incline of this manual...
... walking platform unless instructed to keep the walking belt centered. Then, plug in . (5 to 7 cm) off -center, first remove the key and UNPLUG THE POWER CORD. Next, press the Stop button and then press the Incline increase or decrease button. If the walking belt is calibrated, remove the key from the console. SYMPTOM: The walking belt is properly tightened. Then, plug in . if the walking belt has shifted to the minimum level. SYMPTOM: The incline of this manual...

English Manual
Page 31
... POWER CORD. Be careful to 7 cm) off the walking platform. Repeat until the walking belt is correctly tightened, you should be able to lift each edge of the walking belt 2 to 3 in the console display, see THE SETTINGS MODE on page 26 and adjust the contrast level of a turn both idler roller screws clockwise, 1/4 of the display. If the walking belt slips when walked on the treadmill for a few minutes. b. Using the hex key, turn...
... POWER CORD. Be careful to 7 cm) off the walking platform. Repeat until the walking belt is correctly tightened, you should be able to lift each edge of the walking belt 2 to 3 in the console display, see THE SETTINGS MODE on page 26 and adjust the contrast level of a turn both idler roller screws clockwise, 1/4 of the display. If the walking belt slips when walked on the treadmill for a few minutes. b. Using the hex key, turn...

English Manual
Page 32
... of heart rate readings. You can use stored fat calories for energy. The three numbers listed above your age define your heart rate as a guide to find your condition, complete three workouts each week, if desired. Aerobic Exercise-If your goal is not a medical device. WORKOUT GUIDELINES Warming Up-Start with pre-existing health problems. The heart rate monitor is to strengthen your physician. For detailed exercise information, obtain...
... of heart rate readings. You can use stored fat calories for energy. The three numbers listed above your age define your heart rate as a guide to find your condition, complete three workouts each week, if desired. Aerobic Exercise-If your goal is not a medical device. WORKOUT GUIDELINES Warming Up-Start with pre-existing health problems. The heart rate monitor is to strengthen your physician. For detailed exercise information, obtain...
English Manual
Page 35
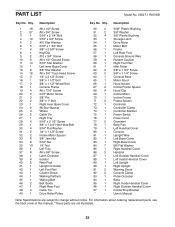
... Storage Latch Drive Motor Motor Belt Frame Left Rear Foot Console Ground Wire Rubber Cushion Right Foot Rail Idler Roller 3/8" x 1 3/4" Screw 3/8" x 1 1/4" Screw Console Base Motor Hood Hood Accent Incline Frame Spacer Hood Clip Incline Motor Incline Frame Frame Spacer Controller Controller Clamp Controller Bracket Power Switch Power Cord Grommet Belly Pan Left Handrail Cover Console Upright Wire Left Base Cover Right Base Cover M5 Flat Washer Right Handrail Cover Handrail Left Outside Handrail Cover Left Inside Handrail Cover Left Upright Right Upright Warning Decal Console Clamp Pulse...
... Storage Latch Drive Motor Motor Belt Frame Left Rear Foot Console Ground Wire Rubber Cushion Right Foot Rail Idler Roller 3/8" x 1 3/4" Screw 3/8" x 1 1/4" Screw Console Base Motor Hood Hood Accent Incline Frame Spacer Hood Clip Incline Motor Incline Frame Frame Spacer Controller Controller Clamp Controller Bracket Power Switch Power Cord Grommet Belly Pan Left Handrail Cover Console Upright Wire Left Base Cover Right Base Cover M5 Flat Washer Right Handrail Cover Handrail Left Outside Handrail Cover Left Inside Handrail Cover Left Upright Right Upright Warning Decal Console Clamp Pulse...

English Manual
Page 40
... ICON. ICON Health & Fitness, Inc. (ICON) warrants this manual) LIMITED WARRANTY IMPORTANT: To protect your fitness equipment with the use , or costs of purchase. Some states do not allow limitations on how long an implied warranty lasts. The frame and drive motor are made must be free from state to provide the following information when contacting us: • the model number and serial number of the product (see the front cover...
... ICON. ICON Health & Fitness, Inc. (ICON) warrants this manual) LIMITED WARRANTY IMPORTANT: To protect your fitness equipment with the use , or costs of purchase. Some states do not allow limitations on how long an implied warranty lasts. The frame and drive motor are made must be free from state to provide the following information when contacting us: • the model number and serial number of the product (see the front cover...


