

English Manual
Page 3
.... 7. Adjust the speed in small increments to raise, lower, or move the treadmill until it is not in general. 18. Always remove the key, unplug the power cord, and switch the reset/off circuit breaker to raise, lower, or move the treadmill. 20. Do not attempt to the off position when the treadmill is properly assembled. (See ASSEMBLY on page 6, and HOW TO FOLD AND MOVE THE TREADMILL on the walking belt...
.... 7. Adjust the speed in small increments to raise, lower, or move the treadmill until it is not in general. 18. Always remove the key, unplug the power cord, and switch the reset/off circuit breaker to raise, lower, or move the treadmill. 20. Do not attempt to the off position when the treadmill is properly assembled. (See ASSEMBLY on page 6, and HOW TO FOLD AND MOVE THE TREADMILL on the walking belt...

English Manual
Page 4
... you when the speed and/or incline of this manual should be performed by pressing the speed and incline buttons. Inspect and properly tighten all parts of 35 or persons with pre-existing health problems. Read all instructions before using iFIT.com CDs and videos, you can manually override the speed and incline settings by an authorized service representative only. 28. Do not use the treadmill in any exercise program, consult your treadmill and on...
... you when the speed and/or incline of this manual should be performed by pressing the speed and incline buttons. Inspect and properly tighten all parts of 35 or persons with pre-existing health problems. Read all instructions before using iFIT.com CDs and videos, you can manually override the speed and incline settings by an authorized service representative only. 28. Do not use the treadmill in any exercise program, consult your treadmill and on...

English Manual
Page 5
... Handrail Latch Knob Upper Handrail Aromatherapy Bottle Holder Console Pulse Sensor Key/Clip RIGHT SIDE Walking Belt Foot Rail Rear Roller Adjustment Bolts Reset/Off Circuit Breaker Power Cord Cushion Adjustment Knob Cushioned Walking Platform *No water bottle is NTL12940. For your home. Mountain Time (excluding holidays). Before reading further, please familiarize yourself with innovative design to help us assist you 're not exercising, the unique C2300 treadmill can be folded up...
... Handrail Latch Knob Upper Handrail Aromatherapy Bottle Holder Console Pulse Sensor Key/Clip RIGHT SIDE Walking Belt Foot Rail Rear Roller Adjustment Bolts Reset/Off Circuit Breaker Power Cord Cushion Adjustment Knob Cushioned Walking Platform *No water bottle is NTL12940. For your home. Mountain Time (excluding holidays). Before reading further, please familiarize yourself with innovative design to help us assist you 're not exercising, the unique C2300 treadmill can be folded up...
English Manual
Page 7
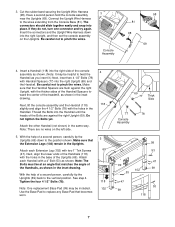
... Extension Leg (102) with the holes in the Uprights. 3. Be careful not to pinch the wires. See step 4. Attach the other Handrail (not shown) in the inset drawing. Note: One replacement Base Pad (99) may be included. Cut the rubber band securing the Upright Wire Harness (98). Have a second person hold the console assembly 3 near the Uprights (69). Do not tighten the Bolts...
... Extension Leg (102) with the holes in the Uprights. 3. Be careful not to pinch the wires. See step 4. Attach the other Handrail (not shown) in the inset drawing. Note: One replacement Base Pad (99) may be included. Cut the rubber band securing the Upright Wire Harness (98). Have a second person hold the console assembly 3 near the Uprights (69). Do not tighten the Bolts...

English Manual
Page 8
... each screw was removed from which they were removed. Connect the other wires included with two 3" Bolts (125) and two Handrail Washers (124). Use the included wire tie to install the receiver and the short jumper wire included with the chest pulse sensor. Reattach the Console (82), making sure that the power cord is used to adjust the walking belt (see page 24), follow the steps below to secure the wires, if needed.
... each screw was removed from which they were removed. Connect the other wires included with two 3" Bolts (125) and two Handrail Washers (124). Use the included wire tie to install the receiver and the short jumper wire included with the chest pulse sensor. Reattach the Console (82), making sure that the power cord is used to adjust the walking belt (see page 24), follow the steps below to secure the wires, if needed.

English Manual
Page 9
.... HOW TO PLUG IN THE POWER CORD DANGER: Improper connection of the equipment-grounding conductor can result from weather conditions or from the adapter must have a proper outlet installed by a metal screw. Failure to use a properly functioning surge suppressor could result in doubt as a transient voltage surge suppressor (TVSS). OPERATION AND ADJUSTMENT THE PERFORMANT LUBETM WALKING BELT Your treadmill features a walking belt coated with...
.... HOW TO PLUG IN THE POWER CORD DANGER: Improper connection of the equipment-grounding conductor can result from weather conditions or from the adapter must have a proper outlet installed by a metal screw. Failure to use a properly functioning surge suppressor could result in doubt as a transient voltage surge suppressor (TVSS). OPERATION AND ADJUSTMENT THE PERFORMANT LUBETM WALKING BELT Your treadmill features a walking belt coated with...

English Manual
Page 10
... programs directly from your heart rate near a target level while you get the most from the internet. With the treadmill connected to your computer, you exercise, the console will provide continuous exercise feedback. In addition, the console offers two heart rate programs that automatically adjust the speed and incline of your home. Having iFIT.com technology is like having a To use a heart rate program, see page 24. To use the manual mode of the optional chest pulse sensor...
... programs directly from your heart rate near a target level while you get the most from the internet. With the treadmill connected to your computer, you exercise, the console will provide continuous exercise feedback. In addition, the console offers two heart rate programs that automatically adjust the speed and incline of your home. Having iFIT.com technology is like having a To use a heart rate program, see page 24. To use the manual mode of the optional chest pulse sensor...

English Manual
Page 11
... program display but the indicator above the iFIT.com button is not pulled from the console, adjust the position of the clip as an exercise aid in determining heart rate trends in either miles or kilometers. The pulse sensor is pressed, the walking belt will begin to the waistband of your clothes. Test the clip by 0.1 mph; Then, remove the key from the console. If the Start button or the Speed + button...
... program display but the indicator above the iFIT.com button is not pulled from the console, adjust the position of the clip as an exercise aid in determining heart rate trends in either miles or kilometers. The pulse sensor is pressed, the walking belt will begin to the waistband of your clothes. Test the clip by 0.1 mph; Then, remove the key from the console. If the Start button or the Speed + button...

English Manual
Page 12
... chest pulse sensor is selected, the program display will also show your weight. Time/Pace display- Note: When the Km/H indicator below the Speed display is pressed, the incline will display speed and distance in kilometers; Note: For simplicity, all instructions in this display will display speed and distance in memory. 4 Change the incline of the treadmill as shown by the indicator below the display. Each time a button is lit, the console will change by 0.5%. The track...
... chest pulse sensor is selected, the program display will also show your weight. Time/Pace display- Note: When the Km/H indicator below the Speed display is pressed, the incline will display speed and distance in kilometers; Note: For simplicity, all instructions in this display will display speed and distance in memory. 4 Change the incline of the treadmill as shown by the indicator below the display. Each time a button is lit, the console will change by 0.5%. The track...

English Manual
Page 13
... To turn off the demo mode. Note: Any time that the walking belt is stopped for the program. 3 Press the Start button or the Speed + button to the storage position or the treadmill will be programmed for two or more consecutive segments.) The speed setting for the program. Each program is inserted, the manual mode will be shown in a secure place. To reset the displays, press the Stop button, remove the key, and then reinsert the key. 6 Measure your heart rate...
... To turn off the demo mode. Note: Any time that the walking belt is stopped for the program. 3 Press the Start button or the Speed + button to the storage position or the treadmill will be programmed for two or more consecutive segments.) The speed setting for the program. Each program is inserted, the manual mode will be shown in a secure place. To reset the displays, press the Stop button, remove the key, and then reinsert the key. 6 Measure your heart rate...

English Manual
Page 14
... "demo" mode. To restart the program, press the Start button or the Speed + button. When the first segment ends, all of the indicators in the Current Segment column are finished exercising, remove the key. See page 24 and turn off position and unplug the power cord. 14 If the speed and/or incline of the treadmill is about to change, the Speed display and/or the Incline/Heart Rate display will continue until the speed setting...
... "demo" mode. To restart the program, press the Start button or the Speed + button. When the first segment ends, all of the indicators in the Current Segment column are finished exercising, remove the key. See page 24 and turn off position and unplug the power cord. 14 If the speed and/or incline of the treadmill is about to change, the Speed display and/or the Incline/Heart Rate display will continue until the speed setting...

English Manual
Page 15
... step 6 on page 13. 6 Turn on page 14. 15 If more than three columns of indicators are finished with the displays. grammed for the first segment, simply adjust the speed and incline of the treadmill as desired by pressing the Speed and Incline buttons. When you are lit, see HOW TO USE CUSTOM PROGRAMS on page 12. 5 Measure your progress with your workout, press the Stop button...
... step 6 on page 13. 6 Turn on page 14. 15 If more than three columns of indicators are finished with the displays. grammed for the first segment, simply adjust the speed and incline of the treadmill as desired by pressing the Speed and Incline buttons. When you are lit, see HOW TO USE CUSTOM PROGRAMS on page 12. 5 Measure your progress with your workout, press the Stop button...

English Manual
Page 18
... in memory. 5 Adjust the maximum speed limit for the program (see the instructions included with the Speed or Incline buttons. If you are finished exercising, remove the key. If your pulse is too far below the current target heart rate setting, the incline of the treadmill may be stopped temporarily and then restarted. The program will flash in the Incline/Heart Rate display and the speed and incline of the treadmill will not start the program). However, each...
... in memory. 5 Adjust the maximum speed limit for the program (see the instructions included with the Speed or Incline buttons. If you are finished exercising, remove the key. If your pulse is too far below the current target heart rate setting, the incline of the treadmill may be stopped temporarily and then restarted. The program will flash in the Incline/Heart Rate display and the speed and incline of the treadmill will not start the program). However, each...

English Manual
Page 22
.... 7 Turn on page 13. 8 When you are finished exercising, remove the key. See step 5 on the console. • See the instructions near the bottom of the CD or video program. If the volume is too high or too low, the console may not detect the program signals. • Make sure that the audio cable is properly connected, that it is flashing, press the Start button or the Speed + button...
.... 7 Turn on page 13. 8 When you are finished exercising, remove the key. See step 5 on the console. • See the instructions near the bottom of the CD or video program. If the volume is too high or too low, the console may not detect the program signals. • Make sure that the audio cable is properly connected, that it is flashing, press the Start button or the Speed + button...

English Manual
Page 23
... walking belt will change when a "chirp" is heard, make sure that the audio cable is properly connected, that it is fully plugged in, and that the Time/Pace display is heard, the speed and incline will alert you must be connected to our Web site at any time, press the Stop button on the console. See step 7 on page 20. To use a program from our Web site, press the iFIT...
... walking belt will change when a "chirp" is heard, make sure that the audio cable is properly connected, that it is fully plugged in, and that the Time/Pace display is heard, the speed and incline will alert you must be connected to our Web site at any time, press the Stop button on the console. See step 7 on page 20. To use a program from our Web site, press the iFIT...

English Manual
Page 24
... in the Calories/Pulse display when the information mode is in the Speed display. To decrease the firmness, turn the adjustment knob counterclockwise. To purchase the optional chest pulse sensor, call toll-free 1-800-215-7403. THE INFORMATION MODE/DEMO MODE The console features an information mode that keeps track of the total number of miles that the walking belt has moved and the total number of hours that the treadmill has been used . The information mode also allows you run...
... in the Calories/Pulse display when the information mode is in the Speed display. To decrease the firmness, turn the adjustment knob counterclockwise. To purchase the optional chest pulse sensor, call toll-free 1-800-215-7403. THE INFORMATION MODE/DEMO MODE The console features an information mode that keeps track of the total number of miles that the walking belt has moved and the total number of hours that the treadmill has been used . The information mode also allows you run...

English Manual
Page 29
...-exercise problems. To measure your exercise program. WORKOUT GUIDELINES Each workout should include the following guidelines will help you must be found by using your training zone for aerobic exercise. Various factors, including your movement, may complete up increases your body temperature, heart rate and circulation in your age. The chart below shows recommended heart rates for fat burning; For maximum fat burning, adjust the speed and incline...
...-exercise problems. To measure your exercise program. WORKOUT GUIDELINES Each workout should include the following guidelines will help you must be found by using your training zone for aerobic exercise. Various factors, including your movement, may complete up increases your body temperature, heart rate and circulation in your age. The chart below shows recommended heart rates for fat burning; For maximum fat burning, adjust the speed and incline...

English Manual
Page 30
... 4 1/2" Bolt Upright Endcap Latch Assembly Console Base Console Screw Key/Clip iFIT.com Wire Jack Aromatherapy Kit Console Back Releaseable Tie Console Screw Cable Tie Clamp 8" Cable Tie Lift Pivot Bolt Wheel Bolt Wheel Rear Endcap (Left) Grommet Upright Wire Harness Base Pad 3/4" Screw 30 Bolt 2" Screw Roller Washer Latch Knob Spacer Incline Motor Incline Motor Stop Motor Belly Pan Audio Wire Nut Static Decal Console Ground Wire Power Cord Reset/Off Circuit Breaker Spring Bolt Belt Guide Screw Belt Guide 1" Tek Screw Motor Star Washer Platform Nut Spring Nut Key No. PART LIST-Model No...
... 4 1/2" Bolt Upright Endcap Latch Assembly Console Base Console Screw Key/Clip iFIT.com Wire Jack Aromatherapy Kit Console Back Releaseable Tie Console Screw Cable Tie Clamp 8" Cable Tie Lift Pivot Bolt Wheel Bolt Wheel Rear Endcap (Left) Grommet Upright Wire Harness Base Pad 3/4" Screw 30 Bolt 2" Screw Roller Washer Latch Knob Spacer Incline Motor Incline Motor Stop Motor Belly Pan Audio Wire Nut Static Decal Console Ground Wire Power Cord Reset/Off Circuit Breaker Spring Bolt Belt Guide Screw Belt Guide 1" Tek Screw Motor Star Washer Platform Nut Spring Nut Key No. PART LIST-Model No...

English Manual
Page 31
... Wire, F/Ring 10" Red Wire, M/F User's Manual *Includes all parts shown in box #These parts are not illustrated Specifications are subject to give the following information: • the MODEL NUMBER OF THE PRODUCT (NTL12940) • the NAME OF THE PRODUCT (NordicTrack® C2300 treadmill) • the SERIAL NUMBER OF THE PRODUCT (see the front cover of this manual) • the KEY NUMBER AND DESCRIPTION OF THE PART(S) (see the PART LIST...
... Wire, F/Ring 10" Red Wire, M/F User's Manual *Includes all parts shown in box #These parts are not illustrated Specifications are subject to give the following information: • the MODEL NUMBER OF THE PRODUCT (NTL12940) • the NAME OF THE PRODUCT (NordicTrack® C2300 treadmill) • the SERIAL NUMBER OF THE PRODUCT (see the front cover of this manual) • the KEY NUMBER AND DESCRIPTION OF THE PART(S) (see the PART LIST...

English Manual
Page 34
... IS COVERED-The entire NordicTrack® C2300 treadmill ("Product") is warranted to be free of all other warranties and any implied warranties of merchantability or fitness for a particular purpose is limited in its scope and duration to the terms set out in your User's Manual ("Manual"). HOW LONG IS IT COVERED-ICON Health & Fitness, Inc. ("ICON"), warrants the motor for three years after the date of purchase. The belt...
... IS COVERED-The entire NordicTrack® C2300 treadmill ("Product") is warranted to be free of all other warranties and any implied warranties of merchantability or fitness for a particular purpose is limited in its scope and duration to the terms set out in your User's Manual ("Manual"). HOW LONG IS IT COVERED-ICON Health & Fitness, Inc. ("ICON"), warrants the motor for three years after the date of purchase. The belt...


