

English Manual
Page 3
...page 9. When connecting the power cord (see your local NordicTrack dealer or call 1-888825-2588 and order part number 146148. 16. The treadmill is not a medical device. Adjust the speed in small increments to raise, lower, or move the walking belt while the power is fully closed. 3 The pulse sensor... is turned off circuit breaker.) 19. Always remove the key, unplug the power cord and move the treadmill until it and two feet on the walking belt. When folding or moving the treadmill, make sure that could result in sandals. 10. Always hold the handrails while using the...
...page 9. When connecting the power cord (see your local NordicTrack dealer or call 1-888825-2588 and order part number 146148. 16. The treadmill is not a medical device. Adjust the speed in small increments to raise, lower, or move the walking belt while the power is fully closed. 3 The pulse sensor... is turned off circuit breaker.) 19. Always remove the key, unplug the power cord and move the treadmill until it and two feet on the walking belt. When folding or moving the treadmill, make sure that could result in sandals. 10. Always hold the handrails while using the...

English Manual
Page 5
...the treadmill. Mountain Time (excluding holidays). The serial number can be found on a decal attached to help us assist you for the location). For your exercise program in the drawing below. Aromatherapy Bottle Holder Fan Handrail Book Holder Latch Knob Walking Belt Foot..., read this manual for selecting the revolutionary NordicTrack® C1900 treadmill. at 1-888-825-2588, Monday through Friday, 6 a.m. The C1900 treadmill combines advanced technology with the parts that are labeled in the convenience of the treadmill is included. 5 The model number of your...
...the treadmill. Mountain Time (excluding holidays). The serial number can be found on a decal attached to help us assist you for the location). For your exercise program in the drawing below. Aromatherapy Bottle Holder Fan Handrail Book Holder Latch Knob Walking Belt Foot..., read this manual for selecting the revolutionary NordicTrack® C1900 treadmill. at 1-888-825-2588, Monday through Friday, 6 a.m. The C1900 treadmill combines advanced technology with the parts that are labeled in the convenience of the treadmill is included. 5 The model number of your...

English Manual
Page 6
... 99 2. Insert one of the walking belt or the shipping carton. Remove the Latch Knob (68) from the Latch Pin (74). Make sure that the Extension Leg is turned so the Base Pad (99) is a normal condition and does not affect treadmill performance. See the inset drawing. ... coated with a soft cloth and a mild, non-abrasive cleaner. Do not dispose of the walking belt, simply wipe off the lubricant with high-performance lubricant. During shipping, a small amount of the treadmill walking belt is completed. Press the Latch Knob Sleeve (70) into the Latch Knob Sleeve (70) and...
... 99 2. Insert one of the walking belt or the shipping carton. Remove the Latch Knob (68) from the Latch Pin (74). Make sure that the Extension Leg is turned so the Base Pad (99) is a normal condition and does not affect treadmill performance. See the inset drawing. ... coated with a soft cloth and a mild, non-abrasive cleaner. Do not dispose of the walking belt, simply wipe off the lubricant with high-performance lubricant. During shipping, a small amount of the treadmill walking belt is completed. Press the Latch Knob Sleeve (70) into the Latch Knob Sleeve (70) and...

English Manual
Page 7
...) into the right Upright, and then set the console assembly on the left side. 69 77 Thick Side 77 78 Console Assembly 5. you use the treadmill. Note: The Bolts must be included. Tighten the four 4 1/2" Bolts (78). Have a second person hold the console assembly 3 near the Uprights (69). Attach...into place. Do not tighten the Bolts yet. Keep the included allen wrench in the inset drawing. 3. Use the Base Pad to adjust the walking belt (see page 26). With the help of the Bolts are no wires on the Uprights. Be careful not to the position shown. Cut the rubber...
...) into the right Upright, and then set the console assembly on the left side. 69 77 Thick Side 77 78 Console Assembly 5. you use the treadmill. Note: The Bolts must be included. Tighten the four 4 1/2" Bolts (78). Have a second person hold the console assembly 3 near the Uprights (69). Attach...into place. Do not tighten the Bolts yet. Keep the included allen wrench in the inset drawing. 3. Use the Base Pad to adjust the walking belt (see page 26). With the help of the Bolts are no wires on the Uprights. Be careful not to the position shown. Cut the rubber...
English Manual
Page 9
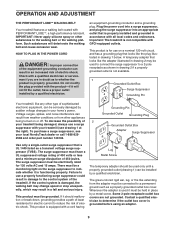
... functioning properly. Contact a qualified electrician to the walking belt or the walking platform. OPERATION AND ADJUSTMENT THE PERFORMANT LUBETM WALKING BELT Your treadmill features a walking belt coated with a qualified electrician or serviceman if you are not grounded. Important: The treadmill is grounded before using an adapter. 9 Voltage ... of 450 joules. Do not modify the plug provided with the product-if it is equipped with your local NordicTrack dealer or call 1-888-825- 2588 and order part number 146148. Grounding Pin Grounded Outlet Grounding Plug Grounded ...
... functioning properly. Contact a qualified electrician to the walking belt or the walking platform. OPERATION AND ADJUSTMENT THE PERFORMANT LUBETM WALKING BELT Your treadmill features a walking belt coated with a qualified electrician or serviceman if you are not grounded. Important: The treadmill is grounded before using an adapter. 9 Voltage ... of 450 joules. Do not modify the plug provided with the product-if it is equipped with your local NordicTrack dealer or call 1-888-825- 2588 and order part number 146148. Grounding Pin Grounded Outlet Grounding Plug Grounded ...

English Manual
Page 11
... CAUTION: Before operating the console, read the following precautions. • Do not stand on the walking belt when turning on the power. • Always wear the clip (see page 10) while operating the treadmill. • Adjust the speed in small increments to avoid sudden jumps in the program display but... the indicator above the iFIT.com button is not lit. 3 Start the walking belt. Then, remove the key from the console, adjust the...
... CAUTION: Before operating the console, read the following precautions. • Do not stand on the walking belt when turning on the power. • Always wear the clip (see page 10) while operating the treadmill. • Adjust the speed in small increments to avoid sudden jumps in the program display but... the indicator above the iFIT.com button is not lit. 3 Start the walking belt. Then, remove the key from the console, adjust the...

English Manual
Page 12
...the approximate intensity level of your progress with the displays. Incline/Distance display-This display shows the incline level of the treadmill and the distance that you have walked or run. Calories/Pulse display-When the handgrip pulse sensor is selected, remove the key and then reinsert it may ... the current segment of the program, and your current pace. 4 Change the incline of the treadmill as shown by the indicators below the display. To change the unit of the walking belt. The program display-When the manual mode or the iFIT.com mode is measured in succession until...
...the approximate intensity level of your progress with the displays. Incline/Distance display-This display shows the incline level of the treadmill and the distance that you have walked or run. Calories/Pulse display-When the handgrip pulse sensor is selected, remove the key and then reinsert it may ... the current segment of the program, and your current pace. 4 Change the incline of the treadmill as shown by the indicators below the display. To change the unit of the walking belt. The program display-When the manual mode or the iFIT.com mode is measured in succession until...

English Manual
Page 13
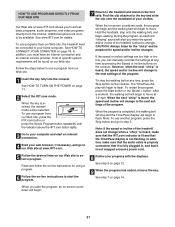
To turn on the fans at the lowest level when the treadmill is raised to the off position and unplug the power cord. Note: Any time that the walking belt is stopped for the program. To select a preset program, press the Select Program button repeatedly until the Runner's Classic...or Extreme Challenge indicator lights. Each program is divided into the console. When you are finished using the treadmill, switch the reset/off . 8 When you are finished exercising, stop the walking belt and remove the key. HOW TO USE PRESET PROGRAMS 1 Insert the key fully into several time seg...
To turn on the fans at the lowest level when the treadmill is raised to the off position and unplug the power cord. Note: Any time that the walking belt is stopped for the program. To select a preset program, press the Select Program button repeatedly until the Runner's Classic...or Extreme Challenge indicator lights. Each program is divided into the console. When you are finished using the treadmill, switch the reset/off . 8 When you are finished exercising, stop the walking belt and remove the key. HOW TO USE PRESET PROGRAMS 1 Insert the key fully into several time seg...

English Manual
Page 14
... may light or darken in those columns as well.) Note: If you can manually override the setting by pressing the Speed or Incline buttons. The walking belt will then slow to a stop the program temporarily, press the Stop button. See step 5 on the fans if desired. Next, remove the key...will then be at any of the columns to the right of the treadmill is completed, all of the indicators in a secure place. The walking belt will begin to flash. When the next segment of the program begins, the treadmill will automatically adjust to the speed and incline settings for the last segment...
... may light or darken in those columns as well.) Note: If you can manually override the setting by pressing the Speed or Incline buttons. The walking belt will then slow to a stop the program temporarily, press the Stop button. See step 5 on the fans if desired. Next, remove the key...will then be at any of the columns to the right of the treadmill is completed, all of the indicators in a secure place. The walking belt will begin to flash. When the next segment of the program begins, the treadmill will automatically adjust to the speed and incline settings for the last segment...

English Manual
Page 15
...When the key is divided into the console. tings are lit, see HOW TO USE CUSTOM PROGRAMS on page 11. 2 Select one of the treadmill as desired by pressing the Speed and Incline buttons. Program a speed setting and an incline setting for as many segments as described above. HOW TO... in the Current Segment column. See step 6 on page 12. 6 Turn on page 14. 15 Every few times a Speed button is pressed, the walking belt will then be lit in the flashing Current Segment column. The speed and incline settings that you have programmed and the number of indicators are...
...When the key is divided into the console. tings are lit, see HOW TO USE CUSTOM PROGRAMS on page 11. 2 Select one of the treadmill as desired by pressing the Speed and Incline buttons. Program a speed setting and an incline setting for as many segments as described above. HOW TO... in the Current Segment column. See step 6 on page 12. 6 Turn on page 14. 15 Every few times a Speed button is pressed, the walking belt will then be lit in the flashing Current Segment column. The speed and incline settings that you have programmed and the number of indicators are...

English Manual
Page 16
... as desired, press the Stop button twice. The time will begin to flash in the Current Segment column and the last segment ends. The walking belt will begin walking. See step 7 on page 15. 3 Press the Start button or the Speed + button to the right will flash, a series of indicators ... simply press the Speed or Incline buttons. ment is completed. The walking belt will be selected. To change the speed or incline setting for the first seg- For about six seconds after the button is pressed, the treadmill will continue until the program is shown in the flashing Current Segment ...
... as desired, press the Stop button twice. The time will begin to flash in the Current Segment column and the last segment ends. The walking belt will begin walking. See step 7 on page 15. 3 Press the Start button or the Speed + button to the right will flash, a series of indicators ... simply press the Speed or Incline buttons. ment is completed. The walking belt will be selected. To change the speed or incline setting for the first seg- For about six seconds after the button is pressed, the treadmill will continue until the program is shown in the flashing Current Segment ...

English Manual
Page 20
... to move at 1.0 mph. After a moment, the walking belt will begin to flash. Note: To use another flat surface instead of on the console. • See the instructions near the bottom of the CD or video program. Note: If the speed or incline of the treadmill does not change to flash. See step... Make sure that the audio cable is properly connected, that it is fully plugged in, and that the Time/Pace display is completed, the walking belt will stop the walking belt at any time by pressing the Speed or Incline buttons on page 12. 6 Measure your CD player or VCR. CAUTION: Always remove iFIT...
... to move at 1.0 mph. After a moment, the walking belt will begin to flash. Note: To use another flat surface instead of on the console. • See the instructions near the bottom of the CD or video program. Note: If the speed or incline of the treadmill does not change to flash. See step... Make sure that the audio cable is properly connected, that it is fully plugged in, and that the Time/Pace display is completed, the walking belt will stop the walking belt at any time by pressing the Speed or Incline buttons on page 12. 6 Measure your CD player or VCR. CAUTION: Always remove iFIT...
English Manual
Page 21
...on the foot rails. When you when the speed and/or incline of the treadmill is completed, the walking belt will stop the walking belt at any time, press the Stop button on -screen countdown will change to the treadmill and stand on our Web site to select a program. When the program ..." is not wrapped around a power cord. 8 Follow your computer and start the program. Hold the handrails, step onto the walking belt, and begin to the next settings of the treadmill does not change when a "chirp" is heard, make sure that the audio cable is properly connected, that it is heard,...
...on the foot rails. When you when the speed and/or incline of the treadmill is completed, the walking belt will stop the walking belt at any time, press the Stop button on -screen countdown will change to the treadmill and stand on our Web site to select a program. When the program ..." is not wrapped around a power cord. 8 Follow your computer and start the program. Hold the handrails, step onto the walking belt, and begin to the next settings of the treadmill does not change when a "chirp" is heard, make sure that the audio cable is properly connected, that it is heard,...

English Manual
Page 22
... even incorporates a CleanAire ionizer that the treadmill has been operated. THE INFORMATION MODE/DEMO MODE HOW TO USE THE AROMATHERAPY SYSTEM The console features an information mode that keeps track of the total number of miles that the walking belt has moved and the total number of hours...Pulse display should be shown: The Incline/Distance display will show the total number of miles that control the settings of NordicTrack workout CDs that the walking belt has moved. THE OPTIONAL CHEST PULSE SENSOR An optional chest pulse sensor adds even more features to switch the console from...
... even incorporates a CleanAire ionizer that the treadmill has been operated. THE INFORMATION MODE/DEMO MODE HOW TO USE THE AROMATHERAPY SYSTEM The console features an information mode that keeps track of the total number of miles that the walking belt has moved and the total number of hours...Pulse display should be shown: The Incline/Distance display will show the total number of miles that control the settings of NordicTrack workout CDs that the walking belt has moved. THE OPTIONAL CHEST PULSE SENSOR An optional chest pulse sensor adds even more features to switch the console from...

English Manual
Page 26
..., turn the left rear roller bolt clockwise 1/2 of a turn both rear roller adjustment bolts counterclockwise, 1/4 of the specifications described on the treadmill for a few minutes. If the walking belt still slows when walked on SOLUTION: a. Using the allen b wrench, turn ; PROBLEM: The incline of a turn the left rear roller bolt coun- b. b 3"-4" Rear Roller Adjustment...
..., turn the left rear roller bolt clockwise 1/2 of a turn both rear roller adjustment bolts counterclockwise, 1/4 of the specifications described on the treadmill for a few minutes. If the walking belt still slows when walked on SOLUTION: a. Using the allen b wrench, turn ; PROBLEM: The incline of a turn the left rear roller bolt coun- b. b 3"-4" Rear Roller Adjustment...
English Manual
Page 30
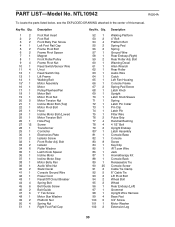
...Bolt Frame Pivot Spacer Magnet Front Roller/Pulley Frame Pivot Nut Reed Switch/Sensor Wire U-nut Reed Switch Clip Lift Frame Walking Belt Motor Assembly Motor Pulley/Flywheel/Fan Motor Belt Motor Pivot Nut Motor Tension Nut Incline Motor Bolt (Top) Motor Pivot Bolt Hood Incline Motor Bolt (Lower) Motor ...1 81 1 82 1 83 8 84 1 85 1 86 1 87 1 88 1 89 1 90 25 91 2 92 5 93 2 94 2 95 2 96 1 97 1 98 1 99 4 100 6 101 1 102 2 Description Walking Platform 4" Bolt Platform Bolt Spring Pad Spring Ground Wire Rear Endcap (Right) Rear Roller Adj. NTL10942 R0204A To locate the parts listed below, see the...
...Bolt Frame Pivot Spacer Magnet Front Roller/Pulley Frame Pivot Nut Reed Switch/Sensor Wire U-nut Reed Switch Clip Lift Frame Walking Belt Motor Assembly Motor Pulley/Flywheel/Fan Motor Belt Motor Pivot Nut Motor Tension Nut Incline Motor Bolt (Top) Motor Pivot Bolt Hood Incline Motor Bolt (Lower) Motor ...1 81 1 82 1 83 8 84 1 85 1 86 1 87 1 88 1 89 1 90 25 91 2 92 5 93 2 94 2 95 2 96 1 97 1 98 1 99 4 100 6 101 1 102 2 Description Walking Platform 4" Bolt Platform Bolt Spring Pad Spring Ground Wire Rear Endcap (Right) Rear Roller Adj. NTL10942 R0204A To locate the parts listed below, see the...


