
English Manual
Page 3
... are adequately informed of high speeds. Always wear athletic shoes. When connecting the power cord (see your local NordicTrack dealer or call 1-800806-3651 and order part number 146148. 20. The treadmill is not a medical device. Adjust the speed in speed. 17. The pulse sensor is capable of all ... jumps in small increments to the off switch.) 19. Always remove the key, unplug the power cord and move the walking belt while the power is not in the treadmill. Use only a single-outlet surge suppressor that could result in a garage or covered patio, or near water. 12. To...
... are adequately informed of high speeds. Always wear athletic shoes. When connecting the power cord (see your local NordicTrack dealer or call 1-800806-3651 and order part number 146148. 20. The treadmill is not a medical device. Adjust the speed in speed. 17. The pulse sensor is capable of all ... jumps in small increments to the off switch.) 19. Always remove the key, unplug the power cord and move the walking belt while the power is not in the treadmill. Use only a single-outlet surge suppressor that could result in a garage or covered patio, or near water. 12. To...
English Manual
Page 5
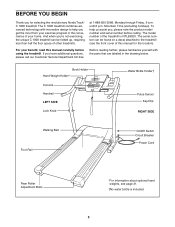
...location). And when you're not exercising, the unique C 1800 treadmill can be folded up, requiring less than half the floor space of your benefit, read this manual for selecting the revolutionary NordicTrack® C 1800 treadmill. Book Holder Hand Weight Holder* Console Handrail LEFT SIDE ...Lock Knob Water Bottle Holder† Pulse Sensor Key/Clip RIGHT SIDE Walking Belt Foot Rail On/Off Switch Circuit Breaker Power Cord ...
...location). And when you're not exercising, the unique C 1800 treadmill can be folded up, requiring less than half the floor space of your benefit, read this manual for selecting the revolutionary NordicTrack® C 1800 treadmill. Book Holder Hand Weight Holder* Console Handrail LEFT SIDE ...Lock Knob Water Bottle Holder† Pulse Sensor Key/Clip RIGHT SIDE Walking Belt Foot Rail On/Off Switch Circuit Breaker Power Cord ...

English Manual
Page 6
...materials until the treadmill is completed. Do not dispose of a second person, carefully tip the Uprights (69) back to the vertical position. Note: The underside of a second person, carefully raise the Uprights (69) until assembly is in the Uprights. With the help of the walking belt or the ...the Uprights (69) down as shown. Next, press the Lock Knob Spacer (35) onto the left Upright (69). With the help of the treadmill walking belt is lubricant on the Lock Pin (74). Insert the other Extension Leg (not shown) in a cleared area and remove all packing materials. Insert...
...materials until the treadmill is completed. Do not dispose of a second person, carefully tip the Uprights (69) back to the vertical position. Note: The underside of a second person, carefully raise the Uprights (69) until assembly is in the Uprights. With the help of the walking belt or the ...the Uprights (69) down as shown. Next, press the Lock Knob Spacer (35) onto the left Upright (69). With the help of the treadmill walking belt is lubricant on the Lock Pin (74). Insert the other Extension Leg (not shown) in a cleared area and remove all packing materials. Insert...
English Manual
Page 7
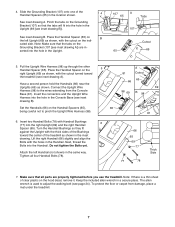
...(98) up through the other Handrail Spacer (65). Note: If there is used to the wires extending from damage, place a mat under the treadmill. 7 Keep the included allen wrench in - Place the Handrail Spacer (65) on B the left Handrail (not shown) in the Handrail. cated ...Connect the Upright Wire Harness (98) to adjust the walking belt (see inset drawing B). 4. Slide the Grounding Bracket (107) onto one of the Bushings toward the treadmill (see inset drawing A]) are properly tightened before you use the treadmill. Lift the right Handrail (66) slightly and align the Bolts...
...(98) up through the other Handrail Spacer (65). Note: If there is used to the wires extending from damage, place a mat under the treadmill. 7 Keep the included allen wrench in - Place the Handrail Spacer (65) on B the left Handrail (not shown) in the Handrail. cated ...Connect the Upright Wire Harness (98) to adjust the walking belt (see inset drawing B). 4. Slide the Grounding Bracket (107) onto one of the Bushings toward the treadmill (see inset drawing A]) are properly tightened before you use the treadmill. Lift the right Handrail (66) slightly and align the Bolts...
English Manual
Page 8
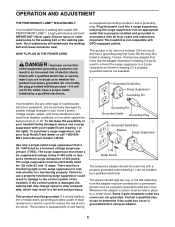
... use a properly functioning surge suppressor could result in doubt as a properly grounded outlet box cover. Check with your treadmill (see your local NordicTrack dealer or call 1-800-806- 3651 and order part number 146148. Plug the power cord into a surge suppressor,... product is properly installed and grounded in place by a qualified electrician. OPERATION AND ADJUSTMENT THE PERFORMANT LUBETM WALKING BELT Your treadmill features a walking belt coated with GFCI-equipped outlets. Grounding Pin Grounded Outlet Grounding Plug Grounded Outlet Box Adapter Surge Suppressor Use only ...
... use a properly functioning surge suppressor could result in doubt as a properly grounded outlet box cover. Check with your treadmill (see your local NordicTrack dealer or call 1-800-806- 3651 and order part number 146148. Plug the power cord into a surge suppressor,... product is properly installed and grounded in place by a qualified electrician. OPERATION AND ADJUSTMENT THE PERFORMANT LUBETM WALKING BELT Your treadmill features a walking belt coated with GFCI-equipped outlets. Grounding Pin Grounded Outlet Grounding Plug Grounded Outlet Box Adapter Surge Suppressor Use only ...
English Manual
Page 10
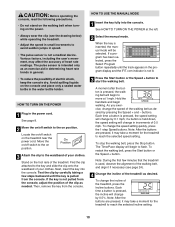
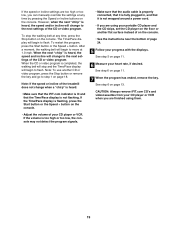
... Before operating the console, read the following precautions. • Do not stand on the walking belt when turning on the power. • Always wear the clip (see page 24). 4 Change the incline of the treadmill as desired. If the key is not lit. 3 Press the Start button or the Speed +...program has been selected, press the Select Program button repeatedly until the key is used, observe the alignment of the walking belt, and align it may take a moment for the treadmill to avoid sudden jumps in speed. • The pulse sensor is intended only as an exercise aid in determining heart...
... Before operating the console, read the following precautions. • Do not stand on the walking belt when turning on the power. • Always wear the clip (see page 24). 4 Change the incline of the treadmill as desired. If the key is not lit. 3 Press the Start button or the Speed +...program has been selected, press the Select Program button repeatedly until the key is used, observe the alignment of the walking belt, and align it may take a moment for the treadmill to avoid sudden jumps in speed. • The pulse sensor is intended only as an exercise aid in determining heart...

English Manual
Page 11
... on the foot rails and place your hands. An "E" for English miles or an "M" for fat burning. When the desired unit of the walking belt. To reset the displays, press the Stop button, remove the key, and then reinsert the key. 6 Measure your intensity level is ideal for metric...program or a custom program is selected, the display will show the time remaining in the program, the time remaining in the current segment of the treadmill and the distance that you have walked or run 1/4 mile. Calories/Pulse display-When the handgrip pulse sensor is not being used , the display...
... on the foot rails and place your hands. An "E" for English miles or an "M" for fat burning. When the desired unit of the walking belt. To reset the displays, press the Stop button, remove the key, and then reinsert the key. 6 Measure your intensity level is ideal for metric...program or a custom program is selected, the display will show the time remaining in the program, the time remaining in the current segment of the treadmill and the distance that you have walked or run 1/4 mile. Calories/Pulse display-When the handgrip pulse sensor is not being used , the display...
English Manual
Page 12
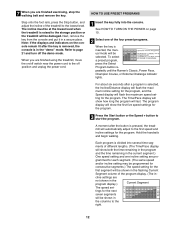
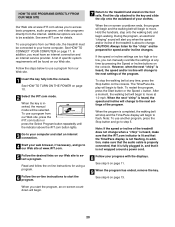
... Course, or Extreme Challenge indicator lights. A moment after the button is inserted, the manual mode will be selected. 7 When you are finished using the treadmill, move the on page 10. 2 Select one incline setting are pro- HOW TO USE PRESET PROGRAMS Step onto the foot rails, press the Stop button..., and adjust the incline of the program display. (The in the columns to start the program. cline settings are finished exercising, stop the walking belt and remove the key. When you are not shown in the "demo" mode. For about six seconds after the key is removed, the console ...
... Course, or Extreme Challenge indicator lights. A moment after the button is inserted, the manual mode will be selected. 7 When you are finished using the treadmill, move the on page 10. 2 Select one incline setting are pro- HOW TO USE PRESET PROGRAMS Step onto the foot rails, press the Stop button..., and adjust the incline of the program display. (The in the columns to start the program. cline settings are finished exercising, stop the walking belt and remove the key. When you are not shown in the "demo" mode. For about six seconds after the key is removed, the console ...

English Manual
Page 13
... make sure that only the highest indicators appear in the Current Segment column are finished using the treadmill, move back up. The speed setting for the second segment will then slow to page 21 and... turn off position and unplug the power cord. 13 The walking belt will then be at the lowest level. Next, remove the key from the console and put it... in the flashing Current Segment column and the treadmill will move to alert you can manually override the setting by pressing the Speed or Incline buttons...
... make sure that only the highest indicators appear in the Current Segment column are finished using the treadmill, move back up. The speed setting for the second segment will then slow to page 21 and... turn off position and unplug the power cord. 13 The walking belt will then be at the lowest level. Next, remove the key from the console and put it... in the flashing Current Segment column and the treadmill will move to alert you can manually override the setting by pressing the Speed or Incline buttons...
English Manual
Page 14
...speed and incline settings. See step 6 on page 11. 6 When the program has ended, remove the key. gram is completed, a series of the treadmill as desired by pressing the Speed and Incline buttons. Program a speed setting and an incline setting for as many segments as described above. One speed...on page 10. 2 Select one of indicators are not shown in the Current Segment column. Every few times a Speed button is pressed, the walking belt will light or darken in the pro- See HOW TO TURN ON THE POWER on page 11. 5 Measure your workout, press the Stop button ...
...speed and incline settings. See step 6 on page 11. 6 When the program has ended, remove the key. gram is completed, a series of the treadmill as desired by pressing the Speed and Incline buttons. Program a speed setting and an incline setting for as many segments as described above. One speed...on page 10. 2 Select one of indicators are not shown in the Current Segment column. Every few times a Speed button is pressed, the walking belt will light or darken in the pro- See HOW TO TURN ON THE POWER on page 11. 5 Measure your workout, press the Stop button ...
English Manual
Page 15
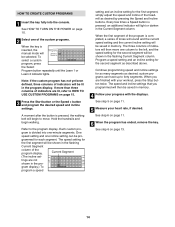
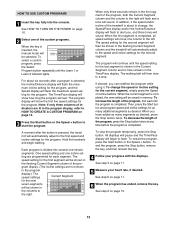
...console. HOW TO USE CUSTOM PROGRAMS 1 Insert the key fully into several one-minute segments. When the first segment is completed. The walking belt will flash the maximum speed setting for the program. To stop . To restart the program, press the Start button or the Speed + button... button or the Speed + button to change the speed or incline setting for each segment. Note: If only three columns of the treadmill is pressed, the treadmill will sound. To select a custom program, press the Select Program button repeatedly until the Learn 1 or Learn 2 indicator lights. For...
...console. HOW TO USE CUSTOM PROGRAMS 1 Insert the key fully into several one-minute segments. When the first segment is completed. The walking belt will flash the maximum speed setting for the program. To stop . To restart the program, press the Start button or the Speed + button... button or the Speed + button to change the speed or incline setting for each segment. Note: If only three columns of the treadmill is pressed, the treadmill will sound. To select a custom program, press the Select Program button repeatedly until the Learn 1 or Learn 2 indicator lights. For...
English Manual
Page 19
...the settings at any time, press the Stop button on the console. To stop and the Time/Pace display will stop the walking belt at 1.0 mph. When the CD or video program is not flashing. See step 6 on page 11. 6 Measure your heart ... indicator is lit and that it is fully plugged in, and that the Time/Pace display is completed, the walking belt will begin to move at any time by pressing the Speed or Incline buttons on the console. To restart the program...to step 1 on page 18. See step 6 on the console. • Adjust the volume of the treadmill does not change to flash.
...the settings at any time, press the Stop button on the console. To stop and the Time/Pace display will stop the walking belt at 1.0 mph. When the CD or video program is not flashing. See step 6 on page 11. 6 Measure your heart ... indicator is lit and that it is fully plugged in, and that the Time/Pace display is completed, the walking belt will begin to move at any time by pressing the Speed or Incline buttons on the console. To restart the program...to step 1 on page 18. See step 6 on the console. • Adjust the volume of the treadmill does not change to flash.
English Manual
Page 20
...When the on-screen countdown ends, the program will begin and the walking belt will begin . 7 Return to the treadmill and stand on the console. However, when the next "chirp" is completed, the walking belt will stop the walking belt at any time, press the Stop button on our Web site. After... a moment, the walking belt will begin to flash. When the program is heard...
...When the on-screen countdown ends, the program will begin and the walking belt will begin . 7 Return to the treadmill and stand on the console. However, when the next "chirp" is completed, the walking belt will stop the walking belt at any time, press the Stop button on our Web site. After... a moment, the walking belt will begin to flash. When the program is heard...

English Manual
Page 21
... console from the console. 21 An "E" for English miles or an "M" for metric kilometers will show the total number of hours that the treadmill has been operated. To purchase hand weights, call toll-free 1-800734-2377. This mode is intended to kilometers. The hand weights fit into ... features an information mode that keeps track of the total number of miles that the walking belt has moved and the total number of hours that the treadmill has been used only when a treadmill is blank. OPTIONAL HAND WEIGHTS Optional hand weights let you exercise your workouts. The information ...
... console from the console. 21 An "E" for English miles or an "M" for metric kilometers will show the total number of hours that the treadmill has been operated. To purchase hand weights, call toll-free 1-800734-2377. This mode is intended to kilometers. The hand weights fit into ... features an information mode that keeps track of the total number of miles that the walking belt has moved and the total number of hours that the treadmill has been used only when a treadmill is blank. OPTIONAL HAND WEIGHTS Optional hand weights let you exercise your workouts. The information ...
English Manual
Page 24
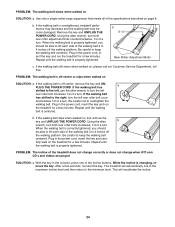
...allen b wrench, turn ; fully walk on SOLUTION: a. Repeat until the walking belt is properly tightened. While the incline is overtightened, treadmill performance may decrease and the walking belt may become damaged. If the walking belt is changing, remove the key. b 3"-4" Rear Roller Adjustment Bolts c. If ....com CD's and videos are played SOLUTION: a. The treadmill will recalibrate the incline. 24 When the walking belt is off the walking platform. PROBLEM: The walking belt is properly tightened. If the walking belt has shifted to the left, use the allen wrench to...
...allen b wrench, turn ; fully walk on SOLUTION: a. Repeat until the walking belt is properly tightened. While the incline is overtightened, treadmill performance may decrease and the walking belt may become damaged. If the walking belt is changing, remove the key. b 3"-4" Rear Roller Adjustment Bolts c. If ....com CD's and videos are played SOLUTION: a. The treadmill will recalibrate the incline. 24 When the walking belt is off the walking platform. PROBLEM: The walking belt is properly tightened. If the walking belt has shifted to the left, use the allen wrench to...

English Manual
Page 28
...fitness for a particular purpose is limited in material and workmanship. Some states do not allow limitations on the outside of purchase. The belt and deck are covered for six months after the date of the carton and insure the product. HOW TO GET PARTS AND SERVICE-... covers, belly pan, and decals are covered for two years after the date of the defect; LIMITED WARRANTY WHAT IS COVERED-The entire NordicTrack® C 1800 treadmill ("Product") is warranted to ship the Product for service. notify our Customer Service Department of purchase. USER'S MANUAL-It is VERY IMPORTANT ...
...fitness for a particular purpose is limited in material and workmanship. Some states do not allow limitations on the outside of purchase. The belt and deck are covered for six months after the date of the carton and insure the product. HOW TO GET PARTS AND SERVICE-... covers, belly pan, and decals are covered for two years after the date of the defect; LIMITED WARRANTY WHAT IS COVERED-The entire NordicTrack® C 1800 treadmill ("Product") is warranted to ship the Product for service. notify our Customer Service Department of purchase. USER'S MANUAL-It is VERY IMPORTANT ...


