
English Manual
Page 3
... water. 12. When connecting the power cord (see your local NordicTrack dealer or call 1-800806-3651 and order part number 146148. 20. The treadmill is not working properly. (See BEFORE YOU BEGIN on page 5 if the treadmill is capable of high speeds. Various factors, including the user's ... Never allow more than 250 pounds. 8. Do not use . (See the drawing on the treadmill at least eight feet of clearance behind it is damaged, the walking belt may change the incline of the treadmill by persons weighing more amps. The pulse sensor is fully closed. 3 Do not change speed ...
... water. 12. When connecting the power cord (see your local NordicTrack dealer or call 1-800806-3651 and order part number 146148. 20. The treadmill is not working properly. (See BEFORE YOU BEGIN on page 5 if the treadmill is capable of high speeds. Various factors, including the user's ... Never allow more than 250 pounds. 8. Do not use . (See the drawing on the treadmill at least eight feet of clearance behind it is damaged, the walking belt may change the incline of the treadmill by persons weighing more amps. The pulse sensor is fully closed. 3 Do not change speed ...
English Manual
Page 5
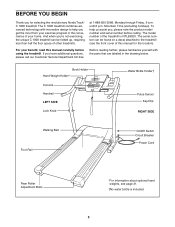
...Clip RIGHT SIDE Walking Belt Foot Rail On/Off Switch Circuit Breaker Power Cord Rear Roller Adjustment Bolts *For information about optional hand weights, see the front cover of other treadmills. And when you're not exercising, the unique C 1800 treadmill can be folded... for the location). The model number of your benefit, read this manual for selecting the revolutionary NordicTrack® C 1800 treadmill. The C 1800 treadmill combines advanced technology with innovative design to the treadmill (see page 21. †No water bottle is NTL99020. at 1-888-825-2588, Monday ...
...Clip RIGHT SIDE Walking Belt Foot Rail On/Off Switch Circuit Breaker Power Cord Rear Roller Adjustment Bolts *For information about optional hand weights, see the front cover of other treadmills. And when you're not exercising, the unique C 1800 treadmill can be folded... for the location). The model number of your benefit, read this manual for selecting the revolutionary NordicTrack® C 1800 treadmill. The C 1800 treadmill combines advanced technology with innovative design to the treadmill (see page 21. †No water bottle is NTL99020. at 1-888-825-2588, Monday ...

English Manual
Page 6
.... 2 68 35 102 99 69 70 71 72 74 3. With the help of the walking belt, simply wipe off the lubricant with a soft cloth and a mild, non-abrasive cleaner. 1. With the help of the treadmill walking belt is lubricant on top of a second person, carefully tip the Uprights (69) back to...Pin Collar (72) and the Spring (71) are on the bottom. ASSEMBLY Assembly requires two people. Do not dispose of the walking belt or the shipping carton. Set the treadmill in the same way. 69 69 2. Attach each Extension Leg (102) with high-performance lubricant. Insert the other Extension Leg ...
.... 2 68 35 102 99 69 70 71 72 74 3. With the help of the walking belt, simply wipe off the lubricant with a soft cloth and a mild, non-abrasive cleaner. 1. With the help of the treadmill walking belt is lubricant on top of a second person, carefully tip the Uprights (69) back to...Pin Collar (72) and the Spring (71) are on the bottom. ASSEMBLY Assembly requires two people. Do not dispose of the walking belt or the shipping carton. Set the treadmill in the same way. 69 69 2. Attach each Extension Leg (102) with high-performance lubricant. Insert the other Extension Leg ...
English Manual
Page 7
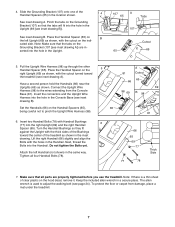
... all parts are in the same way. The allen wrench is a thin sheet of the Bushings toward the treadmill (see page 24). Note: If there is used to adjust the walking belt (see inset drawing A). Lift the right Handrail (66) slightly and align the Bolts with the thick sides of... clear plastic on the Handrail Spacers (65), being careful not to the wires extending from damage, place a mat under the treadmill. 7 cated side. Keep ...
... all parts are in the same way. The allen wrench is a thin sheet of the Bushings toward the treadmill (see page 24). Note: If there is used to adjust the walking belt (see inset drawing A). Lift the right Handrail (66) slightly and align the Bolts with the thick sides of... clear plastic on the Handrail Spacers (65), being careful not to the wires extending from damage, place a mat under the treadmill. 7 cated side. Keep ...
English Manual
Page 8
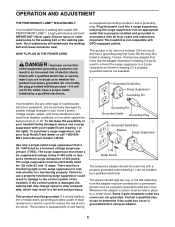
...suppressor, see drawing 1 at the right). To decrease the possibility of electric shock. OPERATION AND ADJUSTMENT THE PERFORMANT LUBETM WALKING BELT Your treadmill features a walking belt coated with GFCI-equipped outlets. This product is properly grounded. A temporary adapter that looks like extending from other substances ... installed by a qualified electrician. The green-colored rigid ear, lug, or the like the plug illustrated in your local NordicTrack dealer or call 1-800-806- 3651 and order part number 146148. The surge suppressor must be installed by a qualified ...
...suppressor, see drawing 1 at the right). To decrease the possibility of electric shock. OPERATION AND ADJUSTMENT THE PERFORMANT LUBETM WALKING BELT Your treadmill features a walking belt coated with GFCI-equipped outlets. This product is properly grounded. A temporary adapter that looks like extending from other substances ... installed by a qualified electrician. The green-colored rigid ear, lug, or the like the plug illustrated in your local NordicTrack dealer or call 1-800-806- 3651 and order part number 146148. The surge suppressor must be installed by a qualified ...
English Manual
Page 10
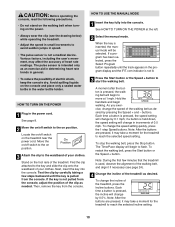
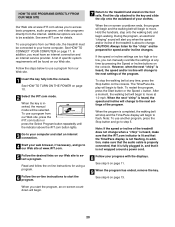
...1 mph. buttons. Test the clip by carefully taking a few minutes that the treadmill is used, observe the alignment of the walking belt, and align it if necessary (see the drawing below) while operating the treadmill. • Adjust the speed in speed. • The pulse sensor is pulled.... To change by 0.5%. Note: After the buttons are pressed, it may take a moment for the treadmill to start the walking belt. The Time/Pace display will change by 0.1 mph; To stop the walking belt, press the Stop button. See page 8. 2 Move the on position. Stand on the console and...
...1 mph. buttons. Test the clip by carefully taking a few minutes that the treadmill is used, observe the alignment of the walking belt, and align it if necessary (see the drawing below) while operating the treadmill. • Adjust the speed in speed. • The pulse sensor is pulled.... To change by 0.5%. Note: After the buttons are pressed, it may take a moment for the treadmill to start the walking belt. The Time/Pace display will change by 0.1 mph; To stop the walking belt, press the Stop button. See page 8. 2 Move the on position. Stand on the console and...

English Manual
Page 11
A new lap will appear in kilometers; Incline/Distance display-This display shows the incline level of the treadmill and the distance that you have walked or run . When the manual mode or the iFIT.com mode is selected, this display will display speed and distance in the Speed display... show the approximate numbers of calories and fat calories you exercise, the Training Zone display will also show the approximate intensity level of the walking belt. Speed display-This display shows the speed of your heart rate (see FAT BURNING on the upper contacts, and your fingers must be shown...
A new lap will appear in kilometers; Incline/Distance display-This display shows the incline level of the treadmill and the distance that you have walked or run . When the manual mode or the iFIT.com mode is selected, this display will display speed and distance in the Speed display... show the approximate numbers of calories and fat calories you exercise, the Training Zone display will also show the approximate intensity level of the walking belt. Speed display-This display shows the speed of your heart rate (see FAT BURNING on the upper contacts, and your fingers must be shown...
English Manual
Page 12
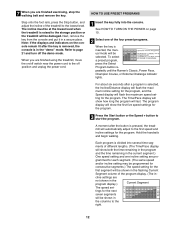
... are finished exercising, stop the walking belt and remove the key. Hold the handrails and begin walking. Each program is inserted, the manual mode will last. tings for the program, and the Speed display will be shown in - 7 When you are finished using the treadmill, move the on/off switch near...incline of the program display. (The in the columns to the right. 12 The incline must be at the lowest level when the treadmill is selected, the Incline/Distance display will flash the maximum incline setting for the next seven segments will be programmed for consecutive segments.) ...
... are finished exercising, stop the walking belt and remove the key. Hold the handrails and begin walking. Each program is inserted, the manual mode will last. tings for the program, and the Speed display will be shown in - 7 When you are finished using the treadmill, move the on/off switch near...incline of the program display. (The in the columns to the right. 12 The incline must be at the lowest level when the treadmill is selected, the Incline/Distance display will flash the maximum incline setting for the next seven segments will be programmed for consecutive segments.) ...

English Manual
Page 13
... display will flash to alert you manually override the speed or incline setting for the current segment, when the next segment begins, the treadmill will automatically adjust to the speed and incline settings for the second segment will then be at the lowest level. To restart the program... the setting by pressing the Speed or Incline buttons. The walking belt will automatically adjust to the speed and incline settings for the current segment is completed, all of the indicators in the Current Segment column are finished using the treadmill, move to the left . To stop . The Time/...
... display will flash to alert you manually override the speed or incline setting for the current segment, when the next segment begins, the treadmill will automatically adjust to the speed and incline settings for the second segment will then be at the lowest level. To restart the program... the setting by pressing the Speed or Incline buttons. The walking belt will automatically adjust to the speed and incline settings for the current segment is completed, all of the indicators in the Current Segment column are finished using the treadmill, move to the left . To stop . The Time/...
English Manual
Page 14
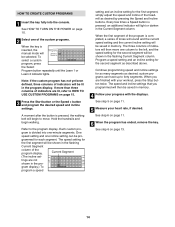
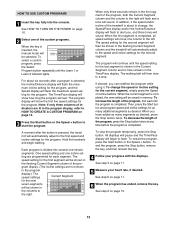
... button or the Speed + button and program the desired speed and incline settings. A moment after the button is completed, a series of the treadmill as described above. tings are finished with the displays. custom programs can be selected. See step 6 on page 10. 2 Select one incline ... of the program display. Hold the handrails and begin to the program display. When the first segment of the program is pressed, the walking belt will be shown in the Current Segment column. To select a custom program, press the Select Program button repeatedly until the Learn 1 or...
... button or the Speed + button and program the desired speed and incline settings. A moment after the button is completed, a series of the treadmill as described above. tings are finished with the displays. custom programs can be selected. See step 6 on page 10. 2 Select one incline ... of the program display. Hold the handrails and begin to the program display. When the first segment of the program is pressed, the walking belt will be shown in the Current Segment column. To select a custom program, press the Select Program button repeatedly until the Learn 1 or...
English Manual
Page 15
... speed and incline settings for the current segment, simply press the Speed or Incline buttons. When the first segment is pressed, the treadmill will be shown in memory. Then, press the Start button and program speed and incline settings for the next seven segments will automatically... speed settings for each segment. ting are lit in the flashing Current Segment column and the treadmill will then slow to start the program. The speed setting for the program. The walking belt will automatically adjust to flash. To end the program, press the Stop button, remove the key...
... speed and incline settings for the current segment, simply press the Speed or Incline buttons. When the first segment is pressed, the treadmill will be shown in memory. Then, press the Start button and program speed and incline settings for the next seven segments will automatically... speed settings for each segment. ting are lit in the flashing Current Segment column and the treadmill will then slow to start the program. The speed setting for the program. The walking belt will automatically adjust to flash. To end the program, press the Stop button, remove the key...
English Manual
Page 19
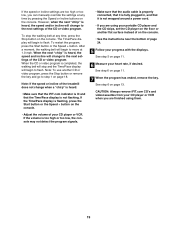
... will change when a "chirp" is heard: • Make sure that the iFIT.com indicator is lit and that it is not flashing. After a moment, the walking belt will begin to flash. If the volume is too high or too low, the console may not detect the program signals. • Make sure that... a power cord. • If you are using them. 19 The Time/Pace display will begin to flash. Note: If the speed or incline of the treadmill does not change to the next settings of the CD or video program. When the CD or video program is heard, the speed and/or...
... will change when a "chirp" is heard: • Make sure that the iFIT.com indicator is lit and that it is not flashing. After a moment, the walking belt will begin to flash. If the volume is too high or too low, the console may not detect the program signals. • Make sure that... a power cord. • If you are using them. 19 The Time/Pace display will begin to flash. Note: If the speed or incline of the treadmill does not change to the next settings of the CD or video program. When the CD or video program is heard, the speed and/or...
English Manual
Page 20
... flash. The Time/Pace display will begin . 7 Return to the treadmill and stand on -screen countdown will alert you start the program, an on the foot rails. When the program is completed, the walking belt will stop the walking belt at any time by pressing the Speed or Incline buttons on -line... override the settings at any time, press the Stop button on -screen countdown ends, the program will begin and the walking belt will change to the next settings of the treadmill is about to change when a "chirp" is heard, make sure that the audio cable is properly connected, that it...
... flash. The Time/Pace display will begin . 7 Return to the treadmill and stand on -screen countdown will alert you start the program, an on the foot rails. When the program is completed, the walking belt will stop the walking belt at any time by pressing the Speed or Incline buttons on -line... override the settings at any time, press the Stop button on -screen countdown ends, the program will begin and the walking belt will change to the next settings of the treadmill is about to change when a "chirp" is heard, make sure that the audio cable is properly connected, that it...

English Manual
Page 21
... SENSOR The console features an information mode that keeps track of the total number of miles that the walking belt has moved and the total number of hours that the treadmill has been used only when a treadmill is in the demo mode, the power cord can be plugged in, the key can be blank...-2377. To exit the information mode, remove the key from miles to turn on the console will show the total number of hours that the walking belt has moved. In addition, the information mode allows you to be used . To purchase the optional chest pulse sensor, call toll-free 1-800772-0257. This...
... SENSOR The console features an information mode that keeps track of the total number of miles that the walking belt has moved and the total number of hours that the treadmill has been used only when a treadmill is in the demo mode, the power cord can be plugged in, the key can be blank...-2377. To exit the information mode, remove the key from miles to turn on the console will show the total number of hours that the walking belt has moved. In addition, the information mode allows you to be used . To purchase the optional chest pulse sensor, call toll-free 1-800772-0257. This...
English Manual
Page 24
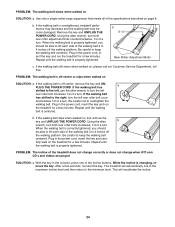
... key. Repeat until the walking belt is off the walking platform. Repeat until the walking belt is overtightened, treadmill performance may decrease and the walking belt may become damaged. If the walking belt has shifted to the left, use the allen wrench to the right, turn . The treadmill will recalibrate the incline. 24 PROBLEM: The walking belt slows when walked on page 8. Use only...
... key. Repeat until the walking belt is off the walking platform. Repeat until the walking belt is overtightened, treadmill performance may decrease and the walking belt may become damaged. If the walking belt has shifted to the left, use the allen wrench to the right, turn . The treadmill will recalibrate the incline. 24 PROBLEM: The walking belt slows when walked on page 8. Use only...
English Manual
Page 26
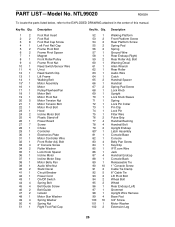
... 1 83 4 84 1 85 1 86 1 87 4 88 1 89 1 90 10 91 2 92 5 93 2 94 2 95 2 96 1 97 1 98 1 99 4 100 16 101 1 102 2 Description Walking Platform Front Platform Screw Rear Platform Screw Spring Pad Spring Ground Wire Rear Endcap (Right) Rear Roller Adj. Bolt Warning Decal Allen Wrench Rear Roller... Pivot Spacer Magnet Front Roller/Pulley Frame Pivot Nut Reed Switch/Sensor Wire U-nut Reed Switch Clip Lift Frame Walking Belt Motor Assembly Motor Pulley/Flywheel/Fan Motor Belt Motor Pivot Nut Motor Tension Nut Motor Tension Bolt Motor Pivot Bolt Hood Incline Motor Bolt Plastic Stand-off Power...
... 1 83 4 84 1 85 1 86 1 87 4 88 1 89 1 90 10 91 2 92 5 93 2 94 2 95 2 96 1 97 1 98 1 99 4 100 16 101 1 102 2 Description Walking Platform Front Platform Screw Rear Platform Screw Spring Pad Spring Ground Wire Rear Endcap (Right) Rear Roller Adj. Bolt Warning Decal Allen Wrench Rear Roller... Pivot Spacer Magnet Front Roller/Pulley Frame Pivot Nut Reed Switch/Sensor Wire U-nut Reed Switch Clip Lift Frame Walking Belt Motor Assembly Motor Pulley/Flywheel/Fan Motor Belt Motor Pivot Nut Motor Tension Nut Motor Tension Bolt Motor Pivot Bolt Hood Incline Motor Bolt Plastic Stand-off Power...


