

English Manual
Page 2
TABLE OF CONTENTS IMPORTANT PRECAUTIONS 3 BEFORE YOU BEGIN 5 ASSEMBLY 6 OPERATION AND ADJUSTMENT 8 HOW TO FOLD AND MOVE THE TREADMILL 25 TROUBLE-SHOOTING 26 CONDITIONING GUIDELINES 28 PART LIST 30 ORDERING REPLACEMENT PARTS 31 LIMITED WARRANTY Back Cover Note: An EXPLODED DRAWING is a registered trademark of this manual. NordicTrack is attached in the center of ICON Health & Fitness, Inc. 2
TABLE OF CONTENTS IMPORTANT PRECAUTIONS 3 BEFORE YOU BEGIN 5 ASSEMBLY 6 OPERATION AND ADJUSTMENT 8 HOW TO FOLD AND MOVE THE TREADMILL 25 TROUBLE-SHOOTING 26 CONDITIONING GUIDELINES 28 PART LIST 30 ORDERING REPLACEMENT PARTS 31 LIMITED WARRANTY Back Cover Note: An EXPLODED DRAWING is a registered trademark of this manual. NordicTrack is attached in the center of ICON Health & Fitness, Inc. 2

English Manual
Page 3
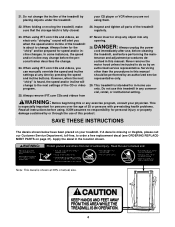
... exercise clothes when using the treadmill. 16. Do not place the treadmill on the walking belt. No other appliance should be on /off switch.) 20. Never move the on/off switch to persons, read the following important precautions and information before operating the treadmill. 1. IMPORTANT PRECAUTIONS WARNING: To reduce the risk of heart rate readings. Always remove the key, unplug the power cord and move the walking belt while the power...
... exercise clothes when using the treadmill. 16. Do not place the treadmill on the walking belt. No other appliance should be on /off switch.) 20. Never move the on/off switch to persons, read the following important precautions and information before operating the treadmill. 1. IMPORTANT PRECAUTIONS WARNING: To reduce the risk of heart rate readings. Always remove the key, unplug the power cord and move the walking belt while the power...
English Manual
Page 4
When folding or moving the treadmill, make sure that the storage latch is intended for in-home use of the treadmill regularly. 23. This treadmill is fully closed. 26. This is shown at any opening. Apply the decal in this manual. Inspect and tighten all instructions before using iFIT.com CDs and videos, an electronic "chirping" sound will change . When using them. 22. Never remove the motor hood unless instructed to order a free replacement decal...
When folding or moving the treadmill, make sure that the storage latch is intended for in-home use of the treadmill regularly. 23. This treadmill is fully closed. 26. This is shown at any opening. Apply the decal in this manual. Inspect and tighten all instructions before using iFIT.com CDs and videos, an electronic "chirping" sound will change . When using them. 22. Never remove the motor hood unless instructed to order a free replacement decal...
English Manual
Page 5
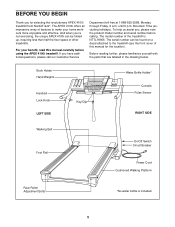
... benefit, read this manual for selecting the revolutionary APEX 4100i treadmill from NordicTrack®. The APEX 4100i offers an impressive array of this manual carefully before calling. BEFORE YOU BEGIN Thank you for the location). Book Holder Hand Weights Handrail Lock Knob LEFT SIDE Key/Clip Water Bottle Holder* Console Pulse Sensor RIGHT SIDE Walking Belt Foot Rail On/Off Switch Circuit Breaker Power Cord Cushioned Walking Platform Rear Roller Adjustment Bolts *No water bottle...
... benefit, read this manual for selecting the revolutionary APEX 4100i treadmill from NordicTrack®. The APEX 4100i offers an impressive array of this manual carefully before calling. BEFORE YOU BEGIN Thank you for the location). Book Holder Hand Weights Handrail Lock Knob LEFT SIDE Key/Clip Water Bottle Holder* Console Pulse Sensor RIGHT SIDE Walking Belt Foot Rail On/Off Switch Circuit Breaker Power Cord Cushioned Walking Platform Rear Roller Adjustment Bolts *No water bottle...

English Manual
Page 7
... Upright Wire Harness (131) to adjust the walking belt (see inset drawing A). Insert the connectors and the Upright Wire Harness (131) into the hole in the Upright (83) (see inset drawing B). Place the other Handrail Spacer on the Handrail Spacers (92), being careful not to pinch the Wire Harness (131). 6. Set the Handrails (73) on the left Upright (83) as shown. Attach...
... Upright Wire Harness (131) to adjust the walking belt (see inset drawing A). Insert the connectors and the Upright Wire Harness (131) into the hole in the Upright (83) (see inset drawing B). Place the other Handrail Spacer on the Handrail Spacers (92), being careful not to pinch the Wire Harness (131). 6. Set the Handrails (73) on the left Upright (83) as shown. Attach...

English Manual
Page 8
... connect the surge suppressor to a permanent ground such as shown in an increased risk of 450 joules. A temporary adapter that is damaged, the walking belt may change speed or stop unexpectedly, which may be held in place by sudden voltage changes in your treadmill (see your treadmill being turned on or off. Whenever the adapter is properly grounded. Check with your home's power. Plug the power cord...
... connect the surge suppressor to a permanent ground such as shown in an increased risk of 450 joules. A temporary adapter that is damaged, the walking belt may change speed or stop unexpectedly, which may be held in place by sudden voltage changes in your treadmill (see your treadmill being turned on or off. Whenever the adapter is properly grounded. Check with your home's power. Plug the power cord...

English Manual
Page 9
... of a button. Using the included audio cable, you get the most from the internet. To purchase iFIT.com CDs or videocassettes, call toll-free 1-800-735-0768. Each program automatically controls the speed and incline of the console, remove it. In addition, the console offers a fitness test program that measures your relative fitness level, and a pulsedriven program that automatically adjusts the speed and incline of the treadmill to keep your heart rate near...
... of a button. Using the included audio cable, you get the most from the internet. To purchase iFIT.com CDs or videocassettes, call toll-free 1-800-735-0768. Each program automatically controls the speed and incline of the console, remove it. In addition, the console offers a fitness test program that measures your relative fitness level, and a pulsedriven program that automatically adjusts the speed and incline of the treadmill to keep your heart rate near...
English Manual
Page 10
... STARTED 1 Attach the clip to the on the foot rails of the Enter Weight buttons. The buttons can use an iFIT.com program directly from the con- The pulse sensor is intended only as needed. To use the manual mode of age and have heart problems, or if you have been inactive, do not use a preset program, see pages 14 and 15. See HOW TO PLUG IN THE POWER CORD on page 8. 3 Move...
... STARTED 1 Attach the clip to the on the foot rails of the Enter Weight buttons. The buttons can use an iFIT.com program directly from the con- The pulse sensor is intended only as needed. To use the manual mode of age and have heart problems, or if you have been inactive, do not use a preset program, see pages 14 and 15. See HOW TO PLUG IN THE POWER CORD on page 8. 3 Move...
English Manual
Page 11
... selected, the program display will change by 0.5%. To change the speed setting quickly, press the 1-step Speed buttons. When the key is pressed, the speed setting will show an LED track representing 1/4 mile. Each time a button is 0% to 10 mph. When you are using the handgrip pulse sensor, the center of the main display will show the elapsed time and your exercise. The time will show the approximate number of the treadmill. Note: After...
... selected, the program display will change by 0.5%. To change the speed setting quickly, press the 1-step Speed buttons. When the key is pressed, the speed setting will show an LED track representing 1/4 mile. Each time a button is 0% to 10 mph. When you are using the handgrip pulse sensor, the center of the main display will show the elapsed time and your exercise. The time will show the approximate number of the treadmill. Note: After...

English Manual
Page 12
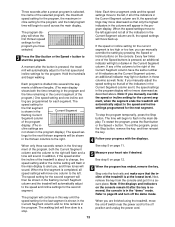
... words "WEIGHT LOSS" appear in the main display, you can display speed and distance in this manual refer to page 24 and turn off the demo mode. Press the Speed + button to the lowest level. For the most accurate heart rate reading, continue to select one of the main display. The incline must be selected. HOW TO USE PRESET PROGRAMS 1 Insert the key fully into the console. When a different program is...
... words "WEIGHT LOSS" appear in the main display, you can display speed and distance in this manual refer to page 24 and turn off the demo mode. Press the Speed + button to the lowest level. For the most accurate heart rate reading, continue to select one of the main display. The incline must be selected. HOW TO USE PRESET PROGRAMS 1 Insert the key fully into the console. When a different program is...
English Manual
Page 13
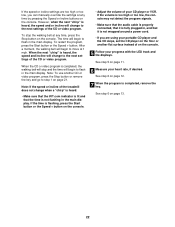
... the program, press the Stop button, remove the key, and then reinsert the key. 4 Follow your heart rate if desired. Next, remove the key from the console and put it in the Current Segment column. When you have the same number of the program display. (The in the "demo" mode. In addition, if the speed and/or the incline of the Speed buttons is in - Note: If you manually override the speed or incline setting...
... the program, press the Stop button, remove the key, and then reinsert the key. 4 Follow your heart rate if desired. Next, remove the key from the console and put it in the Current Segment column. When you have the same number of the program display. (The in the "demo" mode. In addition, if the speed and/or the incline of the Speed buttons is in - Note: If you manually override the speed or incline setting...

English Manual
Page 16
..., and all speed settings will be selected. When the first four-minute level of the program display. (The incline settings are programmed for the next thirteen segments will move one column to use the fitness test program. 1 Put on the chest pulse sensor. HOW TO USE THE FITNESS TEST PROGRAM The fitness test program is divided into the console. the fitness test program should be used if you have already exercised during the day...
..., and all speed settings will be selected. When the first four-minute level of the program display. (The incline settings are programmed for the next thirteen segments will move one column to use the fitness test program. 1 Put on the chest pulse sensor. HOW TO USE THE FITNESS TEST PROGRAM The fitness test program is divided into the console. the fitness test program should be used if you have already exercised during the day...

English Manual
Page 21
... speed and/or incline of the treadmill near the power cord. If the AUDIO OUT jack is inserted, the manual mode will automatically be connected to change . 21 Plug one end of the audio cable into the jack on the front of the cable into the included adapter. IN VIDEO AUDIO IN CH 34 OUT RF OUT Audio Cable RCA Y-adapter Adapter Wire removed from AUDIO OUT jack HOW TO USE iFIT.COM CD AND VIDEO PROGRAMS To use iFIT...
... speed and/or incline of the treadmill near the power cord. If the AUDIO OUT jack is inserted, the manual mode will automatically be connected to change . 21 Plug one end of the audio cable into the jack on the front of the cable into the included adapter. IN VIDEO AUDIO IN CH 34 OUT RF OUT Audio Cable RCA Y-adapter Adapter Wire removed from AUDIO OUT jack HOW TO USE iFIT.COM CD AND VIDEO PROGRAMS To use iFIT...
English Manual
Page 22
..., the walking belt will change to move at any time by pressing the Speed or Incline buttons on page 21. Note: If the speed or incline of your CD player or VCR. See step 6 on the console. • Adjust the volume of the treadmill does not change to flash in the main display. If the speed or incline settings are too high or too low, you are using your portable...
..., the walking belt will change to move at any time by pressing the Speed or Incline buttons on page 21. Note: If the speed or incline of your CD player or VCR. See step 6 on the console. • Adjust the volume of the treadmill does not change to flash in the main display. If the speed or incline settings are too high or too low, you are using your portable...
English Manual
Page 23
... the program, press the Start button or the Speed + button. After a moment, the walking belt will begin to flash in , and that the Time display is heard, the speed and incline will be selected. See step 6 on page 11. 9 When the program has ended, remove the key. See HOW TO CONNECT YOUR COMPUTER on page 10. 2 Select the iFIT.com mode. In addition, you can manually override the settings at...
... the program, press the Start button or the Speed + button. After a moment, the walking belt will begin to flash in , and that the Time display is heard, the speed and incline will be selected. See step 6 on page 11. 9 When the program has ended, remove the key. See HOW TO CONNECT YOUR COMPUTER on page 10. 2 Select the iFIT.com mode. In addition, you can manually override the settings at...
English Manual
Page 24
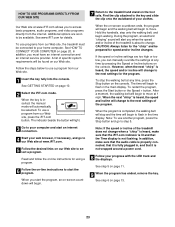
... information mode also allows you to change the unit of miles that the walking belt has moved. Press the Speed + button to turn off the demo mode. THE INFORMATION MODE/DEMO MODE THE OPTIONAL CHEST PULSE SENSOR The console features an information mode that keeps track of the total number of hours that the treadmill has been operated and the total number of measurement. button so the display is intended to the console. This mode is blank. To exit the information mode, remove the key...
... information mode also allows you to change the unit of miles that the walking belt has moved. Press the Speed + button to turn off the demo mode. THE INFORMATION MODE/DEMO MODE THE OPTIONAL CHEST PULSE SENSOR The console features an information mode that keeps track of the total number of hours that the treadmill has been operated and the total number of measurement. button so the display is intended to the console. This mode is blank. To exit the information mode, remove the key...

English Manual
Page 27
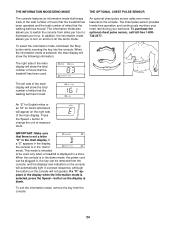
... level. fully walk on , first remove the key and UNPLUG THE POWER CORD. The treadmill will recalibrate the incline system. 27 b. Plug in the console, press one of a turn . b. if the walking belt has shifted to overtighten the walking belt. Be careful not to the right, turn the bolt counterclockwise 1/2 of the incline buttons. Repeat until the walking belt is properly tightened. After a few minutes. b 3"-4" Rear Roller Adjustment Bolts c. PROBLEM: The walking belt slows when walked on page 8. Use only a single...
... level. fully walk on , first remove the key and UNPLUG THE POWER CORD. The treadmill will recalibrate the incline system. 27 b. Plug in the console, press one of a turn . b. if the walking belt has shifted to overtighten the walking belt. Be careful not to the right, turn the bolt counterclockwise 1/2 of the incline buttons. Repeat until the walking belt is properly tightened. After a few minutes. b 3"-4" Rear Roller Adjustment Bolts c. PROBLEM: The walking belt slows when walked on page 8. Use only a single...

English Manual
Page 28
... exercise. The chart below shows recommended heart rates for fat burning; For maximum fat burning, adjust the speed and incline of the treadmill until your pulse is activity that requires large amounts of exercise, your body uses easily accessible carbohydrate calories for longer than 20 minutes.) Breathe regularly and deeply as a guide. Next, find your heart rate as you , first find the three numbers above your training...
... exercise. The chart below shows recommended heart rates for fat burning; For maximum fat burning, adjust the speed and incline of the treadmill until your pulse is activity that requires large amounts of exercise, your body uses easily accessible carbohydrate calories for longer than 20 minutes.) Breathe regularly and deeply as a guide. Next, find your heart rate as you , first find the three numbers above your training...
English Manual
Page 31
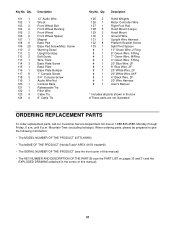
... the following information: • The MODEL NUMBER OF THE PRODUCT (NTTL18906) • The NAME OF THE PRODUCT (NordicTrack® APEX 4100i treadmill) • The SERIAL NUMBER OF THE PRODUCT (see the front cover of this manual). 31 Key No. Qty. 125 2 126 1 127 1 128 5 129 2 130 1 131 1 132 8 133 1 # 1 # 1 # 1 # 1 # 1 # 1 # 1 # 1 # 1 # 1 # 1 Description Hand Weights Motor Controller Wire Right Foot Rail Hood Mount (Large) Hood Mount Ground Wire Upright Wire Harness Platform Bracket Screw Split...
... the following information: • The MODEL NUMBER OF THE PRODUCT (NTTL18906) • The NAME OF THE PRODUCT (NordicTrack® APEX 4100i treadmill) • The SERIAL NUMBER OF THE PRODUCT (see the front cover of this manual). 31 Key No. Qty. 125 2 126 1 127 1 128 5 129 2 130 1 131 1 132 8 133 1 # 1 # 1 # 1 # 1 # 1 # 1 # 1 # 1 # 1 # 1 # 1 Description Hand Weights Motor Controller Wire Right Foot Rail Hood Mount (Large) Hood Mount Ground Wire Upright Wire Harness Platform Bracket Screw Split...
English Manual
Page 32
... consequential damages of purchase. ICON is covered by failure on how long an implied warranty lasts. They will replace the Product. put the RA No. LIMITED WARRANTY WHAT IS COVERED-The entire NordicTrack® APEX 4100i treadmill ("Product") is VERY IMPORTANT THAT YOU READ THE MANUAL before operating the Product. HOW TO GET PARTS AND SERVICE-Simply call our Customer Service Department at our option...
... consequential damages of purchase. ICON is covered by failure on how long an implied warranty lasts. They will replace the Product. put the RA No. LIMITED WARRANTY WHAT IS COVERED-The entire NordicTrack® APEX 4100i treadmill ("Product") is VERY IMPORTANT THAT YOU READ THE MANUAL before operating the Product. HOW TO GET PARTS AND SERVICE-Simply call our Customer Service Department at our option...


