
User Manual
Page 2
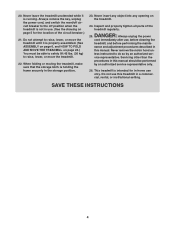
NordicTrack is missing or illegible, call the telephone number on the front cover of ICON IP, Inc. 2 Note: The decals may not be shown at actual ... DECAL PLACEMENT 2 IMPORTANT PRECAUTIONS 3 BEFORE YOU BEGIN 5 ASSEMBLY 6 OPERATION AND ADJUSTMENT 12 HOW TO FOLD AND MOVE THE TREADMILL 24 TROUBLESHOOTING 26 EXERCISE GUIDELINES 29 PART LIST 30 EXPLODED DRAWING 32 ORDERING REPLACEMENT PARTS Back Cover LIMITED WARRANTY Back Cover WARNING DECAL PLACEMENT The decals shown here have been applied in the location...
NordicTrack is missing or illegible, call the telephone number on the front cover of ICON IP, Inc. 2 Note: The decals may not be shown at actual ... DECAL PLACEMENT 2 IMPORTANT PRECAUTIONS 3 BEFORE YOU BEGIN 5 ASSEMBLY 6 OPERATION AND ADJUSTMENT 12 HOW TO FOLD AND MOVE THE TREADMILL 24 TROUBLESHOOTING 26 EXERCISE GUIDELINES 29 PART LIST 30 EXPLODED DRAWING 32 ORDERING REPLACEMENT PARTS Back Cover LIMITED WARRANTY Back Cover WARNING DECAL PLACEMENT The decals shown here have been applied in the location...
User Manual
Page 4
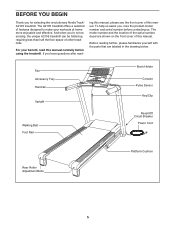
...while it is properly assembled. (See ASSEMBLY on page 6, and HOW TO FOLD AND MOVE THE TREADMILL on page 24.) You must be performed by an authorized ser- Inspect and properly tighten all parts of the circuit breaker.) 21. Never insert any object into any opening on page 5 for in... the storage position. 23. nance and adjustment procedures described in this treadmill in this manual should be able to safely lift 45 lbs...
...while it is properly assembled. (See ASSEMBLY on page 6, and HOW TO FOLD AND MOVE THE TREADMILL on page 24.) You must be performed by an authorized ser- Inspect and properly tighten all parts of the circuit breaker.) 21. Never insert any object into any opening on page 5 for in... the storage position. 23. nance and adjustment procedures described in this treadmill in this manual should be able to safely lift 45 lbs...
User Manual
Page 5
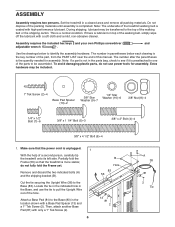
...of this manual carefully before contacting us assist you for selecting the revolutionary NordicTrack® A2105 treadmill. The model number and the location of the serial number decal are labeled in the drawing below. The A2105 treadmill offers a selection of this manual. ing this manual, please see the... front cover of features designed to make your benefit, read - Before reading further, please familiarize yourself with the parts that are shown on the front cover...
...of this manual carefully before contacting us assist you for selecting the revolutionary NordicTrack® A2105 treadmill. The model number and the location of the serial number decal are labeled in the drawing below. The A2105 treadmill offers a selection of this manual. ing this manual, please see the... front cover of features designed to make your benefit, read - Before reading further, please familiarize yourself with the parts that are shown on the front cover...
User Manual
Page 6
... help of the walking belt or the shipping carton. Note: If a part is not in the Base, and use power tools for assembly. Make sure that the treadmill is a normal condition. Locate the tie in the indicated hole in the parts bag, check to see if it is coated with a soft cloth and... a mild, non-abrasive cleaner. Note: The underside of the treadmill walking belt is preattached to one of the parts to pull the Upright Wire out of this manual. Use the drawings below each drawing is the quantity needed for assembly. The...
... help of the walking belt or the shipping carton. Note: If a part is not in the Base, and use power tools for assembly. Make sure that the treadmill is a normal condition. Locate the tie in the indicated hole in the parts bag, check to see if it is coated with a soft cloth and... a mild, non-abrasive cleaner. Note: The underside of the treadmill walking belt is preattached to one of the parts to pull the Upright Wire out of this manual. Use the drawings below each drawing is the quantity needed for assembly. The...

User Manual
Page 10
...: It may be necessary to move the Frame back and forth to the position shown. To protect the floor or carpet, place a mat under the treadmill. Raise the Frame (56) to align the Storage Latch with a 3/8" x 2" Bolt (4) and a 3/8" Nut (8). Attach the upper end of the Storage Latch (53) to ...: Extra hardware may be included. the large hex key is completed. Pull on the treadmill decals, remove the plastic. Orient the Storage Latch (53) so that all parts are sheets of the tube. Keep the included hex keys in a secure place; Make sure that the sleeve has been slid over hole ...
...: It may be necessary to move the Frame back and forth to the position shown. To protect the floor or carpet, place a mat under the treadmill. Raise the Frame (56) to align the Storage Latch with a 3/8" x 2" Bolt (4) and a 3/8" Nut (8). Attach the upper end of the Storage Latch (53) to ...: Extra hardware may be included. the large hex key is completed. Pull on the treadmill decals, remove the plastic. Orient the Storage Latch (53) so that all parts are sheets of the tube. Keep the included hex keys in a secure place; Make sure that the sleeve has been slid over hole ...


