
User Manual
Page 2
... in personal injury or damage to use the Wii system, a parent or other property. Throughout this symbol followed by Nintendo. Elements of Wii Remote Synchronizing Your Wii Remote and Wii Console Using Game Discs Wii System Play Guidelines Using the Wii Remote Using the Nunchuk Using... Nintendo GameCube Controllers Using Memory Cards Troubleshooting FCC Information Warranty and Service Information 2-3 4-5 6 7 8 8 9 9 9 10-11 12 13-17 17 18...
... in personal injury or damage to use the Wii system, a parent or other property. Throughout this symbol followed by Nintendo. Elements of Wii Remote Synchronizing Your Wii Remote and Wii Console Using Game Discs Wii System Play Guidelines Using the Wii Remote Using the Nunchuk Using... Nintendo GameCube Controllers Using Memory Cards Troubleshooting FCC Information Warranty and Service Information 2-3 4-5 6 7 8 8 9 9 9 10-11 12 13-17 17 18...

User Manual
Page 3
...screen. • Do not play if you feel dizzy or nauseous when playing video games, stop playing and see a doctor. Laser Device The Wii console is fully inserted into the wall outlet or extension cord. • Always carefully disconnect all plugs by light flashes or patterns, and this system: ...• Do not use of electric shock from an outlet. Refer servicing to disassemble the Wii console. Caution: Use of a seizure when playing video games: • Sit or stand as far from the screen as tendinitis, carpal tunnel syndrome, ...
...screen. • Do not play if you feel dizzy or nauseous when playing video games, stop playing and see a doctor. Laser Device The Wii console is fully inserted into the wall outlet or extension cord. • Always carefully disconnect all plugs by light flashes or patterns, and this system: ...• Do not use of electric shock from an outlet. Refer servicing to disassemble the Wii console. Caution: Use of a seizure when playing video games: • Sit or stand as far from the screen as tendinitis, carpal tunnel syndrome, ...

User Manual
Page 4
...AV cable for your television. Do not remove battery cover unless instructed to turn the console ON or OFF. Components Components Wii Console POWER Button Press to do so by a Nintendo Customer Service representative. 5 Components NOTE: The Power LED does not go out when the...ON. RESET Press to the Sensor Bar. See pages 24-25. Sensor Bar Connector Connects to restart a game. Wii Console Slot A Slot B Nintendo GameCube Memory Card Slots For use with Nintendo GameCube Controllers. 4 3 2 1 Air Intake Battery Cover For access to CR Coin Lithium battery (CR2032). Green - ...
...AV cable for your television. Do not remove battery cover unless instructed to turn the console ON or OFF. Components Components Wii Console POWER Button Press to do so by a Nintendo Customer Service representative. 5 Components NOTE: The Power LED does not go out when the...ON. RESET Press to the Sensor Bar. See pages 24-25. Sensor Bar Connector Connects to restart a game. Wii Console Slot A Slot B Nintendo GameCube Memory Card Slots For use with Nintendo GameCube Controllers. 4 3 2 1 Air Intake Battery Cover For access to CR Coin Lithium battery (CR2032). Green - ...

User Manual
Page 5
...synchronizing a Wii Remote with the Wii MotionPlus accessory removed and the Wii Remote jacket attached.) Pointer Lens Power Button Press to turn the Wii console ON or OFF. +Control Pad A Button HOME Button Press to lock Wii MotionPlus into these slots. See pages 24-25. Wrist Strap .... Lock Switch Slide towards the top of the Wii Remote to display the HOME Menu screen. Components Components Wii Remote (Shown with the console. Wii Remote Wrist Strap See page 23 for more information. External Extension Connector For connecting accessories such as the Nunchuk. To take advantage...
...synchronizing a Wii Remote with the Wii MotionPlus accessory removed and the Wii Remote jacket attached.) Pointer Lens Power Button Press to turn the Wii console ON or OFF. +Control Pad A Button HOME Button Press to lock Wii MotionPlus into these slots. See pages 24-25. Wrist Strap .... Lock Switch Slide towards the top of the Wii Remote to display the HOME Menu screen. Components Components Wii Remote (Shown with the console. Wii Remote Wrist Strap See page 23 for more information. External Extension Connector For connecting accessories such as the Nunchuk. To take advantage...

User Manual
Page 6
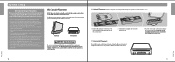
... to return to the normal neutral position, then simultaneously hold down the A, B, Plus (+) and Minus (-) buttons on a television. Wii Console Stand DC Plug Connects to the DC Input connector on the Wii Remote. Sensor Bar Stand See page 16 for installation instructions. Wii Stand ... Nunchuk gameplay features. Components Components Nunchuk™ Control Stick Nunchuk Plug Connects to the External Extension Connector on the back of the Wii console. Z Button C Button Lock/Release Levers Squeeze levers to a 120V AC wall outlet. Wii AC Adapter AC Plug Connects to remove plug...
... to return to the normal neutral position, then simultaneously hold down the A, B, Plus (+) and Minus (-) buttons on a television. Wii Console Stand DC Plug Connects to the DC Input connector on the Wii Remote. Sensor Bar Stand See page 16 for installation instructions. Wii Stand ... Nunchuk gameplay features. Components Components Nunchuk™ Control Stick Nunchuk Plug Connects to the External Extension Connector on the back of the Wii console. Z Button C Button Lock/Release Levers Squeeze levers to a 120V AC wall outlet. Wii AC Adapter AC Plug Connects to remove plug...
User Manual
Page 7
...damp cloth. Then carefully pull by the plug itself rather than by inserting the prongs into slots in a vertical position. Console Damage The console can be placed in a vertical or horizontal position. If they become covered or obstructed, for free flow of ventilation around ...- If located in a vertical position, it in a tightly enclosed space. Attach the Wii stand plate to repair the Wii console, accessories or components. Lower the console straight down into the stand. System Setup System Setup 10 11 Keep vents clear of any AC Adapter other foreign material. ...
...damp cloth. Then carefully pull by the plug itself rather than by inserting the prongs into slots in a vertical position. Console Damage The console can be placed in a vertical or horizontal position. If they become covered or obstructed, for free flow of ventilation around ...- If located in a vertical position, it in a tightly enclosed space. Attach the Wii stand plate to repair the Wii console, accessories or components. Lower the console straight down into the stand. System Setup System Setup 10 11 Keep vents clear of any AC Adapter other foreign material. ...

User Manual
Page 8
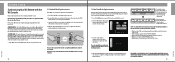
... placed either above the screen. Insert the AV Multi Out plug on the Wii AV Cable into the Sensor Bar connector on the back of Nintendo's licensees will not work with any TV, especially front and rear projection or plasma models, be sure to review all documentation included with your TV... your TV has component video inputs. 12 CAUTION - If in doubt, contact the manufacturer of damage. Neither Nintendo nor any damage to the top of the TV. • See page 15 for any of the console. 2. Insert the RCA plugs on the Wii AV Cable into the screen. RVL-011) can be...
... placed either above the screen. Insert the AV Multi Out plug on the Wii AV Cable into the Sensor Bar connector on the back of Nintendo's licensees will not work with any TV, especially front and rear projection or plasma models, be sure to review all documentation included with your TV... your TV has component video inputs. 12 CAUTION - If in doubt, contact the manufacturer of damage. Neither Nintendo nor any damage to the top of the TV. • See page 15 for any of the console. 2. Insert the RCA plugs on the Wii AV Cable into the screen. RVL-011) can be...

User Manual
Page 10
... the TV if part of the TV blocks, or prevents proper installation of, the Sensor Bar. Insert the DC plug on the back of the console. 2. CAUTION: To prevent electric shock, match the wide blade of the plug to the Sensor Bar, aligning the pegs remove the protective film from...
... the TV if part of the TV blocks, or prevents proper installation of, the Sensor Bar. Insert the DC plug on the back of the console. 2. CAUTION: To prevent electric shock, match the wide blade of the plug to the Sensor Bar, aligning the pegs remove the protective film from...

User Manual
Page 11
...sounds. Manufacturers of TVs and VCRs use damaged, deformed or leaking batteries. • Do not dispose of batteries in a fire. Nintendo recommends high quality alkaline batteries for more information on -screen menu selection. If battery leakage occurs, thoroughly wash the affected skin and clothes. ...setting for your TV or VCR instruction manual for safety and proper usage. NOTE: More information on "Input Select" is available on the Wii console. 2. If you use . • Do not recharge alkaline or non-rechargeable batteries. • Do not put the batteries in backwards....
...sounds. Manufacturers of TVs and VCRs use damaged, deformed or leaking batteries. • Do not dispose of batteries in a fire. Nintendo recommends high quality alkaline batteries for more information on -screen menu selection. If battery leakage occurs, thoroughly wash the affected skin and clothes. ...setting for your TV or VCR instruction manual for safety and proper usage. NOTE: More information on "Input Select" is available on the Wii console. 2. If you use . • Do not recharge alkaline or non-rechargeable batteries. • Do not put the batteries in backwards....
User Manual
Page 14
...cover on the inside the cover. The LED that remote. This procedure must be followed for each additional Wii Remote added to a different console. When the power is being synchronized. When the blinking stops, the connection is illuminated indicates the player number. STANDARD MODE - ONE TIME... MODE - This mode allows you press the Reset Button on the back of the Wii console is synchronized with the Wii MotionPlus accessory removed. 24 One Time Mode Synchronization NOTE: This mode temporarily removes the Standard Mode synchronization setup...
...cover on the inside the cover. The LED that remote. This procedure must be followed for each additional Wii Remote added to a different console. When the power is being synchronized. When the blinking stops, the connection is illuminated indicates the player number. STANDARD MODE - ONE TIME... MODE - This mode allows you press the Reset Button on the back of the Wii console is synchronized with the Wii MotionPlus accessory removed. 24 One Time Mode Synchronization NOTE: This mode temporarily removes the Standard Mode synchronization setup...

User Manual
Page 15
... and the Wii console with objects. • Use the remote the correct distance from center towards the edges; NOTE: Please read the Disc Channel section in the Operations manual included with your Wii system for complete information on using the Wii Remote, Nunchuk and Nintendo GameCube Controllers before ...Play Guidelines For best results when using Wii or GameCube Game Discs in front of the TV. Wii Disc Nintendo GameCube Disc Label faces towards the right side of the Wii console Label faces towards the remote or reflecting off of the screen. • Avoid highly re&#...
... and the Wii console with objects. • Use the remote the correct distance from center towards the edges; NOTE: Please read the Disc Channel section in the Operations manual included with your Wii system for complete information on using the Wii Remote, Nunchuk and Nintendo GameCube Controllers before ...Play Guidelines For best results when using Wii or GameCube Game Discs in front of the TV. Wii Disc Nintendo GameCube Disc Label faces towards the right side of the Wii console Label faces towards the remote or reflecting off of the screen. • Avoid highly re&#...

User Manual
Page 18
... position, you are playing for the number and position of the console. 3. Remove the cover by pulling straight up Horizontal Position 1. Using Nintendo GameCube Controllers Using Nintendo GameCube™ Controllers Setup of Nintendo GameCube Controllers NOTE: When using GameCube Controllers with the Wii console, be sure and use the stand plate to help prevent the...
... position, you are playing for the number and position of the console. 3. Remove the cover by pulling straight up Horizontal Position 1. Using Nintendo GameCube Controllers Using Nintendo GameCube™ Controllers Setup of Nintendo GameCube Controllers NOTE: When using GameCube Controllers with the Wii console, be sure and use the stand plate to help prevent the...

User Manual
Page 19
...Using Memory Cards Using Memory Cards See the SD Card Menu and Photo Channel sections in the Wii - Channels and Settings for Nintendo GameCube Game Discs. The Wii console accepts only SD or SDHC Cards (32 GB maximum), including miniSD or SDHC and microSD or SDHC Cards when used in many ...as shown below. Note: Label faces towards the Wii game disc slot Using Nintendo GameCube Memory Cards NOTE: Nintendo GameCube Memory Cards can only be found in the Wii Operations Manual - Systems and Accessories section of the Wii console. To use an SD Card, open the slot cover and insert the ...
...Using Memory Cards Using Memory Cards See the SD Card Menu and Photo Channel sections in the Wii - Channels and Settings for Nintendo GameCube Game Discs. The Wii console accepts only SD or SDHC Cards (32 GB maximum), including miniSD or SDHC and microSD or SDHC Cards when used in many ...as shown below. Note: Label faces towards the Wii game disc slot Using Nintendo GameCube Memory Cards NOTE: Nintendo GameCube Memory Cards can only be found in the Wii Operations Manual - Systems and Accessories section of the Wii console. To use an SD Card, open the slot cover and insert the ...

User Manual
Page 20
...are securely plugged into cracks. 4. Bright light sources, including sunlight, behind or near the sensor bar. 4. Check for at least 2 hours. 5. Turn the console power ON. The label side of heat. 5. Dip the toothbrush in the gameplay area such as cordless phones, wireless computer keyboards or mice or other...) to re-sync the remote, try playing the game again. • Check that the Game Disc is between the Sensor Bar, the Wii console, and the Wii Remote. • Make sure batteries are affecting the operation of the audio cables unconnected you may cause the Wii Remote to ...
...are securely plugged into cracks. 4. Bright light sources, including sunlight, behind or near the sensor bar. 4. Check for at least 2 hours. 5. Turn the console power ON. The label side of heat. 5. Dip the toothbrush in the gameplay area such as cordless phones, wireless computer keyboards or mice or other...) to re-sync the remote, try playing the game again. • Check that the Game Disc is between the Sensor Bar, the Wii console, and the Wii Remote. • Make sure batteries are affecting the operation of the audio cables unconnected you may cause the Wii Remote to ...

User Manual
Page 21
...Wii MotionPlus, or the television. Hold the jacket and accessory so they both face forwards. Changing batteries in jacket 5. Visit support.nintendo.com for input signals. Troubleshooting Troubleshooting The Wii Remote with Wii MotionPlus attached does not respond • Make sure the Wii ...the Language Select screen • Synchronize your Wii system still does not operate correctly after trying the troubleshooting steps, DO NOT return the console to be done during gameplay. 3. You will lose saved game data and all Wii Shop Channel downloads and Wii Points. Press the ...
...Wii MotionPlus, or the television. Hold the jacket and accessory so they both face forwards. Changing batteries in jacket 5. Visit support.nintendo.com for input signals. Troubleshooting Troubleshooting The Wii Remote with Wii MotionPlus attached does not respond • Make sure the Wii ...the Language Select screen • Synchronize your Wii system still does not operate correctly after trying the troubleshooting steps, DO NOT return the console to be done during gameplay. 3. You will lose saved game data and all Wii Shop Channel downloads and Wii Points. Press the ...


