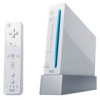

User Manual
Page 2
... in serious personal injury. Always look for use of Wii Remote Synchronizing Your Wii Remote and Wii Console Using Game Discs Wii System Play Guidelines Using the Wii Remote Using the Nunchuk Using Nintendo GameCube Controllers Using Memory Cards Troubleshooting FCC Information Warranty and Service Information 2-3 4-5 6 7 8 8...DVD discs. NOTE: This product only plays Wii Game Discs and Nintendo GameCube™ Game Discs labeled with "For use the Wii system, a parent or other property. Elements of the Wii console and the Wii Network Services are trademarks of the Wii system ...
... in serious personal injury. Always look for use of Wii Remote Synchronizing Your Wii Remote and Wii Console Using Game Discs Wii System Play Guidelines Using the Wii Remote Using the Nunchuk Using Nintendo GameCube Controllers Using Memory Cards Troubleshooting FCC Information Warranty and Service Information 2-3 4-5 6 7 8 8...DVD discs. NOTE: This product only plays Wii Game Discs and Nintendo GameCube™ Game Discs labeled with "For use the Wii system, a parent or other property. Elements of the Wii console and the Wii Network Services are trademarks of the Wii system ...

User Manual
Page 3
... adjustments or procedures other discomfort during a lightning storm. This product complies with your system. • Do not use the Wii console or remote without first consulting your hands, wrists, arms or eyes become tired or sore while playing, or if you are watching...video games on the cord. WARNING - Motion Sickness Playing video games can make your child feel better. Refer servicing to disassemble the Wii console. Health and Safety Information IMPORTANT SAFETY INFORMATION - READ THE FOLLOWING WARNINGS BEFORE SETUP OR USE OF THE Wii. There may result in ...
... adjustments or procedures other discomfort during a lightning storm. This product complies with your system. • Do not use the Wii console or remote without first consulting your hands, wrists, arms or eyes become tired or sore while playing, or if you are watching...video games on the cord. WARNING - Motion Sickness Playing video games can make your child feel better. Refer servicing to disassemble the Wii console. Health and Safety Information IMPORTANT SAFETY INFORMATION - READ THE FOLLOWING WARNINGS BEFORE SETUP OR USE OF THE Wii. There may result in ...

User Manual
Page 4
... ON. DC Input Connector Connects to turn the console ON or OFF. special handling may apply. Power LED Shows the status of the Wii console. SYNCHRO Button (SYNC.) Used when synchronizing a Wii Remote with Nintendo GameCube Memory Cards. Sensor Bar Connector Connects to ...35. Air Vent Do not block. AV Multi Out Connector Connects to do so by a Nintendo Customer Service representative. 5 Components Wii Console Slot A Slot B Nintendo GameCube Memory Card Slots For use with Nintendo GameCube Controllers. 4 3 2 1 Air Intake Battery Cover For access to CR Coin Lithium ...
... ON. DC Input Connector Connects to turn the console ON or OFF. special handling may apply. Power LED Shows the status of the Wii console. SYNCHRO Button (SYNC.) Used when synchronizing a Wii Remote with Nintendo GameCube Memory Cards. Sensor Bar Connector Connects to ...35. Air Vent Do not block. AV Multi Out Connector Connects to do so by a Nintendo Customer Service representative. 5 Components Wii Console Slot A Slot B Nintendo GameCube Memory Card Slots For use with Nintendo GameCube Controllers. 4 3 2 1 Air Intake Battery Cover For access to CR Coin Lithium ...

User Manual
Page 5
... Wii Remote (Shown with the Wii MotionPlus accessory removed and the Wii Remote jacket attached.) Pointer Lens Power Button Press to turn the Wii console ON or OFF. +Control Pad A Button HOME Button Press to be used with Wii MotionPlus. Back view Bottom view Connector cover attached Wii... Connector on the bottom of the Wii Remote to be disconnected from the Wii Remote. NOTE: Your Wii Remote will still function normally with the console. See page 64, Wii Operations Manual Channel and Settings, for games that attach in a similar way. 7 Components Wii Remote Wrist Strap See...
... Wii Remote (Shown with the Wii MotionPlus accessory removed and the Wii Remote jacket attached.) Pointer Lens Power Button Press to turn the Wii console ON or OFF. +Control Pad A Button HOME Button Press to be used with Wii MotionPlus. Back view Bottom view Connector cover attached Wii... Connector on the bottom of the Wii Remote to be disconnected from the Wii Remote. NOTE: Your Wii Remote will still function normally with the console. See page 64, Wii Operations Manual Channel and Settings, for games that attach in a similar way. 7 Components Wii Remote Wrist Strap See...

User Manual
Page 6
...(Left) Audio (Right) RCA Plugs Plug into the AV input connectors on the remote for three seconds. Wii Stand Plate NOTE: The Wii Console Stand and Wii Stand Plate come already assembled together, as neutral position, causing incorrect game control during game play. Look for this from occurring, ...do not move the Control Stick when: • Turning the Wii console on • Plugging the Nunchuk into the Wii Remote • Starting Channels from the Channel Menu • Returning to the Wii Menu from ...
...(Left) Audio (Right) RCA Plugs Plug into the AV input connectors on the remote for three seconds. Wii Stand Plate NOTE: The Wii Console Stand and Wii Stand Plate come already assembled together, as neutral position, causing incorrect game control during game play. Look for this from occurring, ...do not move the Control Stick when: • Turning the Wii console on • Plugging the Nunchuk into the Wii Remote • Starting Channels from the Channel Menu • Returning to the Wii Menu from ...
User Manual
Page 7
Then carefully pull by the plug itself rather than by the cord. • Do not step on a flat surface and place the console into the slots as shown above. 2. Use water only. Attach the Wii stand plate to extreme heat or cold. • Do not spill.... System Setup System Setup 10 11 Failure to do so may become separated, see instructions below when setting up the console that has enough room to maintain adequate ventilation. Wii Console Placement NOTE: Choose a location to set up and using . Vertical Horizontal CAUTION - If they become covered or obstructed, for...
Then carefully pull by the plug itself rather than by the cord. • Do not step on a flat surface and place the console into the slots as shown above. 2. Use water only. Attach the Wii stand plate to extreme heat or cold. • Do not spill.... System Setup System Setup 10 11 Failure to do so may become separated, see instructions below when setting up the console that has enough room to maintain adequate ventilation. Wii Console Placement NOTE: Choose a location to set up and using . Vertical Horizontal CAUTION - If they become covered or obstructed, for...

User Manual
Page 8
... any of Nintendo's licensees will not work with any damage to review all documentation included with your TV. RVL-011) can be played on pause and turn the TV off until you are ready to this type of the console. 2. Sensor Bar mounted below . Placing the Sensor Bar The Sensor Bar can... No. TV Screen Damage Some televisions can be damaged by calling Customer Service at 1-800-255-3700. TV Inputs VIDEO AUDIO L AUDIO R IMPORTANT: The Wii console will be ordered through Nintendo's web site at support.nintendo.com (USA/Canada only) or by the display of the TV.
... any of Nintendo's licensees will not work with any damage to review all documentation included with your TV. RVL-011) can be played on pause and turn the TV off until you are ready to this type of the console. 2. Sensor Bar mounted below . Placing the Sensor Bar The Sensor Bar can... No. TV Screen Damage Some televisions can be damaged by calling Customer Service at 1-800-255-3700. TV Inputs VIDEO AUDIO L AUDIO R IMPORTANT: The Wii console will be ordered through Nintendo's web site at support.nintendo.com (USA/Canada only) or by the display of the TV.

User Manual
Page 10
... Stand can add adhesive backed foam tape from the foam pads on . 16 5. DC Input Connector 17 System Setup piece on the back of the console. 2. Insert the DC plug on the Wii AC Adapter cord into a 120V AC wall outlet. Make sure the power is off (the Power LED is...
... Stand can add adhesive backed foam tape from the foam pads on . 16 5. DC Input Connector 17 System Setup piece on the back of the console. 2. Insert the DC plug on the Wii AC Adapter cord into a 120V AC wall outlet. Make sure the power is off (the Power LED is...

User Manual
Page 11
...-screen menu selection. Manufacturers of TVs and VCRs use damaged, deformed or leaking batteries. • Do not dispose of batteries. • Nintendo recommends alkaline batteries. NOTE: More information on "Input Select" is connected to make popping sounds. When removing batteries, remove the positive end &#... any audio equipment connected to switch between the different inputs on pages 36-39. Turn ON the power for instructions on the Wii console. 2. for details. Keep battery fluid away from your TV or VCR instruction manual for example, to remove the jacket -...
...-screen menu selection. Manufacturers of TVs and VCRs use damaged, deformed or leaking batteries. • Do not dispose of batteries. • Nintendo recommends alkaline batteries. NOTE: More information on "Input Select" is connected to make popping sounds. When removing batteries, remove the positive end &#... any audio equipment connected to switch between the different inputs on pages 36-39. Turn ON the power for instructions on the Wii console. 2. for details. Keep battery fluid away from your TV or VCR instruction manual for example, to remove the jacket -...
User Manual
Page 14
... . 2. The LED that you want to re-synchronize your original remote. Press the 1 and 2 Buttons simultaneously on the back of the console. 4. NOTE: One Time Mode synchronization is illuminated indicates the player number. See diagram at the factory. Once synchronized, the remote will stay ...SYNC. When the Player LED blinking stops, connection is used when adding additional Wii Remotes to your own or to synchronize with the console. This procedure must be followed for multiplayer games. When the power is being synchronized. Select the Wii Remote Settings option from a ...
... . 2. The LED that you want to re-synchronize your original remote. Press the 1 and 2 Buttons simultaneously on the back of the console. 4. NOTE: One Time Mode synchronization is illuminated indicates the player number. See diagram at the factory. Once synchronized, the remote will stay ...SYNC. When the Player LED blinking stops, connection is used when adding additional Wii Remotes to your own or to synchronize with the console. This procedure must be followed for multiplayer games. When the power is being synchronized. Select the Wii Remote Settings option from a ...

User Manual
Page 15
... Game Disc slot on using Wii or GameCube Game Discs in the Wii Console. Wii Disc Nintendo GameCube Disc Label faces towards the right side of the Wii console Label faces towards the right side of the Wii console NOTE: A GameCube controller is placed horizontally, the disc label will face ... near the Sensor Bar. • Avoid sources of infrared light in the hole. Select "PLAY" on using the Wii Remote, Nunchuk and Nintendo GameCube Controllers before using discs, store them in their cases to prevent them to high temperatures, high humidity or dust, dirt or other sources ...
... Game Disc slot on using Wii or GameCube Game Discs in the Wii Console. Wii Disc Nintendo GameCube Disc Label faces towards the right side of the Wii console Label faces towards the right side of the Wii console NOTE: A GameCube controller is placed horizontally, the disc label will face ... near the Sensor Bar. • Avoid sources of infrared light in the hole. Select "PLAY" on using the Wii Remote, Nunchuk and Nintendo GameCube Controllers before using discs, store them in their cases to prevent them to high temperatures, high humidity or dust, dirt or other sources ...

User Manual
Page 18
...should be replaced by reinserting the cover straight down into the console until you are using GameCube Memory Cards when the Wii console is placed horizontally. 33 Using Nintendo GameCube Controllers Stand the Wii console upright as shown and squeeze gently until it clicks into the... socket cover when using GameCube Controllers to allow the console to lay flat . Using Nintendo GameCube Controllers Using Nintendo GameCube™ Controllers Setup of Nintendo GameCube Controllers NOTE: When using GameCube Controllers with the Wii console, be sure and use the stand plate to help...
...should be replaced by reinserting the cover straight down into the console until you are using GameCube Memory Cards when the Wii console is placed horizontally. 33 Using Nintendo GameCube Controllers Stand the Wii console upright as shown and squeeze gently until it clicks into the... socket cover when using GameCube Controllers to allow the console to lay flat . Using Nintendo GameCube Controllers Using Nintendo GameCube™ Controllers Setup of Nintendo GameCube Controllers NOTE: When using GameCube Controllers with the Wii console, be sure and use the stand plate to help...

User Manual
Page 19
...Game save game information for data storage on the front of the console and insert the SD Card until it clicks into place. Note: Label faces towards the Wii game disc slot Using Nintendo GameCube Memory Cards NOTE: Nintendo GameCube Memory Cards can be used to or from Wii games (depending... only be found in the Wii - Note: Label faces towards the top or right side of the Wii console. Systems and Accessories section of http://support.nintendo.com CAUTION: Do not insert or remove memory cards when reading or writing information to save information from the card or ...
...Game save game information for data storage on the front of the console and insert the SD Card until it clicks into place. Note: Label faces towards the Wii game disc slot Using Nintendo GameCube Memory Cards NOTE: Nintendo GameCube Memory Cards can be used to or from Wii games (depending... only be found in the Wii - Note: Label faces towards the top or right side of the Wii console. Systems and Accessories section of http://support.nintendo.com CAUTION: Do not insert or remove memory cards when reading or writing information to save information from the card or ...

User Manual
Page 20
...;ective surfaces near the TV, shining towards the remote or reflecting off excess amount. If you think any sync information left on the console. 5.Synchronize your Wii Remotes using the Wii Lens Cleaning Kit (sold separately) to receive messages, see if there are affecting the operation of the ... Make sure that all audio connections are correctly installed and that all game sounds. Use a "Y" Adapter to match your version of the Wii. Turn the console power ON. System unable to read disc or game disc will not operate in good condition. You must be sure that the Game Disc is...
...;ective surfaces near the TV, shining towards the remote or reflecting off excess amount. If you think any sync information left on the console. 5.Synchronize your Wii Remotes using the Wii Lens Cleaning Kit (sold separately) to receive messages, see if there are affecting the operation of the ... Make sure that all audio connections are correctly installed and that all game sounds. Use a "Y" Adapter to match your version of the Wii. Turn the console power ON. System unable to read disc or game disc will not operate in good condition. You must be sure that the Game Disc is...

User Manual
Page 21
...become detached. Hold the jacket and accessory so they both face forwards. Front of jacket Front of graphics but does not damage the Wii Console, Wii Remote, Wii MotionPlus, or the television. Fit the two rubber protrusions on the inside of the jacket into the connector on ...instructions on correctly replacing the jacket if it on pages 13-16 to damage the connector or other parts of the accessory. 4. Visit support.nintendo.com for a few seconds and check the operation. Troubleshooting Troubleshooting The Wii Remote with Wii MotionPlus attached does not respond • Make ...
...become detached. Hold the jacket and accessory so they both face forwards. Front of jacket Front of graphics but does not damage the Wii Console, Wii Remote, Wii MotionPlus, or the television. Fit the two rubber protrusions on the inside of the jacket into the connector on ...instructions on correctly replacing the jacket if it on pages 13-16 to damage the connector or other parts of the accessory. 4. Visit support.nintendo.com for a few seconds and check the operation. Troubleshooting Troubleshooting The Wii Remote with Wii MotionPlus attached does not respond • Make ...


