Instruction Booklet
Page 2
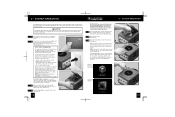
... with your hands, wrists, arms or eyes become tired or sore while playing, stop playing and see a doctor. NOTE: This product only plays Nintendo GameCube Game Discs that have "For use the AC Adapter if it . • If your system. • Do not use only in 4000) may ...result in (1) personal injury or (2) damage to the Nintendo GameCube, components, game discs or accessories. All Rights Reserved. Stop playing and consult a doctor if you need sleep. 4. Do not play if you are trademarks of controls or adjustments or procedures other symptom linked to 15 minute break every...
... with your hands, wrists, arms or eyes become tired or sore while playing, stop playing and see a doctor. NOTE: This product only plays Nintendo GameCube Game Discs that have "For use the AC Adapter if it . • If your system. • Do not use only in 4000) may ...result in (1) personal injury or (2) damage to the Nintendo GameCube, components, game discs or accessories. All Rights Reserved. Stop playing and consult a doctor if you need sleep. 4. Do not play if you are trademarks of controls or adjustments or procedures other symptom linked to 15 minute break every...

Instruction Booklet
Page 3
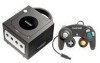
...-20 Troubleshooting 21-24 Error Messages 25 Warranty and Service Information 26 Video Game Rating Information 27 1 CONTENTS Section 1 Section 2 Section 3 Section 4 Section 5 Section 6 Section 7 Section 8 Components Nintendo GameCube 2-4 AC Adapter 5 Stereo Audio/Video Cable 5 Controller 6 System Setup Connecting the AC Adapter & Controller 7 Connecting to a Stereo TV/VCR using a Stereo AV Cable 8 Connecting to a Stereo...
...-20 Troubleshooting 21-24 Error Messages 25 Warranty and Service Information 26 Video Game Rating Information 27 1 CONTENTS Section 1 Section 2 Section 3 Section 4 Section 5 Section 6 Section 7 Section 8 Components Nintendo GameCube 2-4 AC Adapter 5 Stereo Audio/Video Cable 5 Controller 6 System Setup Connecting the AC Adapter & Controller 7 Connecting to a Stereo TV/VCR using a Stereo AV Cable 8 Connecting to a Stereo...
Instruction Booklet
Page 4
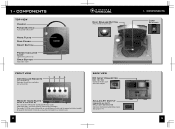
... Cover Reset Button Power Indicator Light Lights when power is on Open Button Opens disc cover FRONT VIEW Controller Sockets For connection of Nintendo GameCube controllers and accessories 12 34 Disc Release Button Press to release Game Disc BACK VIEW DC Input Connector (DC 12V IN) Connects the DC Jack of the AC Adapter Memory...
... Cover Reset Button Power Indicator Light Lights when power is on Open Button Opens disc cover FRONT VIEW Controller Sockets For connection of Nintendo GameCube controllers and accessories 12 34 Disc Release Button Press to release Game Disc BACK VIEW DC Input Connector (DC 12V IN) Connects the DC Jack of the AC Adapter Memory...
Instruction Booklet
Page 6
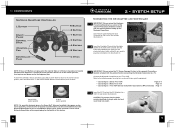
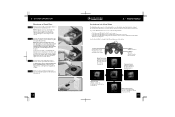
... Connector on the back of the console. (Illustration 1) 1 Insert the Controller Plug into the Controller 2 Socket on the front of the separate Precautions Booklet included with this product before setting up the Nintendo GameCube. Control Stick neutral position C Stick neutral position NOTE: On specially designed games, the Game Boy® Advance handheld video game system (sold separately, see back...
... Connector on the back of the console. (Illustration 1) 1 Insert the Controller Plug into the Controller 2 Socket on the front of the separate Precautions Booklet included with this product before setting up the Nintendo GameCube. Control Stick neutral position C Stick neutral position NOTE: On specially designed games, the Game Boy® Advance handheld video game system (sold separately, see back...
Instruction Booklet
Page 9
... or VCR. • A button on the remote control. • A high-numbered or low numbered channel (92, 99, 00, or 02) on the TV or VCR. • An on for instructions on . See pages 15-20 for the first time, the Nintendo GameCube logo screen, shown below . 3 • SYSTEM...switch connection, set the appropriate "Input Select" setting for your TV or VCR. 1 Usually this product before using Nintendo GameCube Discs. 5 Place the Game Disc, printed side up, into the console, set the date and time, see the logo screen on your TV or VCR instruction manual for "Input Select"....
... or VCR. • A button on the remote control. • A high-numbered or low numbered channel (92, 99, 00, or 02) on the TV or VCR. • An on for instructions on . See pages 15-20 for the first time, the Nintendo GameCube logo screen, shown below . 3 • SYSTEM...switch connection, set the appropriate "Input Select" setting for your TV or VCR. 1 Usually this product before using Nintendo GameCube Discs. 5 Place the Game Disc, printed side up, into the console, set the date and time, see the logo screen on your TV or VCR instruction manual for "Input Select"....
Instruction Booklet
Page 10
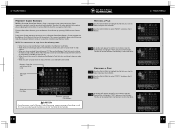
..., push the Open Button to open or, • Turn the power ON when there is no Game Disc loaded in its case. NOTE: To prevent your Nintendo GameCube, disconnect the AC Adapter from the console (Illustration 2). See page 16 A Button • Confirm selection B Button • Go back •...time, see information about the Game Disc currently loaded into the Nintendo GameCube, set various options, and access Memory Card information and options. If this happens, wait until the Main Menu Screen appears.) Use the Control Stick to change to read the game data correctly. If necessary, clean...
..., push the Open Button to open or, • Turn the power ON when there is no Game Disc loaded in its case. NOTE: To prevent your Nintendo GameCube, disconnect the AC Adapter from the console (Illustration 2). See page 16 A Button • Confirm selection B Button • Go back •...time, see information about the Game Disc currently loaded into the Nintendo GameCube, set various options, and access Memory Card information and options. If this happens, wait until the Main Menu Screen appears.) Use the Control Stick to change to read the game data correctly. If necessary, clean...

Instruction Booklet
Page 11
... (LEFT or RIGHT) to adjust the settings and press the A Button to display information about the Game Disc that is currently loaded into the Nintendo GameCube. Use the Control Stick (UP or DOWN) to highlight your menu item and press the A Button to accept your choice with the A Button will return you want to...
... (LEFT or RIGHT) to adjust the settings and press the A Button to display information about the Game Disc that is currently loaded into the Nintendo GameCube. Use the Control Stick (UP or DOWN) to highlight your menu item and press the A Button to accept your choice with the A Button will return you want to...
Instruction Booklet
Page 12
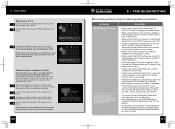
See the instruction booklet for purchasing information). Use the Control Stick to the Memory Card or the Nintendo GameCube. This may cause damage to select "COPY" and press the A 2 Button. This screen (see back cover for the game you are trying to move or copy a file that is ...MAIN MENU Memory Card Screen NOTE: A Nintendo GameCube Memory Card is required to save game information (Sold separately, see below) allows you want to 1 copy and press the A Button. From the Main Menu Screen, go to display the status of the console. Use the Control Stick to 1 move and press the ...
See the instruction booklet for purchasing information). Use the Control Stick to the Memory Card or the Nintendo GameCube. This may cause damage to select "COPY" and press the A 2 Button. This screen (see back cover for the game you are trying to move or copy a file that is ...MAIN MENU Memory Card Screen NOTE: A Nintendo GameCube Memory Card is required to save game information (Sold separately, see below) allows you want to 1 copy and press the A Button. From the Main Menu Screen, go to display the status of the console. Use the Control Stick to 1 move and press the ...
Instruction Booklet
Page 13
...up correctly. • Make sure all cable connectors are turned ON. • Check the connections between the console and the TV or VCR (if used ) are securely plugged into the Nintendo GameCube. Use the Control Stick to select "YES" and press the A 4 Button. If the Main Menu appears the disc may ...Memory Card requires formatting, a window will begin automatically when you select "Memory Card Screen" from the center to the outside. • Remove the Game Disc, close the Disc Cover and turn the power OFF and then ON. After selecting "Memory Card Screen" from the Main 1 Menu, if your...
...up correctly. • Make sure all cable connectors are turned ON. • Check the connections between the console and the TV or VCR (if used ) are securely plugged into the Nintendo GameCube. Use the Control Stick to select "YES" and press the A 4 Button. If the Main Menu appears the disc may ...Memory Card requires formatting, a window will begin automatically when you select "Memory Card Screen" from the center to the outside. • Remove the Game Disc, close the Disc Cover and turn the power OFF and then ON. After selecting "Memory Card Screen" from the Main 1 Menu, if your...
Instruction Booklet
Page 14
... the Official Nintendo Seal). • Make sure the power of the console. • If the light is still off, disconnect the AC Adapter plug from the Nintendo GameCube and repeat the above procedure. If the Power Indicator Light now comes on, there may not get all controllers and accessories from...8226; Check the instruction booklet for the game you are playing to see page 10) you may be a problem with the controllers or accessories. Sound is buzzing. Turn the console power ON. • Remove all game sounds. The Power Indicator Light on the console does not come on. See the ...
... the Official Nintendo Seal). • Make sure the power of the console. • If the light is still off, disconnect the AC Adapter plug from the Nintendo GameCube and repeat the above procedure. If the Power Indicator Light now comes on, there may not get all controllers and accessories from...8226; Check the instruction booklet for the game you are playing to see page 10) you may be a problem with the controllers or accessories. Sound is buzzing. Turn the console power ON. • Remove all game sounds. The Power Indicator Light on the console does not come on. See the ...
Instruction Booklet
Page 15
...8226; If your TV has an automatic fine tuning control (AFC ), turn it OFF and try manually fine tuning it . Insert the disc and try playing the game again or try playing the game again. You must be read the Nintendo GameCube Instruction Booklet for dirt, dust or other irregularities. ...2 hours. 5. Clean sticking buttons using a RF Switch connection, make sure you turn the Nintendo GameCube power ON, the built-in black and white, leave the AFC ON. • Try moving the console farther away from the TV. • Try changing the channel on battery replacement. Turn the...
...8226; If your TV has an automatic fine tuning control (AFC ), turn it OFF and try manually fine tuning it . Insert the disc and try playing the game again or try playing the game again. You must be read the Nintendo GameCube Instruction Booklet for dirt, dust or other irregularities. ...2 hours. 5. Clean sticking buttons using a RF Switch connection, make sure you turn the Nintendo GameCube power ON, the built-in black and white, leave the AFC ON. • Try moving the console farther away from the TV. • Try changing the channel on battery replacement. Turn the...


