Instruction Booklet
Page 2
...Nintendo GameCube during or after a few hours. It is recommended that have any of the following symptoms: Convulsions Altered vision Eye or muscle twitching Involuntary movements Loss of awareness Disorientation • To reduce the likelihood of Nintendo. © 2001-2004 Nintendo. WARNING - There may be a risk of controls... lighting. • Use only the AC Adapter that comes with your child feel better. NOTE: This product only plays Nintendo GameCube Game Discs that parents monitor their children play , stop and rest them . All Rights Reserved. Dolby, Pro Logic and the...
...Nintendo GameCube during or after a few hours. It is recommended that have any of the following symptoms: Convulsions Altered vision Eye or muscle twitching Involuntary movements Loss of awareness Disorientation • To reduce the likelihood of Nintendo. © 2001-2004 Nintendo. WARNING - There may be a risk of controls... lighting. • Use only the AC Adapter that comes with your child feel better. NOTE: This product only plays Nintendo GameCube Game Discs that parents monitor their children play , stop and rest them . All Rights Reserved. Dolby, Pro Logic and the...

Instruction Booklet
Page 3
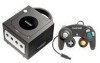
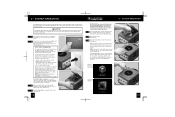
...the Nintendo GameCube system or components. Serial Number: DS Graphics chip designed by Nintendo. ATI logo used with permission of the Nintendo GameCube, in the space below. CONTENTS Section 1 Section 2 Section 3 Section 4 Section 5 Section 6 Section 7 Section 8 Components Nintendo GameCube 2-4 AC Adapter 5 Stereo Audio/Video Cable 5 Controller 6... Screen 17 Memory Card Screens 18-20 Troubleshooting 21-24 Error Messages 25 Warranty and Service Information 26 Video Game Rating Information 27 1 The official seal is your system, please refer to this booklet. Thank you are...
...the Nintendo GameCube system or components. Serial Number: DS Graphics chip designed by Nintendo. ATI logo used with permission of the Nintendo GameCube, in the space below. CONTENTS Section 1 Section 2 Section 3 Section 4 Section 5 Section 6 Section 7 Section 8 Components Nintendo GameCube 2-4 AC Adapter 5 Stereo Audio/Video Cable 5 Controller 6... Screen 17 Memory Card Screens 18-20 Troubleshooting 21-24 Error Messages 25 Warranty and Service Information 26 Video Game Rating Information 27 1 The official seal is your system, please refer to this booklet. Thank you are...
Instruction Booklet
Page 4
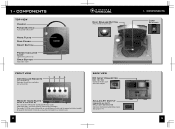
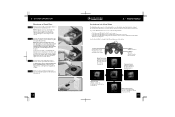
... Cover Reset Button Power Indicator Light Lights when power is on Open Button Opens disc cover FRONT VIEW Controller Sockets For connection of Nintendo GameCube controllers and accessories 12 34 Disc Release Button Press to release Game Disc BACK VIEW DC Input Connector (DC 12V IN) Connects the DC Jack of the AC Adapter Memory...
... Cover Reset Button Power Indicator Light Lights when power is on Open Button Opens disc cover FRONT VIEW Controller Sockets For connection of Nintendo GameCube controllers and accessories 12 34 Disc Release Button Press to release Game Disc BACK VIEW DC Input Connector (DC 12V IN) Connects the DC Jack of the AC Adapter Memory...
Instruction Booklet
Page 6
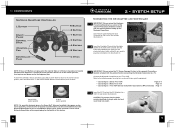
... turned ON, those positions will be connected directly to the Nintendo GameCube for use as the neutral position, causing incorrect game control during game play. Connect the Nintendo GameCube to a TV. Insert the DC Jack into the DC Input Connector on the back of the console. (Illustration 1) 1 Insert the Controller Plug into . (Illustration 2) 2 IMPORTANT: Please review the TV Screen...
... turned ON, those positions will be connected directly to the Nintendo GameCube for use as the neutral position, causing incorrect game control during game play. Connect the Nintendo GameCube to a TV. Insert the DC Jack into the DC Input Connector on the back of the console. (Illustration 1) 1 Insert the Controller Plug into . (Illustration 2) 2 IMPORTANT: Please review the TV Screen...
Instruction Booklet
Page 9
...controller and AC Adapter are : input, select, input select, line, line in, source, in any location where these vents may become covered or obstructed. 1 Turn your TV on for your TV or VCR. 1 Usually this product before using Nintendo GameCube Discs. 5 Place the Game Disc, printed side up, into the console..., set the appropriate "Input Select" setting for the first time, the Nintendo GameCube logo screen, shown below . If channel 3 has an ...
...controller and AC Adapter are : input, select, input select, line, line in, source, in any location where these vents may become covered or obstructed. 1 Turn your TV on for your TV or VCR. 1 Usually this product before using Nintendo GameCube Discs. 5 Place the Game Disc, printed side up, into the console..., set the appropriate "Input Select" setting for the first time, the Nintendo GameCube logo screen, shown below . If channel 3 has an ...
Instruction Booklet
Page 10
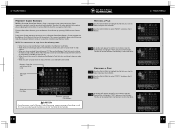
... the power is no Game Disc loaded in its case. Control Stick • Select menu screen • Highlight menu item • Change menu setting Game Play Screen Displays information about the Game Disc currently loaded into the Nintendo GameCube, set the date and time, see information about the Game Disc loaded into the console. See page 16 Memory...
... the power is no Game Disc loaded in its case. Control Stick • Select menu screen • Highlight menu item • Change menu setting Game Play Screen Displays information about the Game Disc currently loaded into the Nintendo GameCube, set the date and time, see information about the Game Disc loaded into the console. See page 16 Memory...

Instruction Booklet
Page 11
...on the Control Stick. 4 • MAIN MENU Game Play Screen From the Main Menu Screen, go to the Game Play Screen by pushing UP on the Control Stick. Press the A Button to begin the game. Press START to display information about the Game Disc that is currently loaded into the Nintendo GameCube. Press ...the B Button to return to accept. Use the Control Stick (LEFT or RIGHT...
...on the Control Stick. 4 • MAIN MENU Game Play Screen From the Main Menu Screen, go to the Game Play Screen by pushing UP on the Control Stick. Press the A Button to begin the game. Press START to display information about the Game Disc that is currently loaded into the Nintendo GameCube. Press ...the B Button to return to accept. Use the Control Stick (LEFT or RIGHT...
Instruction Booklet
Page 12
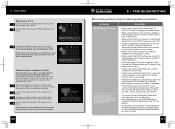
... the A Button to save game information. A window will be copied from one Memory Card to 1 move or copy files between Memory Cards, or erase files stored on the front of the console. Use the Control Stick to confirm your choice. Use the 3 Control Stick to be moved from one... screen (see back cover for instructions on using a Memory Card to display the status of any Nintendo GameCube Memory Cards plugged into the Memory Card Slots on your choice. Use the Control Stick to move and press the A Button. The file will appear to select "COPY" and press the A ...
... the A Button to save game information. A window will be copied from one Memory Card to 1 move or copy files between Memory Cards, or erase files stored on the front of the console. Use the Control Stick to confirm your choice. Use the 3 Control Stick to be moved from one... screen (see back cover for instructions on using a Memory Card to display the status of any Nintendo GameCube Memory Cards plugged into the Memory Card Slots on your choice. Use the Control Stick to move and press the A Button. The file will appear to select "COPY" and press the A ...
Instruction Booklet
Page 13
... the DC Input Connector on Nintendo Gamecube Model No. You cannot use in the USA, Canada, Mexico and Latin America. • You must be sure that the INPUT settings are securely plugged into the console. • Check to keep! Use the Control Stick to erase files from ...Control Stick to select "YES" and press the A 4 Button. If dirty, wipe with Game Discs made for formatting. This system will appear to highlight "YES" and press the A Button. SOLUTION • Make sure that the Nintendo GameCube, TV and VCR (if used) are turned ON. • Check the connections between the console...
... the DC Input Connector on Nintendo Gamecube Model No. You cannot use in the USA, Canada, Mexico and Latin America. • You must be sure that the INPUT settings are securely plugged into the console. • Check to keep! Use the Control Stick to erase files from ...Control Stick to select "YES" and press the A 4 Button. If dirty, wipe with Game Discs made for formatting. This system will appear to highlight "YES" and press the A Button. SOLUTION • Make sure that the Nintendo GameCube, TV and VCR (if used) are turned ON. • Check the connections between the console...
Instruction Booklet
Page 14
... on the console does not come on the TV or VCR, not the "Output" connectors. • Make sure that can only be a problem with the controllers or accessories. When not playing games, the normal TV picture won't come on, or goes off or muted. • Check the audio connections between the Nintendo GameCube and the...
... on the console does not come on the TV or VCR, not the "Output" connectors. • Make sure that can only be a problem with the controllers or accessories. When not playing games, the normal TV picture won't come on, or goes off or muted. • Check the audio connections between the Nintendo GameCube and the...
Instruction Booklet
Page 15
... the Controller Plug completely into cracks. 4. Do not use paper) from the console. 2. Do not submerge in, or pour any type of our web site at least 2 hours. 5. ERROR MESSAGE An error has occurred. PROCEDURE The Game Disc may be dirty or damaged. Insert the disc and try a different disc. Turn the Nintendo GameCube OFF...
... the Controller Plug completely into cracks. 4. Do not use paper) from the console. 2. Do not submerge in, or pour any type of our web site at least 2 hours. 5. ERROR MESSAGE An error has occurred. PROCEDURE The Game Disc may be dirty or damaged. Insert the disc and try a different disc. Turn the Nintendo GameCube OFF...

