Instruction Booklet
Page 2
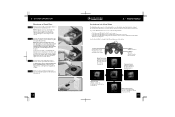
... NOTE: This is a Class I laser product. NOTE: This product only plays Nintendo GameCube Game Discs that could result in hazardous radiation exposure. Repetitive Motion Injuries and Eyestrain Playing video games can cause motion sickness. Dolby, Pro Logic and the double-D symbol are trademarks of... use only in a well-lit room. 5. NOTE: Points out important information on the smallest available television screen. 3. WARNING - Make sure the Nintendo GameCube power switch is fully inserted into the wall outlet or extension cord. • Always carefully disconnect all plugs...
... NOTE: This is a Class I laser product. NOTE: This product only plays Nintendo GameCube Game Discs that could result in hazardous radiation exposure. Repetitive Motion Injuries and Eyestrain Playing video games can cause motion sickness. Dolby, Pro Logic and the double-D symbol are trademarks of... use only in a well-lit room. 5. NOTE: Points out important information on the smallest available television screen. 3. WARNING - Make sure the Nintendo GameCube power switch is fully inserted into the wall outlet or extension cord. • Always carefully disconnect all plugs...

Instruction Booklet
Page 3
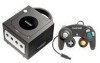
... instructions, you for purchasing the Nintendo GameCube™. Please record the serial number, located on the back cover of products without Audio/Video connections (RF connection 11 System Operation 12-14 Main Menu Accessing the Main Menu 15 Game Play Screen 16 Option Screen 16 Calendar Screen 17 Memory Card Screens 18-20 Troubleshooting 21-24 Error...
... instructions, you for purchasing the Nintendo GameCube™. Please record the serial number, located on the back cover of products without Audio/Video connections (RF connection 11 System Operation 12-14 Main Menu Accessing the Main Menu 15 Game Play Screen 16 Option Screen 16 Calendar Screen 17 Memory Card Screens 18-20 Troubleshooting 21-24 Error...
Instruction Booklet
Page 6
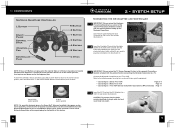
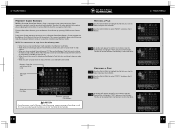
...Nintendo GameCube for the game you need to plug the controller(s) into. (Illustration 2) 2 IMPORTANT: Please review the TV Screen Damage Caution in the separate Precautions 3 Booklet included with this product before connecting the Nintendo GameCube to a TV. Please check Nintendo GameCube software packaging for 3 seconds. Connect the Nintendo GameCube... IMPORTANT: Please review the Hardware 1 Precautions/Maintenance section of the console. Insert the DC Jack into the DC Input Connector on the back of the console. (Illustration 1) 1 Insert the Controller Plug into a 4 120V...
...Nintendo GameCube for the game you need to plug the controller(s) into. (Illustration 2) 2 IMPORTANT: Please review the TV Screen Damage Caution in the separate Precautions 3 Booklet included with this product before connecting the Nintendo GameCube to a TV. Please check Nintendo GameCube software packaging for 3 seconds. Connect the Nintendo GameCube... IMPORTANT: Please review the Hardware 1 Precautions/Maintenance section of the console. Insert the DC Jack into the DC Input Connector on the back of the console. (Illustration 1) 1 Insert the Controller Plug into a 4 120V...
Instruction Booklet
Page 9
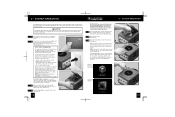
...the power on. (Illustration 6) 4 When the power is available on the Main Menu screens. 5 Nintendo GameCube logo screen Main Menu Screen 6 13 Once the system is unrestricted air flow to 3. CAUTION The Nintendo GameCube has intake/exhaust vents on page 21. The 2 common names for the component that there... would be between the different inputs on your TV or VCR. 1 Usually this product before using Nintendo GameCube Discs. 5 Place the Game Disc, printed side up, into the console, set your TV, review Step 2 or go to the Troubleshooting section on the right and left...
...the power on. (Illustration 6) 4 When the power is available on the Main Menu screens. 5 Nintendo GameCube logo screen Main Menu Screen 6 13 Once the system is unrestricted air flow to 3. CAUTION The Nintendo GameCube has intake/exhaust vents on page 21. The 2 common names for the component that there... would be between the different inputs on your TV or VCR. 1 Usually this product before using Nintendo GameCube Discs. 5 Place the Game Disc, printed side up, into the console, set your TV, review Step 2 or go to the Troubleshooting section on the right and left...
Instruction Booklet
Page 10
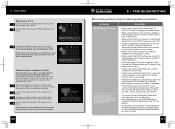
...console or, • Turn the power ON while holding down the A Button on the controller. (Hold down until the disc stops spinning before removing it by the edges. See page 16 Memory Card Screen Accesses information and options for Sound and Screen Position. See pages 18-20 15 NOTE: To prevent your Nintendo GameCube... Button to turn the power OFF. (Illustration 3) To prevent dust, dirt or other foreign matter from the console (Illustration 2). 3 • SYSTEM OPERATION Removing a Game Disc 1 While the power is ON, push the Open Button to open for the date and time of the...
...console or, • Turn the power ON while holding down the A Button on the controller. (Hold down until the disc stops spinning before removing it by the edges. See page 16 Memory Card Screen Accesses information and options for Sound and Screen Position. See pages 18-20 15 NOTE: To prevent your Nintendo GameCube... Button to turn the power OFF. (Illustration 3) To prevent dust, dirt or other foreign matter from the console (Illustration 2). 3 • SYSTEM OPERATION Removing a Game Disc 1 While the power is ON, push the Open Button to open for the date and time of the...

Instruction Booklet
Page 11
... choices of Date or Time. Option Screen From the Main Menu Screen, go to the Option Screen by pushing UP on the Control Stick. Press the A Button to display information about the Game Disc that is currently loaded into the Nintendo GameCube. Press the B Button to return to begin the game. Press START to the Calendar Menu...
... choices of Date or Time. Option Screen From the Main Menu Screen, go to the Option Screen by pushing UP on the Control Stick. Press the A Button to display information about the Game Disc that is currently loaded into the Nintendo GameCube. Press the B Button to return to begin the game. Press START to the Calendar Menu...
Instruction Booklet
Page 12
4• MAIN MENU Memory Card Screen NOTE: A Nintendo GameCube Memory Card is required to save game information (Sold separately, see below) allows you to move or copy files between Memory Cards, or erase files stored on your choice. This screen (see back cover for instructions on using a Memory Card to save files to.)... is not enough space in the Memory Card that have reached the maximum of the console. Use the 3 Control Stick to select "MOVE" and press the A 2 Button. See the instruction booklet for the game you are trying to move or copy files in the following cases: • When...
4• MAIN MENU Memory Card Screen NOTE: A Nintendo GameCube Memory Card is required to save game information (Sold separately, see below) allows you to move or copy files between Memory Cards, or erase files stored on your choice. This screen (see back cover for instructions on using a Memory Card to save files to.)... is not enough space in the Memory Card that have reached the maximum of the console. Use the 3 Control Stick to select "MOVE" and press the A 2 Button. See the instruction booklet for the game you are trying to move or copy files in the following cases: • When...
Instruction Booklet
Page 13
... erased and unable to be sure that the Game Disc is not available on TV screen. DOL-001(USA). After selecting "Memory Card Screen" from the Main 1 Menu, if your version of the console. • Make sure that the power switches on the Nintendo GameCube, TV and VCR (if used) are turned... ON. • Check the connections between the console and the TV ...
... erased and unable to be sure that the Game Disc is not available on TV screen. DOL-001(USA). After selecting "Memory Card Screen" from the Main 1 Menu, if your version of the console. • Make sure that the power switches on the Nintendo GameCube, TV and VCR (if used) are turned... ON. • Check the connections between the console and the TV ...

