Instruction Booklet
Page 2
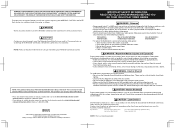
... • If your muscles, joints, skin or eyes hurt after play . • Take a 10 to the Nintendo GameCube, components, game discs or accessories. Play video games on using or maintaining your child feel better. Do not play CD or DVD disks. • Pour une version ... or stand as follows: WARNING Warns you feel dizzy or nauseous when playing video games with WARNING, CAUTION, and NOTE. Take a 10 to disassemble the Nintendo GameCube. WARNING - Laser Device The Nintendo GameCube is a latex-free product. All Rights Reserved. IMPORTANT SAFETY INFORMATION: READ THE FOLLOWING...
... • If your muscles, joints, skin or eyes hurt after play . • Take a 10 to the Nintendo GameCube, components, game discs or accessories. Play video games on using or maintaining your child feel better. Do not play CD or DVD disks. • Pour une version ... or stand as follows: WARNING Warns you feel dizzy or nauseous when playing video games with WARNING, CAUTION, and NOTE. Take a 10 to disassemble the Nintendo GameCube. WARNING - Laser Device The Nintendo GameCube is a latex-free product. All Rights Reserved. IMPORTANT SAFETY INFORMATION: READ THE FOLLOWING...

Instruction Booklet
Page 3
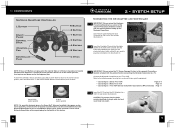
...Stereo TV(digital ready) using the Nintendo GameCube system or components. Always look for this number when calling for purchasing the Nintendo GameCube™. You may need to refer to this seal when buying video game systems, accessories, games and related products. Nintendo does not license the sale or...24 Error Messages 25 Warranty and Service Information 26 Video Game Rating Information 27 1 The official seal is your system, please refer to the consumer assistance information on the bottom of the Nintendo GameCube, in the space below. Serial Number: DS Graphics ...
...Stereo TV(digital ready) using the Nintendo GameCube system or components. Always look for this number when calling for purchasing the Nintendo GameCube™. You may need to refer to this seal when buying video game systems, accessories, games and related products. Nintendo does not license the sale or...24 Error Messages 25 Warranty and Service Information 26 Video Game Rating Information 27 1 The official seal is your system, please refer to the consumer assistance information on the bottom of the Nintendo GameCube, in the space below. Serial Number: DS Graphics ...
Instruction Booklet
Page 4
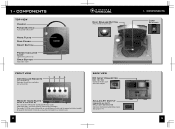
...Lights when power is on Open Button Opens disc cover FRONT VIEW Controller Sockets For connection of Nintendo GameCube controllers and accessories 12 34 Disc Release Button Press to release Game Disc BACK VIEW DC Input Connector (DC 12V IN) Connects the DC Jack of the AC... SLOT B) SLOT A SLOT B For connection of Nintendo GameCube Memory Cards (Sold separately, see back cover for purchasing information.) See pages 18-20 for more information on using Memory Cards and the game instruction booklet for specific information on how to save game information to a memory card. 2 Analog AV Output...
...Lights when power is on Open Button Opens disc cover FRONT VIEW Controller Sockets For connection of Nintendo GameCube controllers and accessories 12 34 Disc Release Button Press to release Game Disc BACK VIEW DC Input Connector (DC 12V IN) Connects the DC Jack of the AC... SLOT B) SLOT A SLOT B For connection of Nintendo GameCube Memory Cards (Sold separately, see back cover for purchasing information.) See pages 18-20 for more information on using Memory Cards and the game instruction booklet for specific information on how to save game information to a memory card. 2 Analog AV Output...
Instruction Booklet
Page 6
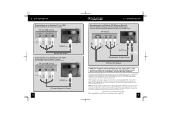
... Input Connector on the back of the console. (Illustration 1) 1 Insert the Controller Plug into the Controller 2 Socket on the front of the separate Precautions Booklet included with this product before setting up the Nintendo GameCube. Refer to the following pages to setup...positions will be connected directly to the Nintendo GameCube for use as the neutral position, causing incorrect game control during game play. Control Stick neutral position C Stick neutral position NOTE: On specially designed games, the Game Boy® Advance handheld video game system (sold separately, see back ...
... Input Connector on the back of the console. (Illustration 1) 1 Insert the Controller Plug into the Controller 2 Socket on the front of the separate Precautions Booklet included with this product before setting up the Nintendo GameCube. Refer to the following pages to setup...positions will be connected directly to the Nintendo GameCube for use as the neutral position, causing incorrect game control during game play. Control Stick neutral position C Stick neutral position NOTE: On specially designed games, the Game Boy® Advance handheld video game system (sold separately, see back ...
Instruction Booklet
Page 7
... the "IN" or "INPUT" connectors on your Nintendo GameCube software instruction booklet for each model of this feature. Please see your TV or VCR (Do not use Audio Left (White) Audio Right (Red) Red Blue Green To console DIGITAL AV OUT To console ANALOG AV OUT Component Video Cable Stereo AV Cable... ("input select") on the TV or VCR that the cable is not needed when using the Stereo AV Cable, you to display specially designed games in Progressive Scan Mode if your TV has Progressive Scan capability (see your TV operation manual). See page 12 for purchasing information.) TV or...
... the "IN" or "INPUT" connectors on your Nintendo GameCube software instruction booklet for each model of this feature. Please see your TV or VCR (Do not use Audio Left (White) Audio Right (Red) Red Blue Green To console DIGITAL AV OUT To console ANALOG AV OUT Component Video Cable Stereo AV Cable... ("input select") on the TV or VCR that the cable is not needed when using the Stereo AV Cable, you to display specially designed games in Progressive Scan Mode if your TV has Progressive Scan capability (see your TV operation manual). See page 12 for purchasing information.) TV or...
Instruction Booklet
Page 8
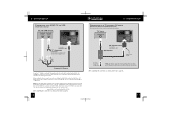
... Switch and RF Modulator (Sold separately, see back cover for purchasing information.) TV Input ANTENNA IN To console ANALOG AV OUT "Y" Adapter (optional) (Not included - 2 • SYSTEM SETUP Connecting to a...connections labeled "OUT" or "OUTPUT"). Leave the unused plug unconnected. NOTE: For the game image to page 12. 11 You may plug either the red or white audio plug directly... although some sound will work with the Nintendo GameCube. See page 12 for more information about input select on our web site at: www.nintendo.com/consumer/inputselects.html After completing the ...
... Switch and RF Modulator (Sold separately, see back cover for purchasing information.) TV Input ANTENNA IN To console ANALOG AV OUT "Y" Adapter (optional) (Not included - 2 • SYSTEM SETUP Connecting to a...connections labeled "OUT" or "OUTPUT"). Leave the unused plug unconnected. NOTE: For the game image to page 12. 11 You may plug either the red or white audio plug directly... although some sound will work with the Nintendo GameCube. See page 12 for more information about input select on our web site at: www.nintendo.com/consumer/inputselects.html After completing the ...
Instruction Booklet
Page 9
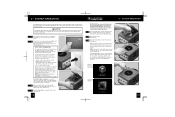
.../consumer/inputselects.html For the RF switch connection, set your TV or VCR. 1 Usually this product before using Nintendo GameCube Discs. 5 Place the Game Disc, printed side up, into the disc compartment and onto the center hub (Illustration 4). If channel 3 has an ... details. The Main Menu allows you don't see information about the game loaded into the console and the wall outlet. (Illustration 2) 3 4 Press the Open Button to the Troubleshooting section on the Main Menu screens. 5 Nintendo GameCube logo screen Main Menu Screen 6 13 Manufacturers of the separate Health...
.../consumer/inputselects.html For the RF switch connection, set your TV or VCR. 1 Usually this product before using Nintendo GameCube Discs. 5 Place the Game Disc, printed side up, into the disc compartment and onto the center hub (Illustration 4). If channel 3 has an ... details. The Main Menu allows you don't see information about the game loaded into the console and the wall outlet. (Illustration 2) 3 4 Press the Open Button to the Troubleshooting section on the Main Menu screens. 5 Nintendo GameCube logo screen Main Menu Screen 6 13 Manufacturers of the separate Health...
Instruction Booklet
Page 10
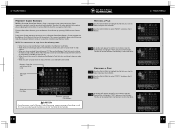
... Nintendo GameCube, disconnect the AC Adapter from becoming dirty or scratched, always handle 1 it in its case. When the disc is not in the console, always store it by the edges. Control Stick • Select menu screen • Highlight menu item • Change menu setting Game ... • MAIN MENU Accessing the Main Menu The Main Menu allows you to set the date and time, see information about the Game Disc currently loaded into the Nintendo GameCube, set various options, and access Memory Card information and options. See page 16 A Button • Confirm selection B Button •...
... Nintendo GameCube, disconnect the AC Adapter from becoming dirty or scratched, always handle 1 it in its case. When the disc is not in the console, always store it by the edges. Control Stick • Select menu screen • Highlight menu item • Change menu setting Game ... • MAIN MENU Accessing the Main Menu The Main Menu allows you to set the date and time, see information about the Game Disc currently loaded into the Nintendo GameCube, set various options, and access Memory Card information and options. See page 16 A Button • Confirm selection B Button •...

Instruction Booklet
Page 11
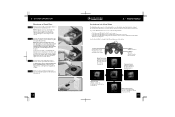
... adjust the settings and press the A Button to the Main Menu. Press the B Button to return to display information about the Game Disc that is currently loaded into the Nintendo GameCube. Use the Control Stick (UP or DOWN) to highlight your menu item and press the A Button to the Calendar Screen by ... menu item and press the A Button to the Option Screen by pushing UP on the Control Stick. Press the B Button to return to begin the game. Pressing the B Button before accepting your choice. Use the Control Stick (LEFT or RIGHT) to highlight the number you want to change, then (UP ...
... adjust the settings and press the A Button to the Main Menu. Press the B Button to return to display information about the Game Disc that is currently loaded into the Nintendo GameCube. Use the Control Stick (UP or DOWN) to highlight your menu item and press the A Button to the Calendar Screen by ... menu item and press the A Button to the Option Screen by pushing UP on the Control Stick. Press the B Button to return to begin the game. Pressing the B Button before accepting your choice. Use the Control Stick (LEFT or RIGHT) to highlight the number you want to change, then (UP ...
Instruction Booklet
Page 12
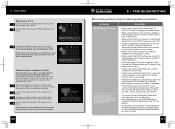
... file that is not allowed to the Memory Card or the Nintendo GameCube. Use the 3 Control Stick to display the status of any Nintendo GameCube Memory Cards plugged into the Memory Card Slots on the Control... is the same file already on your Memory Cards. This screen (see back cover for the game you want to the other . 18 4• MAIN MENU 19 Selected File Moving a File Use... the Control Stick to highlight the file that have reached the maximum of the console. The file will be moved. The file will be moved from one Memory Card to select "COPY"...
... file that is not allowed to the Memory Card or the Nintendo GameCube. Use the 3 Control Stick to display the status of any Nintendo GameCube Memory Cards plugged into the Memory Card Slots on the Control... is the same file already on your Memory Cards. This screen (see back cover for the game you want to the other . 18 4• MAIN MENU 19 Selected File Moving a File Use... the Control Stick to highlight the file that have reached the maximum of the console. The file will be moved. The file will be moved from one Memory Card to select "COPY"...
Instruction Booklet
Page 13
...3700) to connect the Nintendo GameCube to the TV (see page 9). • The progressive scan feature is clean and in a game that the Game Disc is only available on your choice. Formatting a Memory Card This procedure is only used if a corrupted Memory Card is inserted into the console. • Check to...If required, this procedure will appear to confirm your version of the console. • Make sure that the power switches on the Nintendo GameCube, TV and VCR (if used) are turned ON. • Check the connections between the console and the TV or VCR (if used ) are plugged into power ...
...3700) to connect the Nintendo GameCube to the TV (see page 9). • The progressive scan feature is clean and in a game that the Game Disc is only available on your choice. Formatting a Memory Card This procedure is only used if a corrupted Memory Card is inserted into the console. • Check to...If required, this procedure will appear to confirm your version of the console. • Make sure that the power switches on the Nintendo GameCube, TV and VCR (if used) are turned ON. • Check the connections between the console and the TV or VCR (if used ) are plugged into power ...
Instruction Booklet
Page 14
...the Power Indicator Light now comes on Nintendo GameCube Model No. DOL-001(USA). See the back cover for the Official Nintendo Seal). • Make sure the power of the console. • If the light is buzzing. Turn the console power ON. • Remove all game sounds. Sound is still off, ... connection, make sure it is plugged into the outlet. The Power Indicator Light on the console does not come on Nintendo GameCube Model No. Use a "Y" Adapter to get all controllers and accessories from the game. • If you may be sure you have a mono TV or VCR and left...
...the Power Indicator Light now comes on Nintendo GameCube Model No. DOL-001(USA). See the back cover for the Official Nintendo Seal). • Make sure the power of the console. • If the light is buzzing. Turn the console power ON. • Remove all game sounds. Sound is still off, ... connection, make sure it is plugged into the outlet. The Power Indicator Light on the console does not come on Nintendo GameCube Model No. Use a "Y" Adapter to get all controllers and accessories from the game. • If you may be sure you have a mono TV or VCR and left...
Instruction Booklet
Page 15
... or other irregularities. Please visit the customer service area of the console. • Read the instruction booklet for the game you still get the same error message, there may be read the Nintendo GameCube Instruction Booklet for contamination, dirt, scratches or other settings were reset... The controller buttons occasionally stick. PROCEDURE The Game Disc may be replaced by wiping with a soft, slightly damp cotton cloth (do not use boiling water, soap or detergent. 3. System settings were lost. If your Nintendo GameCube system still does not operate correctly after trying...
... or other irregularities. Please visit the customer service area of the console. • Read the instruction booklet for the game you still get the same error message, there may be read the Nintendo GameCube Instruction Booklet for contamination, dirt, scratches or other settings were reset... The controller buttons occasionally stick. PROCEDURE The Game Disc may be replaced by wiping with a soft, slightly damp cotton cloth (do not use boiling water, soap or detergent. 3. System settings were lost. If your Nintendo GameCube system still does not operate correctly after trying...
Instruction Booklet
Page 16
... accessories) shall be solved with the troubleshooting information available on the Nintendo GameCube package, IBM is not responsible for twelve (12) months from the date of the Nintendo GameCube. 8 • ESRB VIDEO GAME RATING INFORMATION Entertainment software Rating board (ESRB) Video and Computer Game Software rating Information The Entertainment Software Rating Board (ESRB) ratings are awaiting...
... accessories) shall be solved with the troubleshooting information available on the Nintendo GameCube package, IBM is not responsible for twelve (12) months from the date of the Nintendo GameCube. 8 • ESRB VIDEO GAME RATING INFORMATION Entertainment software Rating board (ESRB) Video and Computer Game Software rating Information The Entertainment Software Rating Board (ESRB) ratings are awaiting...


