User Manual
Page 3
... that should be read before using your COOLWALKER MSV-01. Keep dry Do not immerse in or expose to water Continuing to others, read the following safety precautions in their entirety before using your Nikon COOLWALKER MSV-01. This icon indicates that more information is...off immediately and unplug in the presence of the Nikon COOLWALKER MSV-01 digital photo storage viewer. After removing the battery pack, take the product to a Nikon-authorized service representative for inspection. In the event of your COOLWALKER MSV-01. This icon marks tips, additional information that could...
... that should be read before using your COOLWALKER MSV-01. Keep dry Do not immerse in or expose to water Continuing to others, read the following safety precautions in their entirety before using your Nikon COOLWALKER MSV-01. This icon indicates that more information is...off immediately and unplug in the presence of the Nikon COOLWALKER MSV-01 digital photo storage viewer. After removing the battery pack, take the product to a Nikon-authorized service representative for inspection. In the event of your COOLWALKER MSV-01. This icon marks tips, additional information that could...
User Manual
Page 8
...and AC adapter) certified by Nikon specifically for Your COOLWALKER MSV-01" before use of this product This product is designed to operate within the operational and safety requirements of third-party rechargeable Li-ion polymer batteries not approved by Nikon could interfere with this electronic ... Life-Long Learning As part of Nikon's "Life-Long Learning" commitment to ongoing product support and education, continually-updated information is available on digital imaging and photography. This Product is backed up -to-date with this Nikon product are engineered and proven to ...
...and AC adapter) certified by Nikon specifically for Your COOLWALKER MSV-01" before use of this product This product is designed to operate within the operational and safety requirements of third-party rechargeable Li-ion polymer batteries not approved by Nikon could interfere with this electronic ... Life-Long Learning As part of Nikon's "Life-Long Learning" commitment to ongoing product support and education, continually-updated information is available on digital imaging and photography. This Product is backed up -to-date with this Nikon product are engineered and proven to ...

User Manual
Page 9
Table of Contents Table of Contents Introduction i For Your Safety ...i Notices...iv Preparation 1 About the COOLWALKER MSV-01 1 Check the Package Contents 2 Parts of the COOLWALKER MSV-01 3 Main Unit ...3 Remote Control Unit 5 Navigating the Menus...6 Installing and Charging the Battery Pack 8 Power-ON/OFF...12 Inserting a Memory Card 12 Copying Images from a Memory Card (Copy CF card ¬ HDD 13 Viewing Images Stored on the COOLWALKER MSV-01 (Play HDD images 14 Displaying Image Information 16 Taking a Closer Look: Playback Zoom 17 Viewing Images Stored on a Memory Card (Play...
Table of Contents Table of Contents Introduction i For Your Safety ...i Notices...iv Preparation 1 About the COOLWALKER MSV-01 1 Check the Package Contents 2 Parts of the COOLWALKER MSV-01 3 Main Unit ...3 Remote Control Unit 5 Navigating the Menus...6 Installing and Charging the Battery Pack 8 Power-ON/OFF...12 Inserting a Memory Card 12 Copying Images from a Memory Card (Copy CF card ¬ HDD 13 Viewing Images Stored on the COOLWALKER MSV-01 (Play HDD images 14 Displaying Image Information 16 Taking a Closer Look: Playback Zoom 17 Viewing Images Stored on a Memory Card (Play...

User Manual
Page 10
... Selected Image 37 Printing Pictures...38 DPOF printset...39 Printing Via Direct USB Connection (PictBridge 42 Connecting to a Printer 42 Printing Images Stored on the MSV-01 43 Printing Images Stored on a Memory Card 45 Printing Images Stored on a Memory Card Using DPOF Settings 46 Finishing Direct Printing 47 Slideshow ...48 ... mode ...54 Format (CF Card/HDD 55 The INFORMATION Screen 56 Displaying Memory Information 56 Technical Notes 57 Optional Accessories...57 Caring for Your COOLWALKER MSV-01 58 Error Messages...62 Troubleshooting ...64 Specifications ...65 Index 67 viii
... Selected Image 37 Printing Pictures...38 DPOF printset...39 Printing Via Direct USB Connection (PictBridge 42 Connecting to a Printer 42 Printing Images Stored on the MSV-01 43 Printing Images Stored on a Memory Card 45 Printing Images Stored on a Memory Card Using DPOF Settings 46 Finishing Direct Printing 47 Slideshow ...48 ... mode ...54 Format (CF Card/HDD 55 The INFORMATION Screen 56 Displaying Memory Information 56 Technical Notes 57 Optional Accessories...57 Caring for Your COOLWALKER MSV-01 58 Error Messages...62 Troubleshooting ...64 Specifications ...65 Index 67 viii

User Manual
Page 11
back" ( 15) and "Specifications" ( 65). 1 Supported Image Data Formats • The COOLWALKER MSV-01 supports image data recorded with Nikon digital cameras (DCF format). • The COOLWALKER MSV-01 supports NEF (Nikon Electronic Image Format) files (RAW files containing embedded preview images). • Images taken with cameras from other manufacturers or images edited using a computer may not ...
back" ( 15) and "Specifications" ( 65). 1 Supported Image Data Formats • The COOLWALKER MSV-01 supports image data recorded with Nikon digital cameras (DCF format). • The COOLWALKER MSV-01 supports NEF (Nikon Electronic Image Format) files (RAW files containing embedded preview images). • Images taken with cameras from other manufacturers or images edited using a computer may not ...

User Manual
Page 12
Preparation-Check the Package Contents COOLWALKER MSV-01 AC Adapter DSA-0151F-05 User's Manual (this manual) Remote Control Unit ML-CW1 (CR2025 Lithium Battery included) Warranty Audio/Video (A/V) cable EG-CW1 Soft Case CF-CW1 USB interface cable UC-E9 MSV-01 Windows® 98 SE Driver Installer CD 2 Battery pack case (for use with the removed battery pack) Check the Package Contents Unpack the COOLWALKER MSV-01 box and check the contents to make sure that you have all the items listed below.
Preparation-Check the Package Contents COOLWALKER MSV-01 AC Adapter DSA-0151F-05 User's Manual (this manual) Remote Control Unit ML-CW1 (CR2025 Lithium Battery included) Warranty Audio/Video (A/V) cable EG-CW1 Soft Case CF-CW1 USB interface cable UC-E9 MSV-01 Windows® 98 SE Driver Installer CD 2 Battery pack case (for use with the removed battery pack) Check the Package Contents Unpack the COOLWALKER MSV-01 box and check the contents to make sure that you have all the items listed below.

User Manual
Page 13
Preparation-Parts of the COOLWALKER MSV-01 Parts of the COOLWALKER MSV-01 Main Unit Power-on lamp ( 10) Power switch ( 10) HDD Access lamp (flashes during reading from or writing to the internal HDD) LCD Monitor Left function button (Left button) ( 6) Enter button ( 6) Remote-control sensor ( 6) Right function button (Right button) ( 6) Multi selector ( 6) Memory card slot ( 12) Memory card slot cover ( 12) 3
Preparation-Parts of the COOLWALKER MSV-01 Parts of the COOLWALKER MSV-01 Main Unit Power-on lamp ( 10) Power switch ( 10) HDD Access lamp (flashes during reading from or writing to the internal HDD) LCD Monitor Left function button (Left button) ( 6) Enter button ( 6) Remote-control sensor ( 6) Right function button (Right button) ( 6) Multi selector ( 6) Memory card slot ( 12) Memory card slot cover ( 12) 3

User Manual
Page 14
tery pack. 4 Preparation-Parts of the COOLWALKER MSV-01 Interface connector cover Audio/Video-out connector ( 35) DC-in connector ( 8) USB connector ( 30, 42) Interface connector cover Battery pack (Rechargeable Li-ion Polymer Battery EN-EL6) ( 8) Battery release button ( 8) Battery Release Button • Do not press the battery release button when charging the battery pack or when operating the MSV-01. • Make sure to turn the MSV-01 main unit off and disconnect the AC adapter before removing the bat-
tery pack. 4 Preparation-Parts of the COOLWALKER MSV-01 Interface connector cover Audio/Video-out connector ( 35) DC-in connector ( 8) USB connector ( 30, 42) Interface connector cover Battery pack (Rechargeable Li-ion Polymer Battery EN-EL6) ( 8) Battery release button ( 8) Battery Release Button • Do not press the battery release button when charging the battery pack or when operating the MSV-01. • Make sure to turn the MSV-01 main unit off and disconnect the AC adapter before removing the bat-

User Manual
Page 15
... insulating tape in place (). Insulating Tape Inserting the CR2025 Lithium Battery 1. Place the battery in correct orientation as indicated on the back of the COOLWALKER MSV-01 Enter button ( 6) Battery holder (CR2025 lithium battery) Before Using the Remote Control Unit Remove the Insulating Tape.
... insulating tape in place (). Insulating Tape Inserting the CR2025 Lithium Battery 1. Place the battery in correct orientation as indicated on the back of the COOLWALKER MSV-01 Enter button ( 6) Battery holder (CR2025 lithium battery) Before Using the Remote Control Unit Remove the Insulating Tape.
User Manual
Page 18
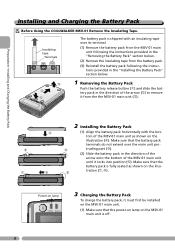
...; ‘ “ tration (’, “). Power-on lamp 3 Charging the Battery Pack To charge the battery pack, it from the the MSV-01 main unit (Ž). 2 Installing the Battery Pack (1) Align the battery pack horizontally with an insulating tape over the main unit pro- &#... the battery pack in the direction of the arrow onto the bottom of the MSV-01 main unit as shown on the illustration (). Preparation-Installing and Charging the Battery Pack Installing and Charging the Battery Pack Before Using the COOLWALKER MSV-01 Remove the Insulating Tape.
...; ‘ “ tration (’, “). Power-on lamp 3 Charging the Battery Pack To charge the battery pack, it from the the MSV-01 main unit (Ž). 2 Installing the Battery Pack (1) Align the battery pack horizontally with an insulating tape over the main unit pro- &#... the battery pack in the direction of the arrow onto the bottom of the MSV-01 main unit as shown on the illustration (). Preparation-Installing and Charging the Battery Pack Installing and Charging the Battery Pack Before Using the COOLWALKER MSV-01 Remove the Insulating Tape.

User Manual
Page 19
... an AC power supply source. Charging is on lamp will begin immediately. Using the COOLWALKER MSV-01 from an AC Power Supply Source • To use your MSV-01 from becoming dirty. • Do not leave unattended or transport the MSV-01 with the AC adapter connected. connected. • When removing or attaching the battery pack, always...
... an AC power supply source. Charging is on lamp will begin immediately. Using the COOLWALKER MSV-01 from an AC Power Supply Source • To use your MSV-01 from becoming dirty. • Do not leave unattended or transport the MSV-01 with the AC adapter connected. connected. • When removing or attaching the battery pack, always...
User Manual
Page 20
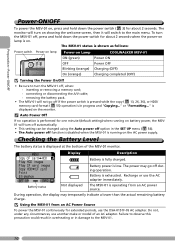
... main menu. or "Formatting..." Do not, under any circumstances, use the AC adapter immediately. The MSV-01 status is shown as follows: Power switch Power-on lamp Power-on Lamp ON (green) OFF Blinking (orange) On (orange) COOLWALKER MSV-01 Power ON Power OFF Charging (OFF) Charging completed (OFF) Turning the Power On/Off •...
... main menu. or "Formatting..." Do not, under any circumstances, use the AC adapter immediately. The MSV-01 status is shown as follows: Power switch Power-on lamp Power-on Lamp ON (green) OFF Blinking (orange) On (orange) COOLWALKER MSV-01 Power ON Power OFF Charging (OFF) Charging completed (OFF) Turning the Power On/Off •...

User Manual
Page 22
...terminals first. Basic Operation-Inserting a Memory Card Basic Operation Inserting a Memory Card To copy image data from a memory card to the MSV-01 or from the MSV-01 to a memory card, insert a CompactFlash™ memory card into the memory card slot in the correct orientation. • Perform all... memory card Insert a memory card into the memory card slot. 1 Turn the MSV-01 off or, if the AC adapter is connected, is off Confirm that memory cards may become hot during use with the COOLWALKER MSV-01 see "Approved Memory Cards" ( 57). 12 Terminals Front Direction of the memory ...
...terminals first. Basic Operation-Inserting a Memory Card Basic Operation Inserting a Memory Card To copy image data from a memory card to the MSV-01 or from the MSV-01 to a memory card, insert a CompactFlash™ memory card into the memory card slot in the correct orientation. • Perform all... memory card Insert a memory card into the memory card slot. 1 Turn the MSV-01 off or, if the AC adapter is connected, is off Confirm that memory cards may become hot during use with the COOLWALKER MSV-01 see "Approved Memory Cards" ( 57). 12 Terminals Front Direction of the memory ...

User Manual
Page 24
...sub-folders in the folder. To display the next or previous images, press or on the COOLWALKER MSV-01 (Play HDD images) Highlight Play HDD images using or . 3 Press . Viewing Images Stored on the COOLWALKER MSV-01 (Play HDD images) Use Play HDD images from the main menu to view images stored ...on the MSV-01. 1 2 Basic Operation-Viewing Images Stored on the multi selector. You will see a list of ...
...sub-folders in the folder. To display the next or previous images, press or on the COOLWALKER MSV-01 (Play HDD images) Highlight Play HDD images using or . 3 Press . Viewing Images Stored on the COOLWALKER MSV-01 (Play HDD images) Use Play HDD images from the main menu to view images stored ...on the MSV-01. 1 2 Basic Operation-Viewing Images Stored on the multi selector. You will see a list of ...

User Manual
Page 25
...played. • Images taken with an asterisk (*). To change the orientation of a still image, press the Rotate button on the COOLWALKER MSV-01 (Play HDD images) 9 Press (Left button) to return to thumbnail playback (Step 7). Viewing Movies Movies can be displayed or ...Operation-Viewing Images Stored on the remote control unit ( 5). The icon is shown for the image data recorded with Nikon digital cameras (DCF format). • The COOLWALKER MSV-01 supports NEF (RAW) files containing embedded JPEG preview images. • Large size images may not be displayed correctly...
...played. • Images taken with an asterisk (*). To change the orientation of a still image, press the Rotate button on the COOLWALKER MSV-01 (Play HDD images) 9 Press (Left button) to return to thumbnail playback (Step 7). Viewing Movies Movies can be displayed or ...Operation-Viewing Images Stored on the remote control unit ( 5). The icon is shown for the image data recorded with Nikon digital cameras (DCF format). • The COOLWALKER MSV-01 supports NEF (RAW) files containing embedded JPEG preview images. • Large size images may not be displayed correctly...

User Manual
Page 40
... explanation, and then click Next. 30 For more information on the desktop and double-click the CD (COOLWALKER) icon in the My Computer window. 2 The Nikon COOLWALKER MSV-01 USB Drivers Setup Wizard will appear automatically. Then insert the MSV-01 Windows® 98 SE Driver Installer CD into the CD-ROM drive. Continue on to a computer...
... explanation, and then click Next. 30 For more information on the desktop and double-click the CD (COOLWALKER) icon in the My Computer window. 2 The Nikon COOLWALKER MSV-01 USB Drivers Setup Wizard will appear automatically. Then insert the MSV-01 Windows® 98 SE Driver Installer CD into the CD-ROM drive. Continue on to a computer...
User Manual
Page 41
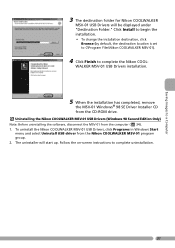
... Browse (by default, the destination location is set to C\Program Files\Nikon COOLWALKER MSV-01). 4 Click Finish to complete uninstallation. 31 The uninstaller will be displayed under "Destination Folder." Saving Images to a Computer 3 The destination folder for Nikon COOLWALKER MSV-01 USB Drivers will start up. Uninstalling the Nikon COOLWALKER MSV-01 USB Drivers (Windows 98 Second Edition Only) Note: Before uninstalling...
... Browse (by default, the destination location is set to C\Program Files\Nikon COOLWALKER MSV-01). 4 Click Finish to complete uninstallation. 31 The uninstaller will be displayed under "Destination Folder." Saving Images to a Computer 3 The destination folder for Nikon COOLWALKER MSV-01 USB Drivers will start up. Uninstalling the Nikon COOLWALKER MSV-01 USB Drivers (Windows 98 Second Edition Only) Note: Before uninstalling...

User Manual
Page 42
... USB" is displayed on a flat and stable surface. • When connecting the MSV-01 to a computer, use the DSA-0151F-05 AC adapter. • Connect the MSV-01 directly to a Computer • Place the MSV-01 on the monitor; Saving Images to a Computer-Connecting the USB Cable Connecting the USB... below using the provided USB cable UC-E9. all controls are disabled. • When disconnecting the MSV-01 from a computer, disconnect the USB cable only after completing the procedure described in "Disconnecting the COOLWALKER MSV-01" ( 34). 32 Turn the MSV-01 off and connect it to start up.
... USB" is displayed on a flat and stable surface. • When connecting the MSV-01 to a computer, use the DSA-0151F-05 AC adapter. • Connect the MSV-01 directly to a Computer • Place the MSV-01 on the monitor; Saving Images to a Computer-Connecting the USB Cable Connecting the USB... below using the provided USB cable UC-E9. all controls are disabled. • When disconnecting the MSV-01 from a computer, disconnect the USB cable only after completing the procedure described in "Disconnecting the COOLWALKER MSV-01" ( 34). 32 Turn the MSV-01 off and connect it to start up.

User Manual
Page 43
... USB interface, and your computer, using the pro- To copy data stored on the MSV-01 HDD to the computer, make sure that the unit is inserted in the next section, "Disconnecting the COOLWALKER MSV-01" ( 34) and turn the MSV-01 on the MSV-01 to start an image related application. • For more information on with an...
... USB interface, and your computer, using the pro- To copy data stored on the MSV-01 HDD to the computer, make sure that the unit is inserted in the next section, "Disconnecting the COOLWALKER MSV-01" ( 34) and turn the MSV-01 on the MSV-01 to start an image related application. • For more information on with an...

User Manual
Page 44
... from the menu that appears. Saving Images to a Computer-Disconnecting the COOLWALKER MSV-01 Disconnecting the COOLWALKER MSV-01 Be sure to remove the MSV-01 from the system as a card reader, the drive name (disk volume icon) representing the MSV-01 depends on the COOLWALKER icon corresponding to the MSV-01 and select Eject from the menu that appears.* Mac OS X Drag...
... from the menu that appears. Saving Images to a Computer-Disconnecting the COOLWALKER MSV-01 Disconnecting the COOLWALKER MSV-01 Be sure to remove the MSV-01 from the system as a card reader, the drive name (disk volume icon) representing the MSV-01 depends on the COOLWALKER icon corresponding to the MSV-01 and select Eject from the menu that appears.* Mac OS X Drag...