
User Manual
Page 6
Table of Contents Q&A Index ii For Your Safety xiii Notices...xvi Quick Start Guide xxii Introduction 1 Package Contents 1 Getting to Know the Camera 2 Camera Body 2 The Top Control Panel 7 The Rear Control Panel 9 The Viewfinder Display 11 The Information Display 13 The BS-2 Accessory Shoe Cover 17 Tutorial 19 Camera ...
Table of Contents Q&A Index ii For Your Safety xiii Notices...xvi Quick Start Guide xxii Introduction 1 Package Contents 1 Getting to Know the Camera 2 Camera Body 2 The Top Control Panel 7 The Rear Control Panel 9 The Viewfinder Display 11 The Information Display 13 The BS-2 Accessory Shoe Cover 17 Tutorial 19 Camera ...

User Manual
Page 27
... • User's Manual (this guide) • Quick Guide • Network Guide • ViewNX 2 installer CD (0 263) 1 Memory cards are sold separately. • D4 digital camera (0 2) • BF-1B body cap (0 28, 394) X • BS-2 accessory shoe cover (0 17, 191) • EN-EL18 rechargeable Li-ion battery with terminal cover (0 23, 25) •...
... • User's Manual (this guide) • Quick Guide • Network Guide • ViewNX 2 installer CD (0 263) 1 Memory cards are sold separately. • D4 digital camera (0 2) • BF-1B body cap (0 28, 394) X • BS-2 accessory shoe cover (0 17, 191) • EN-EL18 rechargeable Li-ion battery with terminal cover (0 23, 25) •...

User Manual
Page 28
... to Know the Camera Take a few moments to it helpful to bookmark this section and refer to familiarize yourself with camera controls and displays. Camera Body X 1 D button 10 E button Bracketing .......141, 145, 149, 335 Exposure compensation .........137 2 Release mode dial 11 I/Q button lock release 111 Exposure mode 125 3 Eyelet for camera...
... to Know the Camera Take a few moments to it helpful to bookmark this section and refer to familiarize yourself with camera controls and displays. Camera Body X 1 D button 10 E button Bracketing .......141, 145, 149, 335 Exposure compensation .........137 2 Release mode dial 11 I/Q button lock release 111 Exposure mode 125 3 Eyelet for camera...

User Manual
Page 29
... connector cover....... 391 22 Focus-mode selector ..... 52, 97, 108 10 Audio connector cover 69 23 Meter coupling lever 433 11 HDMI/Ethernet connector 24 Body cap 28, 394 cover 269, 280 12 Peripheral connector 391 3
... connector cover....... 391 22 Focus-mode selector ..... 52, 97, 108 10 Audio connector cover 69 23 Meter coupling lever 433 11 HDMI/Ethernet connector 24 Body cap 28, 394 cover 269, 280 12 Peripheral connector 391 3

User Manual
Page 30
Failure to magnetic devices. Camera Body (Continued) X 1 Pv button 6 Vertical shooting shutter-release Using the Pv button button lock 42 67, 125, 333, 341 7 Fn button (vertical) 2 Sub-command dial 336 ...
Failure to magnetic devices. Camera Body (Continued) X 1 Pv button 6 Vertical shooting shutter-release Using the Pv button button lock 42 67, 125, 333, 341 7 Fn button (vertical) 2 Sub-command dial 336 ...

User Manual
Page 32
Camera Body (Continued) X 1 Viewfinder 38 12 Live view selector 49, 63 2 Sub-selector 13 a button 104, 105, 135, 333, 342 Live view 49, 63 3 B button 14 Multi ...
Camera Body (Continued) X 1 Viewfinder 38 12 Live view selector 49, 63 2 Sub-selector 13 a button 104, 105, 135, 333, 342 Live view 49, 63 3 B button 14 Multi ...

User Manual
Page 54
Lens cap Mounting index CPU contacts (0 387) s Focus-mode switch (0 29) 1 Turn the camera off. Focus ring (0 108) 2 Remove the rear lens cap and the camera body cap. 28 Attach a Lens Care should be taken to prevent dust from entering the camera when the lens is an AF-S NIKKOR 50mm f/1.4G. The lens generally used in this manual for illustrative purposes is removed.
Lens cap Mounting index CPU contacts (0 387) s Focus-mode switch (0 29) 1 Turn the camera off. Focus ring (0 108) 2 Remove the rear lens cap and the camera body cap. 28 Attach a Lens Care should be taken to prevent dust from entering the camera when the lens is an AF-S NIKKOR 50mm f/1.4G. The lens generally used in this manual for illustrative purposes is removed.

User Manual
Page 55
... A-M or M/A-M mode switch, select A (autofocus) or M/A (autofocus with the mounting index on the lens aligned with manual priority). Keeping the mounting index on the camera body, position the lens in the camera's bayonet mount (q). Image area 29 A Image Area The DX format image area is automatically selected when a DX lens is... an aperture ring (0 387), lock aperture at the minimum setting (highest f-number). 3 Attach the lens. After removing the lens, replace the lens caps and camera body cap.
... A-M or M/A-M mode switch, select A (autofocus) or M/A (autofocus with the mounting index on the lens aligned with manual priority). Keeping the mounting index on the camera body, position the lens in the camera's bayonet mount (q). Image area 29 A Image Area The DX format image area is automatically selected when a DX lens is... an aperture ring (0 387), lock aperture at the minimum setting (highest f-number). 3 Attach the lens. After removing the lens, replace the lens caps and camera body cap.

User Manual
Page 68
...in Portrait (Tall) Orientation The camera is in landscape (wide) orientation. 42 Rotate the vertical shooting shutter-release button lock to L to keep your upper body stable. Keep your elbows propped lightly against your torso for use in portrait (tall) orientation, including a vertical shutter-release, Fn, and B buttons, ... equipped with your left. When framing photographs in portrait (tall) orientation, hold the handgrip in your right hand and cradle the camera body or lens with controls for support and place one foot half a pace ahead of the three illustrations at right.
...in Portrait (Tall) Orientation The camera is in landscape (wide) orientation. 42 Rotate the vertical shooting shutter-release button lock to L to keep your upper body stable. Keep your elbows propped lightly against your torso for use in portrait (tall) orientation, including a vertical shutter-release, Fn, and B buttons, ... equipped with your left. When framing photographs in portrait (tall) orientation, hold the handgrip in your right hand and cradle the camera body or lens with controls for support and place one foot half a pace ahead of the three illustrations at right.

User Manual
Page 135
..., the infocus indicator may sometimes be displayed when the subject is displayed. confirm focus in focus; Note that with the subjects listed on the camera body. After positioning the subject in the selected focus point, press the shutter-release button halfway and rotate the lens focus ring until the in-focus...
..., the infocus indicator may sometimes be displayed when the subject is displayed. confirm focus in focus; Note that with the subjects listed on the camera body. After positioning the subject in the selected focus point, press the shutter-release button halfway and rotate the lens focus ring until the in-focus...
User Manual
Page 320
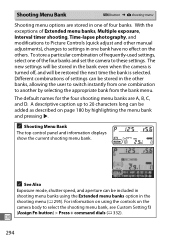
... menu bank, see Custom Setting f3 U (Assign Fn button) > Press + command dials (0 332). 294 The new settings will be added as described on the camera body to 20 characters long can be included in the bank even when the camera is selected.
... menu bank, see Custom Setting f3 U (Assign Fn button) > Press + command dials (0 332). 294 The new settings will be added as described on the camera body to 20 characters long can be included in the bank even when the camera is selected.

User Manual
Page 412
... shifting and/or tilting the lens, or when an aperture other than flash sync speed by one step or more. 17 Exposure determined by camera body.
... shifting and/or tilting the lens, or when an aperture other than flash sync speed by one step or more. 17 Exposure determined by camera body.

User Manual
Page 420
... terminal accessories Body Cap BF-1B/Body Cap BF-1A: The body cap keeps the mirror, viewfinder screen, and low-pass filter free of up to 8 m (26 ft 3 in.). n 394 The D4 is equipped with a cap, which protects the contacts when the terminal is not in use. can be used... GP-1 (0 231): Record latitude, longitude, altitude, and UTC time with pictures. • GPS Adapter Cord MC-35 (0 231): Connects GPS devices to D4 via sound or electronic signals (length 1 m/3 ft 3 in place. can be used for remote control and automatic photography. The following accessories can be used at...
... terminal accessories Body Cap BF-1B/Body Cap BF-1A: The body cap keeps the mirror, viewfinder screen, and low-pass filter free of up to 8 m (26 ft 3 in.). n 394 The D4 is equipped with a cap, which protects the contacts when the terminal is not in use. can be used... GP-1 (0 231): Record latitude, longitude, altitude, and UTC time with pictures. • GPS Adapter Cord MC-35 (0 231): Connects GPS devices to D4 via sound or electronic signals (length 1 m/3 ft 3 in place. can be used for remote control and automatic photography. The following accessories can be used at...

User Manual
Page 424
..., then wipe gently with a blower. These glass elements are exposed to temperatures above 50 °C (122 °F) or below -10 °C (14 °F) Cleaning Camera body Use a blower to prevent the discharge of liquid. Monitor Remove dust and lint with a cloth lightly dampened in damage or malfunction. Remove dust and Lens...
..., then wipe gently with a blower. These glass elements are exposed to temperatures above 50 °C (122 °F) or below -10 °C (14 °F) Cleaning Camera body Use a blower to prevent the discharge of liquid. Monitor Remove dust and lint with a cloth lightly dampened in damage or malfunction. Remove dust and Lens...

User Manual
Page 430
...flash to warn that can not be removed with a blower. To prevent damage to the down position and the shutter curtain will be removed by Nikon-authorized service personnel. End cleaning n or inspection immediately. 404 Remove any dust and lint from the filter with a blower can only be lowered ... the mirror is raised, the curtain will close . Dirt that the shutter curtain will close and the mirror will close automatically. Replace the lens or body cap. 7 Clean the filter. If the camera powers off . Do not use a blower-brush, as the bristles could damage the filter. D Use a ...
...flash to warn that can not be removed with a blower. To prevent damage to the down position and the shutter curtain will be removed by Nikon-authorized service personnel. End cleaning n or inspection immediately. 404 Remove any dust and lint from the filter with a blower can only be lowered ... the mirror is raised, the curtain will close . Dirt that the shutter curtain will close and the mirror will close automatically. Replace the lens or body cap. 7 Clean the filter. If the camera powers off . Do not use a blower-brush, as the bristles could damage the filter. D Use a ...

User Manual
Page 431
...removed or exchanged. Avoid exchanging lenses in some third-party imaging applications. The D4, however, is inspected or serviced. Photographs affected by the presence of foreign matter on the Low-Pass Filter Nikon takes every possible precaution to prevent foreign matter from coming into contact with interchangeable..., and foreign matter may appear in place, be sure to replace the body cap provided with the camera, such as described above, or have the filter cleaned by the original retailer or Nikon service representative once every one to two years, and that it may enter...
...removed or exchanged. Avoid exchanging lenses in some third-party imaging applications. The D4, however, is inspected or serviced. Photographs affected by the presence of foreign matter on the Low-Pass Filter Nikon takes every possible precaution to prevent foreign matter from coming into contact with interchangeable..., and foreign matter may appear in place, be sure to replace the body cap provided with the camera, such as described above, or have the filter cleaned by the original retailer or Nikon service representative once every one to two years, and that it may enter...

User Manual
Page 435
... the battery away. This does not indicate a malfunction, and the display will not be gently removed with a soft, dry cloth. Cleaning: When cleaning the camera body, use a blower to gently remove dust and lint, then wipe gently with a blower.
... the battery away. This does not indicate a malfunction, and the display will not be gently removed with a soft, dry cloth. Cleaning: When cleaning the camera body, use a blower to gently remove dust and lint, then wipe gently with a blower.

User Manual
Page 463
.... 1340 g (2 lb. 15.3 oz.) with a fully-charged battery operating at an ambient temperature of 20 °C (68 °F). • Nikon reserves the right to change the specifications of the hardware and software described in this manual may result from any mistakes that may contain. approx... than 85% (no condensation) • Unless otherwise stated, all figures are for damages that this manual at any time and without body cap and accessory shoe cover; n 437 Supported languages Supported languages Arabic, Chinese (Simplified and Traditional), Czech, Danish, Dutch, English, Finnish...
.... 1340 g (2 lb. 15.3 oz.) with a fully-charged battery operating at an ambient temperature of 20 °C (68 °F). • Nikon reserves the right to change the specifications of the hardware and software described in this manual may result from any mistakes that may contain. approx... than 85% (no condensation) • Unless otherwise stated, all figures are for damages that this manual at any time and without body cap and accessory shoe cover; n 437 Supported languages Supported languages Arabic, Chinese (Simplified and Traditional), Czech, Danish, Dutch, English, Finnish...

User Manual
Page 476
..., 322 Battery 23-27, 40, 351, 438, 440 Battery info 351 Beep 318 D button 141, 145, 149, 190, 212, 335 Black-and-white (Monochrome).... 367 Body cap 28, 394 Border 274 Bracketing 139, 325, 326 Bracketing order 326 Bulb 131 Burst 112, 319, 329 Button backlights 10, 322 C Calibration 440 Camera...
..., 322 Battery 23-27, 40, 351, 438, 440 Battery info 351 Beep 318 D button 141, 145, 149, 190, 212, 335 Black-and-white (Monochrome).... 367 Body cap 28, 394 Border 274 Bracketing 139, 325, 326 Bracketing order 326 Bulb 131 Burst 112, 319, 329 Button backlights 10, 322 C Calibration 440 Camera...


