

User Manual
Page 32
... access lamp..... 34, 44 4 Main command dial 336 16 Ambient brightness sensor for 5 Multi selector 20, 45, 237 automatic monitor brightness 6 Card slot cover release button control 57, 345 (under cover 33 7 Memory card slot cover ..........33, 35 8 C button Using the AF-ON button for vertical shooting 312 9 Main command dial (vertical) ...336 Speaker...
... access lamp..... 34, 44 4 Main command dial 336 16 Ambient brightness sensor for 5 Multi selector 20, 45, 237 automatic monitor brightness 6 Card slot cover release button control 57, 345 (under cover 33 7 Memory card slot cover ..........33, 35 8 C button Using the AF-ON button for vertical shooting 312 9 Main command dial (vertical) ...336 Speaker...

User Manual
Page 60
... (XQD) card slot Direction of insertion for right (CompactFlash) card slot Rear label Rear label 4 Close the card slot cover. XQD memory cards: Holding the card with the rear label toward the monitor, slide it into the XQD card slot until it clicks into the CompactFlash card slot with the rear label... toward the monitor (q). The green access lamp will light briefly. Check to be used after being used or formatted in the correct orientation. Access lamp CompactFlash memory cards: ...
... (XQD) card slot Direction of insertion for right (CompactFlash) card slot Rear label Rear label 4 Close the card slot cover. XQD memory cards: Holding the card with the rear label toward the monitor, slide it into the XQD card slot until it clicks into the CompactFlash card slot with the rear label... toward the monitor (q). The green access lamp will light briefly. Check to be used after being used or formatted in the correct orientation. Access lamp CompactFlash memory cards: ...
User Manual
Page 91
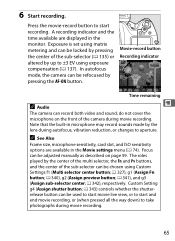
..., microphone sensitivity, card slot, and ISO sensitivity options are displayed in the monitor. 6 Start recording. Press the movie-record button to start and end movie recording, or (when pressed all the way down) to start recording. do not cover the microphone on page 59. Note that the built-in the Movie settings...
..., microphone sensitivity, card slot, and ISO sensitivity options are displayed in the monitor. 6 Start recording. Press the movie-record button to start and end movie recording, or (when pressed all the way down) to start recording. do not cover the microphone on page 59. Note that the built-in the Movie settings...

User Manual
Page 306
... before connecting or disconnecting an HDMI cable. 2 Connect the HDMI cable as shown. Q D Close the Connector Cover Close the connector cover when the connectors are not in the connectors can be displayed both in the camera monitor and on and press K button. During playback, images will be used to connect the camera to...
... before connecting or disconnecting an HDMI cable. 2 Connect the HDMI cable as shown. Q D Close the Connector Cover Close the connector cover when the connectors are not in the connectors can be displayed both in the camera monitor and on and press K button. During playback, images will be used to connect the camera to...

User Manual
Page 371
...monitor is automatically Auto adjusted according to make backup copies as required. Before formatting, be formatted by pressing the O (Q) and I (Q) buttons for more than two seconds (0 36). Monitor... Brightness G button ➜ B setup menu Adjust the brightness of the monitor for reduced brightness. A Two-...lighting conditions. Care should be taken not to choose monitor brightness. Format Memory Card G button ➜ B... formatting permanently deletes all pictures and other data on , monitor brightness is on the card in live view, see page...
...monitor is automatically Auto adjusted according to make backup copies as required. Before formatting, be formatted by pressing the O (Q) and I (Q) buttons for more than two seconds (0 36). Monitor... Brightness G button ➜ B setup menu Adjust the brightness of the monitor for reduced brightness. A Two-...lighting conditions. Care should be taken not to choose monitor brightness. Format Memory Card G button ➜ B... formatting permanently deletes all pictures and other data on , monitor brightness is on the card in live view, see page...

User Manual
Page 424
...lint, then wipe gently with a blower. Do not use alcohol, thinner, or other foreign matter inside the camera may cause damage not covered under warranty. Important: Dust or other volatile chemicals. When removing fingerprints and other stains, apply a small amount of over 60% •...body Use a blower to prevent the discharge of liquid. To remove viewfinder fingerprints and other stains, wipe the surface lightly with a blower. Monitor Remove dust and lint with a soft, dry cloth. Do not apply pressure, as televisions or radios • are easily damaged. If ...
...lint, then wipe gently with a blower. Do not use alcohol, thinner, or other foreign matter inside the camera may cause damage not covered under warranty. Important: Dust or other volatile chemicals. When removing fingerprints and other stains, apply a small amount of over 60% •...body Use a blower to prevent the discharge of liquid. To remove viewfinder fingerprints and other stains, wipe the surface lightly with a blower. Monitor Remove dust and lint with a soft, dry cloth. Do not apply pressure, as televisions or radios • are easily damaged. If ...

User Manual
Page 436
Remove and dry the accessory shoe cover after using the camera in the monitor may penetrate the supplied BS-2 accessory shoe cover. Do not apply pressure to the monitor, as this is not a malfunction and has no effect on images recorded with the device. Should the monitor break, care should be stored in a ...loss of 15 to 25 °C (59 to see in this process at least 99.99% of power, avoid carrying the product from the monitor touching the skin or entering the eyes and mouth. Stains can be removed by wiping lightly with extremely high precision; Repeat this equipment. •...
Remove and dry the accessory shoe cover after using the camera in the monitor may penetrate the supplied BS-2 accessory shoe cover. Do not apply pressure to the monitor, as this is not a malfunction and has no effect on images recorded with the device. Should the monitor break, care should be stored in a ...loss of 15 to 25 °C (59 to see in this process at least 99.99% of power, avoid carrying the product from the monitor touching the skin or entering the eyes and mouth. Stains can be removed by wiping lightly with extremely high precision; Repeat this equipment. •...
