

User Manual
Page 3
CONTENT Important Safety Instructions 4 Introduction 5 PROJECTOR FEATURES 5 SHIPPING CONTENTS 6 PROJECTOR EXTERIOR VIEW 7 Front / Upper View 7 Left Side View 7 Right Side View 8 Lower / Bottom View 8 CONTROLS AND FUNCTIONS 9 External Control Panel 9 Remote Control 10 Remote control ... devices 12 Operation 14 START-UP 14 SWITCHING INPUT SIGNAL 14 SHUTDOWN 15 MENU OPERATION 16 PICTURE MENUS 18 Troubleshooting 20 Maintenance 21 Specifications 22 PROJECTOR SPECIFICATIONS 22 Dimensions 23 Warranty 24 LIMITED WARRANTY 24 3
CONTENT Important Safety Instructions 4 Introduction 5 PROJECTOR FEATURES 5 SHIPPING CONTENTS 6 PROJECTOR EXTERIOR VIEW 7 Front / Upper View 7 Left Side View 7 Right Side View 8 Lower / Bottom View 8 CONTROLS AND FUNCTIONS 9 External Control Panel 9 Remote Control 10 Remote control ... devices 12 Operation 14 START-UP 14 SWITCHING INPUT SIGNAL 14 SHUTDOWN 15 MENU OPERATION 16 PICTURE MENUS 18 Troubleshooting 20 Maintenance 21 Specifications 22 PROJECTOR SPECIFICATIONS 22 Dimensions 23 Warranty 24 LIMITED WARRANTY 24 3
User Manual
Page 4
... it may cause short-circuiting and physical injury. λ Do not catch your finger between the unit and surface of the floor when moving the projector installed on . λ Do not place your finger in the cooling fan. 4
... it may cause short-circuiting and physical injury. λ Do not catch your finger between the unit and surface of the floor when moving the projector installed on . λ Do not place your finger in the cooling fan. 4
User Manual
Page 5
... the following features: λ Quick cooling function for reducing projector cooling time; λ Compact and portable unit; λ High quality short throw lens; λ Adjustable color balance control for data/video display; λ Halogen 75W...AV picture; λ External Power Adapter with Universal AC Voltage input 100-240V, 12VDC at 7A output; λ The apparent brightness of use. Introduction Projector Features The projector integrates high-performance optical engine projection and a user-friendly design to deliver high reliability and ease of the projected image will vary depending on...
... the following features: λ Quick cooling function for reducing projector cooling time; λ Compact and portable unit; λ High quality short throw lens; λ Adjustable color balance control for data/video display; λ Halogen 75W...AV picture; λ External Power Adapter with Universal AC Voltage input 100-240V, 12VDC at 7A output; λ The apparent brightness of use. Introduction Projector Features The projector integrates high-performance optical engine projection and a user-friendly design to deliver high reliability and ease of the projected image will vary depending on...
User Manual
Page 6
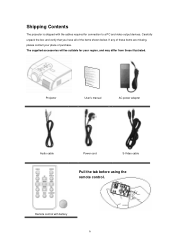
Remote control with the cables required for your place of the items shown below. The supplied accessories will be suitable for connection to a PC and video output devices. Projector User's manual AC power adapter Audio cable Power cord S-Video cable Pull the tab before using the remote control. Shipping Contents The projector is shipped with battery 6 If any of these items are missing, please contact your region, and may differ from those illustrated. Carefully unpack the box and verify that you have all of purchase.
Remote control with the cables required for your place of the items shown below. The supplied accessories will be suitable for connection to a PC and video output devices. Projector User's manual AC power adapter Audio cable Power cord S-Video cable Pull the tab before using the remote control. Shipping Contents The projector is shipped with battery 6 If any of these items are missing, please contact your region, and may differ from those illustrated. Carefully unpack the box and verify that you have all of purchase.
User Manual
Page 7
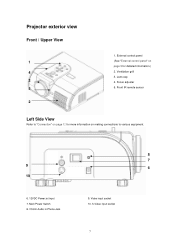
Lens cap 4. Front IR remote sensor Left Side View Refer to "Connection" on making connections to various equipment. 8 7 9 6 10 6. 12VDC Power jet input 7. Video input socket 10. S-Video input socket 7 External control panel (See "External control panel" on page 9 for more information on page 12 for detailed information.) 2. Projector exterior view Front / Upper View 1 4 3 5 2 1. Focus adjuster 5. Ventilation grill 3. Main Power Switch 8. 3.5mm Audio in Phone Jack 9.
Lens cap 4. Front IR remote sensor Left Side View Refer to "Connection" on making connections to various equipment. 8 7 9 6 10 6. 12VDC Power jet input 7. Video input socket 10. S-Video input socket 7 External control panel (See "External control panel" on page 9 for more information on page 12 for detailed information.) 2. Projector exterior view Front / Upper View 1 4 3 5 2 1. Focus adjuster 5. Ventilation grill 3. Main Power Switch 8. 3.5mm Audio in Phone Jack 9.

User Manual
Page 9
Power (Refer to "Switching input signal" on or off. 3. Digital volume control. 6. Menu recalls for more information.) Turns the projector on page 14 for OSD. 7. Down key. (OSD control only). 5. Volume decrease. Up key. (OSD control only). 11. OSD Menu. OSD Enter/Source (Refer to "...
Power (Refer to "Switching input signal" on or off. 3. Digital volume control. 6. Menu recalls for more information.) Turns the projector on page 14 for OSD. 7. Down key. (OSD control only). 5. Volume decrease. Up key. (OSD control only). 11. OSD Menu. OSD Enter/Source (Refer to "...

User Manual
Page 10
MUTE - UP - Up key for OSD control. Digital volume control. ALIGNMENT - Turns the projector on or off . Left key for OSD control. RIGHT - Down key for OSD control. VOL+ - VOL- - MODE - OSD menu recall. Display - MENU - Right key for ...
MUTE - UP - Up key for OSD control. Digital volume control. ALIGNMENT - Turns the projector on or off . Left key for OSD control. RIGHT - Down key for OSD control. VOL+ - VOL- - MODE - OSD menu recall. Display - MENU - Right key for ...

User Manual
Page 11
...is incorrectly replaced. λ Replace only with the same or equivalent type battery, as recommended by the battery manufacturer. λ Dispose of the projector's IR remote control sensors to the manufacturer's instructions. λ Never throw a battery into a fire. The distance between the remote control and... the IR sensors on the projector that there are located on the front and the back of battery leakage. 11 Push the holder into the remote control until it ...
...is incorrectly replaced. λ Replace only with the same or equivalent type battery, as recommended by the battery manufacturer. λ Dispose of the projector's IR remote control sensors to the manufacturer's instructions. λ Never throw a battery into a fire. The distance between the remote control and... the IR sensors on the projector that there are located on the front and the back of battery leakage. 11 Push the holder into the remote control until it ...

User Manual
Page 12
...device as might be expected in home theatre or home cinema applications. It is mixed into a common mono audio output through the projector speaker. 12 They are firmly inserted. If you should elect to a video source device using video cables. Cable connection Connecting video... source devices This section describes how to connect the projector to : 1. Use the correct signal cables for video presentations. Any stereo audio input (if provided) is not designed for, nor ...
...device as might be expected in home theatre or home cinema applications. It is mixed into a common mono audio output through the projector speaker. 12 They are firmly inserted. If you should elect to a video source device using video cables. Cable connection Connecting video... source devices This section describes how to connect the projector to : 1. Use the correct signal cables for video presentations. Any stereo audio input (if provided) is not designed for, nor ...

User Manual
Page 13
You need not connect audio to the mono audio projector. If you have a separate sound system, you will most likely want to connect the audio output of your video source device to that sound system, instead of to the projector if there is an alternate sound system available, or if audio is not required. 13 The audio connections illustrated in the following sections are provided for informational purposes only.
You need not connect audio to the mono audio projector. If you have a separate sound system, you will most likely want to connect the audio output of your video source device to that sound system, instead of to the projector if there is an alternate sound system available, or if audio is not required. 13 The audio connections illustrated in the following sections are provided for informational purposes only.
User Manual
Page 14
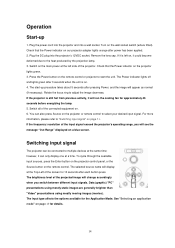
...on the main power at a time. If the frequency/ resolution of the projected image will display at the same time; Switching input signal The projector can be connected to the heat produced by the projection lamp. 3. Turn on the remote control. Press the Power button on . 4. Rotate... the focus ring to start -up 1. To cycle through the available input sources, press the Enter button on the projector control panel, or the Source button on the wall socket switch (where fitted). Operation Start-up procedure takes about 5 seconds after each button press...
...on the main power at a time. If the frequency/ resolution of the projected image will display at the same time; Switching input signal The projector can be connected to the heat produced by the projection lamp. 3. Turn on the remote control. Press the Power button on . 4. Rotate... the focus ring to start -up 1. To cycle through the available input sources, press the Enter button on the projector control panel, or the Source button on the wall socket switch (where fitted). Operation Start-up procedure takes about 5 seconds after each button press...
User Manual
Page 15
... green and the lamp shuts down process. λ If the projector is hot. 15 Do not move the projector while the lamp is not properly shut down the projector. λ To protect the lamp, the projector will not respond to turn the projector off the main Power at the left side and disconnect the... power cord at the adaptor from the wall socket. λ Do not unplug the adaptor or power cord before the projector shutdown sequence is complete, or during the cooling process. λ To shorten the cooling time, you risk damaging the lamp. The fans continue to ...
... green and the lamp shuts down process. λ If the projector is hot. 15 Do not move the projector while the lamp is not properly shut down the projector. λ To protect the lamp, the projector will not respond to turn the projector off the main Power at the left side and disconnect the... power cord at the adaptor from the wall socket. λ Do not unplug the adaptor or power cord before the projector shutdown sequence is complete, or during the cooling process. λ To shorten the cooling time, you risk damaging the lamp. The fans continue to ...

User Manual
Page 19
The lower the value, the more greenish the image becomes. Use Left / Right on the projector, or Left / Right on the remote control, to the factory preset values. 19 Returns all settings to select your desired language. Language sets the language for the OSD control menus. The higher the value, the more reddish the image becomes. Hue Language Default Adjusts the color tones of the image.
The lower the value, the more greenish the image becomes. Use Left / Right on the projector, or Left / Right on the remote control, to the factory preset values. 19 Returns all settings to select your desired language. Language sets the language for the OSD control menus. The higher the value, the more reddish the image becomes. Hue Language Default Adjusts the color tones of the image.
User Manual
Page 20
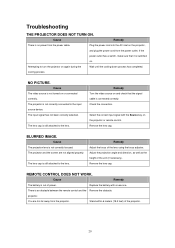
...correctly selected. Check the connection. BLURRED IMAGE. The lens cap is out of the unit (if necessary). Remedy Adjust the focus of the projector. 20 Stand within 6 meters (19.5 feet) of the lens using the focus adjuster. cooling process. Cause The video source is connected correctly.... Replace the battery with the Source key on again during the Wait until the cooling down process has completed. projector. Attempting to the input source device. REMOTE CONTROL DOES NOT WORK. Cause Remedy There is an obstacle between the remote control and...
...correctly selected. Check the connection. BLURRED IMAGE. The lens cap is out of the unit (if necessary). Remedy Adjust the focus of the projector. 20 Stand within 6 meters (19.5 feet) of the lens using the focus adjuster. cooling process. Cause The video source is connected correctly.... Replace the battery with the Source key on again during the Wait until the cooling down process has completed. projector. Attempting to the input source device. REMOTE CONTROL DOES NOT WORK. Cause Remedy There is an obstacle between the remote control and...
User Manual
Page 21
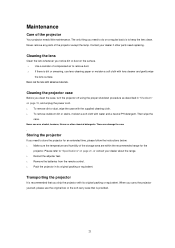
...case that you notice dirt or dust on page 22, or consult your dealer if other chemical detergents. Storing the projector If you clean the case, turn the projector off using the proper shutdown procedure as described in its original packing or equivalent. Contact your dealer about the range. ...λ Retract the adjuster feet. λ Remove the batteries from the remote control. λ Pack the projector in "Shutdown" on page 15, and unplug the power cord. λ To remove dirt or dust, wipe the case with the supplied cleaning cloth. ...
...case that you notice dirt or dust on page 22, or consult your dealer if other chemical detergents. Storing the projector If you clean the case, turn the projector off using the proper shutdown procedure as described in its original packing or equivalent. Contact your dealer about the range. ...λ Retract the adjuster feet. λ Remove the batteries from the remote control. λ Pack the projector in "Shutdown" on page 15, and unplug the power cord. λ To remove dirt or dust, wipe the case with the supplied cleaning cloth. ...
User Manual
Page 22
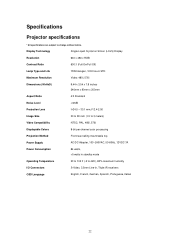
Display Technology Single Liquid Crystal on Silicon (LCoS) Display Resolution 640 x 480 x RGB Contrast Ratio 600:1 (Full On/Full Off) Lamp Type and Life 75W Halogen, 1000 hours STD Maximum Resolution Video: 480i, 576i Dimensions (WxHxD) 9.44 x 3.54 x 7.9 inches 240mm x 90mm x 200mm Aspect Ratio 4:3 Standard Noise Level Specifications Projector specifications * All specifications are subject to change without notice.
Display Technology Single Liquid Crystal on Silicon (LCoS) Display Resolution 640 x 480 x RGB Contrast Ratio 600:1 (Full On/Full Off) Lamp Type and Life 75W Halogen, 1000 hours STD Maximum Resolution Video: 480i, 576i Dimensions (WxHxD) 9.44 x 3.54 x 7.9 inches 240mm x 90mm x 200mm Aspect Ratio 4:3 Standard Noise Level Specifications Projector specifications * All specifications are subject to change without notice.
User Manual
Page 24
... in material and workmanship, under normal usage and storage. Proof of purchase date will be required with NEXTAR's written instructions, especially the requirement that vary from country to country. Important: The above warranty shall...operate the product in a dusty environment. Limited warranty is found to be defective within the warranty period, NEXTAR's only obligation-and your exclusive remedy-shall be replacement of any defective parts (labor included). Please refer ...altitude lower than 10000 feet, and avoidance of operation of the projector in accordance with any warranty claim.
... in material and workmanship, under normal usage and storage. Proof of purchase date will be required with NEXTAR's written instructions, especially the requirement that vary from country to country. Important: The above warranty shall...operate the product in a dusty environment. Limited warranty is found to be defective within the warranty period, NEXTAR's only obligation-and your exclusive remedy-shall be replacement of any defective parts (labor included). Please refer ...altitude lower than 10000 feet, and avoidance of operation of the projector in accordance with any warranty claim.