N7S Instruction Manual
Page 2
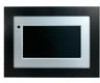
... use this device, please read this manual thoroughly and keep it available for choosing our Digital Photo Frame. This manual will be supported. 1 Introduction Thank you to enjoy unbelievably amazing visual & audio experience. No computer, digital camera, or Internet connection is compatible with the following memory cards and ports: SD, MultiMedia Card, Memory Stick, and Memory Stick PRO and USB. Main Features ★ This device can display digital pictures (JPEG) and play MP3 music or supported video files without connecting a computer (memory card...
... use this device, please read this manual thoroughly and keep it available for choosing our Digital Photo Frame. This manual will be supported. 1 Introduction Thank you to enjoy unbelievably amazing visual & audio experience. No computer, digital camera, or Internet connection is compatible with the following memory cards and ports: SD, MultiMedia Card, Memory Stick, and Memory Stick PRO and USB. Main Features ★ This device can display digital pictures (JPEG) and play MP3 music or supported video files without connecting a computer (memory card...
N7S Instruction Manual
Page 3
... direct sunlight. Otherwise, it may be easily scratched or broken. ★ To clean fingerprints and dust from condensation; Safety Precautions and Maintenance ★ For indoor use the buttons built in to the memory card slots to remove memory cards from the device. ★ Do not disassemble the Digital Photo Frame, otherwise it may cause damage to main functions. How to the LCD screen if using LCD Screen...
... direct sunlight. Otherwise, it may be easily scratched or broken. ★ To clean fingerprints and dust from condensation; Safety Precautions and Maintenance ★ For indoor use the buttons built in to the memory card slots to remove memory cards from the device. ★ Do not disassemble the Digital Photo Frame, otherwise it may cause damage to main functions. How to the LCD screen if using LCD Screen...
N7S Instruction Manual
Page 4
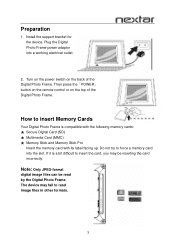
... be read image files in other formats. 3 Note: Only JPEG-format digital image files can be inserting the card incorrectly. Do not try to read by the Digital Photo Frame. Then press the「POWER」 button on the remote control or on the back of the Digital Photo Frame. How to insert Memory Cards Your Digital Photo Frame is a bit difficult to insert the card, you may fail to force a memory card into a working electrical outlet. 2. Preparation 1. Install the support...
... be read image files in other formats. 3 Note: Only JPEG-format digital image files can be inserting the card incorrectly. Do not try to read by the Digital Photo Frame. Then press the「POWER」 button on the remote control or on the back of the Digital Photo Frame. How to insert Memory Cards Your Digital Photo Frame is a bit difficult to insert the card, you may fail to force a memory card into a working electrical outlet. 2. Preparation 1. Install the support...
N7S Instruction Manual
Page 5
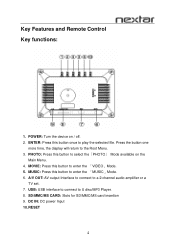
... play the selected file. SD/MMC/MS CARD: Slots for SD/MMC/MS card insertion 9. POWER: Turn the device on the Main Menu. 4. DC IN: DC power Input 10. Key Features and Remote Control Key functions: 1. MUSIC: Press this button once to enter the 「MUSIC」Mode. 6. RESET 4 USB: USB interface to connect to the Root Menu. 3. Press the button one more time, the display will return to U disc/MP3 Player. 8. PHOTO: Press this button...
... play the selected file. SD/MMC/MS CARD: Slots for SD/MMC/MS card insertion 9. POWER: Turn the device on the Main Menu. 4. DC IN: DC power Input 10. Key Features and Remote Control Key functions: 1. MUSIC: Press this button once to enter the 「MUSIC」Mode. 6. RESET 4 USB: USB interface to connect to the Root Menu. 3. Press the button one more time, the display will return to U disc/MP3 Player. 8. PHOTO: Press this button...
N7S Instruction Manual
Page 6
... pictures. ROTATE: Press this button to view the pictures one by one automatically. SETUP: Press this button to enter Slide Show Mode available on /off . PHOTO: Press this button to display the device's setup menu. VIEW: Press this button to choose the TFT LCD aspect ratios between 4:3 and 16:9. REPEAT: Press this button to activate all plastic strips.) POWER: Press this button to enter 「VIDEO」Mode. MOVIE: Press this button to turn the device...
... pictures. ROTATE: Press this button to view the pictures one by one automatically. SETUP: Press this button to enter Slide Show Mode available on /off . PHOTO: Press this button to display the device's setup menu. VIEW: Press this button to choose the TFT LCD aspect ratios between 4:3 and 16:9. REPEAT: Press this button to activate all plastic strips.) POWER: Press this button to enter 「VIDEO」Mode. MOVIE: Press this button to turn the device...
N7S Instruction Manual
Page 7
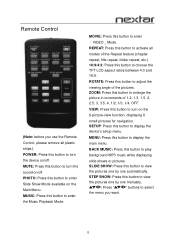
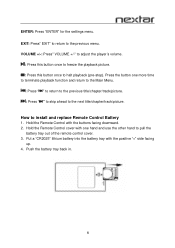
... "ENTER" for the settings menu. VOLUME +/-: Press" VOLUME +/-" to adjust the player's volume. : Press this button once to freeze the playback picture. : Press this button once to install and replace Remote Control Battery 1. How to halt playback (pre-stop). Push the battery tray back in. 6 Press the button one hand and use the other hand to pull the battery tray out of the remote control cover. 3. EXIT: Press...
... "ENTER" for the settings menu. VOLUME +/-: Press" VOLUME +/-" to adjust the player's volume. : Press this button once to freeze the playback picture. : Press this button once to install and replace Remote Control Battery 1. How to halt playback (pre-stop). Push the battery tray back in. 6 Press the button one hand and use the other hand to pull the battery tray out of the remote control cover. 3. EXIT: Press...
N7S Instruction Manual
Page 8
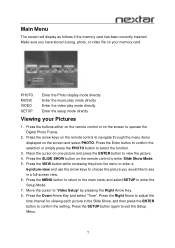
Make sure you would like to see in the Slide Show, and then press the ENTER button to operate the Digital Photo Frame. 2. Press the arrow keys on the remote control to navigate through the menu items displayed on the screen to confirm the setting. Press the SETUP button again to select the function. 3. PHOTO MUSIC VIDEO SETUP Enter the Photo display mode directly Enter the music play mode directly Enter the video play mode directly Enter the setup mode directly Viewing your memory card. Press the buttons either...
Make sure you would like to see in the Slide Show, and then press the ENTER button to operate the Digital Photo Frame. 2. Press the arrow keys on the remote control to navigate through the menu items displayed on the screen to confirm the setting. Press the SETUP button again to select the function. 3. PHOTO MUSIC VIDEO SETUP Enter the Photo display mode directly Enter the music play mode directly Enter the video play mode directly Enter the setup mode directly Viewing your memory card. Press the buttons either...
N7S Instruction Manual
Page 9
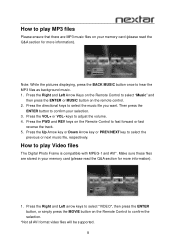
... your memory card (please read the Q&A section for more information). 1. Make sure these files are MP3 music files on the remote control. 2. How to play Video files The Digital Photo Frame is compatible with MPEG-1 and AVI*. Press the Right and Left arrow keys to select "VIDEO", then press the ENTER button, or simply press the MOVIE button on the Remote Control to confirm the selection. *Not all AVI format video files will be supported...
... your memory card (please read the Q&A section for more information). 1. Make sure these files are MP3 music files on the remote control. 2. How to play Video files The Digital Photo Frame is compatible with MPEG-1 and AVI*. Press the Right and Left arrow keys to select "VIDEO", then press the ENTER button, or simply press the MOVIE button on the Remote Control to confirm the selection. *Not all AVI format video files will be supported...
N7S Instruction Manual
Page 10
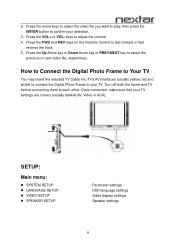
... the Remote Control to each other. How to Connect the Digital Photo Frame to Your TV You may insert the included TV Cable into TV's AV interfaces (usually yellow, red and white) to connect the Digital Photo Frame to confirm your TV. Once connected, make sure that your TV settings are correct (usually labeled AV, Video or AUX). SETUP: Main menu: z SYSTEM SETUP z LANGUAGE SETUP z VIDEO SETUP z SPEAKER SETUP Parameter settings OSD language settings Video display settings Speaker settings...
... the Remote Control to each other. How to Connect the Digital Photo Frame to Your TV You may insert the included TV Cable into TV's AV interfaces (usually yellow, red and white) to connect the Digital Photo Frame to confirm your TV. Once connected, make sure that your TV settings are correct (usually labeled AV, Video or AUX). SETUP: Main menu: z SYSTEM SETUP z LANGUAGE SETUP z VIDEO SETUP z SPEAKER SETUP Parameter settings OSD language settings Video display settings Speaker settings...
N7S Instruction Manual
Page 11
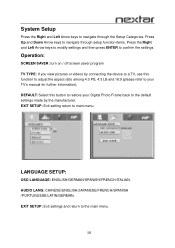
.... EXIT SETUP: Exit setting return to the main menu. 10 DEFAULT: Select this function to adjust the aspect ratio among 4:3 PS, 4:3 LB and 16:9 (please refer to your Digital Photo Frame back to the default settings made by the manufacturer. Operation: SCREEN SAVER: turn on / off screen saver program TV TYPE: If you view pictures or videos by connecting the device to a TV, use this button to restore your TV's manual for...
.... EXIT SETUP: Exit setting return to the main menu. 10 DEFAULT: Select this function to adjust the aspect ratio among 4:3 PS, 4:3 LB and 16:9 (please refer to your Digital Photo Frame back to the default settings made by the manufacturer. Operation: SCREEN SAVER: turn on / off screen saver program TV TYPE: If you view pictures or videos by connecting the device to a TV, use this button to restore your TV's manual for...
N7S Instruction Manual
Page 12
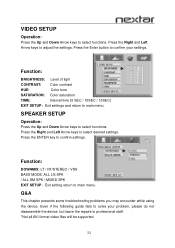
Press the Enter button to confirm your problem, please do not disassemble the device, but leave the repairs to professional staff. *Not all AVI format video files will be supported 11 Function: BRIGHTNESS: Level of light CONTRAST: Color contrast HUE: Color tone SATURATION: Color saturation TIME: Interval time (5 SEC / 10SEC / 15SEC) EXIT SETUP:Exit settings and return to main menu. Function: DOWNMIX: LT / RT...
Press the Enter button to confirm your problem, please do not disassemble the device, but leave the repairs to professional staff. *Not all AVI format video files will be supported 11 Function: BRIGHTNESS: Level of light CONTRAST: Color contrast HUE: Color tone SATURATION: Color saturation TIME: Interval time (5 SEC / 10SEC / 15SEC) EXIT SETUP:Exit settings and return to main menu. Function: DOWNMIX: LT / RT...
N7S Instruction Manual
Page 13
... Digital Photo Frame is compatible with photo, music, and video files in the Digital memory? Transfer the MP3 file to its original status once you turn off the digital frame device. Does it play MPEG-1 files stored on and read from Memory Card or U Disc. You can I rotate the picture displaying on the screen Yes, press the directional buttons on a compatible memory card. Photo: JPEG Music: MP3 Video: MPEG-1 and AVI*. Can I adjust the color of memory cards are preset by using a Memory Card Reader. the Digital Photo Frame at a time. The device...
... Digital Photo Frame is compatible with photo, music, and video files in the Digital memory? Transfer the MP3 file to its original status once you turn off the digital frame device. Does it play MPEG-1 files stored on and read from Memory Card or U Disc. You can I rotate the picture displaying on the screen Yes, press the directional buttons on a compatible memory card. Photo: JPEG Music: MP3 Video: MPEG-1 and AVI*. Can I adjust the color of memory cards are preset by using a Memory Card Reader. the Digital Photo Frame at a time. The device...
N7S Quick Start Guide
Page 1
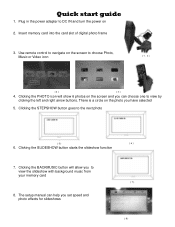
... button will show 6 photos on the photo you set speed and photo effects for slideshows (8) Use remote control to navigate on 2. The setup manual can choose one to the next photo (5) (6) 6. Quick start guide 1. Insert memory card into the card slot of digital photo frame 3. Clicking the SLIDESHOW button starts the slideshow function 7. Plug in the power adapter to DC IN and turn the power on the screen to view the slideshow with background music from your memory card...
... button will show 6 photos on the photo you set speed and photo effects for slideshows (8) Use remote control to navigate on 2. The setup manual can choose one to the next photo (5) (6) 6. Quick start guide 1. Insert memory card into the card slot of digital photo frame 3. Clicking the SLIDESHOW button starts the slideshow function 7. Plug in the power adapter to DC IN and turn the power on the screen to view the slideshow with background music from your memory card...


