N3-508 manual
Page 2
Bottom View 5 Using Your Digital Photo Frame 6 Technical Notes 8 Question"Troubleshooting Guide Specifications 10 FCC Compliance 11 TABLE OF CONTENTS Safety precautions 2 Introduction 2 1. Product Diagram 4 A. Side View 5 D. Packaging Check List 3 3. Top View 4 B. Front View 4 C. Features 3 2.
Bottom View 5 Using Your Digital Photo Frame 6 Technical Notes 8 Question"Troubleshooting Guide Specifications 10 FCC Compliance 11 TABLE OF CONTENTS Safety precautions 2 Introduction 2 1. Product Diagram 4 A. Side View 5 D. Packaging Check List 3 3. Top View 4 B. Front View 4 C. Features 3 2.
N3-508 manual
Page 3
... anywhere to display your digital photos. Introduction Your new Digital Photo Frame is a convenient and innovative way to share photos with you can easily view digital photos directly from your warranty. It supports all of the most popular memory card types on display tens or even hundreds of digital photos without the need to clean the unit. Safety precautions 1) Use only the supplied Input 100-240V, Output 5V adapter. 2) Turn off power before cleaning. With...
... anywhere to display your digital photos. Introduction Your new Digital Photo Frame is a convenient and innovative way to share photos with you can easily view digital photos directly from your warranty. It supports all of the most popular memory card types on display tens or even hundreds of digital photos without the need to clean the unit. Safety precautions 1) Use only the supplied Input 100-240V, Output 5V adapter. 2) Turn off power before cleaning. With...
N3-508 manual
Page 4
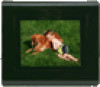
Features • Shows sharp photos on a 3.5 inch LCD display • Supports SD, MMC MS memory card formats • Displays photos from memory cards • Renders in a smooth and clear resolution of 320X240 pixels • Offers a variety of display features. including a slide show mode 2. Packaging Check List • Digital Photo Frame • User Manual • Quick Start Guide • Power Adaptor • USB Cable • Magnetic Stand - 3 - 1.
Features • Shows sharp photos on a 3.5 inch LCD display • Supports SD, MMC MS memory card formats • Displays photos from memory cards • Renders in a smooth and clear resolution of 320X240 pixels • Offers a variety of display features. including a slide show mode 2. Packaging Check List • Digital Photo Frame • User Manual • Quick Start Guide • Power Adaptor • USB Cable • Magnetic Stand - 3 - 1.

N3-508 manual
Page 5
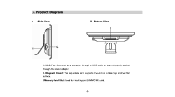
UP: Moves the cursor up. ENTER: Confirm selection/rotate/zoom F. MODE: Press once to turn off the screen. DOWN: Moves the cursor down C. E. 3. Product Diagram A. Front View ABCDE A. D. Press and hold to start slide show. Top View B. B. ESC: Return to the previous screen. LCD Display - 4 -
UP: Moves the cursor up. ENTER: Confirm selection/rotate/zoom F. MODE: Press once to turn off the screen. DOWN: Moves the cursor down C. E. 3. Product Diagram A. Front View ABCDE A. D. Press and hold to start slide show. Top View B. B. ESC: Return to the previous screen. LCD Display - 4 -
N3-508 manual
Page 6
USB Port: Connects to a computer through a USB cable or to an electronic socket through the power adaptor H. Product Diagram C. 3. Bottom View G. Memory Card Slot: Used for inserting an SD/MMC/MS card. - 5 - Side View D. Magnetic Stand: This adjustable arm supports the unit on a table top or other flat surface. 1.
USB Port: Connects to a computer through a USB cable or to an electronic socket through the power adaptor H. Product Diagram C. 3. Bottom View G. Memory Card Slot: Used for inserting an SD/MMC/MS card. - 5 - Side View D. Magnetic Stand: This adjustable arm supports the unit on a table top or other flat surface. 1.
N3-508 manual
Page 7
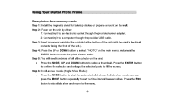
... photo viewer mode. s - Step 2: Power on the main menu. Press the ENTER button to confirm the selection and enlarge the selected photo to set the time interval between slides. Step 3: Insert a memory card into the card slot at the bottom of the unit (with the card's electrical contacts facing the front of the photos on the wall. Using Your Digital Photo Frame View photos from memory cards Step 1: Install the magnetic stand for tabletop display...
... photo viewer mode. s - Step 2: Power on the main menu. Press the ENTER button to confirm the selection and enlarge the selected photo to set the time interval between slides. Step 3: Insert a memory card into the card slot at the bottom of the unit (with the card's electrical contacts facing the front of the photos on the wall. Using Your Digital Photo Frame View photos from memory cards Step 1: Install the magnetic stand for tabletop display...
N3-508 manual
Page 8
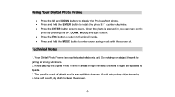
... buttons to display the Previous/Next photo. • Press and hold the MODE button to enter power saving mode with the screen off. Technical Notes 1. Avoid using sharp objects nearby. 4. Avoid placing the Digital Photo Frame in , you can roam on the photo by pressing the UP, DOWN, MODE, and ESC button. • Press the ESC button to return to thumbnail mode. • Press and hold the ENTER button to rotate the photo...
... buttons to display the Previous/Next photo. • Press and hold the MODE button to enter power saving mode with the screen off. Technical Notes 1. Avoid using sharp objects nearby. 4. Avoid placing the Digital Photo Frame in , you can roam on the photo by pressing the UP, DOWN, MODE, and ESC button. • Press the ESC button to return to thumbnail mode. • Press and hold the ENTER button to rotate the photo...
N3-508 manual
Page 9
... format for contact details. 1. Answer: The Frame will display digital photos that are stored in the JPEG format, which is the memory card not recognized? Answer: Please make sure the unit is properly connected to be inserted improperly or not pushed in the right direction and is turned on again. 3. Some cameras allow photos to a power source. Even if the following guide fails to solve your problem...
... format for contact details. 1. Answer: The Frame will display digital photos that are stored in the JPEG format, which is the memory card not recognized? Answer: Please make sure the unit is properly connected to be inserted improperly or not pushed in the right direction and is turned on again. 3. Some cameras allow photos to a power source. Even if the following guide fails to solve your problem...
N3-508 manual
Page 10
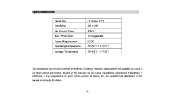
No part of Nextar, Inc. Photo Size Power Requirement Operating Temperature Storage Temperature 3.5 inches TFT 320 x 240 JPEG 16 megapixels 5V DC -10-55°C, 14-131T -20-55t, -1-131T This manual was correct and complete at any way without prior notice. s - However, specifications and updates can occur at the time of this manual may be copied, republished, reproduced, transmitted, or distributed in any time without...
No part of Nextar, Inc. Photo Size Power Requirement Operating Temperature Storage Temperature 3.5 inches TFT 320 x 240 JPEG 16 megapixels 5V DC -10-55°C, 14-131T -20-55t, -1-131T This manual was correct and complete at any way without prior notice. s - However, specifications and updates can occur at the time of this manual may be copied, republished, reproduced, transmitted, or distributed in any time without...
N3-508 manual
Page 11
... reception, which the receiver is connected. 3. Operation is encouraged to try to correct the interference through one or more of the following two conditions: (1) this device may cause harmful interference to which can radiate radio frequency energy and, if not installed and used in a residential installation. The user is subject to part 15 of the FCC Rules. Consult...
... reception, which the receiver is connected. 3. Operation is encouraged to try to correct the interference through one or more of the following two conditions: (1) this device may cause harmful interference to which can radiate radio frequency energy and, if not installed and used in a residential installation. The user is subject to part 15 of the FCC Rules. Consult...
N3-508 manual
Page 12
... in China © 2005 Nextar (Hong Kong) Limited. For instruction manuals, updated drivers or other brand names, product names and trademarks are simulated and may find it necessary to do this manual. Inc. Nextar is a trademark of their registered owners. We reserve the right to modify, amend or otherwise change without any time, without notice. All screen shots shown are the...
... in China © 2005 Nextar (Hong Kong) Limited. For instruction manuals, updated drivers or other brand names, product names and trademarks are simulated and may find it necessary to do this manual. Inc. Nextar is a trademark of their registered owners. We reserve the right to modify, amend or otherwise change without any time, without notice. All screen shots shown are the...
N3-508 QSG
Page 1
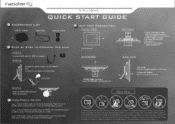
.... ' QUICK START GUIDE ACCESSORIES LIST USB AC Adaptor USB Cable Magnetic Stand Scii UNIT VIEW DESCRIPTION FRONT VIEW STEP BY STEP TO CONNECT THE UNIT STEP 1 Connect USB cable to USB AC adaptor STEP 2 Connect to power supply via AC adaptor OR Connect to computer via USB cable r AC100-240V 1.LCD Screen BOTTOM VIEW 1.SD/MS /MMC Card Slot Insert SD/MS/MMC card into the digital photo frame. Press and hold to confirm. ESC: Return 5. Press the ENTER button...
.... ' QUICK START GUIDE ACCESSORIES LIST USB AC Adaptor USB Cable Magnetic Stand Scii UNIT VIEW DESCRIPTION FRONT VIEW STEP BY STEP TO CONNECT THE UNIT STEP 1 Connect USB cable to USB AC adaptor STEP 2 Connect to power supply via AC adaptor OR Connect to computer via USB cable r AC100-240V 1.LCD Screen BOTTOM VIEW 1.SD/MS /MMC Card Slot Insert SD/MS/MMC card into the digital photo frame. Press and hold to confirm. ESC: Return 5. Press the ENTER button...


