N3-506 User's Manual
Page 2
TABLE OF CONTENTS Safety precautions...3 Introduction...3 Features ...4 Packaging Check List ...4 Product Diagram...4 Charge the battery...5 Using Your Digital Photo Frame ...9 Technical Notes...133 Question/Trouble-shooting Guide ...143 Specifications ...15 FCC Compliance ...166 - 2 -
TABLE OF CONTENTS Safety precautions...3 Introduction...3 Features ...4 Packaging Check List ...4 Product Diagram...4 Charge the battery...5 Using Your Digital Photo Frame ...9 Technical Notes...133 Question/Trouble-shooting Guide ...143 Specifications ...15 FCC Compliance ...166 - 2 -

N3-506 User's Manual
Page 3
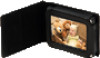
... 5V adapter. 2) Turn off power before cleaning. With it with you can easily view digital photos directly from your camera's memory card; no computer or printer required. Do not use liquid cleaners. 3) Avoid exposing the unit to pay for printing. - 3 - View and keep on display tens or even hundreds of the most popular memory card types on the market, including SD, MMC and MS. The Digital Photo Frame is light...
... 5V adapter. 2) Turn off power before cleaning. With it with you can easily view digital photos directly from your camera's memory card; no computer or printer required. Do not use liquid cleaners. 3) Avoid exposing the unit to pay for printing. - 3 - View and keep on display tens or even hundreds of the most popular memory card types on the market, including SD, MMC and MS. The Digital Photo Frame is light...
N3-506 User's Manual
Page 4
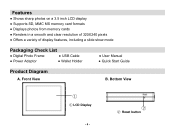
Front View B. Bottom View ① ① LCD Display - 4 - ② ② Reset button Features ● Shows sharp photos on a 3.5 inch LCD display ● Supports SD, MMC MS memory card formats ● Displays photos from memory cards ● Renders in a smooth and clear resolution of 320X240 pixels ● Offers a variety of display features, including a slide show mode Packaging Check List ● Digital Photo Frame ● USB Cable ● Power Adaptor ● Wallet Holder ● User Manual ● Quick Start Guide Product Diagram A.
Front View B. Bottom View ① ① LCD Display - 4 - ② ② Reset button Features ● Shows sharp photos on a 3.5 inch LCD display ● Supports SD, MMC MS memory card formats ● Displays photos from memory cards ● Renders in a smooth and clear resolution of 320X240 pixels ● Offers a variety of display features, including a slide show mode Packaging Check List ● Digital Photo Frame ● USB Cable ● Power Adaptor ● Wallet Holder ● User Manual ● Quick Start Guide Product Diagram A.
N3-506 User's Manual
Page 5
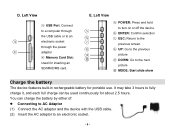
...: Return to the ⑦ previous screen. ⑧ ⑧ UP: Go to the previous ⑨ picture ⑩ ⑨ DOWN: Go to the next picture ⑩ MODE: Start slide show Charge the battery The device features built-in rechargeable battery for inserting an SD/MMC/MS card. Left View ③ USB Port: Connect to a computer through the USB cable or to an electronic socket. - 5 - It may take 3 hours...
...: Return to the ⑦ previous screen. ⑧ ⑧ UP: Go to the previous ⑨ picture ⑩ ⑨ DOWN: Go to the next picture ⑩ MODE: Start slide show Charge the battery The device features built-in rechargeable battery for inserting an SD/MMC/MS card. Left View ③ USB Port: Connect to a computer through the USB cable or to an electronic socket. - 5 - It may take 3 hours...
N3-506 User's Manual
Page 6
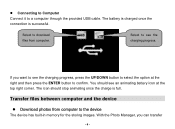
... stop animating once the charge is successful. The battery is charged once the connection is full. Select to download files from computer to the device The device has built-in memory for the storing images. Select to see the charging progress, press the UP/DOWN button to see the charging progress. With the Photo Manager, you want to select the option at the top right corner. z Connecting...
... stop animating once the charge is successful. The battery is charged once the connection is full. Select to download files from computer to the device The device has built-in memory for the storing images. Select to see the charging progress, press the UP/DOWN button to see the charging progress. With the Photo Manager, you want to select the option at the top right corner. z Connecting...
N3-506 User's Manual
Page 7
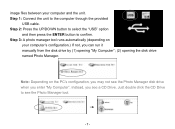
... "USB" option and then press the ENTER button to see a CD Drive. Instead, you enter "My Computer". Just double click the CD Drive to confirm. Note: Depending on your computer and the unit. image files between your computer's configuration.) If not, you can run it manually from the disk drive by (1) opening "My Computer"; (2) opening the disk drive named Photo Manager. Step 1: Connect the...
... "USB" option and then press the ENTER button to see a CD Drive. Instead, you enter "My Computer". Just double click the CD Drive to confirm. Note: Depending on your computer and the unit. image files between your computer's configuration.) If not, you can run it manually from the disk drive by (1) opening "My Computer"; (2) opening the disk drive named Photo Manager. Step 1: Connect the...
N3-506 User's Manual
Page 8
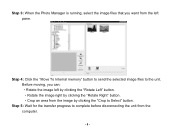
Step 3: When the Photo Manager is running, select the image files that you can: ·Rotate the image left by clicking the "Rotate Left" button. ·Rotate the image right by clicking the "Rotate Right" button. ·Crop an area from the image by clicking the "Crop to complete before disconnecting the unit from the left pane. Step 5: Wait for the transfer progress to Select" button. Before moving, you want from the computer. - 8 - Step 4: Click the "Move To Internal memory" button to send the selected image files to the unit.
Step 3: When the Photo Manager is running, select the image files that you can: ·Rotate the image left by clicking the "Rotate Left" button. ·Rotate the image right by clicking the "Rotate Right" button. ·Crop an area from the image by clicking the "Crop to complete before disconnecting the unit from the left pane. Step 5: Wait for the transfer progress to Select" button. Before moving, you want from the computer. - 8 - Step 4: Click the "Move To Internal memory" button to send the selected image files to the unit.
N3-506 User's Manual
Page 9
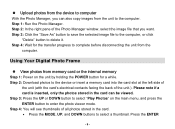
... of the unit.). Using Your Digital Photo Frame z View photos from memory card or the internal memory Step 1: Power on the main menu, and press the ENTER button to enter the photo viewer mode. Step 4: Wait for a while. z Upload photos from the device to computer With the Photo Manager, you want. Step 2: Download photos to select a thumbnail. Step 4: You will see thumbnails of all photos stored in the card can also copy images from the computer. Please...
... of the unit.). Using Your Digital Photo Frame z View photos from memory card or the internal memory Step 1: Power on the main menu, and press the ENTER button to enter the photo viewer mode. Step 4: Wait for a while. z Upload photos from the device to computer With the Photo Manager, you want. Step 2: Download photos to select a thumbnail. Step 4: You will see thumbnails of all photos stored in the card can also copy images from the computer. Please...
N3-506 User's Manual
Page 10
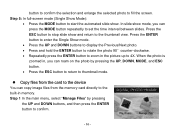
.... z Copy files from the memory card directly to fill the screen. When the photo is zoomed in, you can press the MODE button repeatedly to thumbnail mode. Step 5: In full-screen mode (Single Show Mode): • Press the MODE button to the thumbnail view. In slide show . Step 1 In the main menu, select "Manage Files" by pressing the UP, DOWN, MODE, and ESC button. • Press the ESC button to return to set the time...
.... z Copy files from the memory card directly to fill the screen. When the photo is zoomed in, you can press the MODE button repeatedly to thumbnail mode. Step 5: In full-screen mode (Single Show Mode): • Press the MODE button to the thumbnail view. In slide show . Step 1 In the main menu, select "Manage Files" by pressing the UP, DOWN, MODE, and ESC button. • Press the ESC button to return to set the time...
N3-506 User's Manual
Page 11
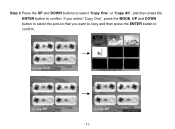
If you select "Copy One", press the MODE, UP and DOWN button to select the picture that you want to copy and then press the ENTER button to confirm. Step 2 Press the UP and DOWN buttons to select "Copy One" or "Copy All", and then press the ENTER button to confirm. - 11 -
If you select "Copy One", press the MODE, UP and DOWN button to select the picture that you want to copy and then press the ENTER button to confirm. Step 2 Press the UP and DOWN buttons to select "Copy One" or "Copy All", and then press the ENTER button to confirm. - 11 -
N3-506 User's Manual
Page 12
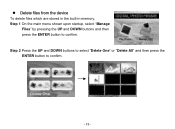
z Delete files from the device To delete files which are stored in the built-in memory, Step 1 On the main menu shown upon startup, select "Manage Files" by pressing the UP and DOWN buttons and then press the ENTER button to confirm. - 12 - Step 2 Press the UP and DOWN buttons to select "Delete One" or "Delete All" and then press the ENTER button to confirm.
z Delete files from the device To delete files which are stored in the built-in memory, Step 1 On the main menu shown upon startup, select "Manage Files" by pressing the UP and DOWN buttons and then press the ENTER button to confirm. - 12 - Step 2 Press the UP and DOWN buttons to select "Delete One" or "Delete All" and then press the ENTER button to confirm.
N3-506 User's Manual
Page 13
Do not drop or subject the unit to clean the screen. - 13 - Technical Notes 1. Avoid placing the Digital Photo Frame in areas of plastic and is a sophisticated electronic unit. The panel is made of high humidity or where it might be exposed to damage. Your Digital Photo Frame is susceptible to liquids. 3. Use only a soft, dry cloth to jarring or strong vibrations. 2. Avoid using sharp objects nearby. 4.
Do not drop or subject the unit to clean the screen. - 13 - Technical Notes 1. Avoid placing the Digital Photo Frame in areas of plastic and is a sophisticated electronic unit. The panel is made of high humidity or where it might be exposed to damage. Your Digital Photo Frame is susceptible to liquids. 3. Use only a soft, dry cloth to jarring or strong vibrations. 2. Avoid using sharp objects nearby. 4.
N3-506 User's Manual
Page 14
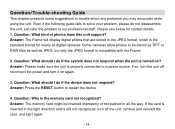
... Frame will display digital photos that are stored in the right direction and is turned on again. 3. Answer: Please make sure the unit is the memory card not recognized? Even if the following guide fails to restart the device. 4. Question: Why is properly connected to be inserted improperly or not pushed in all digital cameras. If the card is inserted in the JPEG format, which is compatible...
... Frame will display digital photos that are stored in the right direction and is turned on again. 3. Answer: Please make sure the unit is the memory card not recognized? Even if the following guide fails to restart the device. 4. Question: Why is properly connected to be inserted improperly or not pushed in all digital cameras. If the card is inserted in the JPEG format, which is compatible...
N3-506 User's Manual
Page 15
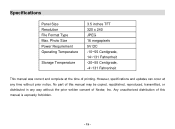
... - Photo Size Power Requirement Operating Temperature Storage Temperature 3.5 inches TFT 320 x 240 JPEG 16 megapixels 5V DC -10~55 Centigrade, 14~131 Fahrenheit -20~55 Centigrade, -4~131 Fahrenheit This manual was correct and complete at any time without the prior written consent of this manual may be copied, republished, reproduced, transmitted, or distributed in any way without prior notice. Specifications Panel Size...
... - Photo Size Power Requirement Operating Temperature Storage Temperature 3.5 inches TFT 320 x 240 JPEG 16 megapixels 5V DC -10~55 Centigrade, 14~131 Fahrenheit -20~55 Centigrade, -4~131 Fahrenheit This manual was correct and complete at any time without the prior written consent of this manual may be copied, republished, reproduced, transmitted, or distributed in any way without prior notice. Specifications Panel Size...
N3-506 User's Manual
Page 16
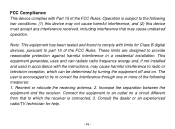
... undesired operation. The user is subject to provide reasonable protection against harmful interference in accordance with Part 15 of the FCC Rules. These limits are designed to the following measures: 1. Consult the dealer or an experienced radio/TV technician for Class B digital devices, pursuant to which can radiate radio frequency energy and, if not installed and used...
... undesired operation. The user is subject to provide reasonable protection against harmful interference in accordance with Part 15 of the FCC Rules. These limits are designed to the following measures: 1. Consult the dealer or an experienced radio/TV technician for Class B digital devices, pursuant to which can radiate radio frequency energy and, if not installed and used...
N3-506 User's Manual
Page 17
... to do this manual. All specifications and features are property of their owners. - 17 - Nextar is a trademark of Nextar (Hong Kong) Limited. Nextar™ is a trademark and service mark of Nextar (Hong Kong) Limited. unless otherwise indicated Made in China © 2008 Nextar (Hong Kong) Limited. AND ITS AFFILIATES 1661 FAIRPLEX DRIVE LA VERNE, CA 91750. For instruction manuals, updated drivers or other brand...
... to do this manual. All specifications and features are property of their owners. - 17 - Nextar is a trademark of Nextar (Hong Kong) Limited. Nextar™ is a trademark and service mark of Nextar (Hong Kong) Limited. unless otherwise indicated Made in China © 2008 Nextar (Hong Kong) Limited. AND ITS AFFILIATES 1661 FAIRPLEX DRIVE LA VERNE, CA 91750. For instruction manuals, updated drivers or other brand...


