
User Guide
Page 1
... voltage" which could cause electric shock. When a cart is equipped with one wider than the other apparatus (including amplifiers) that blocks ventilation. Important Safety Instructions WARNING: To reduce the risk of fire or electric shock, DO NOT expose this apparatus during lightning storms or when unused for replacement of time. 14) Refer all instructions. 5) Do not use...
... voltage" which could cause electric shock. When a cart is equipped with one wider than the other apparatus (including amplifiers) that blocks ventilation. Important Safety Instructions WARNING: To reduce the risk of fire or electric shock, DO NOT expose this apparatus during lightning storms or when unused for replacement of time. 14) Refer all instructions. 5) Do not use...

User Guide
Page 2
... with 40GB ultra large capacity, and hundreds of MPEG4 films and thousands of MP3 music could play files of MP3 music can be used as a moveable harddisk. Voice Recording Support to PC at any time via AV cable. Designed with USB 2.0 OTG port, can download multi-media files from www.Manualslib.com manuals search engine - 2 - It...
... with 40GB ultra large capacity, and hundreds of MPEG4 films and thousands of MP3 music could play files of MP3 music can be used as a moveable harddisk. Voice Recording Support to PC at any time via AV cable. Designed with USB 2.0 OTG port, can download multi-media files from www.Manualslib.com manuals search engine - 2 - It...
User Guide
Page 3
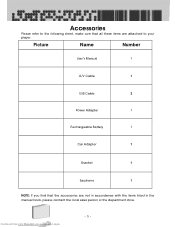
Downloaded from www.Manualslib.com manuals search engine - 3 - Picture Name Number User's Manual 1 A/V Cable 1 USB Cable 2 Power Adapter 1 Rechargeable Battery 1 Car Adapter 1 Bracket 1 Earphone 1 NOTE: If you find that all these items are not in accordance with the items listed in the manual book, please contact the local sales person or the department store. Accessories Please refer to the following sheet, make sure that the accessories are attached to your player.
Downloaded from www.Manualslib.com manuals search engine - 3 - Picture Name Number User's Manual 1 A/V Cable 1 USB Cable 2 Power Adapter 1 Rechargeable Battery 1 Car Adapter 1 Bracket 1 Earphone 1 NOTE: If you find that all these items are not in accordance with the items listed in the manual book, please contact the local sales person or the department store. Accessories Please refer to the following sheet, make sure that the accessories are attached to your player.
User Guide
Page 4
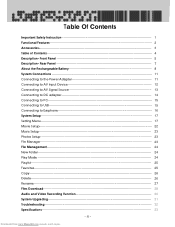
... Important Safety Instruction 1 Functional Features 2 Accessories 3 Table of Contents 4 Description- Rear Panel 7 About the Rechargeable Battery 8 System Connections 11 Connecting to the Power Adapter 11 Connecting to AV Input Device 12 Connecting to AV Signal Source 13 Connecting to DC adapter 14 Connecting to PC 15 Connecting to USB 15 Connecting to Earphone 16 System Setup 17 Setting...
... Important Safety Instruction 1 Functional Features 2 Accessories 3 Table of Contents 4 Description- Rear Panel 7 About the Rechargeable Battery 8 System Connections 11 Connecting to the Power Adapter 11 Connecting to AV Input Device 12 Connecting to AV Signal Source 13 Connecting to DC adapter 14 Connecting to PC 15 Connecting to USB 15 Connecting to Earphone 16 System Setup 17 Setting...

User Guide
Page 5
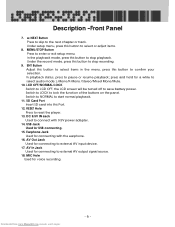
...press MENU/ STOP button to select or adjust items. Downloaded from www.Manualslib.com manuals search engine - 5 - SETUP Button Under file menu, press this button to enter ...file arrangement mode. Under audio file playback status, press this button to enter playback mode selecting menu. 3. VOL - The light.... 6. PREV Button Press to skip to turn on/off the power. Description -Front Panel 1. POWER Button/Power Indicator/Charge Indicator Press and hold the button for about 2 seconds to...
...press MENU/ STOP button to select or adjust items. Downloaded from www.Manualslib.com manuals search engine - 5 - SETUP Button Under file menu, press this button to enter ...file arrangement mode. Under audio file playback status, press this button to enter playback mode selecting menu. 3. VOL - The light.... 6. PREV Button Press to skip to turn on/off the power. Description -Front Panel 1. POWER Button/Power Indicator/Charge Indicator Press and hold the button for about 2 seconds to...
User Guide
Page 6
... mode, press this Port. 12. MIC Hole Used for USB connecting. 15. LCD OFF/NORMAL/LOCK Switch to LCD OFF, the LCD screen will be turned off to the next chapter or track. USB Jack Used for voice recording. Downloaded from www.Manualslib.com manuals search engine - 6 - Description -Front Panel 7. NEXT Button Press to skip to save battery power.
... mode, press this Port. 12. MIC Hole Used for USB connecting. 15. LCD OFF/NORMAL/LOCK Switch to LCD OFF, the LCD screen will be turned off to the next chapter or track. USB Jack Used for voice recording. Downloaded from www.Manualslib.com manuals search engine - 6 - Description -Front Panel 7. NEXT Button Press to skip to save battery power.
User Guide
Page 7
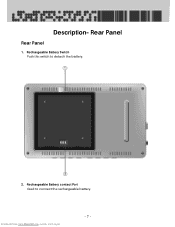
Downloaded from www.Manualslib.com manuals search engine - 7 - Description- Rechargeable Battery Switch Push this switch to connect the rechargeable battery. Rechargeable Battery contact Port Used to detach the battery. 2. Rear Panel Rear Panel 1.
Downloaded from www.Manualslib.com manuals search engine - 7 - Description- Rechargeable Battery Switch Push this switch to connect the rechargeable battery. Rechargeable Battery contact Port Used to detach the battery. 2. Rear Panel Rear Panel 1.
User Guide
Page 8
... attached power adapter or the rechargeable battery. It is suggested that do not charge the battery under playback mode. ¾ Detach the battery when it is not in use . To exit the standby mode, connect the player with a specific lithium polymeric rechargeable battery, for using time of the battery. ¾ Do not open or disassemble the battery. ¾ Do not short the battery terminals. As a portable...
... attached power adapter or the rechargeable battery. It is suggested that do not charge the battery under playback mode. ¾ Detach the battery when it is not in use . To exit the standby mode, connect the player with a specific lithium polymeric rechargeable battery, for using time of the battery. ¾ Do not open or disassemble the battery. ¾ Do not short the battery terminals. As a portable...
User Guide
Page 9
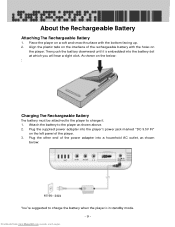
... "DC 9.5V IN" on the below: : Charging The Rechargeable Battery The battery must be attached to the player to the player as shown above. 2. Downloaded from www.Manualslib.com manuals search engine - 9 - Then push the battery downward until it . 1. Attach the battery to charge it is in standby mode. About the Rechargeable Battery Attaching The Rechargeable Battery 1. As shown on the left panel...
... "DC 9.5V IN" on the below: : Charging The Rechargeable Battery The battery must be attached to the player to the player as shown above. 2. Downloaded from www.Manualslib.com manuals search engine - 9 - Then push the battery downward until it . 1. Attach the battery to charge it is in standby mode. About the Rechargeable Battery Attaching The Rechargeable Battery 1. As shown on the left panel...
User Guide
Page 10
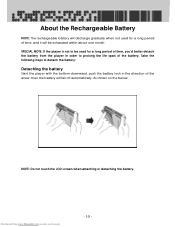
... the player is not to prolong the life span of the battery. About the Rechargeable Battery NOTE: The rechargeable battery will discharge gradually when not used for a long period of time, you'd better detach the battery from www.Manualslib.com manuals search engine - 10 - Take the following steps to detach the battery: Detaching the battery Slant the player with the bottom...
... the player is not to prolong the life span of the battery. About the Rechargeable Battery NOTE: The rechargeable battery will discharge gradually when not used for a long period of time, you'd better detach the battery from www.Manualslib.com manuals search engine - 10 - Take the following steps to detach the battery: Detaching the battery Slant the player with the bottom...
User Guide
Page 11
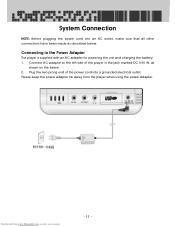
... 9.5V IN, as described below . 2. Connect AC adapter to the Power Adapter The player is supplied with an AC adapter for powering the unit and charging the battery. 1. Downloaded from the player when using the power adapter. Please keep the power adapter far away from www.Manualslib.com manuals search engine - 11 - Connecting to the left side of the...
... 9.5V IN, as described below . 2. Connect AC adapter to the Power Adapter The player is supplied with an AC adapter for powering the unit and charging the battery. 1. Downloaded from the player when using the power adapter. Please keep the power adapter far away from www.Manualslib.com manuals search engine - 11 - Connecting to the left side of the...

User Guide
Page 12
System Connection Connecting to the external AV input device, such as shown on the left panel of the player Plug the other end into the input jack of the external AV input device, such as a TV, as a TV. Using the supplied audio/video cable to connect the player to AV Input Device This player supports AV output function. Plug one end into the AV Out jack on the below figure: Downloaded from www.Manualslib.com manuals search engine - 12 -
System Connection Connecting to the external AV input device, such as shown on the left panel of the player Plug the other end into the input jack of the external AV input device, such as a TV, as a TV. Using the supplied audio/video cable to connect the player to AV Input Device This player supports AV output function. Plug one end into the AV Out jack on the below figure: Downloaded from www.Manualslib.com manuals search engine - 12 -
User Guide
Page 14
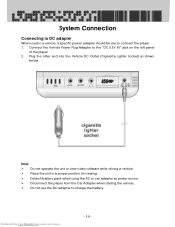
Downloaded from the Car Adapter when starting the vehicle. ¾ Do not use to connect the player. 1. Plug the other end into the Vehicle DC Outlet (Cigarette Lighter Socket) as power source. ¾ Disconnect the player from www.Manualslib.com manuals search engine - 14 - Note: ¾ ...the unit or view video software while driving a vehicle. ¾ Place the unit in a vehicle, a specific power adapter should be use the DC adapter to charge the battery. Connect the Vehicle Power Plug Adapter to the "DC 9.5V IN" jack on the left panel of the player 2. System Connection ...
Downloaded from the Car Adapter when starting the vehicle. ¾ Do not use to connect the player. 1. Plug the other end into the Vehicle DC Outlet (Cigarette Lighter Socket) as power source. ¾ Disconnect the player from www.Manualslib.com manuals search engine - 14 - Note: ¾ ...the unit or view video software while driving a vehicle. ¾ Place the unit in a vehicle, a specific power adapter should be use the DC adapter to charge the battery. Connect the Vehicle Power Plug Adapter to the "DC 9.5V IN" jack on the left panel of the player 2. System Connection ...

User Guide
Page 15
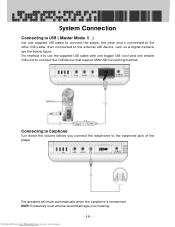
....Manualslib.com manuals search engine - 15 - Plug one end into the USB jack on the left panel of the computer. See the below figure. Plug one end into the USB jack on the left panel of the player and the other end into the USB jack of the player, and the other end... into the storage device, such as digital camera, etc. See the below figure. Connecting to USB(Master ModeⅠ ) Use the supplied USB connecting cable to connect the player to the personal computer. ...
....Manualslib.com manuals search engine - 15 - Plug one end into the USB jack on the left panel of the computer. See the below figure. Plug one end into the USB jack on the left panel of the player and the other end into the USB jack of the player, and the other end... into the storage device, such as digital camera, etc. See the below figure. Connecting to USB(Master ModeⅠ ) Use the supplied USB connecting cable to connect the player to the personal computer. ...
User Guide
Page 16
... manuals search engine - 16 - Connecting to Earphone Turn down the volume before you connect the earphones to connect the USB device that support MINI USB connecting method. System Connection Connecting to USB(Master Mode Ⅱ ) Use one supplied USB cable to connect the player, the other end is connected to the other USB cable, then connected to the external USB...
... manuals search engine - 16 - Connecting to Earphone Turn down the volume before you connect the earphones to connect the USB device that support MINI USB connecting method. System Connection Connecting to USB(Master Mode Ⅱ ) Use one supplied USB cable to connect the player, the other end is connected to the other USB cable, then connected to the external USB...
User Guide
Page 17
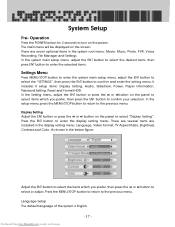
...select "Display Setting". It Includes 8 setup items: Display Setting, Audio, Slideshow, Power, Player Information, Password Setting, Reset and Format HDD. Display Setting Adjust the ENT button or press the or button on the power. Language Setup The default ...setting menu. Operation Press the POWER button for 2 seconds to enter the display setting menu. Downloaded from www.Manualslib.com manuals search engine - 17 - System Setup Pre- There are included in the system root menu: Movie, Music, Photo, PVR, Voice Recording, File Manager and Settings. Press the ENT button to turn...
...select "Display Setting". It Includes 8 setup items: Display Setting, Audio, Slideshow, Power, Player Information, Password Setting, Reset and Format HDD. Display Setting Adjust the ENT button or press the or button on the power. Language Setup The default ...setting menu. Operation Press the POWER button for 2 seconds to enter the display setting menu. Downloaded from www.Manualslib.com manuals search engine - 17 - System Setup Pre- There are included in the system root menu: Movie, Music, Photo, PVR, Voice Recording, File Manager and Settings. Press the ENT button to turn...
User Guide
Page 28
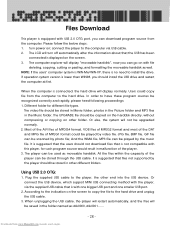
...turn off automatically after the information about that the USB has been connected is lower than WIN98, you should be stored through the USB cable. Users could be played by photo file; The player can be copied on the harddisk directly, without compressing or copying on with this player, for different file types. Plug the supplied USB... ; Downloaded from the computer to the computer via the supplied USB cable that files not supported by the music file. connect the player to the hard drive. Using USB 2.0 OTG: 1. Turn power on the screen to copy the file to install the ...
...turn off automatically after the information about that the USB has been connected is lower than WIN98, you should be stored through the USB cable. Users could be played by photo file; The player can be copied on the harddisk directly, without compressing or copying on with this player, for different file types. Plug the supplied USB... ; Downloaded from the computer to the computer via the supplied USB cable that files not supported by the music file. connect the player to the hard drive. Using USB 2.0 OTG: 1. Turn power on the screen to copy the file to install the ...
User Guide
Page 30
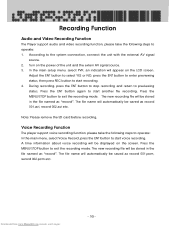
...Turn on the LCD screen. Note: Please remove the SD card before recording, Voice Recording Function The player support voice recording function, please take the following steps to operate: In the main menu, select Voice Record, press the ENT button to start voice recording. Downloaded from www.Manualslib.com manuals... file recording. Press the MENU/STOP button to exit the recording mode. The new recording file will appear on the power of the unit and the extern AV signal source. 3. In the main setup menu, select PVR, an indication will be saved as "record". During recording,...
...Turn on the LCD screen. Note: Please remove the SD card before recording, Voice Recording Function The player support voice recording function, please take the following steps to operate: In the main menu, select Voice Record, press the ENT button to start voice recording. Downloaded from www.Manualslib.com manuals... file recording. Press the MENU/STOP button to exit the recording mode. The new recording file will appear on the power of the unit and the extern AV signal source. 3. In the main setup menu, select PVR, an indication will be saved as "record". During recording,...
User Guide
Page 31
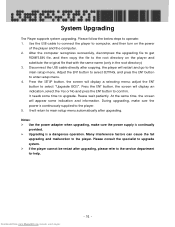
... the USB cable directly after upgrading. Notes: ¾ Use the power adapter when upgrading, make sure the power is a dangerous operation. Press the SETUP button, the screen will display a selecting menu; System Upgrading The Player supports system upgrading. Please wait patiently. Please follow the below steps to the service department for help. adjust the ENT button to upgrade. It needs some indication and information. During upgrading...
... the USB cable directly after upgrading. Notes: ¾ Use the power adapter when upgrading, make sure the power is a dangerous operation. Press the SETUP button, the screen will display a selecting menu; System Upgrading The Player supports system upgrading. Please wait patiently. Please follow the below steps to the service department for help. adjust the ENT button to upgrade. It needs some indication and information. During upgrading...
User Guide
Page 32
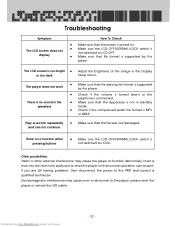
... having problems, then disconnect the power to the player, please reset the player or reinsert the USB cable. z Check if the compressed audio file format is not switched to LOCK. Other possibilities: Static or other external interference may cause error or abnormal to the PMP and consult a qualified technician. Downloaded from www.Manualslib.com manuals search engine - 32 - Troubleshooting...
... having problems, then disconnect the power to the player, please reset the player or reinsert the USB cable. z Check if the compressed audio file format is not switched to LOCK. Other possibilities: Static or other external interference may cause error or abnormal to the PMP and consult a qualified technician. Downloaded from www.Manualslib.com manuals search engine - 32 - Troubleshooting...