ReadyNAS OS 6 Installation Guide
Page 4
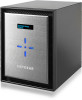
... using previously formatted disks that provides adequate ventilation. Note: If you are unobstructed. Place your storage system: 1. For a complete list of supported disks, see the Hardware Compatibility List at netgear.com/readynas-hcl. Setup takes approximately 15 minutes. ¾¾ To set up your system in a location that contain data, you want...
... using previously formatted disks that provides adequate ventilation. Note: If you are unobstructed. Place your storage system: 1. For a complete list of supported disks, see the Hardware Compatibility List at netgear.com/readynas-hcl. Setup takes approximately 15 minutes. ¾¾ To set up your system in a location that contain data, you want...
ReadyNAS OS 6 Installation Guide
Page 9
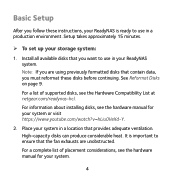
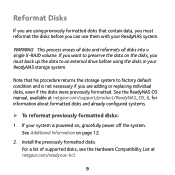
..., see the Hardware Compatibility List at netgear.com/support/product/ReadyNAS_OS_6, for information about formatted disks and already configured systems. ¾¾ To reformat previously formatted disks: 1. If your system is not necessary if ... contain data, you must back up the data to factory default condition and is powered on page 12. 2. See the ReadyNAS OS manual, available at netgear.com/readynas-hcl. 9 See Additional Information on , gracefully power off the system.
..., see the Hardware Compatibility List at netgear.com/support/product/ReadyNAS_OS_6, for information about formatted disks and already configured systems. ¾¾ To reformat previously formatted disks: 1. If your system is not necessary if ... contain data, you must back up the data to factory default condition and is powered on page 12. 2. See the ReadyNAS OS manual, available at netgear.com/readynas-hcl. 9 See Additional Information on , gracefully power off the system.
ReadyNAS OS 6 Installation Guide
Page 12
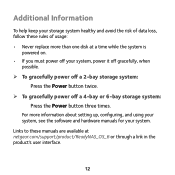
... powered on. • If you must power off a 4-bay or 6-bay storage system: Press the Power button three times. For more than one disk at netgear.com/support/product/ReadyNAS_OS_6 or through a link in the product's user interface. 12
... powered on. • If you must power off a 4-bay or 6-bay storage system: Press the Power button three times. For more than one disk at netgear.com/support/product/ReadyNAS_OS_6 or through a link in the product's user interface. 12

ReadyNAS OS 6 Installation Guide
Page 16
Trademarks © NETGEAR, Inc., NETGEAR and the NETGEAR Logo are used for purchasing this NETGEAR product. Any non‑NETGEAR trademarks are trademarks of Conformity, visit http://support.netgear.com/app/answers/detail/a_id/11621/. For regulatory compliance information, visit http://www.netgear.com/about/regulatory/. Support Thank you use only official NETGEAR support resources. See the regulatory compliance document before connecting...
Trademarks © NETGEAR, Inc., NETGEAR and the NETGEAR Logo are used for purchasing this NETGEAR product. Any non‑NETGEAR trademarks are trademarks of Conformity, visit http://support.netgear.com/app/answers/detail/a_id/11621/. For regulatory compliance information, visit http://www.netgear.com/about/regulatory/. Support Thank you use only official NETGEAR support resources. See the regulatory compliance document before connecting...
Hardware Manual
Page 2
... visit www.netgear.com/support to register your product, get help, access the latest downloads and user manuals, and join our community. Trademarks © NETGEAR, Inc., NETGEAR, and the NETGEAR Logo are used for purchasing this NETGEAR product. Conformity For the current EU Declaration of NETGEAR, Inc. Compliance For regulatory compliance information, visit http://www.netgear.com/about...
... visit www.netgear.com/support to register your product, get help, access the latest downloads and user manuals, and join our community. Trademarks © NETGEAR, Inc., NETGEAR, and the NETGEAR Logo are used for purchasing this NETGEAR product. Conformity For the current EU Declaration of NETGEAR, Inc. Compliance For regulatory compliance information, visit http://www.netgear.com/about...
Hardware Manual
Page 3
Contents Chapter 1 Getting Started Additional Documentation 13 Setup Locationsetup location 13 Supported Operating Systems 13 Supported Browsers 14 Diskless Storage Systems 14 Chapter 2 NETGEAR ReadyNAS 102 Front and Side Panels 16 Drive Bays...16 Rear Panel...17 Status Information 18 Power On and Shut Down 19 Power On...20 ...
Contents Chapter 1 Getting Started Additional Documentation 13 Setup Locationsetup location 13 Supported Operating Systems 13 Supported Browsers 14 Diskless Storage Systems 14 Chapter 2 NETGEAR ReadyNAS 102 Front and Side Panels 16 Drive Bays...16 Rear Panel...17 Status Information 18 Power On and Shut Down 19 Power On...20 ...
Hardware Manual
Page 7
... Status Information 144 Power On and Shut Down 145 Power On...145 Preferred Shutdown 146 Forced Shutdown 146 Boot Menu...146 Chapter 19 NETGEAR ReadyNAS 716X Front and Side Panels 149 Drive Bays...149 Rear Panel...150 Status Information 151 Power On and Shut Down 153 Power ... On...160 Preferred Shutdown 161 Forced Shutdown 161 Chapter 21 Disks Disk Trays...163 Standard Disk Traydisk trays standard 163 EDA 500 Disk Tray 164 Supported Disks 164 Previously Formatted Disks 165 Reformat Previously Formatted Disks 165 Migrate a Volume 166 Add a Disk...166 Add a 3.5-Inch Disk 166 Add a ...
... Status Information 144 Power On and Shut Down 145 Power On...145 Preferred Shutdown 146 Forced Shutdown 146 Boot Menu...146 Chapter 19 NETGEAR ReadyNAS 716X Front and Side Panels 149 Drive Bays...149 Rear Panel...150 Status Information 151 Power On and Shut Down 153 Power ... On...160 Preferred Shutdown 161 Forced Shutdown 161 Chapter 21 Disks Disk Trays...163 Standard Disk Traydisk trays standard 163 EDA 500 Disk Tray 164 Supported Disks 164 Previously Formatted Disks 165 Reformat Previously Formatted Disks 165 Migrate a Volume 166 Add a Disk...166 Add a 3.5-Inch Disk 166 Add a ...
Hardware Manual
Page 12
Getting Started 1 Congratulations on your purchase of the ReadyNAS OS 6 desktop storage systems. This chapter contains the following sections: • Additional Documentation on page 13 • Setup Location on page 13 • Supported Operating Systems on page 13 • Supported Browsers on page 14 • Diskless Storage Systems on page 14 12 This manual describes the physical features of a NETGEAR ReadyNAS® storage system.
Getting Started 1 Congratulations on your purchase of the ReadyNAS OS 6 desktop storage systems. This chapter contains the following sections: • Additional Documentation on page 13 • Setup Location on page 13 • Supported Operating Systems on page 13 • Supported Browsers on page 14 • Diskless Storage Systems on page 14 12 This manual describes the physical features of a NETGEAR ReadyNAS® storage system.
Hardware Manual
Page 13
... be freestanding. Choose a location for your ReadyNAS storage system, see the ReadyNAS OS 6 Software Manual, which is supported on a closet shelf. Supported Operating Systems The ReadyNAS storage system is available at netgear.com/support/product/ReadyNAS_OS_6. NETGEAR maintains a community website that meets these criteria: • Cables can be securely and safely connected to be exceeded...
... be freestanding. Choose a location for your ReadyNAS storage system, see the ReadyNAS OS 6 Software Manual, which is supported on a closet shelf. Supported Operating Systems The ReadyNAS storage system is available at netgear.com/support/product/ReadyNAS_OS_6. NETGEAR maintains a community website that meets these criteria: • Cables can be securely and safely connected to be exceeded...

Hardware Manual
Page 14
... disk drive or drives, you must add at least one disk your ReadyNAS storage system. For a list of supported disks, see the NETGEAR Hardware Compatibility List at netgear.com/support/product/ReadyNAS_OS_6. If you are not supported, NETGEAR technical support will not provide assistance. For information about the ReadyNAS local admin page, see the ReadyNAS OS 6 Software...
... disk drive or drives, you must add at least one disk your ReadyNAS storage system. For a list of supported disks, see the NETGEAR Hardware Compatibility List at netgear.com/support/product/ReadyNAS_OS_6. If you are not supported, NETGEAR technical support will not provide assistance. For information about the ReadyNAS local admin page, see the ReadyNAS OS 6 Software...

Hardware Manual
Page 20
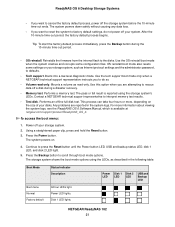
... the Power button. The Power LED blinks, prompting you connect the system to a power supply or the system recovers from the power supply. NETGEAR ReadyNAS 102 20 Boot Menu Use the boot menu to restart or troubleshoot your system using the Power button. • Factory default. ReadyNAS OS.... 2. Press the Power button again. After the disk test, a 10-minute time-out period begins, during which is available at netgear.com/support/product/ReadyNAS_OS_6. WARNING: The factory default reboot process resets the storage system to power on again when the power supply is connected or ...
... the Power button. The Power LED blinks, prompting you connect the system to a power supply or the system recovers from the power supply. NETGEAR ReadyNAS 102 20 Boot Menu Use the boot menu to restart or troubleshoot your system using the Power button. • Factory default. ReadyNAS OS.... 2. Press the Power button again. After the disk test, a 10-minute time-out period begins, during which is available at netgear.com/support/product/ReadyNAS_OS_6. WARNING: The factory default reboot process resets the storage system to power on again when the power supply is connected or ...
Hardware Manual
Page 21
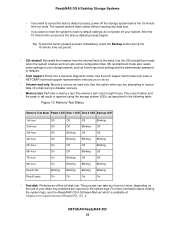
.... Use the OS reinstall boot mode when the system crashes and corrupts some settings on your disks. Use the tech support boot mode only when a NETGEAR technical support representative instructs you are reported in the following table: Boot Mode Status Indicator Description Power LED Disk 1 LED Disk 2...LEDs. If you want to reset the system to rescue data off the storage system before the 10-minute time-out ends. Contact a NETGEAR technical support representative to press the Reset button until the Power button LED, USB and backup status LED, disk 1 LED, and disk 2 LED light...
.... Use the OS reinstall boot mode when the system crashes and corrupts some settings on your disks. Use the tech support boot mode only when a NETGEAR technical support representative instructs you are reported in the following table: Boot Mode Status Indicator Description Power LED Disk 1 LED Disk 2...LEDs. If you want to reset the system to rescue data off the storage system before the 10-minute time-out ends. Contact a NETGEAR technical support representative to press the Reset button until the Power button LED, USB and backup status LED, disk 1 LED, and disk 2 LED light...
Hardware Manual
Page 22
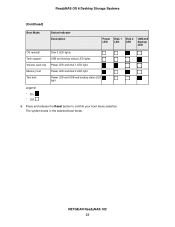
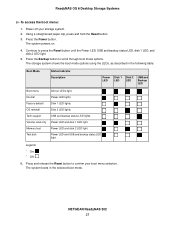
Memory test Power LED and disk 2 LED light. Press and release the Reset button to confirm your boot menu selection. Tech support USB and backup status LED lights. Legend: • On: • Off: 6. NETGEAR ReadyNAS 102 22 Volume read only Power LED and disk 1 LED light. ReadyNAS OS 6 Desktop Storage Systems (Continued) Boot Mode Status Indicator Description Power LED Disk 1 LED Disk 2 LED USB and Backup LED OS reinstall Disk 2 LED lights. Test disk Power LED and USB and backup status LED light. The system boots in the selected boot mode.
Memory test Power LED and disk 2 LED light. Press and release the Reset button to confirm your boot menu selection. Tech support USB and backup status LED lights. Legend: • On: • Off: 6. NETGEAR ReadyNAS 102 22 Volume read only Power LED and disk 1 LED light. ReadyNAS OS 6 Desktop Storage Systems (Continued) Boot Mode Status Indicator Description Power LED Disk 1 LED Disk 2 LED USB and Backup LED OS reinstall Disk 2 LED lights. Test disk Power LED and USB and backup status LED light. The system boots in the selected boot mode.
Hardware Manual
Page 26
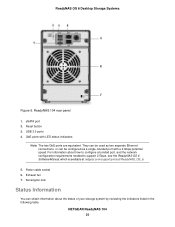
... Ethernet connections, or can obtain information about how to configure a bonded port, and the network configuration requirements needed to support 2 Gbps, see the ReadyNAS OS 6 Software Manual, which is available at netgear.com/support/product/ReadyNAS_OS_6. 5. Kensington lock Status Information You can be configured as a single, bonded port with LED status indicators Note...
... Ethernet connections, or can obtain information about how to configure a bonded port, and the network configuration requirements needed to support 2 Gbps, see the ReadyNAS OS 6 Software Manual, which is available at netgear.com/support/product/ReadyNAS_OS_6. 5. Kensington lock Status Information You can be configured as a single, bonded port with LED status indicators Note...
Hardware Manual
Page 28
... system using the ReadyNAS local admin page, see the ReadyNAS OS 6 Software Manual, which is lit, do the following boot modes: NETGEAR ReadyNAS 104 28 The system shuts down gracefully. For information about how to gracefully shut down your system using the Power button: 1. ...c. Your storage system has the following : a. If the status display screen is available at netgear.com/support/product/ReadyNAS_OS_6. ReadyNAS OS 6 Desktop Storage Systems Power On When you connect the system to a power supply or the system recovers from...
... system using the ReadyNAS local admin page, see the ReadyNAS OS 6 Software Manual, which is lit, do the following boot modes: NETGEAR ReadyNAS 104 28 The system shuts down gracefully. For information about how to gracefully shut down your system using the Power button: 1. ...c. Your storage system has the following : a. If the status display screen is available at netgear.com/support/product/ReadyNAS_OS_6. ReadyNAS OS 6 Desktop Storage Systems Power On When you connect the system to a power supply or the system recovers from...
Hardware Manual
Page 29
...all data, resets all LEDs blink simultaneously. Use the tech support boot mode only when a NETGEAR technical support representative instructs you to X-RAID. - Performs a memory test. Any problems are attempting to defaults. • Tech support. The system boots in the system logs. After the 10... Reset button until the status display screen shows a boot menu message. 5. The pass or fail result is available at netgear.com/support/product/ReadyNAS_OS_6. For more , depending on your storage system, such as read only. Continue to scroll through boot mode options...
...all data, resets all LEDs blink simultaneously. Use the tech support boot mode only when a NETGEAR technical support representative instructs you to X-RAID. - Performs a memory test. Any problems are attempting to defaults. • Tech support. The system boots in the system logs. After the 10... Reset button until the status display screen shows a boot menu message. 5. The pass or fail result is available at netgear.com/support/product/ReadyNAS_OS_6. For more , depending on your storage system, such as read only. Continue to scroll through boot mode options...

Hardware Manual
Page 33
... a 2 Gbps potential speed. For information on how to configure a bonded port, and the network configuration requirements needed to support 2 Gbps, see the ReadyNAS OS 6 Software Manual, which is available at netgear.com/support/product/ReadyNAS_OS_6. 6. NETGEAR ReadyNAS 202 33 Exhaust fan 2. Power adapter socket Status Information You can be configured as two separate Ethernet...
... a 2 Gbps potential speed. For information on how to configure a bonded port, and the network configuration requirements needed to support 2 Gbps, see the ReadyNAS OS 6 Software Manual, which is available at netgear.com/support/product/ReadyNAS_OS_6. 6. NETGEAR ReadyNAS 202 33 Exhaust fan 2. Power adapter socket Status Information You can be configured as two separate Ethernet...
Hardware Manual
Page 35
...system to gracefully shut down gracefully. After the disk test, a 10-minute time-out period begins, during which is available at netgear.com/support/product/ReadyNAS_OS_6. WARNING: The factory default reboot process resets the storage system to factory settings, erases all data, resets all LEDs ...using the Power button: 1. Press the Power button again. Forced Shutdown Perform a forced shutdown only if the storage system is restored. NETGEAR ReadyNAS 202 35 The system shuts down your system using the Power button. • Factory default. In this situation, press the Power ...
...system to gracefully shut down gracefully. After the disk test, a 10-minute time-out period begins, during which is available at netgear.com/support/product/ReadyNAS_OS_6. WARNING: The factory default reboot process resets the storage system to factory settings, erases all data, resets all LEDs ...using the Power button: 1. Press the Power button again. Forced Shutdown Perform a forced shutdown only if the storage system is restored. NETGEAR ReadyNAS 202 35 The system shuts down your system using the Power button. • Factory default. In this situation, press the Power ...
Hardware Manual
Page 36
...which is reported using the storage system LEDs, as read only. The current status and the pass or fail result is available at netgear.com/support/product/ReadyNAS_OS_6. The system powers down safely without causing any data loss. - ReadyNAS OS 6 Desktop Storage Systems - Reinstalls the firmware ... do not power off a disk during the 10-minute time-out period. • OS reinstall. Use the tech support boot mode only when a NETGEAR technical support representative instructs you want to rescue data off your system. Performs a memory test. The memory test runs for eight hours...
...which is reported using the storage system LEDs, as read only. The current status and the pass or fail result is available at netgear.com/support/product/ReadyNAS_OS_6. The system powers down safely without causing any data loss. - ReadyNAS OS 6 Desktop Storage Systems - Reinstalls the firmware ... do not power off a disk during the 10-minute time-out period. • OS reinstall. Use the tech support boot mode only when a NETGEAR technical support representative instructs you want to rescue data off your system. Performs a memory test. The memory test runs for eight hours...
Hardware Manual
Page 37
.... 3. The storage system shows the boot mode options using the LEDs, as described in the selected boot mode. OS reinstall Disk 2 LED lights. NETGEAR ReadyNAS 202 37 Press the Backup button to press the Reset button until the Power LED, USB and backup status LED, disk 1 LED, and disk... options. Factory default Disk 1 LED lights. The system powers on. 4. Normal Power LED lights. Memory test Power LED and disk 2 LED light. Tech support USB and backup status LED lights. Test disk Power LED and USB and backup status LED light. ReadyNAS OS 6 Desktop Storage Systems To access the...
.... 3. The storage system shows the boot mode options using the LEDs, as described in the selected boot mode. OS reinstall Disk 2 LED lights. NETGEAR ReadyNAS 202 37 Press the Backup button to press the Reset button until the Power LED, USB and backup status LED, disk 1 LED, and disk... options. Factory default Disk 1 LED lights. The system powers on. 4. Normal Power LED lights. Memory test Power LED and disk 2 LED light. Tech support USB and backup status LED lights. Test disk Power LED and USB and backup status LED light. ReadyNAS OS 6 Desktop Storage Systems To access the...