Learn more about your EX7000
Page 7
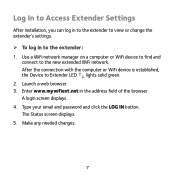
... the computer or WiFi device is established, the Device to the new extended WiFi network. Launch a web browser. 3. Log In to Access Extender Settings After installation, you can log in to the extender to view or change the extender's settings. ¾¾ To log in the address field of the browser...
... the computer or WiFi device is established, the Device to the new extended WiFi network. Launch a web browser. 3. Log In to Access Extender Settings After installation, you can log in to the extender to view or change the extender's settings. ¾¾ To log in the address field of the browser...
Learn more about your EX7000
Page 10
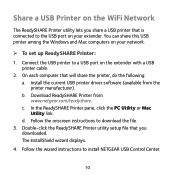
... the ReadySHARE Printer pane, click the PC Utility or Mac Utility link. c. b. Follow the wizard instructions to download the file. 3. Follow the onscreen instructions to install NETGEAR USB Control Center. 10 The InstallShield wizard displays. 4. Share a USB Printer on the WiFi Network The ReadySHARE Printer utility lets you downloaded. You can share...
... the ReadySHARE Printer pane, click the PC Utility or Mac Utility link. c. b. Follow the wizard instructions to download the file. 3. Follow the onscreen instructions to install NETGEAR USB Control Center. 10 The InstallShield wizard displays. 4. Share a USB Printer on the WiFi Network The ReadySHARE Printer utility lets you downloaded. You can share...
Learn more about your EX7000
Page 13
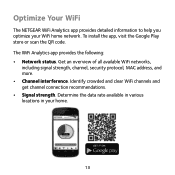
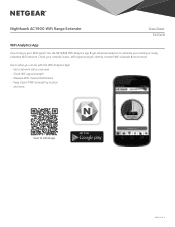
.... Identify crowded and clear WiFi channels and get channel connection recommendations. • Signal strength. Optimize Your WiFi The NETGEAR WiFi Analytics app provides detailed information to help you optimize your home. 13 To install the app, visit the Google Play store or scan the QR code. Get an overview of all available...
.... Identify crowded and clear WiFi channels and get channel connection recommendations. • Signal strength. Optimize Your WiFi The NETGEAR WiFi Analytics app provides detailed information to help you optimize your home. 13 To install the app, visit the Google Play store or scan the QR code. Get an overview of all available...
Learn more about your EX7000
Page 15
... Reset button on the bottom of an Ethernet connection. Type your user name and password and click the LOG IN button. • If you are installing the extender as a pen or paper clip to its factory default settings? 1. How do I see the web browser setup guide? I am connected to the factory...
... Reset button on the bottom of an Ethernet connection. Type your user name and password and click the LOG IN button. • If you are installing the extender as a pen or paper clip to its factory default settings? 1. How do I see the web browser setup guide? I am connected to the factory...
Learn more about your EX7000
Page 17
..., wireless access control, or ACL is in extender mode if I connect it to the router or access point with an Ethernet connection. No. I do when installing the extender? If your router, the MAC address of the WiFi device shown on page 5. What should I enabled a wireless MAC filter, wireless access control, or...
..., wireless access control, or ACL is in extender mode if I connect it to the router or access point with an Ethernet connection. No. I do when installing the extender? If your router, the MAC address of the WiFi device shown on page 5. What should I enabled a wireless MAC filter, wireless access control, or...
Learn more about your EX7000
Page 20
After installing your device, locate the serial number on the label of your product through a link in the United States and/ or other countries. Compliance For the current EU Declaration of NETGEAR, Inc. For product updates and web support, visit http://support.netgear.com. NETGEAR recommends that you use NETGEAR telephone support. and/or its subsidiaries...
After installing your device, locate the serial number on the label of your product through a link in the United States and/ or other countries. Compliance For the current EU Declaration of NETGEAR, Inc. For product updates and web support, visit http://support.netgear.com. NETGEAR recommends that you use NETGEAR telephone support. and/or its subsidiaries...
Installation Guide
Page 2
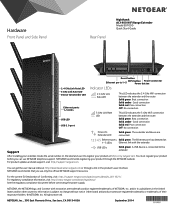
Hardware Front Panel and Side Panel Rear Panel Nighthawk AC1900 WiFi Range Extender Model EX7000 Quick Start Guide 2.4 GHz Link Rate LED 5 GHz Link Rate LED Device to Extender LED Ethernet ports 1-5 LEDs USB LED USB 3.0 port Reset... is connected to change without notice. Support USB LEDs Solid green. After installing your extender, locate the serial number on the label and use NETGEAR telephone support. Best connection Solid amber. For regulatory compliance information, visit http://www.netgear.com/about/regulatory/. Poor connection Off. Solid green. For product updates and...
Hardware Front Panel and Side Panel Rear Panel Nighthawk AC1900 WiFi Range Extender Model EX7000 Quick Start Guide 2.4 GHz Link Rate LED 5 GHz Link Rate LED Device to Extender LED Ethernet ports 1-5 LEDs USB LED USB 3.0 port Reset... is connected to change without notice. Support USB LEDs Solid green. After installing your extender, locate the serial number on the label and use NETGEAR telephone support. Best connection Solid amber. For regulatory compliance information, visit http://www.netgear.com/about/regulatory/. Poor connection Off. Solid green. For product updates and...
Product Data Sheet
Page 3
Scan to optimize your existing or newly extended WiFi network. Nighthawk AC1900 WiFi Range Extender Data Sheet EX7000 WiFi Analytics App How strong is your network status, WiFi signal strength, identify crowded WiFi channels & much more ... Here's what you can do with the ... status overview • Check WiFi signal strength • Measure WiFi channel interference • Keep track of WiFi strength by location • and more ! Use the NETGEAR WiFi Analytics app & get advanced analytics to install app PAGE 3 OF 4 Check your WiFi signal?
Scan to optimize your existing or newly extended WiFi network. Nighthawk AC1900 WiFi Range Extender Data Sheet EX7000 WiFi Analytics App How strong is your network status, WiFi signal strength, identify crowded WiFi channels & much more ... Here's what you can do with the ... status overview • Check WiFi signal strength • Measure WiFi channel interference • Keep track of WiFi strength by location • and more ! Use the NETGEAR WiFi Analytics app & get advanced analytics to install app PAGE 3 OF 4 Check your WiFi signal?
User Manual
Page 2
.../about/regulatory. You must register your product through the NETGEAR website. Trademarks © NETGEAR, Inc. Nighthawk AC1900 WiF Range Extender Support Thank you can use it to register your product at http://support.netgear.com/general/contact/default.aspx. After installing your device, locate the serial number on the label of your product and...
.../about/regulatory. You must register your product through the NETGEAR website. Trademarks © NETGEAR, Inc. Nighthawk AC1900 WiF Range Extender Support Thank you can use it to register your product at http://support.netgear.com/general/contact/default.aspx. After installing your device, locate the serial number on the label of your product and...
User Manual
Page 3
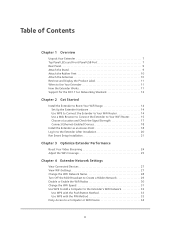
...Label 11 When to Use Your Extender 11 How the Extender Works 11 Support for the 801.11ac Networking Standard 12 Chapter 2 Get Started Install the Extender to Boost Your WiFi Range 14 Set Up the Extender Hardware 14 Use WPS to Connect the Extender to Your WiFi Router ... Router 15 Choose a Location and Check the Signal Strength 17 Connect Ethernet-Enabled Devices 18 Install the Extender as an Access Point 18 Log In to the Extender After Installation 20 Run Smart Setup Installation 21 Chapter 3 Optimize Extender Performance Boost Your Video Streaming 24 Adjust the WiFi Coverage 25 ...
...Label 11 When to Use Your Extender 11 How the Extender Works 11 Support for the 801.11ac Networking Standard 12 Chapter 2 Get Started Install the Extender to Boost Your WiFi Range 14 Set Up the Extender Hardware 14 Use WPS to Connect the Extender to Your WiFi Router ... Router 15 Choose a Location and Check the Signal Strength 17 Connect Ethernet-Enabled Devices 18 Install the Extender as an Access Point 18 Log In to the Extender After Installation 20 Run Smart Setup Installation 21 Chapter 3 Optimize Extender Performance Boost Your Video Streaming 24 Adjust the WiFi Coverage 25 ...
User Manual
Page 7
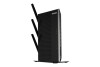
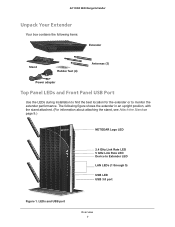
The following items: Extender Stand Rubber feet (4) Antennas (3) Power adapter Top Panel LEDs and Front Panel USB Port Use the LEDs during installation to find the best location for the extender or to Extender LED LAN LEDs (1 through 5) USB LED USB 3.0 port Figure 1. LEDs and USB port Overview 7 ... following figure shows the extender in an upright position, with the stand attached. (For information about attaching the stand, see Attach the Stand on page 9.) NETGEAR Logo LED 2.4 GHz Link Rate LED 5 GHz Link Rate LED Device to monitor the extender performance.
The following items: Extender Stand Rubber feet (4) Antennas (3) Power adapter Top Panel LEDs and Front Panel USB Port Use the LEDs during installation to find the best location for the extender or to Extender LED LAN LEDs (1 through 5) USB LED USB 3.0 port Figure 1. LEDs and USB port Overview 7 ... following figure shows the extender in an upright position, with the stand attached. (For information about attaching the stand, see Attach the Stand on page 9.) NETGEAR Logo LED 2.4 GHz Link Rate LED 5 GHz Link Rate LED Device to monitor the extender performance.
User Manual
Page 13
Get Started This chapter covers the following topics: • Install the Extender to Boost Your WiFi Range • Install the Extender as an Access Point • Log In to the Extender After Installation • Run Smart Setup Installation 2 13 2.
Get Started This chapter covers the following topics: • Install the Extender to Boost Your WiFi Range • Install the Extender as an Access Point • Log In to the Extender After Installation • Run Smart Setup Installation 2 13 2.
User Manual
Page 14
...and check that the extender is to your WiFi router without typing your WiFi router: 1. If your WiFi router. 4. For information about access point installation, see Attach the Stand on page 9 or Attach the Rubber Feet on page 15. To use the extender as an Access Point on...10. 3. Attach the stand or the rubber feet. For more information, see Install the Extender as a WiFi access point and create a new WiFi hotspot by using a wired Ethernet connection. Turn on the extender. The NETGEAR LED lights white and the Link Rate LEDs and the Device to Extender LED ...
...and check that the extender is to your WiFi router without typing your WiFi router: 1. If your WiFi router. 4. For information about access point installation, see Attach the Stand on page 9 or Attach the Rubber Feet on page 15. To use the extender as an Access Point on...10. 3. Attach the stand or the rubber feet. For more information, see Install the Extender as a WiFi access point and create a new WiFi hotspot by using a wired Ethernet connection. Turn on the extender. The NETGEAR LED lights white and the Link Rate LEDs and the Device to Extender LED ...
User Manual
Page 18
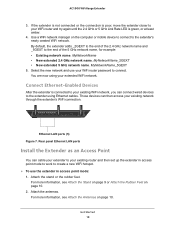
... extended WiFi network. AC1900 WiFi Range Extender 3. Connect Ethernet-Enabled Devices After the extender is green, or at least amber. 4. Rear panel Ethernet LAN ports Install the Extender as an Access Point You can cable your extender to your existing router and then set up the extender in access point mode...
... extended WiFi network. AC1900 WiFi Range Extender 3. Connect Ethernet-Enabled Devices After the extender is green, or at least amber. 4. Rear panel Ethernet LAN ports Install the Extender as an Access Point You can cable your extender to your existing router and then set up the extender in access point mode...
User Manual
Page 20
... the computer or WiFi device is established, the Device to the new extended WiFi network. AC1900 WiFi Range Extender 8. Log In to the Extender After Installation You can log in to the extender to the extender. 10. Launch a web browser. 3. Use a WiFi network manager on the computer or WiFi device to...
... the computer or WiFi device is established, the Device to the new extended WiFi network. AC1900 WiFi Range Extender 8. Log In to the Extender After Installation You can log in to the extender to the extender. 10. Launch a web browser. 3. Use a WiFi network manager on the computer or WiFi device to...
User Manual
Page 21
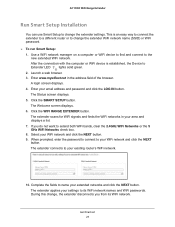
... the fields to change the extender WiFi network name (SSID) or WiFi password. To run Smart Setup: 1. AC1900 WiFi Range Extender Run Smart Setup Installation You can use Smart Setup to name your existing router's WiFi network. 10. Enter your email address and password and click the LOG IN button.
... the fields to change the extender WiFi network name (SSID) or WiFi password. To run Smart Setup: 1. AC1900 WiFi Range Extender Run Smart Setup Installation You can use Smart Setup to name your existing router's WiFi network. 10. Enter your email address and password and click the LOG IN button.
User Manual
Page 32
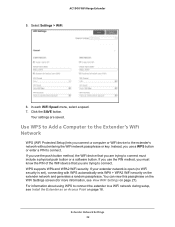
... Setup) lets you must include a physical push button or a software button. You can view this passphrase on the WiFi Settings screen (for more information, see Install the Extender as an Access Point on page 18. For information about using WPS to connect the extender to connect. Select Settings > WiFi. 6. Instead, you...
... Setup) lets you must include a physical push button or a software button. You can view this passphrase on the WiFi Settings screen (for more information, see Install the Extender as an Access Point on page 18. For information about using WPS to connect the extender to connect. Select Settings > WiFi. 6. Instead, you...
User Manual
Page 62
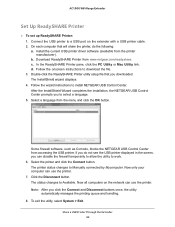
Download ReadySHARE Printer from the menu and click the OK button. After the InstallShield Wizard completes the installation, the NETGEAR USB Control Center prompts you click the Connect and Disconnect buttons once, the utility automatically manages the printing queue and handling. 8. ...disable the firewall temporarily to allow the utility to work. 6. On each computer that you do the following: a. Note: After you to install NETGEAR USB Control Center. Share a USB Printer Through the Extender 62 AC1900 WiFi Range Extender Set Up ReadySHARE Printer To set up ReadySHARE ...
Download ReadySHARE Printer from the menu and click the OK button. After the InstallShield Wizard completes the installation, the NETGEAR USB Control Center prompts you click the Connect and Disconnect buttons once, the utility automatically manages the printing queue and handling. 8. ...disable the firewall temporarily to allow the utility to work. 6. On each computer that you do the following: a. Note: After you to install NETGEAR USB Control Center. Share a USB Printer Through the Extender 62 AC1900 WiFi Range Extender Set Up ReadySHARE Printer To set up ReadySHARE ...
User Manual
Page 63
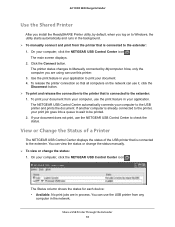
... Use the Shared Printer After you install the ReadySHARE Printer utility, by Mycomputer. The printer status changes to Manually connected by default, when you are in your application to print your computer to the USB printer and prints the document. The NETGEAR USB Control Center automatically connects your ...the connection to the printer that is connected to the extender. Click the Connect button. View or Change the Status of a Printer The NETGEAR USB Control Center displays the status of the USB printer that is connected to the extender: 1. Now, only the computer you log ...
... Use the Shared Printer After you install the ReadySHARE Printer utility, by Mycomputer. The printer status changes to Manually connected by default, when you are in your application to print your computer to the USB printer and prints the document. The NETGEAR USB Control Center automatically connects your ...the connection to the printer that is connected to the extender. Click the Connect button. View or Change the Status of a Printer The NETGEAR USB Control Center displays the status of the USB printer that is connected to the extender: 1. Now, only the computer you log ...
User Manual
Page 68
... NETGEAR_EXT and launched a browser. I entered the correct password. If you might experience with the extender. The extender is set up to use DHCP (most are installing the extender as an access point, make sure that you are typing the network password in the address field.
... NETGEAR_EXT and launched a browser. I entered the correct password. If you might experience with the extender. The extender is set up to use DHCP (most are installing the extender as an access point, make sure that you are typing the network password in the address field.


