
NF-900 manual - English
Page 1
9" Digital Photo Frame NF-900 Instruction Manual Please read carefully before use and keep for future reference.
9" Digital Photo Frame NF-900 Instruction Manual Please read carefully before use and keep for future reference.

NF-900 manual - English
Page 2
Table of Contents Thank You 3 Troubleshooting 13 In the Box 3 Warnings and Precautions 14 At a Glance 4 Buttons (Rear 4 Connections 5 Connections 5 Specifications 18 Support 18 Getting Started 6 Operating Instructions 7 Main Menu 7 Card and USB 8 Photo Mode 8 Copy & Delete Function 9 File Browser 10 Calendar 11 Setup 12 Page 2 Naxa Electronics
Table of Contents Thank You 3 Troubleshooting 13 In the Box 3 Warnings and Precautions 14 At a Glance 4 Buttons (Rear 4 Connections 5 Connections 5 Specifications 18 Support 18 Getting Started 6 Operating Instructions 7 Main Menu 7 Card and USB 8 Photo Mode 8 Copy & Delete Function 9 File Browser 10 Calendar 11 Setup 12 Page 2 Naxa Electronics
NF-900 manual - English
Page 3
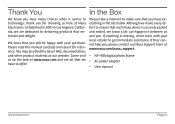
...your purchase. Please read this manual carefully and save it comes to get immediate assistance. You may also find the latest FAQ, documentation, and other product material at www.naxa.com/naxa_support. •• NF-900 digital photo frame •• AC power adapter •• User manual www.naxa.com Page 3 ...sealed, we are dedicated to make every effort to offer! If they cannot help you, please contact our Naxa Support team at our website. Although we have many choices when it for choosing us on the web at Naxa Electronics. Thank You In the Box...
...your purchase. Please read this manual carefully and save it comes to get immediate assistance. You may also find the latest FAQ, documentation, and other product material at www.naxa.com/naxa_support. •• NF-900 digital photo frame •• AC power adapter •• User manual www.naxa.com Page 3 ...sealed, we are dedicated to make every effort to offer! If they cannot help you, please contact our Naxa Support team at our website. Although we have many choices when it for choosing us on the web at Naxa Electronics. Thank You In the Box...

NF-900 manual - English
Page 4
At a Glance Buttons (Rear) Page 4 1 Up: Press to browse up in lists and menus. 2 Right: Press to browse right in lists and menus. 3 Left: Press to browse left in lists and menus. 4 OK: Press to turn the unit on and off. Naxa Electronics Exit: Press to return to the previous screen. 7 Press to confirm a selection in lists and menus. 6 Menu: Press and hold to access an option menu. Play/Pause: Press to start, pause, or resume a slideshow. 5 Down: Press to browse down in lists and menus.
At a Glance Buttons (Rear) Page 4 1 Up: Press to browse up in lists and menus. 2 Right: Press to browse right in lists and menus. 3 Left: Press to browse left in lists and menus. 4 OK: Press to turn the unit on and off. Naxa Electronics Exit: Press to return to the previous screen. 7 Press to confirm a selection in lists and menus. 6 Menu: Press and hold to access an option menu. Play/Pause: Press to start, pause, or resume a slideshow. 5 Down: Press to browse down in lists and menus.

NF-900 manual - English
Page 5
www.naxa.com Page 5 The USB port is not designed to charge high-power devices. 3 Power jack Connector for media playback from flash memory devices. Connections 1 Memory card slot Load memory cards here. 2 USB port Load USB memory sticks here. It is designed for the included power cable.
www.naxa.com Page 5 The USB port is not designed to charge high-power devices. 3 Power jack Connector for media playback from flash memory devices. Connections 1 Memory card slot Load memory cards here. 2 USB port Load USB memory sticks here. It is designed for the included power cable.

NF-900 manual - English
Page 6
... the frame. Page 6 Naxa Electronics Remove the protective film covering on the frame, it will show the startup screen, and then the Main Menu after 3 to 5 seconds. Do not connect the power adapter to the widest position for greatest stability. 2. Turn the unit on by pressing the Power button on the back of the included AC adapter into the right side the frame. 3. Extend the digital photo frame...
... the frame. Page 6 Naxa Electronics Remove the protective film covering on the frame, it will show the startup screen, and then the Main Menu after 3 to 5 seconds. Do not connect the power adapter to the widest position for greatest stability. 2. Turn the unit on by pressing the Power button on the back of the included AC adapter into the right side the frame. 3. Extend the digital photo frame...

NF-900 manual - English
Page 7
www.naxa.com Page 7 Operating Instructions Main Menu You will see the Main menu screen when you turn on the frame. Use the arrow keys [ , , , ] to choose a memory source and then press to access it.
www.naxa.com Page 7 Operating Instructions Main Menu You will see the Main menu screen when you turn on the frame. Use the arrow keys [ , , , ] to choose a memory source and then press to access it.

NF-900 manual - English
Page 8
... photo files, a slideshow will display small preview photos; use the arrow keys [ , , , ] to choose a photo and then press to the Main Menu interface where you may access the Photo, File, Calendar, and Setup modes. Press twice to return to view it in full screen mode. The frame will start automatically. Photo Mode From the Main Menu, highlight the Photo option and then press . LLMake sure there are supported photo files stored on the Card or USB device. Card and USB...
... photo files, a slideshow will display small preview photos; use the arrow keys [ , , , ] to choose a photo and then press to the Main Menu interface where you may access the Photo, File, Calendar, and Setup modes. Press twice to return to view it in full screen mode. The frame will start automatically. Photo Mode From the Main Menu, highlight the Photo option and then press . LLMake sure there are supported photo files stored on the Card or USB device. Card and USB...

NF-900 manual - English
Page 9
... memory: In Photo mode, press to confirm. www.naxa.com Page 9 LL"Memory Full" will be displayed on the screen if there is not enough space to SETUP mode, and then choose SLIDE MODE (single-, three-, or four-windows). Note: To change the slideshow options, hold to confirm. Use to select a photo, then press and hold to go to store the photo. Select "Save Picture" and then press to view the operation menu...
... memory: In Photo mode, press to confirm. www.naxa.com Page 9 LL"Memory Full" will be displayed on the screen if there is not enough space to SETUP mode, and then choose SLIDE MODE (single-, three-, or four-windows). Note: To change the slideshow options, hold to confirm. Use to select a photo, then press and hold to go to store the photo. Select "Save Picture" and then press to view the operation menu...
NF-900 manual - English
Page 10
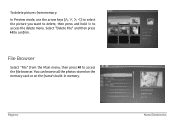
To delete pictures from the Main menu, then press to access the file browser. Page 10 Naxa Electronics File Browser Select "File" from memory: In Preview mode, use the arrow keys [ , , , ] to select the picture you want to delete, then press and hold to confirm. You can browse all the photos stored on the memory card or on the frame's built-in memory. Select "Delete File" and then press to access the delete menu.
To delete pictures from the Main menu, then press to access the file browser. Page 10 Naxa Electronics File Browser Select "File" from memory: In Preview mode, use the arrow keys [ , , , ] to select the picture you want to delete, then press and hold to confirm. You can browse all the photos stored on the memory card or on the frame's built-in memory. Select "Delete File" and then press to access the delete menu.
NF-900 manual - English
Page 11
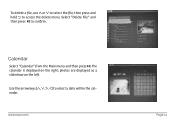
Select "Delete File" and then press to select a date within the calendar. The calendar is displayed on the left. www.naxa.com Page 11 Calendar Select "Calendar" from the Main menu and then press . Use the arrow keys [ , , , ] to confirm. photos are displayed as a slideshow on the right; To delete a file, use or to select the file, then press and hold to access the delete menu.
Select "Delete File" and then press to select a date within the calendar. The calendar is displayed on the left. www.naxa.com Page 11 Calendar Select "Calendar" from the Main menu and then press . Use the arrow keys [ , , , ] to confirm. photos are displayed as a slideshow on the right; To delete a file, use or to select the file, then press and hold to access the delete menu.

NF-900 manual - English
Page 12
Page 12 Naxa Electronics Setup Select "Setup" from the Main menu, then press . Use the or keys to select an option to confirm. Press to view an option's sub menu if it is available, use the or keys to adjust the option, and then press to adjust.
Page 12 Naxa Electronics Setup Select "Setup" from the Main menu, then press . Use the or keys to select an option to confirm. Press to view an option's sub menu if it is available, use the or keys to adjust the option, and then press to adjust.
NF-900 manual - English
Page 13
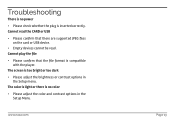
... play the file •• Please confirm that there are supported JPEG files on the card or USB device. •• Empty devices cannot be read. Cannot read the CARD or USB •• Please confirm that the file format is compatible with the player. The screen is too bright or too dark •• Please adjust the brightness or contrast options in the Setup Menu. The color is light...
... play the file •• Please confirm that there are supported JPEG files on the card or USB device. •• Empty devices cannot be read. Cannot read the CARD or USB •• Please confirm that the file format is compatible with the player. The screen is too bright or too dark •• Please adjust the brightness or contrast options in the Setup Menu. The color is light...
NF-900 manual - English
Page 14
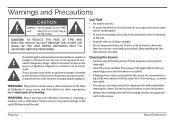
... card/USB device and the unit. Page 14 Naxa Electronics Cleaning the Screen • Turn the unit off before inserting or removing a memory card or USB device. The screen of the Digital Photo Frame is made of glass and can be of significant magnitude to constitute risk of electric shock The exclamation point within an equilateral triangle is a risk of electric shock and there are no user-serviceable parts...
... card/USB device and the unit. Page 14 Naxa Electronics Cleaning the Screen • Turn the unit off before inserting or removing a memory card or USB device. The screen of the Digital Photo Frame is made of glass and can be of significant magnitude to constitute risk of electric shock The exclamation point within an equilateral triangle is a risk of electric shock and there are no user-serviceable parts...

NF-900 manual - English
Page 15
... of power supply to operate from the type of the product should follow the manufacturer's instructions and should be sure the service technician has used a replacement plug that has the same overload protection as the original plug as a bookcase or rack unless proper ventilation is connected to provide some protection against them, paying particular attention to reset the protective device...
... of power supply to operate from the type of the product should follow the manufacturer's instructions and should be sure the service technician has used a replacement plug that has the same overload protection as the original plug as a bookcase or rack unless proper ventilation is connected to provide some protection against them, paying particular attention to reset the protective device...

NF-900 manual - English
Page 16
..., size of grounding conductors, location of antenna-discharge unit, connection to lightning or power-line surges. 16. c) if the product has been exposed to qualified service personnel. 20. Replacement Parts: When replacement parts are covered by the operating instructions as opening or removing covers may touch dangerous voltage points or short out parts that your service technician has used replacement parts specified by a qualified technician to restore the...
..., size of grounding conductors, location of antenna-discharge unit, connection to lightning or power-line surges. 16. c) if the product has been exposed to qualified service personnel. 20. Replacement Parts: When replacement parts are covered by the operating instructions as opening or removing covers may touch dangerous voltage points or short out parts that your service technician has used replacement parts specified by a qualified technician to restore the...
NF-900 manual - English
Page 17
... for a Class B digital device, pursuant to radio communications. www.naxa.com Page 17 FCC NOTICE This device complies with Part 15 of the following two conditions: (1) this device must accept any interference received, including interference that to which can radiate radio frequency energy and, if not installed and used in accordance with the limits for help. Operation is encouraged to...
... for a Class B digital device, pursuant to radio communications. www.naxa.com Page 17 FCC NOTICE This device complies with Part 15 of the following two conditions: (1) this device must accept any interference received, including interference that to which can radiate radio frequency energy and, if not installed and used in accordance with the limits for help. Operation is encouraged to...

NF-900 manual - English
Page 18
... documentation for your device, please consult the instructions in this manual. For additional assistance, please contact Naxa Technical Support. Please also visit us on the web at www.naxa.com to get up to modify the product and specifications without prior notice. Specifications Power Screen Operating environment Picture Format Memory Cards USB connection Adapter input: AC 100- 240 V, 50/60 Hz, 350 mA Adapter output: DC 5 V, 1 A Size: 9" TFT Resolution...
... documentation for your device, please consult the instructions in this manual. For additional assistance, please contact Naxa Technical Support. Please also visit us on the web at www.naxa.com to get up to modify the product and specifications without prior notice. Specifications Power Screen Operating environment Picture Format Memory Cards USB connection Adapter input: AC 100- 240 V, 50/60 Hz, 350 mA Adapter output: DC 5 V, 1 A Size: 9" TFT Resolution...
