
Owners Manual
Page 2
... Latino Americano vaya a: http://support.nautilus.com. Table of Contents Important Safety Instructions 3 User Setup 12 Specifications 5 Workout Programs 13 Features 6 Pausing or Stopping 15 Console 6 Console Setup Mode 16 Remote Heart Rate Monitor 9 Maintenance 16 Operations 11 Troubleshooting 19 Adjustments 11 Contacts 24 Quick Start/Manual Program 12 Manuel du Propriétaire 25 To validate warranty support, keep the original proof of purchase and record the following information: Serial Number Date of Purchase To register...
... Latino Americano vaya a: http://support.nautilus.com. Table of Contents Important Safety Instructions 3 User Setup 12 Specifications 5 Workout Programs 13 Features 6 Pausing or Stopping 15 Console 6 Console Setup Mode 16 Remote Heart Rate Monitor 9 Maintenance 16 Operations 11 Troubleshooting 19 Adjustments 11 Contacts 24 Quick Start/Manual Program 12 Manuel du Propriétaire 25 To validate warranty support, keep the original proof of purchase and record the following information: Serial Number Date of Purchase To register...

Owners Manual
Page 3
... injury. Do not use if you start an exercise program. Please consult the "Safety Warning Labels and Serial Number" section to children. • Consult a physician before servicing this equipment. Use caution when you feel pain or tightness in order to this equipment, obey the following warnings: Read and understand the complete Owner's Manual. Before using this machine. Monitor the Seat, Pedals, and Crank Arms closely. Given the...
... injury. Do not use if you start an exercise program. Please consult the "Safety Warning Labels and Serial Number" section to children. • Consult a physician before servicing this equipment. Use caution when you feel pain or tightness in order to this equipment, obey the following warnings: Read and understand the complete Owner's Manual. Before using this machine. Monitor the Seat, Pedals, and Crank Arms closely. Given the...

Owners Manual
Page 4
... serial number in the Serial Number field at the beginning of this machine is 300 lbs (136 kg). • Replace any "Caution", "Warning" or "Danger" label that is illegible, damaged, or removed. • This machine is not used while using this machine. • The maximum user weight for home use only. • Gardez les enfants et les animaux de compagnie éloignés de cette machine...
... serial number in the Serial Number field at the beginning of this machine is 300 lbs (136 kg). • Replace any "Caution", "Warning" or "Danger" label that is illegible, damaged, or removed. • This machine is not used while using this machine. • The maximum user weight for home use only. • Gardez les enfants et les animaux de compagnie éloignés de cette machine...

Owners Manual
Page 5
Specifications Power Requirements Regulatory Approvals Operational Voltage 9VDC Operating Current 1500 mA AC Power Adapter: UL listed, CSA certified (or equivalent), Rated 120V60Hz Input, 9VDC, 1500mA Output. Class 2 or LPS. 5
Specifications Power Requirements Regulatory Approvals Operational Voltage 9VDC Operating Current 1500 mA AC Power Adapter: UL listed, CSA certified (or equivalent), Rated 120V60Hz Input, 9VDC, 1500mA Output. Class 2 or LPS. 5
Owners Manual
Page 6
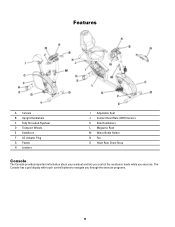
The Console has a grid display with touch control buttons to navigate you exercise. Features A Console B Upright Handlebars C Fully Shrouded Flywheel D Transport Wheels E Stabilizers F AC Adapter Plug G Pedals H Levelers I Adjustable Seat J Contact Heart Rate (CHR) Sensors K Side Handlebars L Magazine Rack M Water Bottle Holder N Fan O Heart Rate Chest Strap Console The Console provides important information about your workout and lets you control the resistance levels while you through the exercise programs. 6
The Console has a grid display with touch control buttons to navigate you exercise. Features A Console B Upright Handlebars C Fully Shrouded Flywheel D Transport Wheels E Stabilizers F AC Adapter Plug G Pedals H Levelers I Adjustable Seat J Contact Heart Rate (CHR) Sensors K Side Handlebars L Magazine Rack M Water Bottle Holder N Fan O Heart Rate Chest Strap Console The Console provides important information about your workout and lets you control the resistance levels while you through the exercise programs. 6

Owners Manual
Page 7
..., time, distance, calories, or workout resistance level) - fan control button, push to start and push again to exit the scan mode. - Starts a Program workout, confirms information , or will end the workout - LCD Display AA1 Distance AA2 Program Display AA3 Watt / Level AA4 Pulse AA5 AA6 AA7 7 Time / Interval Calories Speed Begins a Quick Start workout - Cycles through your workout measurements (during the workout), results, user setup data and console diagnostics. Backlit Console screen - Push STOP/RESET again to turn off -
..., time, distance, calories, or workout resistance level) - fan control button, push to start and push again to exit the scan mode. - Starts a Program workout, confirms information , or will end the workout - LCD Display AA1 Distance AA2 Program Display AA3 Watt / Level AA4 Pulse AA5 AA6 AA7 7 Time / Interval Calories Speed Begins a Quick Start workout - Cycles through your workout measurements (during the workout), results, user setup data and console diagnostics. Backlit Console screen - Push STOP/RESET again to turn off -
Owners Manual
Page 8
... the exercise. Stop exercising if you are producing at the current resistance level (1 horsepower = 746 watts) for 6 seconds, the resistance level (1-16) for the current workout program, the display value starts at zero and counts forward until the end of the workout. Contact your chest, become short of the total program time). Maximum time is set up for 6 seconds. Pulse The Pulse display field shows the heart rate...
... the exercise. Stop exercising if you are producing at the current resistance level (1 horsepower = 746 watts) for 6 seconds, the resistance level (1-16) for the current workout program, the display value starts at zero and counts forward until the end of the workout. Contact your chest, become short of the total program time). Maximum time is set up for 6 seconds. Pulse The Pulse display field shows the heart rate...

Owners Manual
Page 9
... heart rate in contact with pulse detection. As noted above, your optimal target rate may be limited to walking or slow jogging due to the extreme muscle artifacts and hand motion generated by using a wireless chest strap or other implanted electronic device, consult your doctor before using an age related formula. Contact Heart Rate (CHR) sensors are installed to send your heart rate signals to the Console...
... heart rate in contact with pulse detection. As noted above, your optimal target rate may be limited to walking or slow jogging due to the extreme muscle artifacts and hand motion generated by using a wireless chest strap or other implanted electronic device, consult your doctor before using an age related formula. Contact Heart Rate (CHR) sensors are installed to send your heart rate signals to the Console...

Owners Manual
Page 10
Note: As with all exercises and fitness regimens, always use your best judgment when you increase your exercise time or intensity. Fat Burning Target Heart Rate Heart Rate BPM (beats per minute) Maximum Heart Rate Target Heart Rate Zone (keep within this range for optimum fat burning) Age 10
Note: As with all exercises and fitness regimens, always use your best judgment when you increase your exercise time or intensity. Fat Burning Target Heart Rate Heart Rate BPM (beats per minute) Maximum Heart Rate Target Heart Rate Zone (keep within this range for optimum fat burning) Age 10

Owners Manual
Page 11
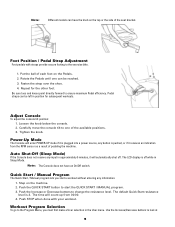
... and tighten the knob. • Recumbent bike-pull the adjustment knob on the recumbent bike. Use the values calculated or measured by the machine's computer for reference purposes only. • 3 times a week for exercise that the pin is fully engaged. With a Pedal in advance. If your foot cannot touch the Pedal, move the seat up on the upright bike or rearward on the seat bracket. Release the adjustment knob to fully tighten...
... and tighten the knob. • Recumbent bike-pull the adjustment knob on the recumbent bike. Use the values calculated or measured by the machine's computer for reference purposes only. • 3 times a week for exercise that the pin is fully engaged. With a Pedal in advance. If your foot cannot touch the Pedal, move the seat up on the upright bike or rearward on the seat bracket. Release the adjustment knob to fully tighten...
Owners Manual
Page 12
... QUICK START button to start a workout without entering any button is off . The default Quick Start resistance level is plugged into a power source, any information. 1. Carefully move the console tilt to the Program Menu, you start the QUICK START / MANUAL program. 3. Quick Start / Manual Program The Quick Start / Manual program lets you must first make a User selection in Sleep Mode. Put the ball of pedaling the machine. Pedal straps can be reached. 3. Loosen the knob below the console. 2. The LCD display is...
... QUICK START button to start a workout without entering any button is off . The default Quick Start resistance level is plugged into a power source, any information. 1. Carefully move the console tilt to the Program Menu, you start the QUICK START / MANUAL program. 3. Quick Start / Manual Program The Quick Start / Manual program lets you must first make a User selection in Sleep Mode. Put the ball of pedaling the machine. Pedal straps can be reached. 3. Loosen the knob below the console. 2. The LCD display is...
Owners Manual
Page 13
... Increase/Decrease buttons to save your user data on the Name screen, tap the START/ENTER button to make the User selection. Current weight 9. each User can set up 2 custom workouts Select / Add User 1. To set for a space. Adjust the resistance level of workouts 3. Edit User Data 1. If you can use , the ADD USER option will not be available. 2. User Setup The Nautilus® 14 Series console lets you store and use 2 User profiles (U1...
... Increase/Decrease buttons to save your user data on the Name screen, tap the START/ENTER button to make the User selection. Current weight 9. each User can set up 2 custom workouts Select / Add User 1. To set for a space. Adjust the resistance level of workouts 3. Edit User Data 1. If you can use , the ADD USER option will not be available. 2. User Setup The Nautilus® 14 Series console lets you store and use 2 User profiles (U1...

Owners Manual
Page 14
... deletion, push STOP/RESET. Use the Increase and Decrease buttons to select a user (guest or custom) and push START/ENTER. 3. Use the Increase/Decrease buttons to adjust the Time value, and push START/ENTER to set the time. Profile Programs These programs automate different resistances and workout levels. Push START/ENTER to set each value after you are complete, tap the START/ENTER or STOP/RESET button until you make the change.
... deletion, push STOP/RESET. Use the Increase and Decrease buttons to select a user (guest or custom) and push START/ENTER. 3. Use the Increase/Decrease buttons to adjust the Time value, and push START/ENTER to set the time. Profile Programs These programs automate different resistances and workout levels. Push START/ENTER to set each value after you are complete, tap the START/ENTER or STOP/RESET button until you make the change.
Owners Manual
Page 15
... the heart rate information from a Heart Rate Monitor (HRM) chest strap. Heart Rate Control (HRC) Program The Heart Rate Control (HRC) program lets you must enter your physical fitness level. To adjust the resistance, use the Increase/Decrease buttons. 4. Set the Time for the HRC program to work correctly. As you become more fit, you must enter your heart rate. Set the workout level: FIT (beginner) or GETTING FIT (advanced). 2. When you are a Guest User, you will output more detailed information about fitness zones...
... the heart rate information from a Heart Rate Monitor (HRM) chest strap. Heart Rate Control (HRC) Program The Heart Rate Control (HRC) program lets you must enter your physical fitness level. To adjust the resistance, use the Increase/Decrease buttons. 4. Set the Time for the HRC program to work correctly. As you become more fit, you must enter your heart rate. Set the workout level: FIT (beginner) or GETTING FIT (advanced). 2. When you are a Guest User, you will output more detailed information about fitness zones...

Owners Manual
Page 16
... PULSE signal, the console automatically goes into the CONSOLE SETUP MODE. 2. WORKOUT PAUSED mode shows on the screen to set . 6. Push START/ENTER to give positive feedback while you are working out. 1. "5" = maximum intensity, "1" = minimum). 7. Use the ▲ and ▼ keys to adjust the CAL value, and then push the START/ENTER key to change between ELLIPTICAL and BIKE. 3. The LEVEL display starts at 1. Push the Increase/Decrease buttons to start the workout...
... PULSE signal, the console automatically goes into the CONSOLE SETUP MODE. 2. WORKOUT PAUSED mode shows on the screen to set . 6. Push START/ENTER to give positive feedback while you are working out. 1. "5" = maximum intensity, "1" = minimum). 7. Use the ▲ and ▼ keys to adjust the CAL value, and then push the START/ENTER key to change between ELLIPTICAL and BIKE. 3. The LEVEL display starts at 1. Push the Increase/Decrease buttons to start the workout...

Owners Manual
Page 17
..., dirt, or grime from service until the repair is provided in this machine. Clean the machine to ease operation. Maintenance Equipment must be replaced immediately or the equipment removed from the surfaces. This Notice is made. Repair or replace all bolts and screws are tight. Check pedals and crank arms and tighten as necessary. 17 Make sure all parts at www.nautilus.com/prop65 To reduce the...
..., dirt, or grime from service until the repair is provided in this machine. Clean the machine to ease operation. Maintenance Equipment must be replaced immediately or the equipment removed from the surfaces. This Notice is made. Repair or replace all bolts and screws are tight. Check pedals and crank arms and tighten as necessary. 17 Make sure all parts at www.nautilus.com/prop65 To reduce the...
Owners Manual
Page 18
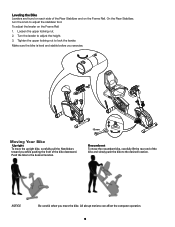
... careful when you exercise. To adjust the leveler on the Frame Rail: 1. Turn the leveler to lock the leveler. Push the bike to the desired location. 13 mm Recumbent To move the recumbent bike, carefully lift the rear end of the Rear Stabilizer and on the Frame Rail. Make sure the bike is level and stable before you move the upright bike, carefully pull the...
... careful when you exercise. To adjust the leveler on the Frame Rail: 1. Turn the leveler to lock the leveler. Push the bike to the desired location. 13 mm Recumbent To move the recumbent bike, carefully lift the rear end of the Rear Stabilizer and on the Frame Rail. Make sure the bike is level and stable before you move the upright bike, carefully pull the...

Owners Manual
Page 19
... larger fitness stores. Replace adapter or connection at Console Insure cable is plugged into place. Replace Console if damaged. Interference Try moving unit away from handlebars and cable to Console are available on the web or at front (recumbent) or Connection should be intact. Check console display for damage Check for further assistance. Check data cable connections/orientation Insure cable is cracked or otherwise damaged. Troubleshooting Problem Check Solution No display/partial...
... larger fitness stores. Replace adapter or connection at Console Insure cable is plugged into place. Replace Console if damaged. Interference Try moving unit away from handlebars and cable to Console are available on the web or at front (recumbent) or Connection should be intact. Check console display for damage Check for further assistance. Check data cable connections/orientation Insure cable is cracked or otherwise damaged. Troubleshooting Problem Check Solution No display/partial...

Owners Manual
Page 20
... level area. 20 Move bike to outlet. Console displays "E2" error code Check data cable integrity Check data cable connections/orientation Console Electronics No speed/RPM reading, Console displays Check data cable integrity "E3" error code Check data cable connections/orientation Check magnet position (requires shroud removal) Check RPM Sensor (requires shroud removal) Console shuts off (enters sleep mode) while in use Check data cable integrity Check data cable connections/orientation Reset Machine (if equipped with reset button) Check magnet position...
... level area. 20 Move bike to outlet. Console displays "E2" error code Check data cable integrity Check data cable connections/orientation Console Electronics No speed/RPM reading, Console displays Check data cable integrity "E3" error code Check data cable connections/orientation Check magnet position (requires shroud removal) Check RPM Sensor (requires shroud removal) Console shuts off (enters sleep mode) while in use Check data cable integrity Check data cable connections/orientation Reset Machine (if equipped with reset button) Check magnet position...

Owners Manual
Page 21
Insure connection is locked into one of the seat post adjustment holes. Insure adjustment pin is not cross-threaded. Insure knob is securely tightened. 21 Pedals loose/unit difficult to pedal Seat post movement Check pedal to crank connection Check crank to axle connection Check locking pin Check adjustment knob Pedal should be tightened securely to axle. Be sure cranks are connected at 180 degrees from each other. Crank should be tightened securely to crank.
Insure connection is locked into one of the seat post adjustment holes. Insure adjustment pin is not cross-threaded. Insure knob is securely tightened. 21 Pedals loose/unit difficult to pedal Seat post movement Check pedal to crank connection Check crank to axle connection Check locking pin Check adjustment knob Pedal should be tightened securely to axle. Be sure cranks are connected at 180 degrees from each other. Crank should be tightened securely to crank.


