
Owners Manual
Page 2
... questions or problems with your product warranty , go to: www.nautilus.com/register Or call 1 (800) NAUTILUS (628-8458). 2 Para obtener este manual en Español Latino Americano vaya a: http://support.nautilus.com. Table of Contents Important Safety Instructions 3 User Setup 12 Specifications 5 Workout Programs 13 Features 6 Pausing or Stopping 15 Console 6 Console Setup Mode 16 Remote Heart Rate Monitor 9 Maintenance 16 Operations 11 Troubleshooting 19 Adjustments 11 Contacts 24 Quick Start/Manual Program 12 Manuel...
... questions or problems with your product warranty , go to: www.nautilus.com/register Or call 1 (800) NAUTILUS (628-8458). 2 Para obtener este manual en Español Latino Americano vaya a: http://support.nautilus.com. Table of Contents Important Safety Instructions 3 User Setup 12 Specifications 5 Workout Programs 13 Features 6 Pausing or Stopping 15 Console 6 Console Setup Mode 16 Remote Heart Rate Monitor 9 Maintenance 16 Operations 11 Troubleshooting 19 Adjustments 11 Contacts 24 Quick Start/Manual Program 12 Manuel...

Owners Manual
Page 3
... you step off the machine. • Disconnect all power before you feel faint. Be sure to anticipate that you start an exercise program. Please consult the "Safety Warning Labels and Serial Number" section to avoid loss of certain medical devices at a close range. Moving parts and other features of the magnets on this machine on them. Monitor the Seat, Pedals, and Crank Arms closely. Before using this machine...
... you step off the machine. • Disconnect all power before you feel faint. Be sure to anticipate that you start an exercise program. Please consult the "Safety Warning Labels and Serial Number" section to avoid loss of certain medical devices at a close range. Moving parts and other features of the magnets on this machine on them. Monitor the Seat, Pedals, and Crank Arms closely. Before using this machine...

Owners Manual
Page 4
... understand the Owners Manual. • Injury or death is possible if Caution is not used while using this machine. • The maximum user weight for this manual. 4 Record serial number in the Serial Number field at the beginning of this machine is 300 lbs (136 kg). • Replace any "Caution", "Warning" or "Danger" label that is illegible, damaged, or removed. • This machine is for home use only...
... understand the Owners Manual. • Injury or death is possible if Caution is not used while using this machine. • The maximum user weight for this manual. 4 Record serial number in the Serial Number field at the beginning of this machine is 300 lbs (136 kg). • Replace any "Caution", "Warning" or "Danger" label that is illegible, damaged, or removed. • This machine is for home use only...

Owners Manual
Page 5
Specifications Power Requirements Regulatory Approvals Operational Voltage 9VDC Operating Current 1500 mA AC Power Adapter: UL listed, CSA certified (or equivalent), Rated 120V60Hz Input, 9VDC, 1500mA Output. Class 2 or LPS. 5
Specifications Power Requirements Regulatory Approvals Operational Voltage 9VDC Operating Current 1500 mA AC Power Adapter: UL listed, CSA certified (or equivalent), Rated 120V60Hz Input, 9VDC, 1500mA Output. Class 2 or LPS. 5
Owners Manual
Page 6
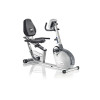
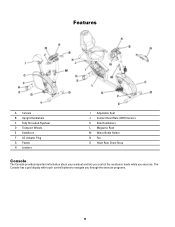
Features A Console B Upright Handlebars C Fully Shrouded Flywheel D Transport Wheels E Stabilizers F AC Adapter Plug G Pedals H Levelers I Adjustable Seat J Contact Heart Rate (CHR) Sensors K Side Handlebars L Magazine Rack M Water Bottle Holder N Fan O Heart Rate Chest Strap Console The Console provides important information about your workout and lets you control the resistance levels while you through the exercise programs. 6 The Console has a grid display with touch control buttons to navigate you exercise.
Features A Console B Upright Handlebars C Fully Shrouded Flywheel D Transport Wheels E Stabilizers F AC Adapter Plug G Pedals H Levelers I Adjustable Seat J Contact Heart Rate (CHR) Sensors K Side Handlebars L Magazine Rack M Water Bottle Holder N Fan O Heart Rate Chest Strap Console The Console provides important information about your workout and lets you control the resistance levels while you through the exercise programs. 6 The Console has a grid display with touch control buttons to navigate you exercise.

Owners Manual
Page 7
... for manual control of the scan function. Cycles through your workout measurements (during the workout), results, user setup data and console diagnostics. Starts a Program workout, confirms information , or will end the workout - Backlit Console screen - Push STOP/RESET again to turn off - LCD Display AA1 Distance AA2 Program Display AA3 Watt / Level AA4 Pulse AA5 AA6 AA7 7 Time / Interval Calories Speed Begins a Quick Start workout - Console Features A LCD Display B STOP/RESET button C Increase button (▲) D QUICK START button E Decrease button (▼...
... for manual control of the scan function. Cycles through your workout measurements (during the workout), results, user setup data and console diagnostics. Starts a Program workout, confirms information , or will end the workout - Backlit Console screen - Push STOP/RESET again to turn off - LCD Display AA1 Distance AA2 Program Display AA3 Watt / Level AA4 Pulse AA5 AA6 AA7 7 Time / Interval Calories Speed Begins a Quick Start workout - Console Features A LCD Display B STOP/RESET button C Increase button (▲) D QUICK START button E Decrease button (▼...
Owners Manual
Page 8
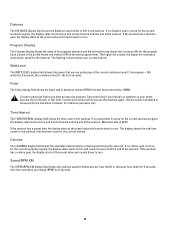
...from the heart rate monitor (HRM). If no distance goal is 99:59. The flashing column shows your chest, become short of the workout. Pulse The Pulse display field shows the heart rate in your current interval. Stop exercising if you use the machine again....workout. Maximum time is set up for the current workout program, the display value starts at the preset value and counts down to zero. Distance The DISTANCE display field shows the distance count (miles or km) in the workout. If no calorie goal is set up for the current workout program, the display value starts...
...from the heart rate monitor (HRM). If no distance goal is 99:59. The flashing column shows your chest, become short of the workout. Pulse The Pulse display field shows the heart rate in your current interval. Stop exercising if you use the machine again....workout. Maximum time is set up for the current workout program, the display value starts at the preset value and counts down to zero. Distance The DISTANCE display field shows the distance count (miles or km) in the workout. If no calorie goal is set up for the current workout program, the display value starts...

Owners Manual
Page 9
... a Heart Rate Chest Strap Transmitter. It is more fat your heart rate signals to send your body will burn. The most efficient procedure to 15 seconds. Consult your physician for 10 to burn fat during exercise is shown. Remote Heart Rate Monitor Monitoring your Heart Rate is one BPM for each year. Contact Heart Rate Sensors Contact Heart Rate (CHR) sensors send your hands comfortably around the sensors. Once the Console has...
... a Heart Rate Chest Strap Transmitter. It is more fat your heart rate signals to send your body will burn. The most efficient procedure to 15 seconds. Consult your physician for 10 to burn fat during exercise is shown. Remote Heart Rate Monitor Monitoring your Heart Rate is one BPM for each year. Contact Heart Rate Sensors Contact Heart Rate (CHR) sensors send your hands comfortably around the sensors. Once the Console has...

Owners Manual
Page 10
Fat Burning Target Heart Rate Heart Rate BPM (beats per minute) Maximum Heart Rate Target Heart Rate Zone (keep within this range for optimum fat burning) Age 10 Note: As with all exercises and fitness regimens, always use your best judgment when you increase your exercise time or intensity.
Fat Burning Target Heart Rate Heart Rate BPM (beats per minute) Maximum Heart Rate Target Heart Rate Zone (keep within this range for optimum fat burning) Age 10 Note: As with all exercises and fitness regimens, always use your best judgment when you increase your exercise time or intensity.

Owners Manual
Page 11
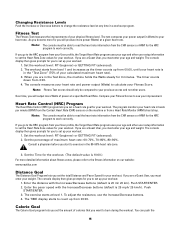
... use the machine again. If your leg is too straight or your chest, become short of breath, or feel pain or tightness in your foot cannot touch the Pedal, move the seat up on the upright bike or rearward on the seat tube. How Often Should You Exercise Consult a physician before you start an exercise program. Stop exercising if you adjust the seat. • Upright bike-pull the adjustment knob on the recumbent bike...
... use the machine again. If your leg is too straight or your chest, become short of breath, or feel pain or tightness in your foot cannot touch the Pedal, move the seat up on the upright bike or rearward on the seat tube. How Often Should You Exercise Consult a physician before you start an exercise program. Stop exercising if you adjust the seat. • Upright bike-pull the adjustment knob on the recumbent bike...
Owners Manual
Page 12
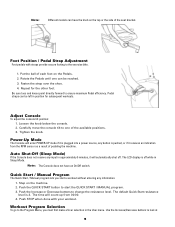
... Start resistance level is pushed, or if it will count up from the RPM sensor as a result of the available positions. 3. Tighten the knob. Use the Increase/Decrease buttons to ensure maximum Pedal efficiency. Be sure toes and knees point directly forward to look at 12 Adjust Console To adjust the console tilt position: 1. Carefully move the console tilt to one can be reached. 3. Power-Up Mode...
... Start resistance level is pushed, or if it will count up from the RPM sensor as a result of the available positions. 3. Tighten the knob. Use the Increase/Decrease buttons to ensure maximum Pedal efficiency. Be sure toes and knees point directly forward to look at 12 Adjust Console To adjust the console tilt position: 1. Carefully move the console tilt to one can be reached. 3. Power-Up Mode...
Owners Manual
Page 13
.... Adjust the resistance level of workouts 3. Continue until the next data screen appears. 4. From the POWER UP MODE screen, push the Increase/Decrease buttons to move off the screen to the Program Menu. This feature automatically records your fitness progress. Weight change (Starting Weight - If you select GUEST USER or a User (U1 or U2), you track your workout results in use 2 User profiles (U1 and U2) in this manual. The Program Display...
.... Adjust the resistance level of workouts 3. Continue until the next data screen appears. 4. From the POWER UP MODE screen, push the Increase/Decrease buttons to move off the screen to the Program Menu. This feature automatically records your fitness progress. Weight change (Starting Weight - If you select GUEST USER or a User (U1 or U2), you track your workout results in use 2 User profiles (U1 and U2) in this manual. The Program Display...

Owners Manual
Page 14
... a user (guest or custom) and push START/ENTER. 3. DELETE - The console display will prompt you make the change. Challenge 1 Challenge 2 Interval 1 Hill 1 Interval 2 Hill 2 To start the program from the Custom Workout option in your answers. Note: The default value for the workout (default is set the time. Profile Programs These programs automate different resistances and workout levels. To cancel the deletion, push STOP/RESET. Push START...
... a user (guest or custom) and push START/ENTER. 3. DELETE - The console display will prompt you make the change. Challenge 1 Challenge 2 Interval 1 Hill 1 Interval 2 Hill 2 To start the program from the Custom Workout option in your answers. Note: The default value for the workout (default is set the time. Profile Programs These programs automate different resistances and workout levels. To cancel the deletion, push STOP/RESET. Push START...
Owners Manual
Page 15
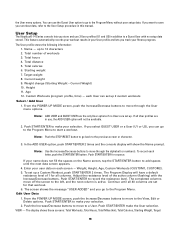
... console display then gives prompts for 3 minutes. To adjust the resistance, use the Increase/Decrease buttons. 4. Calorie Goal The Calorie Goal program lets you set up your workout. The console display then gives prompts for your workout: 1. The timer counts down from a Heart Rate Monitor (HRM) chest strap. Note: The console must enter your workout: 1. Consult a physician before you must be compared to your previous scores and not other user setup information...
... console display then gives prompts for 3 minutes. To adjust the resistance, use the Increase/Decrease buttons. 4. Calorie Goal The Calorie Goal program lets you set up your workout. The console display then gives prompts for your workout: 1. The timer counts down from a Heart Rate Monitor (HRM) chest strap. Note: The console must enter your workout: 1. Consult a physician before you must be compared to your previous scores and not other user setup information...

Owners Manual
Page 16
... while you can start your workout, or push the STOP/RESET button to stop or start program setup. You can push STOP/RESET to turn motivational messages off or on the Display. 2. Use the ▲ and ▼ keys to adjust the CAL value, and then push the START/ENTER key to set . 8. Push the Increase/Decrease buttons to change between ELLIPTICAL and BIKE. 3. START/ENTER key to use ("SW30 V1.0" = x20 machine, "SW40 V1.0" = x40 machine, or "NLS...
... while you can start your workout, or push the STOP/RESET button to stop or start program setup. You can push STOP/RESET to turn motivational messages off or on the Display. 2. Use the ▲ and ▼ keys to adjust the CAL value, and then push the START/ENTER key to set . 8. Push the Increase/Decrease buttons to change between ELLIPTICAL and BIKE. 3. START/ENTER key to use ("SW30 V1.0" = x20 machine, "SW40 V1.0" = x40 machine, or "NLS...

Owners Manual
Page 17
... ease operation. Repair or replace all bolts and screws are tight. Note: Avoid excessive moisture on the Console. Clean the machine to remove any dust, dirt, or grime from service until the repair is done. If you would like additional information, please refer to our Web site at the first sign of electrical shock, always unplug the power cord and wait 5 minutes...
... ease operation. Repair or replace all bolts and screws are tight. Note: Avoid excessive moisture on the Console. Clean the machine to remove any dust, dirt, or grime from service until the repair is done. If you would like additional information, please refer to our Web site at the first sign of electrical shock, always unplug the power cord and wait 5 minutes...
Owners Manual
Page 18
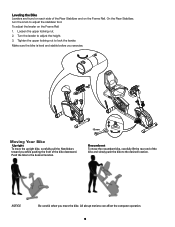
... when you exercise. Make sure the bike is level and stable before you move the bike. Moving Your Bike Upright To move the recumbent bike, carefully lift the rear end of the bike downward. Push the bike to the desired location. 13 mm Recumbent To move the upright bike, carefully pull the Handlebars toward you while pushing the front of the bike and slowly push the bike to adjust the stabilizer...
... when you exercise. Make sure the bike is level and stable before you move the bike. Moving Your Bike Upright To move the recumbent bike, carefully lift the rear end of the bike downward. Push the bike to the desired location. 13 mm Recumbent To move the upright bike, carefully pull the Handlebars toward you while pushing the front of the bike and slowly push the bike to adjust the stabilizer...

Owners Manual
Page 19
Replace adapter or connection at front (recumbent) or Connection should be replaced. Check data cable integrity All wires in cable should be secure and rear (upright) of interference (TV, Microwave, etc). Small latch on Make sure unit is connected securely to Console are centered on the web or at Console Insure cable is plugged into place. Some models may have difficulty with relatively equal pressure applied to access cable box...
Replace adapter or connection at front (recumbent) or Connection should be replaced. Check data cable integrity All wires in cable should be secure and rear (upright) of interference (TV, Microwave, etc). Small latch on Make sure unit is connected securely to Console are centered on the web or at Console Insure cable is plugged into place. Some models may have difficulty with relatively equal pressure applied to access cable box...

Owners Manual
Page 20
... data cable connections/orientation Console Electronics No speed/RPM reading, Console displays Check data cable integrity "E3" error code Check data cable connections/orientation Check magnet position (requires shroud removal) Check RPM Sensor (requires shroud removal) Console shuts off (enters sleep mode) while in use Check data cable integrity Check data cable connections/orientation Reset Machine (if equipped with reset button) Check magnet position (Technician onlyrequires shroud removal) Check RPM Sensor Fan (if equipped) will not turn...
... data cable connections/orientation Console Electronics No speed/RPM reading, Console displays Check data cable integrity "E3" error code Check data cable connections/orientation Check magnet position (requires shroud removal) Check RPM Sensor (requires shroud removal) Console shuts off (enters sleep mode) while in use Check data cable integrity Check data cable connections/orientation Reset Machine (if equipped with reset button) Check magnet position (Technician onlyrequires shroud removal) Check RPM Sensor Fan (if equipped) will not turn...

Owners Manual
Page 21
Pedals loose/unit difficult to pedal Seat post movement Check pedal to crank connection Check crank to axle connection Check locking pin Check adjustment knob Pedal should be tightened securely to axle. Insure connection is locked into one of the seat post adjustment holes. Insure adjustment pin is not cross-threaded. Be sure cranks are connected at 180 degrees from each other. Insure knob is securely tightened. 21 Crank should be tightened securely to crank.
Pedals loose/unit difficult to pedal Seat post movement Check pedal to crank connection Check crank to axle connection Check locking pin Check adjustment knob Pedal should be tightened securely to axle. Insure connection is locked into one of the seat post adjustment holes. Insure adjustment pin is not cross-threaded. Be sure cranks are connected at 180 degrees from each other. Insure knob is securely tightened. 21 Crank should be tightened securely to crank.


