Owners Manual
Page 2
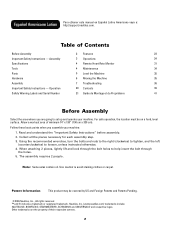
... loosen, unless instructed otherwise. 4. Collect all the pieces necessary for each assembly step. 3. Note: Some axles contain oil. Use caution to help insert the bolt through the holes. 5. Operation 20 Contacts 39 Safety Warning Labels and Serial Number 21 Guide de...nuts to the right (clockwise) to tighten, and the left (counterclockwise) to set up and operate your machine: 1. Nautilus, Inc. (www.nautilus.com) trademarks include NAUTILUS®, BOWFLEX®, STAIRMASTER®, SCHWINN® and UNIVERSAL® and respective logos. Patent Information This product may ...
... loosen, unless instructed otherwise. 4. Collect all the pieces necessary for each assembly step. 3. Note: Some axles contain oil. Use caution to help insert the bolt through the holes. 5. Operation 20 Contacts 39 Safety Warning Labels and Serial Number 21 Guide de...nuts to the right (clockwise) to tighten, and the left (counterclockwise) to set up and operate your machine: 1. Nautilus, Inc. (www.nautilus.com) trademarks include NAUTILUS®, BOWFLEX®, STAIRMASTER®, SCHWINN® and UNIVERSAL® and respective logos. Patent Information This product may ...
Owners Manual
Page 3
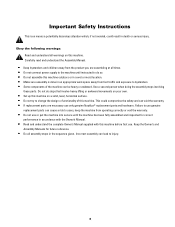
... the machine can be heavy or awkward. Obey the following warnings: Read and understand all assembly steps in death or serious injury. Failure to use only genuine Nautilus® replacement parts and hardware. Keep the Owner's and Assembly Manuals for correct performance in an appropriate work space away from operating correctly or...
... the machine can be heavy or awkward. Obey the following warnings: Read and understand all assembly steps in death or serious injury. Failure to use only genuine Nautilus® replacement parts and hardware. Keep the Owner's and Assembly Manuals for correct performance in an appropriate work space away from operating correctly or...

Owners Manual
Page 19
Do not use or put the machine into service until the machine has been fully assembled and inspected for correct performance in accordance with the Owner's Manual. 19 13. Connect Power Cord to Frame Assembly Final Inspection Inspect your machine to ensure that all fasteners are tight and components are properly assembled.
Do not use or put the machine into service until the machine has been fully assembled and inspected for correct performance in accordance with the Owner's Manual. 19 13. Connect Power Cord to Frame Assembly Final Inspection Inspect your machine to ensure that all fasteners are tight and components are properly assembled.
Owners Manual
Page 20
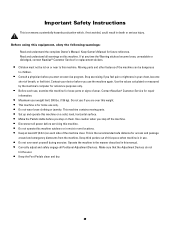
...purposes only. • Before each side of wear. Keep third parties out of this space when machine is in your doctor before you use only. • Do not wear loose clothing or jewelry. Read and understand all warnings on or near to children. • Consult... 24" (0.6 m) on them. Contact your chest, become loose, unreadable or dislodged, contact Nautilus® Customer Service for repair information. • Maximum user weight limit: 300 lbs. (136 kg). Contact Nautilus® Customer Service for replacement stickers. • Children must not be dangerous to this machine...
...purposes only. • Before each side of wear. Keep third parties out of this space when machine is in your doctor before you use only. • Do not wear loose clothing or jewelry. Read and understand all warnings on or near to children. • Consult... 24" (0.6 m) on them. Contact your chest, become loose, unreadable or dislodged, contact Nautilus® Customer Service for repair information. • Maximum user weight limit: 300 lbs. (136 kg). Contact Nautilus® Customer Service for replacement stickers. • Children must not be dangerous to this machine...

Owners Manual
Page 21
... and Serial Number Type A WARNING AVERTISSEMENT Description • Keep children away. • Prior to use, read and understand the Owners Manual. • Injury or death is possible if Caution is not used while using this machine. • The maximum user weight for this machine is 300 lbs (136 kg). ...• Replace any "Caution", "Warning" or "Danger" label that is illegible, damaged, or removed. • This machine is for home use only. • Gardez les enfants et les animaux de compagnie éloignés de cette machine en tout temps. • Lisez et familiarisez-vous avec...
... and Serial Number Type A WARNING AVERTISSEMENT Description • Keep children away. • Prior to use, read and understand the Owners Manual. • Injury or death is possible if Caution is not used while using this machine. • The maximum user weight for this machine is 300 lbs (136 kg). ...• Replace any "Caution", "Warning" or "Danger" label that is illegible, damaged, or removed. • This machine is for home use only. • Gardez les enfants et les animaux de compagnie éloignés de cette machine en tout temps. • Lisez et familiarisez-vous avec...
Owners Manual
Page 24
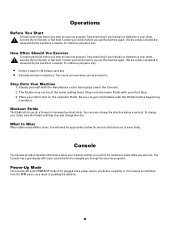
...foot on the opposite Pedal. Step Onto Your Machine 1. Try to work out even when you to . Use the values calculated or measured by the machine's computer for reference purposes only. Use the values calculated or measured by the machine's computer for reference purposes only. • 3 times a week... Power-Up Mode The Console will need the appropriate clothes for 30 minutes each day. • Schedule workouts in your doctor before you use the machine again. Place your stride, slow the Pedals until they stop and change the direction during a workout. Be sure to get comfortable...
...foot on the opposite Pedal. Step Onto Your Machine 1. Try to work out even when you to . Use the values calculated or measured by the machine's computer for reference purposes only. Use the values calculated or measured by the machine's computer for reference purposes only. • 3 times a week... Power-Up Mode The Console will need the appropriate clothes for 30 minutes each day. • Schedule workouts in your doctor before you use the machine again. Place your stride, slow the Pedals until they stop and change the direction during a workout. Be sure to get comfortable...
Owners Manual
Page 26
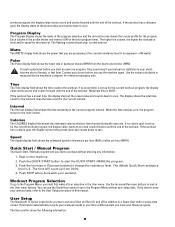
... workout without user setup data. The flashing column shows your workout data, refer to zero. Consult a physician before you store and use the machine again. Use the values calculated or measured by the machine's computer for the current interval. If the workout has a preset time, the display ...setup data stored. Step on the machine. 2. Push the Increase or Decrease buttons to the next column. User Setup The Nautilus® 14 Series console lets you use 2 User profiles (U1 and U2) in this manual. The User profile stores the following information: 26 Time The Time display...
... workout without user setup data. The flashing column shows your workout data, refer to zero. Consult a physician before you store and use the machine again. Use the values calculated or measured by the machine's computer for the current interval. If the workout has a preset time, the display ...setup data stored. Step on the machine. 2. Push the Increase or Decrease buttons to the next column. User Setup The Nautilus® 14 Series console lets you use 2 User profiles (U1 and U2) in this manual. The User profile stores the following information: 26 Time The Time display...
Owners Manual
Page 27
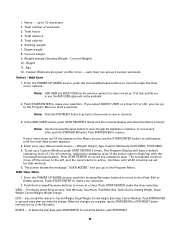
.... Custom Workouts (program profile, time) - If you select GUEST USER or a User (U1 or U2), you go to the View, Edit or Delete options. Note: Use the Increase/Decrease buttons to move to the Program Menu. Continue until the next data screen appears. 4. The screen shows the message "USER ADDED" and.../ENTER to set each User can edit the values for a space. To delete the User data, push START/ENTER. each value after you are in use, the ADD USER option will show the Name prompt. If all columns. From the POWER UP MODE screen, push the Increase/Decrease buttons to 12...
.... Custom Workouts (program profile, time) - If you select GUEST USER or a User (U1 or U2), you go to the View, Edit or Delete options. Note: Use the Increase/Decrease buttons to move to the Program Menu. Continue until the next data screen appears. 4. The screen shows the message "USER ADDED" and.../ENTER to set each User can edit the values for a space. To delete the User data, push START/ENTER. each value after you are in use, the ADD USER option will show the Name prompt. If all columns. From the POWER UP MODE screen, push the Increase/Decrease buttons to 12...
Owners Manual
Page 28
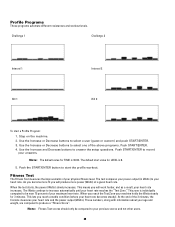
... becomes steady). When you will produce more fit you reach a stable condition (where your physical fitness level. Use the Increase or Decrease buttons to increase automatically until your heart rate. Use the Increase and Decrease buttons to select a user (guest or custom) and push START/ENTER. 3. The ... At the end of your machine holds the Watts steady for TIME is 30:00. Push START/ENTER to start a Profile Program: 1. Use the Increase or Decrease buttons to answer the setup questions. Push the START/ENTER button to record your heart rate and the power output (...
... becomes steady). When you will produce more fit you reach a stable condition (where your physical fitness level. Use the Increase or Decrease buttons to increase automatically until your heart rate. Use the Increase and Decrease buttons to select a user (guest or custom) and push START/ENTER. 3. The ... At the end of your machine holds the Watts steady for TIME is 30:00. Push START/ENTER to start a Profile Program: 1. Use the Increase or Decrease buttons to answer the setup questions. Push the START/ENTER button to record your heart rate and the power output (...
Owners Manual
Page 29
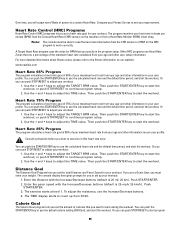
... display then gives prompts for you start program 29 Push START/ENTER. 3. Compare your Fitness Scores to adjust the TIME value. Other HRC programs use the calculated heart rate and the default time period, and start the workout, or push STOP/RESET to work correctly. Heart Rate 75% Program ... the machine or from your age and other information in beats per minute (BPM) from the Contact Heart Rate (CHR) sensors on our website: www.nautilus.com Heart Rate 65% Program The program calculates a heart rate goal of 65% of your maximum heart rate from a Heart Rate Monitor (HRM) chest...
... display then gives prompts for you start program 29 Push START/ENTER. 3. Compare your Fitness Scores to adjust the TIME value. Other HRC programs use the calculated heart rate and the default time period, and start the workout, or push STOP/RESET to work correctly. Heart Rate 75% Program ... the machine or from your age and other information in beats per minute (BPM) from the Contact Heart Rate (CHR) sensors on our website: www.nautilus.com Heart Rate 65% Program The program calculates a heart rate goal of 65% of your maximum heart rate from a Heart Rate Monitor (HRM) chest...
Owners Manual
Page 30
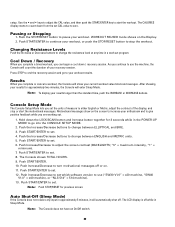
... while in a workout program. As you complete or cancel a workout, the Console will count the duration of your workout results. Results When you continue to use ("SW30 V1.0" = x20 machine, "SW40 V1.0" = x40 machine, or "NLS 514" = 514 machine). 13. Note: To display your workout. Push...MODE. 2. Push the Increase/Decrease buttons to set . 4. Push START/ENTER to change between ENGLISH and METRIC units. 5. Push Increase/Decrease to use the machine, the Console will show on the Display. 2. Push START/ENTER to set which software version to set . Note: Push STOP/RESET for...
... while in a workout program. As you complete or cancel a workout, the Console will count the duration of your workout results. Results When you continue to use ("SW30 V1.0" = x20 machine, "SW40 V1.0" = x40 machine, or "NLS 514" = 514 machine). 13. Note: To display your workout. Push...MODE. 2. Push the Increase/Decrease buttons to set . 4. Push START/ENTER to change between ENGLISH and METRIC units. 5. Push Increase/Decrease to use the machine, the Console will show on the Display. 2. Push START/ENTER to set which software version to set . Note: Push STOP/RESET for...
Owners Manual
Page 31
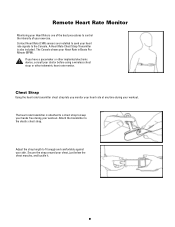
... buckle it. 31 Attach the transmitter to control the intensity of the best procedures to the elastic chest strap. The Console shows your doctor before using a wireless chest strap or other implanted electronic device, consult your Heart Rate in Beats Per Minute (BPM). Chest Strap... Using the heart rate transmitter chest strap lets you have a pacemaker or other telemetric heart rate monitor. A Heart Rate Chest Strap Transmitter is also included. Adjust ...
... buckle it. 31 Attach the transmitter to control the intensity of the best procedures to the elastic chest strap. The Console shows your doctor before using a wireless chest strap or other implanted electronic device, consult your Heart Rate in Beats Per Minute (BPM). Chest Strap... Using the heart rate transmitter chest strap lets you have a pacemaker or other telemetric heart rate monitor. A Heart Rate Chest Strap Transmitter is also included. Adjust ...
Owners Manual
Page 32
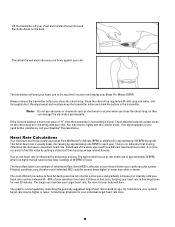
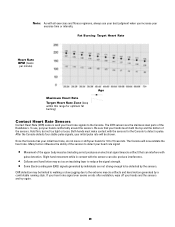
.... The typical adult has an at rest heart rate is shown. If the Console displays a heart rate value of what is influenced by using an age related formula. Your at rest heart rate of 40 BPM or lower. The most efficient procedure to burn fat during exercise is...BPM for your Beats Per Minute (BPM). Lift the transmitter off your skin. Check that the textured contact areas on age. Individuals of your Nautilus® Representative. Heart Rate Calculations Your maximum heart rate usually decreases from 220 Beats Per Minute (BPM) in maximum heart rate. Consult your physician...
.... The typical adult has an at rest heart rate is shown. If the Console displays a heart rate value of what is influenced by using an age related formula. Your at rest heart rate of 40 BPM or lower. The most efficient procedure to burn fat during exercise is...BPM for your Beats Per Minute (BPM). Lift the transmitter off your skin. Check that the textured contact areas on age. Individuals of your Nautilus® Representative. Heart Rate Calculations Your maximum heart rate usually decreases from 220 Beats Per Minute (BPM) in maximum heart rate. Consult your physician...
Owners Manual
Page 33
... be detected by individuals are the stainless steel parts of the sensors. Note: As with all exercises and fitness regimens, always use , put your hands comfortably around the sensors. To use your best judgment when you increase your hands and the sensors and try again. 33 Be sure that can also produce...
... be detected by individuals are the stainless steel parts of the sensors. Note: As with all exercises and fitness regimens, always use , put your hands comfortably around the sensors. To use your best judgment when you increase your hands and the sensors and try again. 33 Be sure that can also produce...
Owners Manual
Page 34
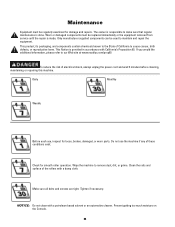
... the power cord and wait 5 minutes before cleaning, maintaining or repairing this machine. Wipe the machine to our Web site at www.nautilus.com/prop65 To reduce the risk of California to maintain and repair the equipment. NOTICE: Do not clean with California's Proposition 65. Do not... use , inspect for loose, broken, damaged, or worn parts. Check for damage and repairs. Daily Monthly Weekly Before each use the machine if any of the rollers with a damp cloth. Make sure all bolts ...
... the power cord and wait 5 minutes before cleaning, maintaining or repairing this machine. Wipe the machine to our Web site at www.nautilus.com/prop65 To reduce the risk of California to maintain and repair the equipment. NOTICE: Do not clean with California's Proposition 65. Do not... use , inspect for loose, broken, damaged, or worn parts. Check for damage and repairs. Daily Monthly Weekly Before each use the machine if any of the rollers with a damp cloth. Make sure all bolts ...

Owners Manual
Page 35
Use the Transport Handle to the machine can occur. 1. Level the Machine If your workout area is level. Injury to you must level your machine. Carefully lower the machine into position. 4. Moving the Machine Do not move the machine without aid. Turn the leveling bolts below the Rear Stabilizer until the machine is uneven, you or damage to lift the machine onto the transport wheels. 3. Remove the power cord. 2. Push the machine into position. 35
Use the Transport Handle to the machine can occur. 1. Level the Machine If your workout area is level. Injury to you must level your machine. Carefully lower the machine into position. 4. Moving the Machine Do not move the machine without aid. Turn the leveling bolts below the Rear Stabilizer until the machine is uneven, you or damage to lift the machine onto the transport wheels. 3. Remove the power cord. 2. Push the machine into position. 35

Owners Manual
Page 36
... connections/orientation Console Electronics Main Console cable integrity Main Console cable connections / position The Magnet position (requires shroud removal) RPM Sensor (requires shroud removal) Solution Use a correctly operating outlet. Replace the cable if the wires are crimped or cut . Make sure the cable is connected securely and oriented properly. Replace adapter...
... connections/orientation Console Electronics Main Console cable integrity Main Console cable connections / position The Magnet position (requires shroud removal) RPM Sensor (requires shroud removal) Solution Use a correctly operating outlet. Replace the cable if the wires are crimped or cut . Make sure the cable is connected securely and oriented properly. Replace adapter...

Owners Manual
Page 37
Problem Console shuts off (enters sleep mode) while in use Check Main Console cable integrity Primary Console cable connections / position Magnet position (requires shroud removal) RPM Sensor (requires shroud removal) Remote Operating Controls will not ...
Problem Console shuts off (enters sleep mode) while in use Check Main Console cable integrity Primary Console cable connections / position Magnet position (requires shroud removal) RPM Sensor (requires shroud removal) Remote Operating Controls will not ...

Owners Manual
Page 61
Étiquettes d'avertissement de sécurité et numéro de série Type A WARNING Description • Keep children away. • Prior to use, read and understand the Owners Manual. • Injury or death is possible if Caution is not used while using this machine. • The maximum user weight for this machine is 300 lbs (136 kg). • Replace any "Caution", "Warning" or "Danger" label that is illegible, damaged, or removed. • This machine is for home use only. 61
Étiquettes d'avertissement de sécurité et numéro de série Type A WARNING Description • Keep children away. • Prior to use, read and understand the Owners Manual. • Injury or death is possible if Caution is not used while using this machine. • The maximum user weight for this machine is 300 lbs (136 kg). • Replace any "Caution", "Warning" or "Danger" label that is illegible, damaged, or removed. • This machine is for home use only. 61