
NP115 : RS232 codes- Projectors
Page 10
...SET 050. AUTO FUNCTIONS EXECUTE 111. AUTO ADJUST EXECUTE2 305-1. ONSCREEN MUTE OFF 030. LAMP INFORMATION REQUEST 2 037-4. REMOTE KEY CODE 060. GAIN PARAMETER REQUEST 2 077. INPUT STATUS REQUEST 078-4. MIRROR COVER STATUS REQUEST 079. WXGA MODE SETTING SET 098-198. COMMON DATA REQUEST 009. POWER ... REQUEST 3 037-7. LAMP MODE REQUEST 039. LAMP MODE SET 046. WXGA MODE SETTING REQUEST 049. SETTING REQUEST 078-2. MUTE STATUS REQUEST 078-5. PIP/SIDE BY SIDE REQUEST 098-196. PROJECTOR INFORMATION REQUEST 00H 81H 00H 00H 00H 81H 00H C0H 00H 00H 00H C0H 00H 88H...
...SET 050. AUTO FUNCTIONS EXECUTE 111. AUTO ADJUST EXECUTE2 305-1. ONSCREEN MUTE OFF 030. LAMP INFORMATION REQUEST 2 037-4. REMOTE KEY CODE 060. GAIN PARAMETER REQUEST 2 077. INPUT STATUS REQUEST 078-4. MIRROR COVER STATUS REQUEST 079. WXGA MODE SETTING SET 098-198. COMMON DATA REQUEST 009. POWER ... REQUEST 3 037-7. LAMP MODE REQUEST 039. LAMP MODE SET 046. WXGA MODE SETTING REQUEST 049. SETTING REQUEST 078-2. MUTE STATUS REQUEST 078-5. PIP/SIDE BY SIDE REQUEST 098-196. PROJECTOR INFORMATION REQUEST 00H 81H 00H 00H 00H 81H 00H C0H 00H 00H 00H C0H 00H 88H...
NP115 : RS232 codes- Projectors
Page 19
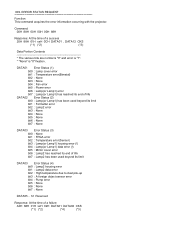
...: None DATA03 Error Status (3) bit0 : None bit1 : FPGA error bit2 : Temperature error(Sensor) bit3 : Lamp(or Lamp1) housing error (!) bit4 : Lamp(or Lamp1) data error (!) bit5 : Mirror cover error bit6 : Lamp2 has reached its end of life bit7 : Lamp2 has been used beyond its limit DATA03 Error...: At the time of a success 20H 88H 01H xxH 0CH DATA01 .. ERROR STATUS REQUEST Function: This command acquires the error information occurring with the projector. DATA12 CKS (*1) (*2) (*3) Data Portion Contents The various bits are normal is "0" and error is "1". * "None" is "0" fixation. 009...
...: None DATA03 Error Status (3) bit0 : None bit1 : FPGA error bit2 : Temperature error(Sensor) bit3 : Lamp(or Lamp1) housing error (!) bit4 : Lamp(or Lamp1) data error (!) bit5 : Mirror cover error bit6 : Lamp2 has reached its end of life bit7 : Lamp2 has been used beyond its limit DATA03 Error...: At the time of a success 20H 88H 01H xxH 0CH DATA01 .. ERROR STATUS REQUEST Function: This command acquires the error information occurring with the projector. DATA12 CKS (*1) (*2) (*3) Data Portion Contents The various bits are normal is "0" and error is "1". * "None" is "0" fixation. 009...
VT595/695/700 spec sheet
Page 2
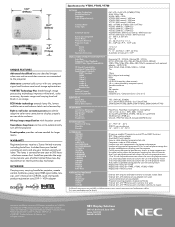
...10/08 ver. 3. ©2008 NEC Display Solutions of VT90 Series parts and labor warranty to ) Screen Size (diagonal) Throw Ratio Projection Distance Projection Angle Lens Zoom Focus F-#, f-# Keystone Correction 0.6" LCD / 0.63" LCD (VT695/VT700) XGA 1024 x 768 UXGA 1600 x 1200... of VT90 Series parts warranty to automatically turn off the projector 5-watt speaker provides volume needed for projector, remote control, battteries, power cord, RGB signal cable, lens cap, user's manual on G ELECTRICAL Power Req. The lamp is covered for details. stereo (shared by video sources) 1/8 in...
...10/08 ver. 3. ©2008 NEC Display Solutions of VT90 Series parts and labor warranty to ) Screen Size (diagonal) Throw Ratio Projection Distance Projection Angle Lens Zoom Focus F-#, f-# Keystone Correction 0.6" LCD / 0.63" LCD (VT695/VT700) XGA 1024 x 768 UXGA 1600 x 1200... of VT90 Series parts warranty to automatically turn off the projector 5-watt speaker provides volume needed for projector, remote control, battteries, power cord, RGB signal cable, lens cap, user's manual on G ELECTRICAL Power Req. The lamp is covered for details. stereo (shared by video sources) 1/8 in...
VT49/490/491/590/595/695 UM
Page 5
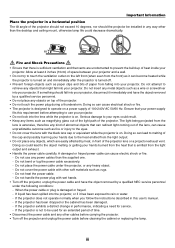
...cover the power cable with wet hands. • Turn off . • Prevent foreign objects such as magnifying glass out of the light path of the projector. If the projector does not operate normally when you follow the instructions described in this requirement before cleaning the cabinet or replacing the lamp. Important Information Place the projector...Ensure that vents are easily affected by a qualified NEC service personnel under the projector, or any other cables before carrying the projector. • Turn off the projector and unplug the power cable before attempting to operate...
...cover the power cable with wet hands. • Turn off . • Prevent foreign objects such as magnifying glass out of the light path of the projector. If the projector does not operate normally when you follow the instructions described in this requirement before cleaning the cabinet or replacing the lamp. Important Information Place the projector...Ensure that vents are easily affected by a qualified NEC service personnel under the projector, or any other cables before carrying the projector. • Turn off the projector and unplug the power cable before attempting to operate...
VT49/490/491/590/595/695 UM
Page 12
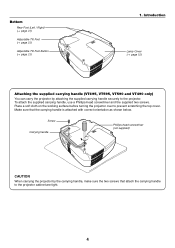
...; page 23) Adjustable Tilt Foot (→ page 23) Adjustable Tilt Foot Button (→ page 23) 1. Introduction Lamp Cover (→ page 52) Attaching the supplied carrying handle (VT695, VT595, VT590 and VT490 only) You can carry the projector by the carrying handle, make sure the two screws that the carrying handle is attached with correct...
...; page 23) Adjustable Tilt Foot (→ page 23) Adjustable Tilt Foot Button (→ page 23) 1. Introduction Lamp Cover (→ page 52) Attaching the supplied carrying handle (VT695, VT595, VT590 and VT490 only) You can carry the projector by the carrying handle, make sure the two screws that the carrying handle is attached with correct...
VT49/490/491/590/595/695 UM
Page 16
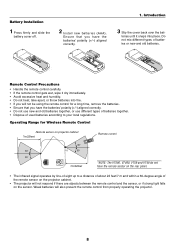
...• Ensure that you have the remote sensor on projector cabinet 7m/22feet 30° 30° (*) 30° 30° AUTO ADJ. Battery Installation 1 Press firmly and slide the battery cover off. 2 Install new batteries (AAA). Remote Control ...Precautions • Handle the remote control carefully. • If the remote control gets wet, wipe it snaps into fire. • If you will also prevent the remote control from properly operating the projector. 8 EXIT ON/STAND BY SOURCE SELECT MENU FOCUS ZOOM LAMP...
...• Ensure that you have the remote sensor on projector cabinet 7m/22feet 30° 30° (*) 30° 30° AUTO ADJ. Battery Installation 1 Press firmly and slide the battery cover off. 2 Install new batteries (AAA). Remote Control ...Precautions • Handle the remote control carefully. • If the remote control gets wet, wipe it snaps into fire. • If you will also prevent the remote control from properly operating the projector. 8 EXIT ON/STAND BY SOURCE SELECT MENU FOCUS ZOOM LAMP...
VT49/490/491/590/595/695 UM
Page 37
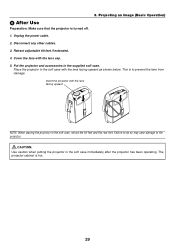
...Use caution when putting the projector in the soft case with the lens facing upward as shown below. Cover the lens with the lens facing upward LAMP STATUS POWER SOURCE ON/STAND BY AUTO ADJ. The projector cabinet is to the projector. Place the projector in the soft case ...immediately after the projector has been operating. ᕨ After Use Preparation...
...Use caution when putting the projector in the soft case with the lens facing upward as shown below. Cover the lens with the lens facing upward LAMP STATUS POWER SOURCE ON/STAND BY AUTO ADJ. The projector cabinet is to the projector. Place the projector in the soft case ...immediately after the projector has been operating. ᕨ After Use Preparation...

VT49/490/491/590/595/695 UM
Page 58
...VT695/VT595/VT590/VT490 To replace the filter (sponge): 1. Catch 2. To clean the air-filter: Vacuum the filter-through the filter cover. CAUTION • Turn off the projector, turn off the filter (sponge) and replace it detach. Remove the filter cover by pushing down on the catch of the filter cover... vacuum cleaner. • Do not attempt to clean the filters and replace the lamp. ᕡ Cleaning or Replacing the Filters The air-filter sponge keeps dust and dirt from getting inside the projector and should be cleaned after every 100 hours of operation (more often in dusty conditions...
...VT695/VT595/VT590/VT490 To replace the filter (sponge): 1. Catch 2. To clean the air-filter: Vacuum the filter-through the filter cover. CAUTION • Turn off the projector, turn off the filter (sponge) and replace it detach. Remove the filter cover by pushing down on the catch of the filter cover... vacuum cleaner. • Do not attempt to clean the filters and replace the lamp. ᕡ Cleaning or Replacing the Filters The air-filter sponge keeps dust and dirt from getting inside the projector and should be cleaned after every 100 hours of operation (more often in dusty conditions...
VT49/490/491/590/595/695 UM
Page 59
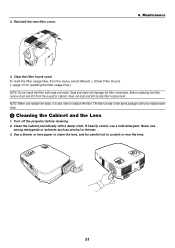
...cover. 6. Clean the cabinet periodically with soap and water. Turn off the projector before cleaning. 2. Use a blower or lens paper to clean the lens, and be careful not to replace the filter. To reset the filter usage time, from the projector cabinet. NOTE: When you replace the lamp,...BY SOURCE AUTO ADJ. Maintenance 4. Keep out dust and dirt during filter replacement. The filter comes in the same package with your replacement lamp. · Cleaning the Cabinet and the Lens 1. Clear the filter hours used. 3. Before replacing the filter, remove dust and dirt from...
...cover. 6. Clean the cabinet periodically with soap and water. Turn off the projector before cleaning. 2. Use a blower or lens paper to clean the lens, and be careful not to replace the filter. To reset the filter usage time, from the projector cabinet. NOTE: When you replace the lamp,...BY SOURCE AUTO ADJ. Maintenance 4. Keep out dust and dirt during filter replacement. The filter comes in the same package with your replacement lamp. · Cleaning the Cabinet and the Lens 1. Clear the filter hours used. 3. Before replacing the filter, remove dust and dirt from...

VT49/490/491/590/595/695 UM
Page 60
...Lamp After your NEC dealer for lamp replacement. *1 NOTE: Lamp life for VT59/VT49 is pressed To turn off the main power switch and then disconnect the power cable. Leaving finger prints on the glass surface might cause an unwanted shadow and poor picture quality. • The projector...to access the lamp cover on the lamp housing. Even though the lamp may cause injury. Allow at 2000*1 (up to use the lamp after it has been used. If this happens, contact your lamp has been operating for one hour for replacement: • Replacement lamp VT85LP (VT695/VT595/VT590/...
...Lamp After your NEC dealer for lamp replacement. *1 NOTE: Lamp life for VT59/VT49 is pressed To turn off the main power switch and then disconnect the power cable. Leaving finger prints on the glass surface might cause an unwanted shadow and poor picture quality. • The projector...to access the lamp cover on the lamp housing. Even though the lamp may cause injury. Allow at 2000*1 (up to use the lamp after it has been used. If this happens, contact your lamp has been operating for one hour for replacement: • Replacement lamp VT85LP (VT695/VT595/VT590/...
VT49/490/491/590/595/695 UM
Page 61
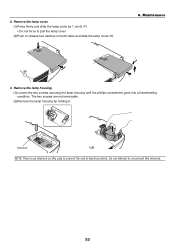
... into a freewheeling condition. Interlock NOTE: There is an interlock on both sides and slide the lamp cover off. 6. Maintenance 1 3 1 2 3. The two screws are not removable. (2)Remove the lamp housing by 1 cm (0.4") • Do not force to pull the lamp cover (2)Push to release two catches on this case to circumvent this interlock. 53 2. Do not...
... into a freewheeling condition. Interlock NOTE: There is an interlock on both sides and slide the lamp cover off. 6. Maintenance 1 3 1 2 3. The two screws are not removable. (2)Remove the lamp housing by 1 cm (0.4") • Do not force to pull the lamp cover (2)Push to release two catches on this case to circumvent this interlock. 53 2. Do not...
VT49/490/491/590/595/695 UM
Page 62
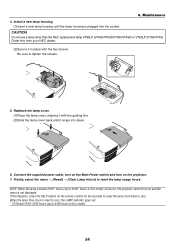
... line. (2)Slide the lamp cover back until the lamp housing is not displayed. Connect the supplied power cable, turn on the Main Power switch and turn on the projector. 7. Maintenance 4. If this from your NEC dealer. (2)Secure it snaps into the socket. CAUTION Do not use a lamp other than the NEC replacement lamp VT85LP (VT695/VT595/VT590/VT490) or...
... line. (2)Slide the lamp cover back until the lamp housing is not displayed. Connect the supplied power cable, turn on the Main Power switch and turn on the projector. 7. Maintenance 4. If this from your NEC dealer. (2)Secure it snaps into the socket. CAUTION Do not use a lamp other than the NEC replacement lamp VT85LP (VT695/VT595/VT590/VT490) or...

VT49/490/491/590/595/695 UM
Page 63
..., the over-temperature protector will not turn on again. The projector is turned on . Lamp Indicator Blinking light Indicator Condition Off Red Steady light Red Green Projector Condition Note Normal - Lamp mode is replaced. Red 1 cycle (0.5 sec On, Lamp cover error or lamp housing error Replace the lamp cover or lamp 2.5 sec Off) housing correctly. 2 cycle (0.5 sec On, Temperature error...
..., the over-temperature protector will not turn on again. The projector is turned on . Lamp Indicator Blinking light Indicator Condition Off Red Steady light Red Green Projector Condition Note Normal - Lamp mode is replaced. Red 1 cycle (0.5 sec On, Lamp cover error or lamp housing error Replace the lamp cover or lamp 2.5 sec Off) housing correctly. 2 cycle (0.5 sec On, Temperature error...
VT49/490/491/590/595/695 UM
Page 64
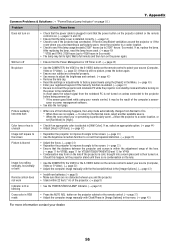
... improve its angle to the screen. (→ page 23) • Ensure that the lamp cover is not turned on unless connected to the projector before turning on the power again. If so, replace the lamp. In most cases the output signal from Normal to Eco. * When there are no picture, press the button ...Wall Color]. Color tone or hue is unusual • Check if an appropriate color is no obstacles between the projector and screen is within 22 feet (7 m) of the lens. (→ page 11 for VT695, page 11 for VT595/VT590/VT490/VT59 and 12 for VT49) • Condensation may form on the lens...
... improve its angle to the screen. (→ page 23) • Ensure that the lamp cover is not turned on unless connected to the projector before turning on the power again. If so, replace the lamp. In most cases the output signal from Normal to Eco. * When there are no picture, press the button ...Wall Color]. Color tone or hue is unusual • Check if an appropriate color is no obstacles between the projector and screen is within 22 feet (7 m) of the lens. (→ page 11 for VT695, page 11 for VT595/VT590/VT490/VT59 and 12 for VT49) • Condensation may form on the lens...
VT49/490/491/590/595/695 UM
Page 74
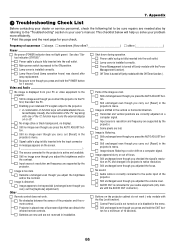
...computer signal. AUDIO OUT is installed correctly . Some pixels are not reversed in the projector's menu. No sound. Remote control does not work ( only models with the AUDIO OUT connector). Lamp cover is connected to your dealer or service personnel, check the following list to the ..."Troubleshooting" section in the projector's menu. No power even though you carry out [Reset] in the menu...
...computer signal. AUDIO OUT is installed correctly . Some pixels are not reversed in the projector's menu. No sound. Remote control does not work ( only models with the AUDIO OUT connector). Lamp cover is connected to your dealer or service personnel, check the following list to the ..."Troubleshooting" section in the projector's menu. No power even though you carry out [Reset] in the menu...
VT49/490/491/590/595/695 UM
Page 76
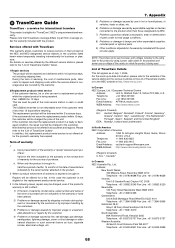
...of America Address: 1250 N. In this case the customer is still in the warranty included with TravelCare This warranty allows customers to lamps and other expendable supplies, included parts or optional parts. 9) Other conditions stipulated in effect: 1) If the term of warranty, model...800 836 0655 Fax Line: +1 800 356 2415 Email Address: [email protected] WEB Address: http://www.necvisualsystems.com (Regions Covered) U.S.A. *, Canada* In Oceania NEC Australia Pty., Ltd. Unit 1/6 Garden Road, Clayton VIC 3168 Telephone: +61 3 8562 6245 Fax Line: +61 3 8562 6220 ...
...of America Address: 1250 N. In this case the customer is still in the warranty included with TravelCare This warranty allows customers to lamps and other expendable supplies, included parts or optional parts. 9) Other conditions stipulated in effect: 1) If the term of warranty, model...800 836 0655 Fax Line: +1 800 356 2415 Email Address: [email protected] WEB Address: http://www.necvisualsystems.com (Regions Covered) U.S.A. *, Canada* In Oceania NEC Australia Pty., Ltd. Unit 1/6 Garden Road, Clayton VIC 3168 Telephone: +61 3 8562 6245 Fax Line: +61 3 8562 6220 ...


