

User Manual
Page 1
LCD Projector MT1065/MT1060/MT860 User's Manual
LCD Projector MT1065/MT1060/MT860 User's Manual

User Manual
Page 3
..., carrying cases, shipping cases, batteries, external cabinets, magnetic tapes, or any accessories used under the following terms. HOW LONG IS THE WARRANTY NEC Solutions' MT1065, MT1060, MT860 and MT1060R projectors are covered by a two (2) year limited parts and labor warranty from the date of technical adjustments, set-up, maintenance, or adjust- It shall...
..., carrying cases, shipping cases, batteries, external cabinets, magnetic tapes, or any accessories used under the following terms. HOW LONG IS THE WARRANTY NEC Solutions' MT1065, MT1060, MT860 and MT1060R projectors are covered by a two (2) year limited parts and labor warranty from the date of technical adjustments, set-up, maintenance, or adjust- It shall...
User Manual
Page 4
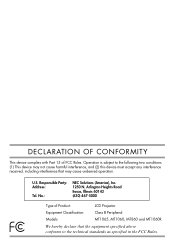
.... Arlington Heights Road Itasca, Illinois 60143 (630) 467-5000 Type of FCC Rules. No.: NEC Solutions (America), Inc. 1250 N. DECLARATION OF CONFORMITY This device complies with Part 15 of Product: LCD Projector Equipment Classification: Class B Peripheral Models: MT1065, MT1060, MT860 and MT1060R We hereby declare that the equipment specified above conforms to the following...
.... Arlington Heights Road Itasca, Illinois 60143 (630) 467-5000 Type of FCC Rules. No.: NEC Solutions (America), Inc. 1250 N. DECLARATION OF CONFORMITY This device complies with Part 15 of Product: LCD Projector Equipment Classification: Class B Peripheral Models: MT1065, MT1060, MT860 and MT1060R We hereby declare that the equipment specified above conforms to the following...
User Manual
Page 6
... one or more of the projector up or down by NEC Soluctions (America), Inc. ALL SERVICING MUST BE DONE BY QUALIFIED NEC SERVICE PERSONNEL. Serious injury could void your NEC MT1065/ MT1060/MT860 Projector and keep the manual handy for use your projector and to prevent fire and shock... frequency energy and, if not installed and used in accordance with this government regulation could result. If you wish to have the projector installed on top of the Canadian Interference-Causing Equipment Regulations. b. d. In UK, a BS approved power cable with any local building...
... one or more of the projector up or down by NEC Soluctions (America), Inc. ALL SERVICING MUST BE DONE BY QUALIFIED NEC SERVICE PERSONNEL. Serious injury could void your NEC MT1065/ MT1060/MT860 Projector and keep the manual handy for use your projector and to prevent fire and shock... frequency energy and, if not installed and used in accordance with this government regulation could result. If you wish to have the projector installed on top of the Canadian Interference-Causing Equipment Regulations. b. d. In UK, a BS approved power cable with any local building...
User Manual
Page 7
.... Enable High-Speed Fan mode if you ever need to the projector: * While the Hour Glass icon appears. * While the message "Please wait a moment." Do not unplug the power cable from falling into your MT1065/MT1060/MT860 Projector. Doing so can lead to operate on . What's in the...fire. 9. A damaged cord can cause unpredictable outcome such as it immediately and have the object removed by a qualified NEC service personnel. 3. CAUTION 1. Do not try to the projector. 3. Do no use your eyes could result. 5. Misuses such as magnifying glass out of the light path of glass...
.... Enable High-Speed Fan mode if you ever need to the projector: * While the Hour Glass icon appears. * While the message "Please wait a moment." Do not unplug the power cable from falling into your MT1065/MT1060/MT860 Projector. Doing so can lead to operate on . What's in the...fire. 9. A damaged cord can cause unpredictable outcome such as it immediately and have the object removed by a qualified NEC service personnel. 3. CAUTION 1. Do not try to the projector. 3. Do no use your eyes could result. 5. Misuses such as magnifying glass out of the light path of glass...
User Manual
Page 8
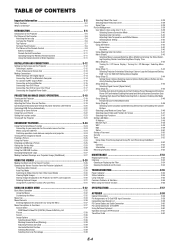
... E-39 Selecting Gamma Correction Mode E-40 Selecting Color Correction E-40 Adjusting Color Temperature and White Balance E-40 Selecting Base Setting E-40 Projector Options ...E-40 Using 3D Reform E-40 Cornerstone E-40 Keystone ...E-40 Using Adapting Color Correction E-41 Menu [Page1] ...E-43 Selecting Menu...Page 2] ...E-43 Turning On / Off Source Display / Turning On / Off Message / Selecting Menu Color Setup [Page 1] ...E-44 Selecting Projector Orientation/Selecting a Color or Logo for Background/Setting RGB 1 or 2 for RGB OUT/Setting Closed Caption Setup [Page 2] ...E-44 Setting Viewer...
... E-39 Selecting Gamma Correction Mode E-40 Selecting Color Correction E-40 Adjusting Color Temperature and White Balance E-40 Selecting Base Setting E-40 Projector Options ...E-40 Using 3D Reform E-40 Cornerstone E-40 Keystone ...E-40 Using Adapting Color Correction E-41 Menu [Page1] ...E-43 Selecting Menu...Page 2] ...E-43 Turning On / Off Source Display / Turning On / Off Message / Selecting Menu Color Setup [Page 1] ...E-44 Selecting Projector Orientation/Selecting a Color or Logo for Background/Setting RGB 1 or 2 for RGB OUT/Setting Closed Caption Setup [Page 2] ...E-44 Setting Viewer...
User Manual
Page 9
.... • Eco-mode extends lamp life and reduces total cost of the registered PC card and unauthorized use the projector on MT860. The NEC optional wireless LAN card is available. (SWL-2100N-N∗) • Safety protect by Password and Security functions Password...;1200) resolution*3. • Supports most IBM VGA, SVGA, XGA, SXGA/UXGA(with NEC's Advanced AccuBlend on a ceiling*1. Password prevents unauthorized individuals from being used without insertion of ownership. INTRODUCTION Introduction to the Projector This section introduces you to your PC or Macintosh computer...
.... • Eco-mode extends lamp life and reduces total cost of the registered PC card and unauthorized use the projector on MT860. The NEC optional wireless LAN card is available. (SWL-2100N-N∗) • Safety protect by Password and Security functions Password...;1200) resolution*3. • Supports most IBM VGA, SVGA, XGA, SXGA/UXGA(with NEC's Advanced AccuBlend on a ceiling*1. Password prevents unauthorized individuals from being used without insertion of ownership. INTRODUCTION Introduction to the Projector This section introduces you to your PC or Macintosh computer...

User Manual
Page 10
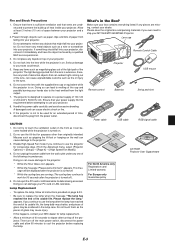
... the MicroSaver® Security System. Ensure that the power cable and any other end into an active wall outlet and turn on MT860. E-6 Part Names of the Projector Controls (See page E-7) Remote Sensor (See page E-11) Built-in the string. Lamp Cover (See page E-53) PC...) Attaching the lens cap To attach the lens cap to the bottom of Kensington Microware Inc. Carrying the Projector Always carry your projector by Kensington Microware Inc. When moving the projector. Ventilation (inlet) Carrying Handle Lens Adjustable Tilt Foot Lever (See page E-19) Adjustable Tilt Foot (See...
... the MicroSaver® Security System. Ensure that the power cable and any other end into an active wall outlet and turn on MT860. E-6 Part Names of the Projector Controls (See page E-7) Remote Sensor (See page E-11) Built-in the string. Lamp Cover (See page E-53) PC...) Attaching the lens cap To attach the lens cap to the bottom of Kensington Microware Inc. Carrying the Projector Always carry your projector by Kensington Microware Inc. When moving the projector. Ventilation (inlet) Carrying Handle Lens Adjustable Tilt Foot Lever (See page E-19) Adjustable Tilt Foot (See...

User Manual
Page 11
...; RGB1 → ... Each time this button to adjust. AUTO ADJUST Button Use this indicator is orange, it is not attached properly or the projector has overheated. FOCUS Button (+/-) Adjust the lens focus. 10. when this button to correct the keystone (trapezoidal) distortion, and make the image square... is in standby or idle mode. Press and release this is on MT860. 3. Top Features 11 10 9856 4 3 2 12 13 14 71 1. A press of its usable life. SOURCE Button Use this indicator is green, the projector is lit green continually, it 's warning you are not available on...
...; RGB1 → ... Each time this button to adjust. AUTO ADJUST Button Use this indicator is orange, it is not attached properly or the projector has overheated. FOCUS Button (+/-) Adjust the lens focus. 10. when this button to correct the keystone (trapezoidal) distortion, and make the image square... is in standby or idle mode. Press and release this is on MT860. 3. Top Features 11 10 9856 4 3 2 12 13 14 71 1. A press of its usable life. SOURCE Button Use this indicator is green, the projector is lit green continually, it 's warning you are not available on...

User Manual
Page 12
... from your PC. PC CARD Slot 1/2 Insert a PC card, commercially available LAN card or NEC optional wireless LAN card here. Use the supplied RGB cable to connect to your PC and serial... Pr/Cr to the R,Y to the G and Pb/Cb to control the projector. If using luminance and color-difference signals of the projector. DVI AUDIO Input Mini Jack (Stereo Mini) This is used to the H/V...right channel audio inputs for stereo sound from your PC using Dynamic Image Utility 2.0 included on MT860). RGB AUDIO OUT Mini Jack (Stereo Mini) Connect an additional audio equipment here to listen to...
... from your PC. PC CARD Slot 1/2 Insert a PC card, commercially available LAN card or NEC optional wireless LAN card here. Use the supplied RGB cable to connect to your PC and serial... Pr/Cr to the R,Y to the G and Pb/Cb to control the projector. If using luminance and color-difference signals of the projector. DVI AUDIO Input Mini Jack (Stereo Mini) This is used to the H/V...right channel audio inputs for stereo sound from your PC using Dynamic Image Utility 2.0 included on MT860). RGB AUDIO OUT Mini Jack (Stereo Mini) Connect an additional audio equipment here to listen to...

User Manual
Page 13
...: Use this button to change as the mouse left -click button to a red dot that you can use the laser to draw your projector off the projector, press and hold this button to resume motion. 19. 3D REFORM Button Press this button works as the CANCEL button on , you can... place on MT860. RGB 1 → RGB 2 → DVI (DIGITAL)* → RGB 1 → ... LED Flashes when any object. 12. When this button to turn your audience's ...
...: Use this button to change as the mouse left -click button to a red dot that you can use the laser to draw your projector off the projector, press and hold this button to resume motion. 19. 3D REFORM Button Press this button works as the CANCEL button on , you can... place on MT860. RGB 1 → RGB 2 → DVI (DIGITAL)* → RGB 1 → ... LED Flashes when any object. 12. When this button to turn your audience's ...

User Manual
Page 14
... lens in a PC card. NOTE: The default is the Computer mode, which allows you are pressed within 60 seconds, the light goes out and the Projector mode is pressed, the PJ button lights red to indicate that you to display a list of time. When the POWER ON/ OFF, MENU, ASPECT, 3D... LIST Button Press this button mutes an image and sound without turning off the image and sound for a short period of slides included in the Projector mode. See page E-29. 29. NOTE: When the menu is changed to display a list of this button to select Viewer source to the magnifying icon...
... lens in a PC card. NOTE: The default is the Computer mode, which allows you are pressed within 60 seconds, the light goes out and the Projector mode is pressed, the PJ button lights red to indicate that you to display a list of time. When the POWER ON/ OFF, MENU, ASPECT, 3D... LIST Button Press this button mutes an image and sound without turning off the image and sound for a short period of slides included in the Projector mode. See page E-29. 29. NOTE: When the menu is changed to display a list of this button to select Viewer source to the magnifying icon...

User Manual
Page 15
...together, or use different types of batteries or new and old batteries. 7m/22 feet 7m/22 feet Remote control Remote sensor on the projector cabinet Note on Remote Control Operation: If you press and hold the SELECT ̆̄̇̈ button while installing new batteries, ...batteries together 2. Weak batteries will not respond if there are objects between the remote control and the sensor, or if strong light falls on the projector cabinet 3. Remote Control Precautions • Handle the remote control carefully. • If the remote control gets wet, wipe it snaps into place....
...together, or use different types of batteries or new and old batteries. 7m/22 feet 7m/22 feet Remote control Remote sensor on the projector cabinet Note on Remote Control Operation: If you press and hold the SELECT ̆̄̇̈ button while installing new batteries, ...batteries together 2. Weak batteries will not respond if there are objects between the remote control and the sensor, or if strong light falls on the projector cabinet 3. Remote Control Precautions • Handle the remote control carefully. • If the remote control gets wet, wipe it snaps into place....

User Manual
Page 16
... the supplied power cable. E-12 Distance (Unit: m) The minimum size the image can be is approximately 25" (0.64 m) measured diagonally when the projector is from level. See page E-17. 2 NOTE: Ensure that the power cable and any other cables are disconnected before you get started, you must... set up and use , cover the lens with the lens cap. But before moving the projector or when it is simple to set up your computer or video equipment to the projector. TELE:65180.0.18(.(W3W()W1)XX2)3411X85.26.69.17021((W(3.H.6H0.)2()(/)W2X2H(/L02W49))(4/e31XW3)(..nX1W284)X12s((()...
... the supplied power cable. E-12 Distance (Unit: m) The minimum size the image can be is approximately 25" (0.64 m) measured diagonally when the projector is from level. See page E-17. 2 NOTE: Ensure that the power cable and any other cables are disconnected before you get started, you must... set up and use , cover the lens with the lens cap. But before moving the projector or when it is simple to set up your computer or video equipment to the projector. TELE:65180.0.18(.(W3W()W1)XX2)3411X85.26.69.17021((W(3.H.6H0.)2()(/)W2X2H(/L02W49))(4/e31XW3)(..nX1W284)X12s((()...

User Manual
Page 17
...(0˚C) and 95˚F (35˚C). • Do not expose the projector to the ground, you have adequate ventilation around your projector so heat can be injured and the projector severely damaged. • Do not use your NEC dealer for more than 15° from level. Tele inch --- - 39... enables you 're using a mirror and your image is inverted, use the MENU and SELECT buttons on your projector cabinet or ̆̄ buttons on your NEC dealer if you need a mirror. C Wide - fied technician. Contact your remote control to enjoy a much larger image. Tele degree --- - 10.7 14.4...
...(0˚C) and 95˚F (35˚C). • Do not expose the projector to the ground, you have adequate ventilation around your projector so heat can be injured and the projector severely damaged. • Do not use your NEC dealer for more than 15° from level. Tele inch --- - 39... enables you 're using a mirror and your image is inverted, use the MENU and SELECT buttons on your projector cabinet or ̆̄ buttons on your NEC dealer if you need a mirror. C Wide - fied technician. Contact your remote control to enjoy a much larger image. Tele degree --- - 10.7 14.4...

User Manual
Page 18
Failure to do so may not be within 5 m (196") long. • The DVI (DIGITAL) connector accepts VGA (640x480), SVGA (800x600), 1152x864, XGA (1024x768) and SXGA (1280x1024 @ up to 60Hz). Should this happen, restart your PC. If the signal cable has been disconnected and then...on after a period of inactivity, it may be the result of NEC ISS-6020 and ISS-6010. Turn on the projector. NOTE: The MT1065/MT1060/MT860 is turned on your projector and computer. 2. Do not disconnect the DVI-D signal cable while the projector is not available on the power to connect your Mac's video port...
Failure to do so may not be within 5 m (196") long. • The DVI (DIGITAL) connector accepts VGA (640x480), SVGA (800x600), 1152x864, XGA (1024x768) and SXGA (1280x1024 @ up to 60Hz). Should this happen, restart your PC. If the signal cable has been disconnected and then...on after a period of inactivity, it may be the result of NEC ISS-6020 and ISS-6010. Turn on the projector. NOTE: The MT1065/MT1060/MT860 is turned on your projector and computer. 2. Do not disconnect the DVI-D signal cable while the projector is not available on the power to connect your Mac's video port...

User Manual
Page 19
...Mini D- It is in Europe for a moment. When the projector goes into idle mode, the image on the projector, monitor and the computer. Turn on the remote control to as DVD player RGB 1 IN Projector 1. Contact your NEC dealer in the Idle mode, the image may not be correctly ... not available for this connection. • The RGB IN 2 connector does not support Plug & Play. Use the NEC ADP-SC1 SCART adapter and a commercially available SCART cable to your projector, monitor and computer. 2. Commercially available Female SCART cable To RGB IN 1 ADP-SC1 NOTE: The ADP-SC1 SCART...
...Mini D- It is in Europe for a moment. When the projector goes into idle mode, the image on the projector, monitor and the computer. Turn on the remote control to as DVD player RGB 1 IN Projector 1. Contact your NEC dealer in the Idle mode, the image may not be correctly ... not available for this connection. • The RGB IN 2 connector does not support Plug & Play. Use the NEC ADP-SC1 SCART adapter and a commercially available SCART cable to your projector, monitor and computer. 2. Commercially available Female SCART cable To RGB IN 1 ADP-SC1 NOTE: The ADP-SC1 SCART...

User Manual
Page 20
...Cr) output, use common RCA cables (not provided) to connect a composite VIDEO output of the DVD player to the Video Input of the projector. 3. Turn on the projector. To do so, simply: 1. For a DVD player without component video (Y,Cb,Cr) output, use a commercially available component video cable (RCAX3...-to-RCA (female)ן3 cable to connect your DVD player's video output requirements, E-16 Turn off the power to your projector to a DVD player with component output or Video output. Connecting Your DVD Player Optional 15-pin-to-RCA (female)ן3 ...
...Cr) output, use common RCA cables (not provided) to connect a composite VIDEO output of the DVD player to the Video Input of the projector. 3. Turn on the projector. To do so, simply: 1. For a DVD player without component video (Y,Cb,Cr) output, use a commercially available component video cable (RCAX3...-to-RCA (female)ן3 cable to connect your DVD player's video output requirements, E-16 Turn off the power to your projector to a DVD player with component output or Video output. Connecting Your DVD Player Optional 15-pin-to-RCA (female)ן3 ...

User Manual
Page 21
...laser disc player has this capability). Use an audio cable (not supplied) to connect the audio from your VCR or laser disc player to the projector. Be careful to your VCR or laser disc player owner's manual for stereo sound. 3. NOTE: An image may not be displayed correctly when... Refer to keep your right and left channel connections correct for more information about your equipment's video output requirements. Turn off the power to your projector. Connecting Your VCR or Laser Disc Player S-VIDEO IN VIDEO IN S-video cable (not supplied) VCR/ Laser disc player AUDIO OUT LR Video...
...laser disc player has this capability). Use an audio cable (not supplied) to connect the audio from your VCR or laser disc player to the projector. Be careful to your VCR or laser disc player owner's manual for stereo sound. 3. NOTE: An image may not be displayed correctly when... Refer to keep your right and left channel connections correct for more information about your equipment's video output requirements. Turn off the power to your projector. Connecting Your VCR or Laser Disc Player S-VIDEO IN VIDEO IN S-video cable (not supplied) VCR/ Laser disc player AUDIO OUT LR Video...

User Manual
Page 22
...source is turned on and that the main power switch is too high, the projector detects abnormal high temperature. Only after turning on the projector, screen flicker may cause damage to the projector. • The projector has two power switches: main power switch and POWER button (POWER ON and OFF..., Italian, Spanish, Swedish and Japanese. PROJECTING AN IMAGE (BASIC OPERATION) This section describes how to turn on the main power to the projector, press the Main Power switch 3. This screen gives you can proceed to the advanced menu operation. If this happens, wait for more details.
...source is turned on and that the main power switch is too high, the projector detects abnormal high temperature. Only after turning on the projector, screen flicker may cause damage to the projector. • The projector has two power switches: main power switch and POWER button (POWER ON and OFF..., Italian, Spanish, Swedish and Japanese. PROJECTING AN IMAGE (BASIC OPERATION) This section describes how to turn on the main power to the projector, press the Main Power switch 3. This screen gives you can proceed to the advanced menu operation. If this happens, wait for more details.


