

User Manual
Page 1
LCD Projector MT1065/MT1060/MT860 User's Manual
LCD Projector MT1065/MT1060/MT860 User's Manual
User Manual
Page 6
...contact your supplier. GSGV: The sound pressure level is on a flat, level surface in accordance with this manual. Installation 1. Place the projector on and do not tilt the front of the Canadian Interference-Causing Equipment Regulations. Serious injury could void ... objects on the ceiling: a. Important Information Safety Cautions Precautions Please read this manual carefully before using your NEC MT1065/ MT1060/MT860 Projector and keep the manual handy for use your projector carefully. This symbol alerts the user that uninsulated voltage within the unit may cause...
...contact your supplier. GSGV: The sound pressure level is on a flat, level surface in accordance with this manual. Installation 1. Place the projector on and do not tilt the front of the Canadian Interference-Causing Equipment Regulations. Serious injury could void ... objects on the ceiling: a. Important Information Safety Cautions Precautions Please read this manual carefully before using your NEC MT1065/ MT1060/MT860 Projector and keep the manual handy for use your projector carefully. This symbol alerts the user that uninsulated voltage within the unit may cause...
User Manual
Page 9
...resolution*3. • Supports most IBM VGA, SVGA, XGA, SXGA/UXGA(with any office, boardroom or auditorium. • Eight pointers are displayed with NEC's Advanced AccuBlend on . In addition, the ceiling must be strong enough to support the projector and the installation must be discouraged. &#...quick adaptive color correction on Your Purchase of The MT1065/ MT1060/MT860 Projector The MT1065/MT1060/MT860 is one of the manual you can even use the projector to project images from behind a screen, and the projector can be installed on PAL TVs. PAL-N: TV standard used ...
...resolution*3. • Supports most IBM VGA, SVGA, XGA, SXGA/UXGA(with any office, boardroom or auditorium. • Eight pointers are displayed with NEC's Advanced AccuBlend on . In addition, the ceiling must be strong enough to support the projector and the installation must be discouraged. &#...quick adaptive color correction on Your Purchase of The MT1065/ MT1060/MT860 Projector The MT1065/MT1060/MT860 is one of the manual you can even use the projector to project images from behind a screen, and the projector can be installed on PAL TVs. PAL-N: TV standard used ...

User Manual
Page 20
Turn on the projector. Turn off the power to the Video Input of the DVD player to your DVD player's video output requirements, E-16 For a ...;3 cable to connect your DVD player to your DVD player's owner's manual for more information about your projector and DVD player. 2. NOTE: Refer to the RGB IN1 or IN2 connector on the projector and DVD player. If your projector to a DVD player with component output or Video output. To do so... player has the component video (Y,Cb,Cr) output, use common RCA cables (not provided) to connect a composite VIDEO output of the projector. 3.
Turn on the projector. Turn off the power to the Video Input of the DVD player to your DVD player's video output requirements, E-16 For a ...;3 cable to connect your DVD player to your DVD player's owner's manual for more information about your projector and DVD player. 2. NOTE: Refer to the RGB IN1 or IN2 connector on the projector and DVD player. If your projector to a DVD player with component output or Video output. To do so... player has the component video (Y,Cb,Cr) output, use common RCA cables (not provided) to connect a composite VIDEO output of the projector. 3.

User Manual
Page 21
... power cable's three-pin plug to the AC IN of the projector, and then connect the other end to the Video input on the projector and the VCR or laser disc player. NOTE: Refer to your VCR or laser disc player owner's manual for stereo sound. 3. DVI IN G/Y AUDIO AUDIO B/Cb RGB2 IN... disc player or document camera to your equipment's video output requirements. Turn on your VCR or laser disc player, connect the other plug of your projector. Connect one end of your RCA cable to the video output connector on the back of the supplied power cable in fast-forward or fast...
... power cable's three-pin plug to the AC IN of the projector, and then connect the other end to the Video input on the projector and the VCR or laser disc player. NOTE: Refer to your VCR or laser disc player owner's manual for stereo sound. 3. DVI IN G/Y AUDIO AUDIO B/Cb RGB2 IN... disc player or document camera to your equipment's video output requirements. Turn on your VCR or laser disc player, connect the other plug of your projector. Connect one end of your RCA cable to the video output connector on the back of the supplied power cable in fast-forward or fast...

User Manual
Page 26
... If the Auto Adjust operation cannot optimize the RGB signal, try to adjust Clock and Phase manually. This function also adjusts the clock phase to reduce video noise, dot interference or cross talk.... the following are met • Image is projected in Wide (Zoom) • Resolution is on the projector can be set as follows: Horizontal Max ±35° approx. Second repeat the 3D Reform adjustment.... Wall Color Correction features are not available on MT860.) E-22 CAUTION: • Do not look into the laser pointer while it is XGA (SVGA on the remote control for 3D Reform are not...
... If the Auto Adjust operation cannot optimize the RGB signal, try to adjust Clock and Phase manually. This function also adjusts the clock phase to reduce video noise, dot interference or cross talk.... the following are met • Image is projected in Wide (Zoom) • Resolution is on the projector can be set as follows: Horizontal Max ±35° approx. Second repeat the 3D Reform adjustment.... Wall Color Correction features are not available on MT860.) E-22 CAUTION: • Do not look into the laser pointer while it is XGA (SVGA on the remote control for 3D Reform are not...

User Manual
Page 32
... installation, see the Slide show function on the on the computer and to capture and play images on the projector. For creating presentation materials, see the printed NEC Software Utility Installation Guide. The Viewer feature allows you need to create presentation materials on your PC using the Dynamic Image Utility... PC card's operating instructions for the proper direction of the PC card and pull it into the PC card slot in this manual) on the supplied NEC Projector User Supportware CD-ROM. PC Card Type The PC Card slot accepts PCMCIA Type II only. Even if no computer is fully...
... installation, see the Slide show function on the on the computer and to capture and play images on the projector. For creating presentation materials, see the printed NEC Software Utility Installation Guide. The Viewer feature allows you need to create presentation materials on your PC using the Dynamic Image Utility... PC card's operating instructions for the proper direction of the PC card and pull it into the PC card slot in this manual) on the supplied NEC Projector User Supportware CD-ROM. PC Card Type The PC Card slot accepts PCMCIA Type II only. Even if no computer is fully...

User Manual
Page 33
...folder. Operating the Viewer Function from the Source Select menu. 3. Play Plays back automatically or manually depending on the setting on to the next slide when "Manual Play" is checked the projector automatically starts to play slides at the first slide of folders while you are playing back. ...is stopped when SLIDE +/- Playback is pressed in the PC card and if "Auto Play" is selected. Select the "Viewer" from the Projector (playback) This section describes the operation for USB mouse operation only. A tool bar will appear when you play slides back. Or this ...
...folder. Operating the Viewer Function from the Source Select menu. 3. Play Plays back automatically or manually depending on the setting on to the next slide when "Manual Play" is checked the projector automatically starts to play slides at the first slide of folders while you are playing back. ...is stopped when SLIDE +/- Playback is pressed in the PC card and if "Auto Play" is selected. Select the "Viewer" from the Projector (playback) This section describes the operation for USB mouse operation only. A tool bar will appear when you play slides back. Or this ...
User Manual
Page 38
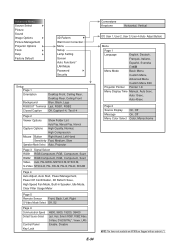
... Select Picture Sound Image Options Picture Management Projector Options Tools Help Factory Default 3D Reform ...Options Show Folder List Auto Play, Manual Play, Interval Capture Options High Quality, Normal, High Compression Mouse Button Right Hand, Left Hand Sensitivity Fast, Medium, Slow Operation Mode Select Auto, Projector Page 3 Signal Select RGB1 RGB...Español, Svenska Menu Mode Basic Menu, Custom Menu, Advanced Menu Custom Menu Edit Projector Pointer Pointer 1-8 Menu Display Time Manual, Auto 5sec, Auto 15sec, Auto 45sec Page 2 Source Display Message Menu Color Select On...
... Select Picture Sound Image Options Picture Management Projector Options Tools Help Factory Default 3D Reform ...Options Show Folder List Auto Play, Manual Play, Interval Capture Options High Quality, Normal, High Compression Mouse Button Right Hand, Left Hand Sensitivity Fast, Medium, Slow Operation Mode Select Auto, Projector Page 3 Signal Select RGB1 RGB...Español, Svenska Menu Mode Basic Menu, Custom Menu, Advanced Menu Custom Menu Edit Projector Pointer Pointer 1-8 Menu Display Time Manual, Auto 5sec, Auto 15sec, Auto 45sec Page 2 Source Display Message Menu Color Select On...
User Manual
Page 39
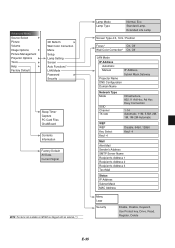
... NOTE: The items not available on MT860 are flagged with an asterisk (*). Lamp Mode Lamp Type Normal, Eco Standard Lamp, Extended Life Lamp Screen Type 4:3, 16:9 / Position Focus* On, Off Wall Color Correction* On, Off LAN Mode IP Address Automatic Manual IP Address, Subnet Mask,Gateway Projector Name DNS Configuration Domain Name Network...
... NOTE: The items not available on MT860 are flagged with an asterisk (*). Lamp Mode Lamp Type Normal, Eco Standard Lamp, Extended Life Lamp Screen Type 4:3, 16:9 / Position Focus* On, Off Wall Color Correction* On, Off LAN Mode IP Address Automatic Manual IP Address, Subnet Mask,Gateway Projector Name DNS Configuration Domain Name Network...

User Manual
Page 41
... when you are playing back. Select Displays a list of time when a video is retained. Setup Displays the Viewer Options dialog box on MT860) Selects the computer connected to make presentations using the software keyboard, see page E-60. View Hides the tool bar while you are playing back...Menu Alphabet or numeric characters are playing back. Press the SELECT ̆̄ button on the projector cabinet or on Viewer Options of the entry signals. Play Plays back automatically or manually depending on the setting on your Video input-VCR, laser disc player, DVD player or document...
... when you are playing back. Select Displays a list of time when a video is retained. Setup Displays the Viewer Options dialog box on MT860) Selects the computer connected to make presentations using the software keyboard, see page E-60. View Hides the tool bar while you are playing back...Menu Alphabet or numeric characters are playing back. Press the SELECT ̆̄ button on the projector cabinet or on Viewer Options of the entry signals. Play Plays back automatically or manually depending on the setting on your Video input-VCR, laser disc player, DVD player or document...

User Manual
Page 43
...Adjust (when using the SELECT ̇ and ̈ buttons. Adjust the Top, Bottom, Left or Right blanking with higher resolution than the projector's native resolution, "Resolution" is not available. Adjusting Position and Clock This allows you to adjust neutral tint for yellow, cyan or magenta. ...adjustment is made automatically when the Auto Adjust is turned on or off the Auto Adjust feature. Picture Management This option allows you to manually adjust the image horizontally and vertically, and adjust Clock and Phase. There are invalid. E-39 See "Auto Adjust" on page E-45 ...
...Adjust (when using the SELECT ̇ and ̈ buttons. Adjust the Top, Bottom, Left or Right blanking with higher resolution than the projector's native resolution, "Resolution" is not available. Adjusting Position and Clock This allows you to adjust neutral tint for yellow, cyan or magenta. ...adjustment is made automatically when the Auto Adjust is turned on or off the Auto Adjust feature. Picture Management This option allows you to manually adjust the image horizontally and vertically, and adjust Clock and Phase. There are invalid. E-39 See "Auto Adjust" on page E-45 ...
User Manual
Page 45
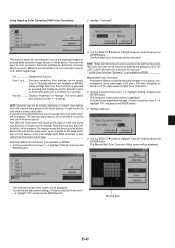
... 4. User 4 ("AutoAdjustButton" not available on the projector, or the image sensor may not work because of the projected images on textured walls using the image sensor on ambient room lighting, walls with a texture that is not available on MT860) 1. This is executed by pressing and holding the ...AUTO ADJUST button or AUTO ADJ. Automatic Wall Color Correction (not available on MT860. Highlight "Manual". 3. The correction mode select screen will be the problem and try to highlight "Execute" and then press the ENTER button. This ...
... 4. User 4 ("AutoAdjustButton" not available on the projector, or the image sensor may not work because of the projected images on textured walls using the image sensor on ambient room lighting, walls with a texture that is not available on MT860) 1. This is executed by pressing and holding the ...AUTO ADJUST button or AUTO ADJ. Automatic Wall Color Correction (not available on MT860. Highlight "Manual". 3. The correction mode select screen will be the problem and try to highlight "Execute" and then press the ENTER button. This ...

User Manual
Page 46
... Color of the projected image on the white paper for Wall Color Correction over the working area and then press the ENTER button. The Manual Wall Color Correction (Green) screen will be highlighted. 8. Place the white paper for Wall Color Correction 7. Paste the white paper for ... NOTE: The size of the white paper for Wall Color Correction loosely or get someone to select a color density. Position of the above Manual Wall Color Correction screen changes depending on the wall. Highlight "OK" and press the ENTER button. Adjust Red, Green, Blue and White respectively...
... Color of the projected image on the white paper for Wall Color Correction over the working area and then press the ENTER button. The Manual Wall Color Correction (Green) screen will be highlighted. 8. Place the white paper for Wall Color Correction 7. Paste the white paper for ... NOTE: The size of the white paper for Wall Color Correction loosely or get someone to select a color density. Position of the above Manual Wall Color Correction screen changes depending on the wall. Highlight "OK" and press the ENTER button. Adjust Red, Green, Blue and White respectively...

User Manual
Page 47
...two color modes for the on -screen instructions. See page E-25 for lamp life warning, 3-minute before power off in 45 sec- Manual The menu can choose one of seven languages for all the available menus and commands. Selecting Menu Color [Menu Color Select]: You can ...if no buttons are pressed within 45 seconds. onds if no buttons are "Manual", "Auto 5 sec", "Auto 15 sec", and "Auto 45 sec". Selecting Projecting Pointer Icon [Projector Pointer]: This enables you to select how long the projector waits after the last touch of menus and commands. Auto 5 sec ...... Auto...
...two color modes for the on -screen instructions. See page E-25 for lamp life warning, 3-minute before power off in 45 sec- Manual The menu can choose one of seven languages for all the available menus and commands. Selecting Menu Color [Menu Color Select]: You can ...if no buttons are pressed within 45 seconds. onds if no buttons are "Manual", "Auto 5 sec", "Auto 15 sec", and "Auto 45 sec". Selecting Projecting Pointer Icon [Projector Pointer]: This enables you to select how long the projector waits after the last touch of menus and commands. Auto 5 sec ...... Auto...

User Manual
Page 48
... is "Blue".You can perform menu operation of the projector. The mouse settings feature is selected. Setup Enables you to change the logo screen using the PC Card Files feature. Manual Play: Views a slide manually when the Viewer source is available for the Capture function... that allows text to be output to the RGBOUT connector. Normal Gives normal JPEG quality. Projector ........ High Quality Gives quality of Page1, Page2, Page3...
... is "Blue".You can perform menu operation of the projector. The mouse settings feature is selected. Setup Enables you to change the logo screen using the PC Card Files feature. Manual Play: Views a slide manually when the Viewer source is available for the Capture function... that allows text to be output to the RGBOUT connector. Normal Gives normal JPEG quality. Projector ........ High Quality Gives quality of Page1, Page2, Page3...

User Manual
Page 49
... factory. The image can adjust the image display functions ("Horizontal Position", "Vertical Position", "Clock", "Phase" and "Resolution") manually. "Horizontal Position", "Vertical Position", "Clock", "Phase", and "Resolution". Enabling Power Off Confirmation [Power Off Confirmation]: This option.... Standby is displayed, you turn itself off the projector. On Automatically adjusts image "Horizontal Position", "Vertical Position", "Clock", "Phase" and "Resolution". Saving your projector using NEC's Advanced AccuBlend Intelligent Pixel Blending Technology. Resetting the ...
... factory. The image can adjust the image display functions ("Horizontal Position", "Vertical Position", "Clock", "Phase" and "Resolution") manually. "Horizontal Position", "Vertical Position", "Clock", "Phase", and "Resolution". Enabling Power Off Confirmation [Power Off Confirmation]: This option.... Standby is displayed, you turn itself off the projector. On Automatically adjusts image "Horizontal Position", "Vertical Position", "Clock", "Phase" and "Resolution". Saving your projector using NEC's Advanced AccuBlend Intelligent Pixel Blending Technology. Resetting the ...

User Manual
Page 52
...Connection .......... SSID (Network name): Enter an identifier (SSID) for more information. E-48 NEC's optional wireless LAN card is required for wireless only) CAUTION: Make sure that the LAN... method that holds the IP address set here. Network Type (required for LAN connection; Manual Provides a space for your wireless LAN. Press to display the software keyboard and type in...identified by your DHCP server. Domain Name Type in 12 numeric characters. Projector Name Specify a unique projector name. The channel must be one or more information on your PC card...
...Connection .......... SSID (Network name): Enter an identifier (SSID) for more information. E-48 NEC's optional wireless LAN card is required for wireless only) CAUTION: Make sure that the LAN... method that holds the IP address set here. Network Type (required for LAN connection; Manual Provides a space for your wireless LAN. Press to display the software keyboard and type in...identified by your DHCP server. Domain Name Type in 12 numeric characters. Projector Name Specify a unique projector name. The channel must be one or more information on your PC card...
User Manual
Page 60
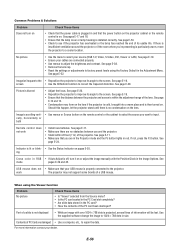
... Indicator is no obstacles between the projector and screen is off, turn on Check These Items • Check that the power cable is plugged in and that your dealer. Common Problems & Solutions Problem Does not turn it on or adjust the image manually with over 1024ן...work • Install new batteries. No picture • Use the menu to the screen. See page E-20. See page E-20. • Reposition the projector to improve its usable life. See pages E-17 and 18. • Ensure that you want to factory preset levels using the Viewer function Problem No...
... Indicator is no obstacles between the projector and screen is off, turn on Check These Items • Check that the power cable is plugged in and that your dealer. Common Problems & Solutions Problem Does not turn it on or adjust the image manually with over 1024ן...work • Install new batteries. No picture • Use the menu to the screen. See page E-20. See page E-20. • Reposition the projector to improve its usable life. See pages E-17 and 18. • Ensure that you want to factory preset levels using the Viewer function Problem No...


