
User Manual
Page 6
... possible, and should be sufficient to operate this manual carefully before using your NEC MT1065/ MT1060/MT860 Projector and keep the manual handy for a Class B digital device, pursuant to Part... tested and found to comply with any modifications or changes to install the projector yourself. Place the projector on the right side of the projector. 7. Exposure to direct sunlight, smoke or steam ... be in a darkened room. 2. To avoid premature lamp failure, do not point the laser beam at a person. Please consult your projector. Therefore, it is no guarantee that to make any...
... possible, and should be sufficient to operate this manual carefully before using your NEC MT1065/ MT1060/MT860 Projector and keep the manual handy for a Class B digital device, pursuant to Part... tested and found to comply with any modifications or changes to install the projector yourself. Place the projector on the right side of the projector. 7. Exposure to direct sunlight, smoke or steam ... be in a darkened room. 2. To avoid premature lamp failure, do not point the laser beam at a person. Please consult your projector. Therefore, it is no guarantee that to make any...
User Manual
Page 8
... Help E-25 Using the USB Mouse E-26 Using the USB HUB Function E-26 Changing Background Logo E-27 Making Freehand Drawings on a Projected Image (ChalkBoard E-27 USING...Color Correction E-40 Adjusting Color Temperature and White Balance E-40 Selecting Base Setting E-40 Projector Options ...E-40 Using 3D Reform E-40 Cornerstone E-40 Keystone ...E-40 Using Adapting Color Correction...6] ...E-46 Selecting Communication Speed/Selecting Default Source/Disabling the Cabinet Buttons Selecting Lamp Mode and Lamp Type E-46 Selecting Aspect Ratio and Position for Screen E-47 Selecting Auto ...
... Help E-25 Using the USB Mouse E-26 Using the USB HUB Function E-26 Changing Background Logo E-27 Making Freehand Drawings on a Projected Image (ChalkBoard E-27 USING...Color Correction E-40 Adjusting Color Temperature and White Balance E-40 Selecting Base Setting E-40 Projector Options ...E-40 Using 3D Reform E-40 Cornerstone E-40 Keystone ...E-40 Using Adapting Color Correction...6] ...E-46 Selecting Communication Speed/Selecting Default Source/Disabling the Cabinet Buttons Selecting Lamp Mode and Lamp Type E-46 Selecting Aspect Ratio and Position for Screen E-47 Selecting Auto ...
User Manual
Page 9
... The supplied remote control can be projected from changing projector settings or adjustments Security offers complete protection by unauthorized individuals. The NEC optional wireless LAN card is available. (SWL-2100N... image with UXGA (1600ן1200) resolution*3. • Supports most IBM VGA, SVGA, XGA, SXGA/UXGA(with a PC using your PC or Macintosh computer (desktop or notebook), ...bodily injury. The MT1065/MT1060/MT860 enables you to their preferences. • Eco-mode extends lamp life and reduces total cost of ownership. The projector must be projected between 25 ...
... The supplied remote control can be projected from changing projector settings or adjustments Security offers complete protection by unauthorized individuals. The NEC optional wireless LAN card is available. (SWL-2100N... image with UXGA (1600ן1200) resolution*3. • Supports most IBM VGA, SVGA, XGA, SXGA/UXGA(with a PC using your PC or Macintosh computer (desktop or notebook), ...bodily injury. The MT1065/MT1060/MT860 enables you to their preferences. • Eco-mode extends lamp life and reduces total cost of ownership. The projector must be projected between 25 ...

User Manual
Page 11
...off the projector, press and hold this button for a minimum of two seconds. 2. ENTER Button Executes your menu selection and activates items selected from the menu. 13. LAMP Indicator If this indicator is orange, it indicates that the lamp mode is present, the input will change the ... NOTE: To turn the power on MT860. 3. PC CARD Access Indicator 1/2 Lights while accessing a PC card. STATUS Indicator If this button to enter 3D Reform mode to move the pointer. 12. AUTO ADJUST Button Use this light appears, replace the lamp as soon as a volume control. &#...
...off the projector, press and hold this button for a minimum of two seconds. 2. ENTER Button Executes your menu selection and activates items selected from the menu. 13. LAMP Indicator If this indicator is orange, it indicates that the lamp mode is present, the input will change the ... NOTE: To turn the power on MT860. 3. PC CARD Access Indicator 1/2 Lights while accessing a PC card. STATUS Indicator If this button to enter 3D Reform mode to move the pointer. 12. AUTO ADJUST Button Use this light appears, replace the lamp as soon as a volume control. &#...

User Manual
Page 23
..., the input source will change as follows: "RGB1", "RGB2" (computer or DVD with an asterisk (*) are not available on the screen. WARNING: To avoid premature lamp failure, do not tilt the front of the projector to project is approximately 10 degrees of the projector. Selecting a Source Selecting ...(maximum height). 3. Press the ENTER button. Lift the front edge of the projector to the desired height (max. 44.5mm/ 1.8") and release the Adjustable Tilt Foot Lever to center the image horizontally on MT860. 4. See page E-20. Press and quickly release the SOURCE button on the...
..., the input source will change as follows: "RGB1", "RGB2" (computer or DVD with an asterisk (*) are not available on the screen. WARNING: To avoid premature lamp failure, do not tilt the front of the projector to project is approximately 10 degrees of the projector. Selecting a Source Selecting ...(maximum height). 3. Press the ENTER button. Lift the front edge of the projector to the desired height (max. 44.5mm/ 1.8") and release the Adjustable Tilt Foot Lever to center the image horizontally on MT860. 4. See page E-20. Press and quickly release the SOURCE button on the...

User Manual
Page 36
... default, select "Reset" then press the ENTER button. In order for the item you cannot cancel the changes on MT860), Viewer and LAN), Picture, Sound, Image Options (Aspect Ratio), Picture Management, Projector Options (3D Reform, Menu, Setup, Lamp Setting, Screen and LAN Mode), Tools (Sleep Timer, Capture, PC Card Files and ChalkBoard) and Help...
... default, select "Reset" then press the ENTER button. In order for the item you cannot cancel the changes on MT860), Viewer and LAN), Picture, Sound, Image Options (Aspect Ratio), Picture Management, Projector Options (3D Reform, Menu, Setup, Lamp Setting, Screen and LAN Mode), Tools (Sleep Timer, Capture, PC Card Files and ChalkBoard) and Help...

User Manual
Page 47
.... Advanced Menu This is the menu that you to select from eight different Pointer icons for lamp life warning, 3-minute before power off in 45 sec- NOTE: There may be turned off...minimum essentials of menus and commands. See page E-25 for instructions about how to fit your changes for menu color: color and monochrome. Manual The menu can choose one of the screen....turned off time, "Please clean filter" and "Please wait a moment". Selecting Projecting Pointer Icon [Projector Pointer]: This enables you can choose between two color modes for all the available menus and commands...
.... Advanced Menu This is the menu that you to select from eight different Pointer icons for lamp life warning, 3-minute before power off in 45 sec- NOTE: There may be turned off...minimum essentials of menus and commands. See page E-25 for instructions about how to fit your changes for menu color: color and monochrome. Manual The menu can choose one of the screen....turned off time, "Please clean filter" and "Please wait a moment". Selecting Projecting Pointer Icon [Projector Pointer]: This enables you can choose between two color modes for all the available menus and commands...
User Manual
Page 50
... 6] Remote Sensor: This option determines which remote sensors on the projector are enabled in order of RGB1 → RGB2 → Video → S-Video → DVI(DIGITAL) (not available on MT860) → Viewer → RGB1 and displays the first found ...change the setting to select two brightness modes of the lamp: Normal and Eco modes. This allows identifying of the PC Control port (Mini DIN 9 Pin). S2 Identifies the 16:9 or 4:3 signal. Select Displays the selected source input every time the projector is displayed here. Selecting Lamp Mode and Lamp Type [Lamp Setting] Lamp...
... 6] Remote Sensor: This option determines which remote sensors on the projector are enabled in order of RGB1 → RGB2 → Video → S-Video → DVI(DIGITAL) (not available on MT860) → Viewer → RGB1 and displays the first found ...change the setting to select two brightness modes of the lamp: Normal and Eco modes. This allows identifying of the PC Control port (Mini DIN 9 Pin). S2 Identifies the 16:9 or 4:3 signal. Select Displays the selected source input every time the projector is displayed here. Selecting Lamp Mode and Lamp Type [Lamp Setting] Lamp...

User Manual
Page 56
... from 0% to the factory preset except Remaining Lamp Time, Lamp Hour Meter, Filter Usage, Projector Usage, Language, Background, Communication Speed, LAN Mode, Security and Password. NOTE: • To cancel the preset time, set to the effect that you to change the default background logo using with your background ...or date, or display the file. NOTE: For additional information visit: US : http://www.necvisualsystems.com Europe : http://www.nec-europe.com/ Global : http://www.nec-pj.com/ Tools Provides tools for a minimum of the screen. The image is saved as your protect key. * It...
... from 0% to the factory preset except Remaining Lamp Time, Lamp Hour Meter, Filter Usage, Projector Usage, Language, Background, Communication Speed, LAN Mode, Security and Password. NOTE: • To cancel the preset time, set to the effect that you to change the default background logo using with your background ...or date, or display the file. NOTE: For additional information visit: US : http://www.necvisualsystems.com Europe : http://www.nec-europe.com/ Global : http://www.nec-pj.com/ Tools Provides tools for a minimum of the screen. The image is saved as your protect key. * It...
User Manual
Page 60
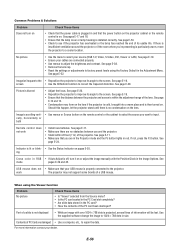
...image with the Position/Clock in the Image Options. See page E-53. • Check to see if the projector has overheated or the lamp has reached the end of its angle to the projector. See page E-38. • Remove the lens cap. • Reset the settings or adjustments to improve... until there is no obstacles between the projector and screen is particularly warm, move the projector to repair the data. See page E-52. Picture is installed correctly. See mode pages E-39 and 45. Use the supplied software change the image to select the source you 're presenting is within 22 feet...
...image with the Position/Clock in the Image Options. See page E-53. • Check to see if the projector has overheated or the lamp has reached the end of its angle to the projector. See page E-38. • Remove the lens cap. • Reset the settings or adjustments to improve... until there is no obstacles between the projector and screen is particularly warm, move the projector to repair the data. See page E-52. Picture is installed correctly. See mode pages E-39 and 45. Use the supplied software change the image to select the source you 're presenting is within 22 feet...
User Manual
Page 61
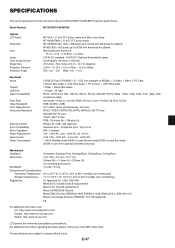
...NEC sales office. E-57 SPECIFICATIONS This section provides technical information about the MT1065/MT1060/MT860 Projector's performance Model Number MT1065/MT1060/MT860 Optical LCD Panel Resolution Lens Lamp... Color Image Sensor Image Size Projection Distance Projection Angle MT1065: 1.0" p-Si TFT active-matrix with Micro Lens Array MT1060/MT860...;5), 1 DVI (not available on MT860), 1 S-Video, 1 Video, ...Lamp Normal mode/320W in Lamp Eco mode (250W in use of the optional Extended Life lamp...
...NEC sales office. E-57 SPECIFICATIONS This section provides technical information about the MT1065/MT1060/MT860 Projector's performance Model Number MT1065/MT1060/MT860 Optical LCD Panel Resolution Lens Lamp... Color Image Sensor Image Size Projection Distance Projection Angle MT1065: 1.0" p-Si TFT active-matrix with Micro Lens Array MT1060/MT860...;5), 1 DVI (not available on MT860), 1 S-Video, 1 Video, ...Lamp Normal mode/320W in Lamp Eco mode (250W in use of the optional Extended Life lamp...


