
Owners Guide
Page 3
... 1-1 Battery Charger 1-2 Section 2 Battery Safety 1-2 Section 3 Important Safety Instructions 1-3 Section 4 Important Electrical Considerations 1-5 Range 1-5 Telephone Line Problems 1-5 Radio Interference 1-6 More than One Cordless Telephone 1-6 FCC RF Compliance 1-6 Chapter 2 About the Dterm Cordless II Section 1 Items Included with the Dterm Cordless II 2-1 Section 2 Section 3 Features of the Cordless Telephone 2-2 Dterm Cordless II Controls and Functions 2-3 Dterm ™ Cordless II Owner's Guide i
... 1-1 Battery Charger 1-2 Section 2 Battery Safety 1-2 Section 3 Important Safety Instructions 1-3 Section 4 Important Electrical Considerations 1-5 Range 1-5 Telephone Line Problems 1-5 Radio Interference 1-6 More than One Cordless Telephone 1-6 FCC RF Compliance 1-6 Chapter 2 About the Dterm Cordless II Section 1 Items Included with the Dterm Cordless II 2-1 Section 2 Section 3 Features of the Cordless Telephone 2-2 Dterm Cordless II Controls and Functions 2-3 Dterm ™ Cordless II Owner's Guide i

Owners Guide
Page 4
Chapter 3 Installing the Dterm Cordless II Section 1 Selecting a Location 3-1 Section 2 Installation Precautions 3-1 Section 3 Connecting the Telephone Cords 3-1 Section 4 Applying Power to the Charging Unit 3-3 Section 5 Wall Installation 3-4 Standard Wall Plate Mounting 3-4 ... Section 9 Low Battery Indicator 3-16 Standby Mode 3-16 Talk Mode 3-17 Section 10 Cleaning the Battery Charge Contacts 3-18 Section 11 Antenna 3-18 Chapter 4 Dterm Cordless II Handset Section 1 Handset Controls 4-1 ii Table of Contents Document Revision 3 NEC Unified Solutions, Inc.
Chapter 3 Installing the Dterm Cordless II Section 1 Selecting a Location 3-1 Section 2 Installation Precautions 3-1 Section 3 Connecting the Telephone Cords 3-1 Section 4 Applying Power to the Charging Unit 3-3 Section 5 Wall Installation 3-4 Standard Wall Plate Mounting 3-4 ... Section 9 Low Battery Indicator 3-16 Standby Mode 3-16 Talk Mode 3-17 Section 10 Cleaning the Battery Charge Contacts 3-18 Section 11 Antenna 3-18 Chapter 4 Dterm Cordless II Handset Section 1 Handset Controls 4-1 ii Table of Contents Document Revision 3 NEC Unified Solutions, Inc.
Owners Guide
Page 5
...4R-1 4-4 Programming Mode 4-4 Switching Between the Desktop Multiline Telephone and the Cordless Telephone Using the Base Unit 4-5 Switching from Desk to Cordless Using a Softkey 4-6 Section 3 Using the Handset 4-7 Acquiring Link 4-7 Volume Low 4-8 Dialing 4-8 No Service 4-8 Section 4 Section 5 Answering a Call 4-9 Making a Call Using the Dterm Cordless II... 4-10 Section 6 Dedicated Feature Operations 4-10 Placing a Call on Hold 4-11 Muting a Call 4-11 Transferring Calls 4-11 Setting up a Conference Call 4-12 Dterm ™ Cordless II Owner's Guide iii NEC ...
...4R-1 4-4 Programming Mode 4-4 Switching Between the Desktop Multiline Telephone and the Cordless Telephone Using the Base Unit 4-5 Switching from Desk to Cordless Using a Softkey 4-6 Section 3 Using the Handset 4-7 Acquiring Link 4-7 Volume Low 4-8 Dialing 4-8 No Service 4-8 Section 4 Section 5 Answering a Call 4-9 Making a Call Using the Dterm Cordless II... 4-10 Section 6 Dedicated Feature Operations 4-10 Placing a Call on Hold 4-11 Muting a Call 4-11 Transferring Calls 4-11 Setting up a Conference Call 4-12 Dterm ™ Cordless II Owner's Guide iii NEC ...

Owners Guide
Page 7
... 3-9 Figure 3-10 Figure 3-11 Figure 3-12 Figure 3-13 Figure 3-14 Items Included with the Dterm Cordless II 2-1 Handset Controls and Functions 2-3 Base Unit Controls and Functions 2-4 Connecting Telephone Cords to the Telephone Jack 3-2 Connecting the Dterm Cordless II to the Multiline Terminal 3-2 Applying Power to the Charging Unit 3-3 Polarized Plug 3-4 Attaching the Wall Mount... Screws for Wall Mounting 3-10 Wrapping the AC Adapter Cord Around the Strain Relief 3-11 Placing the Charging Unit on the Wall 3-11 Dterm ™ Cordless II Owner's Guide v
... 3-9 Figure 3-10 Figure 3-11 Figure 3-12 Figure 3-13 Figure 3-14 Items Included with the Dterm Cordless II 2-1 Handset Controls and Functions 2-3 Base Unit Controls and Functions 2-4 Connecting Telephone Cords to the Telephone Jack 3-2 Connecting the Dterm Cordless II to the Multiline Terminal 3-2 Applying Power to the Charging Unit 3-3 Polarized Plug 3-4 Attaching the Wall Mount... Screws for Wall Mounting 3-10 Wrapping the AC Adapter Cord Around the Strain Relief 3-11 Placing the Charging Unit on the Wall 3-11 Dterm ™ Cordless II Owner's Guide v

Owners Guide
Page 8
Document Revision 3 NEC Unified Solutions, Inc. Figure 3-15 Figure 3-16 Figure 3-17 Figure 3-18 Figure 3-19 Figure 3-20 Figure 3-21 Table 3-1 Figure 3-22 Figure 3-23 Figure 4-1 Table 4-1 Figure 4-2 ... 3-15 Charging the Battery Pack 3-16 Low Battery 3-17 Cleaning Battery Charge Contacts 3-18 Raising the Base Unit Antenna 3-18 Handset Controls 4-1 Handset Control Functions 4-2 Cordless and Desk Buttons 4-5 LCD Display Indicators 4-7 No Service Conditions 4-8 Optional Accessories and Replacement Parts 5-1 Installing the Headset 5-2 Troubleshooting 6-1 vi Table of Contents
Document Revision 3 NEC Unified Solutions, Inc. Figure 3-15 Figure 3-16 Figure 3-17 Figure 3-18 Figure 3-19 Figure 3-20 Figure 3-21 Table 3-1 Figure 3-22 Figure 3-23 Figure 4-1 Table 4-1 Figure 4-2 ... 3-15 Charging the Battery Pack 3-16 Low Battery 3-17 Cleaning Battery Charge Contacts 3-18 Raising the Base Unit Antenna 3-18 Handset Controls 4-1 Handset Control Functions 4-2 Cordless and Desk Buttons 4-5 LCD Display Indicators 4-7 No Service Conditions 4-8 Optional Accessories and Replacement Parts 5-1 Installing the Headset 5-2 Troubleshooting 6-1 vi Table of Contents

Owners Guide
Page 9
D x 2-1/4 in . Handset Receive/Transmit Frequency 902 MHz ~ 928 MHz Power Requirements Nickel-Cadmium Battery Pack Dterm ™ Cordless II Owner's Guide 1 - 1 H Approximately 15.4 oz. General Frequency Control Modulation Operating Temperature Output Power Occupied Bandwidth Data Transmission Speed Phase Lock Loop Spread Spectrum 0° ...Requirements Size Weight 902 MHz ~ 928 MHz 10 Vdc from supplied AC adapter 4-1/4 in . Specifications and Safety Information Chapter 1 SECTION 1 SPECIFICATIONS The Dterm Cordless II complies with FCC and IC parts 15 and 68. W x 7-1/2 in.
D x 2-1/4 in . Handset Receive/Transmit Frequency 902 MHz ~ 928 MHz Power Requirements Nickel-Cadmium Battery Pack Dterm ™ Cordless II Owner's Guide 1 - 1 H Approximately 15.4 oz. General Frequency Control Modulation Operating Temperature Output Power Occupied Bandwidth Data Transmission Speed Phase Lock Loop Spread Spectrum 0° ...Requirements Size Weight 902 MHz ~ 928 MHz 10 Vdc from supplied AC adapter 4-1/4 in . Specifications and Safety Information Chapter 1 SECTION 1 SPECIFICATIONS The Dterm Cordless II complies with FCC and IC parts 15 and 68. W x 7-1/2 in.
Owners Guide
Page 11
...product where the cord will be placed in accordance with or identified for use this product near or over a radiator or heat register. NEC Unified Solutions, Inc. for cleaning. Do not place this product from the type of the battery pack in an environmentally sound manner. ...not be damaged by people walking on it. Contact your regular trash. Observe proper polarity orientation between the battery pack and battery charger. Dterm ™ Cordless II Owner's Guide 1 - 3 The telephone can result in the risk of in a fire, the cell may explode. Do not use with this ...
...product where the cord will be placed in accordance with or identified for use this product near or over a radiator or heat register. NEC Unified Solutions, Inc. for cleaning. Do not place this product from the type of the battery pack in an environmentally sound manner. ...not be damaged by people walking on it. Contact your regular trash. Observe proper polarity orientation between the battery pack and battery charger. Dterm ™ Cordless II Owner's Guide 1 - 3 The telephone can result in the risk of in a fire, the cell may explode. Do not use with this ...
Owners Guide
Page 12
... other controls can overheat and cause burns. Never push objects of other than your own telephone unit, consequently, any communications using the cordless telephone may not be private. 1 - 4 Specifications and Safety Information Improper adjustment of any kind on the product. To reduce the... risk of any kind into this product. Document Revision 3 NEC Unified Solutions, Inc. The battery or conductor can result in damage, and will often require extensive work is damaged or frayed. • ...
... other controls can overheat and cause burns. Never push objects of other than your own telephone unit, consequently, any communications using the cordless telephone may not be private. 1 - 4 Specifications and Safety Information Improper adjustment of any kind on the product. To reduce the... risk of any kind into this product. Document Revision 3 NEC Unified Solutions, Inc. The battery or conductor can result in damage, and will often require extensive work is damaged or frayed. • ...
Owners Guide
Page 13
... of this product in our rating. This telephone is meant to be impossible to operate at a maximum distance with your problem. Dterm ™ Cordless II Owner's Guide 1 - 5 SECTION 4 IMPORTANT ELECTRICAL CONSIDERATIONS Document Revision 3 Do not attempt to it is used as detailed by this manual,... has been corrected. However, your telephone company must first disconnect your unit. We have rated this product not expressly approved by NEC America, Inc., or operation of up to 350 feet (depending upon the environment in which can pass through your household wiring ...
... of this product in our rating. This telephone is meant to be impossible to operate at a maximum distance with your problem. Dterm ™ Cordless II Owner's Guide 1 - 5 SECTION 4 IMPORTANT ELECTRICAL CONSIDERATIONS Document Revision 3 Do not attempt to it is used as detailed by this manual,... has been corrected. However, your telephone company must first disconnect your unit. We have rated this product not expressly approved by NEC America, Inc., or operation of up to 350 feet (depending upon the environment in which can pass through your household wiring ...

Owners Guide
Page 14
... unit.) When the situation persists, contact National Technical Assistance Center. 1 - 6 Specifications and Safety Information Your unit is experienced, moving the cordless telephone farther away from the TV or VCR will often reduce or eliminate the interference. When this type of interference. Radio Interference Radio interference ... channels and more than 20 feet at frequencies that may occasionally cause buzzing and humming in conversation. Document Revision 3 NEC Unified Solutions, Inc. Radio interference causes interruptions in your office to a different channel.
... unit.) When the situation persists, contact National Technical Assistance Center. 1 - 6 Specifications and Safety Information Your unit is experienced, moving the cordless telephone farther away from the TV or VCR will often reduce or eliminate the interference. When this type of interference. Radio Interference Radio interference ... channels and more than 20 feet at frequencies that may occasionally cause buzzing and humming in conversation. Document Revision 3 NEC Unified Solutions, Inc. Radio interference causes interruptions in your office to a different channel.

Owners Guide
Page 15
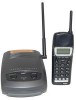
... and engineered to exacting standards for reliability, long life, and outstanding performance. About the Dterm Cordless II Chapter 2 SECTION 1 ITEMS INCLUDED WITH THE Dterm CORDLESS II Congratulations on your purchase of the cordless telephone, read this manual thoroughly. The Dterm Cordless II includes the following items: Base Unit Handset Telephone Cord 2 AC Adapters Rechargeable Battery Belt Clip...
... and engineered to exacting standards for reliability, long life, and outstanding performance. About the Dterm Cordless II Chapter 2 SECTION 1 ITEMS INCLUDED WITH THE Dterm CORDLESS II Congratulations on your purchase of the cordless telephone, read this manual thoroughly. The Dterm Cordless II includes the following items: Base Unit Handset Telephone Cord 2 AC Adapters Rechargeable Battery Belt Clip...
Owners Guide
Page 16
... Charging Stand with Spare Battery Charging Capability AutoStandby ® Silent Alarm Out of features. SECTION 2 FEATURES OF THE CORDLESS TELEPHONE The Dterm telephone provides a variety of Range Protection Low Battery Protection System Wall Mountable Separate Base Unit Wall Mountable... Separate Charging Unit Easy Installation Compact Handset Design Use with an NEC Digital Multiline Telephone Desk/Cordless Softkey Switch The Dterm Cordless II can be used in conjunction with the, Electra Elite ®, and Dterm ® Series E Digital...
... Charging Stand with Spare Battery Charging Capability AutoStandby ® Silent Alarm Out of features. SECTION 2 FEATURES OF THE CORDLESS TELEPHONE The Dterm telephone provides a variety of Range Protection Low Battery Protection System Wall Mountable Separate Base Unit Wall Mountable... Separate Charging Unit Easy Installation Compact Handset Design Use with an NEC Digital Multiline Telephone Desk/Cordless Softkey Switch The Dterm Cordless II can be used in conjunction with the, Electra Elite ®, and Dterm ® Series E Digital...

Owners Guide
Page 17
NEC Unified Solutions, Inc. Headset Jack 10. Message Display 3. Ringer ON/OFF Switch 2. Channel (CHAN) Key 14. F4 16. F1 8. Transfer (TRANSFER) Key 12. Numeric Keypad 6. Conference (CONF) Key 11. Ringer/Volume (R/VOL) Key 17. Microphone 9. Redial (REDIAL) or Desk/Cordless Softkey...HOLD) Key 4. Mute (MUTE) Key Figure 2-2 Handset Controls and Functions Dterm ™ Cordless II Owner's Guide 2 - 3 Document Revision 3 SECTION 3 Dterm CORDLESS II CONTROLS AND FUNCTIONS The primary components of the Dterm Cordless II consist of the handset and base unit. 1.
NEC Unified Solutions, Inc. Headset Jack 10. Message Display 3. Ringer ON/OFF Switch 2. Channel (CHAN) Key 14. F4 16. F1 8. Transfer (TRANSFER) Key 12. Numeric Keypad 6. Conference (CONF) Key 11. Ringer/Volume (R/VOL) Key 17. Microphone 9. Redial (REDIAL) or Desk/Cordless Softkey...HOLD) Key 4. Mute (MUTE) Key Figure 2-2 Handset Controls and Functions Dterm ™ Cordless II Owner's Guide 2 - 3 Document Revision 3 SECTION 3 Dterm CORDLESS II CONTROLS AND FUNCTIONS The primary components of the Dterm Cordless II consist of the handset and base unit. 1.

Owners Guide
Page 18
Desk 20. Power Figure 2-3 Base Unit Controls and Functions 2 - 4 About the Dterm Cordless II Cordless 19. Document Revision 3 NEC Unified Solutions, Inc. 18.
Desk 20. Power Figure 2-3 Base Unit Controls and Functions 2 - 4 About the Dterm Cordless II Cordless 19. Document Revision 3 NEC Unified Solutions, Inc. 18.

Owners Guide
Page 19
...When connecting the telephone cords, observe the following precautions. Refer to Chapter 1 Specifications and Safety Information for the Dterm Cordless II to the vertical position. Always place the base unit on top of a desk or on a standard wall plate using... tabletop near a standard 120 Vac outlet and telephone line jack. Dterm ™ Cordless II Owner's Guide 3 - 1 SECTION 2 INSTALLATION PRECAUTIONS To ensure optimum performance follow these guidelines. Installing the Dterm Cordless II Chapter 3 SECTION 1 SELECTING A LOCATION Select a location for a complete discussion of...
...When connecting the telephone cords, observe the following precautions. Refer to Chapter 1 Specifications and Safety Information for the Dterm Cordless II to the vertical position. Always place the base unit on top of a desk or on a standard wall plate using... tabletop near a standard 120 Vac outlet and telephone line jack. Dterm ™ Cordless II Owner's Guide 3 - 1 SECTION 2 INSTALLATION PRECAUTIONS To ensure optimum performance follow these guidelines. Installing the Dterm Cordless II Chapter 3 SECTION 1 SELECTING A LOCATION Select a location for a complete discussion of...

Owners Guide
Page 20
...KTS/PBX Figure 3-1 Connecting Telephone Cords to the Line In on the Dterm Cordless II. Connect a qualified NEC digital Multiline Terminal to the Multiline Terminal 3 - 2 Installing the Dterm Cordless II To connect the telephone cords: 1. Use caution when installing or modifying telephone ...lines. Line "OUT" Electra Elite or Dterm Series E Multiline Telephone Figure 3-2 Connecting the Dterm Cordless II to the Dterm Cordless II. Document Revision 3 NEC Unified Solutions, Inc. Never touch bare telephone wires or terminals unless the telephone line has been disconnected at...
...KTS/PBX Figure 3-1 Connecting Telephone Cords to the Line In on the Dterm Cordless II. Connect a qualified NEC digital Multiline Terminal to the Multiline Terminal 3 - 2 Installing the Dterm Cordless II To connect the telephone cords: 1. Use caution when installing or modifying telephone ...lines. Line "OUT" Electra Elite or Dterm Series E Multiline Telephone Figure 3-2 Connecting the Dterm Cordless II to the Dterm Cordless II. Document Revision 3 NEC Unified Solutions, Inc. Never touch bare telephone wires or terminals unless the telephone line has been disconnected at...

Owners Guide
Page 21
... place the handset in the charging unit with a polarized line plug (a plug having one way. If you are unable to be replaced. Dterm ™ Cordless II Owner's Guide 3 - 3 NEC Unified Solutions, Inc. The AC adapter furnished with or without the belt clip attached. The battery packs can charge a second battery with this telephone...
... place the handset in the charging unit with a polarized line plug (a plug having one way. If you are unable to be replaced. Dterm ™ Cordless II Owner's Guide 3 - 3 NEC Unified Solutions, Inc. The AC adapter furnished with or without the belt clip attached. The battery packs can charge a second battery with this telephone...

Owners Guide
Page 22
Slide the wall mount stand into place. 3 - 4 Installing the Dterm Cordless II To attach the wall mount stand to be mounted on standard wall plate. Route the power cord where it will not create a trip hazard, or where it into the notches at the top of the base unit. Rotate the wall mount stand down and snap it could become chafed and create a fire or other electrical hazards. Document Revision 3 NEC Unified Solutions, Inc. Figure 3-4 Polarized Plug SECTION 5 WALL INSTALLATION Standard Wall Plate Mounting The base unit is designed to the base unit: 1.
Slide the wall mount stand into place. 3 - 4 Installing the Dterm Cordless II To attach the wall mount stand to be mounted on standard wall plate. Route the power cord where it will not create a trip hazard, or where it into the notches at the top of the base unit. Rotate the wall mount stand down and snap it could become chafed and create a fire or other electrical hazards. Document Revision 3 NEC Unified Solutions, Inc. Figure 3-4 Polarized Plug SECTION 5 WALL INSTALLATION Standard Wall Plate Mounting The base unit is designed to the base unit: 1.

Owners Guide
Page 23
Plug the AC adapter into the base unit. 3. Figure 3-6 Placing the AC Adapter Cord Inside the Wall Mount Stand Dterm ™ Cordless II Owner's Guide 3 - 5 Place the AC adapter cord inside the molded channel of the wall mount stand. NEC Unified Solutions, Inc. Document Revision 3 Figure 3-5 Attaching the Wall Mount Stand to the Base Unit 2.
Plug the AC adapter into the base unit. 3. Figure 3-6 Placing the AC Adapter Cord Inside the Wall Mount Stand Dterm ™ Cordless II Owner's Guide 3 - 5 Place the AC adapter cord inside the molded channel of the wall mount stand. NEC Unified Solutions, Inc. Document Revision 3 Figure 3-5 Attaching the Wall Mount Stand to the Base Unit 2.

Owners Guide
Page 24
... the Base Unit on the bottom of the short telephone cord into a standard 120 Vac wall outlet. Document Revision 3 NEC Unified Solutions, Inc. 4. Plug one end of the wall plate and push down until it is firmly seated. Plug the... AC adapter into the modular wall jack in the LINE jack on the posts of the NEC digital multiline telephone into the PHONE jack. Plug one end of the short telephone cord (locally supplied) in .... 6. Do not use an outlet controlled by a wall switch. 3 - 6 Installing the Dterm Cordless II Place the base unit on the base unit.
... the Base Unit on the bottom of the short telephone cord into a standard 120 Vac wall outlet. Document Revision 3 NEC Unified Solutions, Inc. 4. Plug one end of the wall plate and push down until it is firmly seated. Plug the... AC adapter into the modular wall jack in the LINE jack on the posts of the NEC digital multiline telephone into the PHONE jack. Plug one end of the short telephone cord (locally supplied) in .... 6. Do not use an outlet controlled by a wall switch. 3 - 6 Installing the Dterm Cordless II Place the base unit on the base unit.

