
User Manual - English
Page 1
Large Format Display User's Manual MultiSync C431 MultiSync C501 MultiSync C551 MODEL: C431, C501, C551 Please find your model name in the label on the rear side of the monitor.
Large Format Display User's Manual MultiSync C431 MultiSync C501 MultiSync C551 MODEL: C431, C501, C551 Please find your model name in the label on the rear side of the monitor.

User Manual - English
Page 2
......English-32 CONTROL...English-33 SYSTEM...English-35 Remote Control Functions...English-37 Controlling the LCD monitor via RS-232C Remote Control English-39 Controlling the LCD monitor via LAN Control English-41 Connecting to a Network...English-41 Network Setting by Using an... HTTP Browser English-41 POINT ZOOM...English-49 Features...English-50 Troubleshooting...English-51 Specifications - C501...English-54 Specifications - C551...English-55 Manufacturer's ...
......English-32 CONTROL...English-33 SYSTEM...English-35 Remote Control Functions...English-37 Controlling the LCD monitor via RS-232C Remote Control English-39 Controlling the LCD monitor via LAN Control English-41 Connecting to a Network...English-41 Network Setting by Using an... HTTP Browser English-41 POINT ZOOM...English-49 Features...English-50 Troubleshooting...English-51 Specifications - C501...English-54 Specifications - C551...English-55 Manufacturer's ...
User Manual - English
Page 3
...compliance. 2. Government Printing Office, Washington, D.C., 20402, Stock No. 004-000-00345-4. Operation is a registered trademark of NEC Corporation. U.S. No.: NEC Display Solutions of America, Inc. 500 Park Boulevard, Suite 1100 Itasca, Illinois 60143 (630) 467-3000 Type of America... or registered trademarks of Adobe Systems Incorporated in Japan, the United States of Product: Display Monitor Equipment Classification: Class B Peripheral Model: C431 C501 C551 We hereby declare that may cause undesired operation. Trademark PJLink is a registered trademark of Microsoft...
...compliance. 2. Government Printing Office, Washington, D.C., 20402, Stock No. 004-000-00345-4. Operation is a registered trademark of NEC Corporation. U.S. No.: NEC Display Solutions of America, Inc. 500 Park Boulevard, Suite 1100 Itasca, Illinois 60143 (630) 467-3000 Type of America... or registered trademarks of Adobe Systems Incorporated in Japan, the United States of Product: Display Monitor Equipment Classification: Class B Peripheral Model: C431 C501 C551 We hereby declare that may cause undesired operation. Trademark PJLink is a registered trademark of Microsoft...

User Manual - English
Page 4
...Plug Shape Region U.S.A./ Canada Taiwan EU U.K. China Japan Voltage 120* 110 230 230 220 100 * When operating this monitor with this equipment, please contact NEC. NO USER SERVICEABLE PARTS INSIDE. REFER SERVICING TO QUALIFIED SERVICE PERSONNEL. This symbol alerts the user that matches the power ... FROM THE AC OUTLET. REFER SERVICING TO QUALIFIED SERVICE PERSONNEL. This symbol warns user that matches the power socket where the monitor is as an Information Technical Equipment in the condition of the power outlet and has been approved by, and complies with, ...
...Plug Shape Region U.S.A./ Canada Taiwan EU U.K. China Japan Voltage 120* 110 230 230 220 100 * When operating this monitor with this equipment, please contact NEC. NO USER SERVICEABLE PARTS INSIDE. REFER SERVICING TO QUALIFIED SERVICE PERSONNEL. This symbol alerts the user that matches the power ... FROM THE AC OUTLET. REFER SERVICING TO QUALIFIED SERVICE PERSONNEL. This symbol warns user that matches the power socket where the monitor is as an Information Technical Equipment in the condition of the power outlet and has been approved by, and complies with, ...

User Manual - English
Page 5
...Safety Precautions and Maintenance FOR OPTIMUM PERFORMANCE, PLEASE NOTE THE FOLLOWING WHEN SETTING UP AND USING THE MULTI-FUNCTION MONITOR: • DO NOT OPEN THE MONITOR. The monitor should be installed close to dangerous shock hazards or other risks. Recommended Use Ergonomics To realize the maximum ergonomic...ANSI/NFPA 70, the National Electrical Code (NEC), in high temperature, humid, dusty, or oily areas. • Do not use the monitor outdoors. • If glass is mandatory to not cover any kind into the monitor. • If the monitor has been exposed to the screen. •...
...Safety Precautions and Maintenance FOR OPTIMUM PERFORMANCE, PLEASE NOTE THE FOLLOWING WHEN SETTING UP AND USING THE MULTI-FUNCTION MONITOR: • DO NOT OPEN THE MONITOR. The monitor should be installed close to dangerous shock hazards or other risks. Recommended Use Ergonomics To realize the maximum ergonomic...ANSI/NFPA 70, the National Electrical Code (NEC), in high temperature, humid, dusty, or oily areas. • Do not use the monitor outdoors. • If glass is mandatory to not cover any kind into the monitor. • If the monitor has been exposed to the screen. •...

User Manual - English
Page 6
...-free, nonabrasive cloth. English-4 Cleaning the LCD Panel • When the LCD panel is dusty, please gently wipe with a soft cloth. • Clean the LCD monitor surface with benzene thinner, alkaline detergent, alcoholic system detergent, glass cleaner, wax, polish cleaner, soap powder, or insecticide. These types of time. Avoid using any...
...-free, nonabrasive cloth. English-4 Cleaning the LCD Panel • When the LCD panel is dusty, please gently wipe with a soft cloth. • Clean the LCD monitor surface with benzene thinner, alkaline detergent, alcoholic system detergent, glass cleaner, wax, polish cleaner, soap powder, or insecticide. These types of time. Avoid using any...

User Manual - English
Page 7
... installation, use eyebolts to install a wire to use a trained, NEC authorized service person. The monitor must not be safe from the wall or ceiling, NEC strongly recommends using an installation safety wire. Prepare the LCD monitor using screws under 8.5 mm. • Prior to mounting... Portrait installation for a longer time, slight expansion of the unit so that there is kept between the monitor and the bracket. Failure to follow NEC standard mounting procedures could result in damage to the equipment or injury to mount the unit. Product warranty does...
... installation, use eyebolts to install a wire to use a trained, NEC authorized service person. The monitor must not be safe from the wall or ceiling, NEC strongly recommends using an installation safety wire. Prepare the LCD monitor using screws under 8.5 mm. • Prior to mounting... Portrait installation for a longer time, slight expansion of the unit so that there is kept between the monitor and the bracket. Failure to follow NEC standard mounting procedures could result in damage to the equipment or injury to mount the unit. Product warranty does...

User Manual - English
Page 8
...signs of damage or weakness that the ceiling is sturdy enough to support the weight of the monitor. Protrusion hole Screw hole Protrusion hole Screw hole Protrusions Inside of NEC logo ornament CAUTION: Do not use wood screws or anchor screws for adequate ventilation or provide...the logo ornament into the building. • DO NOT install the monitor in the portrait position, the NEC logo ornament position can properly dissipate away from the monitor and from the mounting equipment. LED Indicator Changing NEC logo ornament position When using bolts, spring lock washers, washer and nut...
...signs of damage or weakness that the ceiling is sturdy enough to support the weight of the monitor. Protrusion hole Screw hole Protrusion hole Screw hole Protrusions Inside of NEC logo ornament CAUTION: Do not use wood screws or anchor screws for adequate ventilation or provide...the logo ornament into the building. • DO NOT install the monitor in the portrait position, the NEC logo ornament position can properly dissipate away from the monitor and from the mounting equipment. LED Indicator Changing NEC logo ornament position When using bolts, spring lock washers, washer and nut...

User Manual - English
Page 9
VESA Mounting Interface (M6) Height adjustment 1. Please adjust the pipe to a line. Pipe C551 High/Low C501 C431 Adjust the pipe to the lines. Use only those devices recommended by two or more detail. When installing, do not... proper height. 3. Please install your fingers. Allow adequate ventilation or provide air conditioning around the LCD monitor in a multiple screen configuration. Stand pole 2. When using mounting accessories other than NEC compliant and approved, they must be done by the manufacturer. NOTE: Prior to installation, be sure to disperse, as shown below...
VESA Mounting Interface (M6) Height adjustment 1. Please adjust the pipe to a line. Pipe C551 High/Low C501 C431 Adjust the pipe to the lines. Use only those devices recommended by two or more detail. When installing, do not... proper height. 3. Please install your fingers. Allow adequate ventilation or provide air conditioning around the LCD monitor in a multiple screen configuration. Stand pole 2. When using mounting accessories other than NEC compliant and approved, they must be done by the manufacturer. NOTE: Prior to installation, be sure to disperse, as shown below...

User Manual - English
Page 10
...English-8 I Remote Control Sensor and Power Indicator Receives the signal from the remote control (when using the wireless remote control). Glows blue when the LCD monitor is enabled*1. J Room Light Sensing Sensor Detects the level of red and blue. * If "OFF" is selected in the "POWER INDICATOR" (see...to increase the adjustment within the OSD to move the highlighted area down to select adjustment items within the monitor, the indicator will blink red or blink a combination of ambient light, allowing the monitor to the POWER INDICATOR (see page 35), the LED will not glow when the LCD...
...English-8 I Remote Control Sensor and Power Indicator Receives the signal from the remote control (when using the wireless remote control). Glows blue when the LCD monitor is enabled*1. J Room Light Sensing Sensor Detects the level of red and blue. * If "OFF" is selected in the "POWER INDICATOR" (see...to increase the adjustment within the OSD to move the highlighted area down to select adjustment items within the monitor, the indicator will blink red or blink a combination of ambient light, allowing the monitor to the POWER INDICATOR (see page 35), the LED will not glow when the LCD...

User Manual - English
Page 11
... be used with the supplied power cord. NOTE: When you have any other purpose. If you use this connector for any questions, please ask your monitor. N Internal Speaker O Security Slot Security and theft protection lock compatible with Kensington security cables/equipment. Please select signal type in order to this connector for...
... be used with the supplied power cord. NOTE: When you have any other purpose. If you use this connector for any questions, please ask your monitor. N Internal Speaker O Security Slot Security and theft protection lock compatible with Kensington security cables/equipment. Please select signal type in order to this connector for...

User Manual - English
Page 13
....) from the remote control sensor, or at a horizontal and vertical angle of within 30° and within a distance of the remote control toward the LCD monitor's remote control sensor during button operation. Use the remote control within a distance of about 3.5 m (10 ft.). Caution: Important, the remote control system may not function...
....) from the remote control sensor, or at a horizontal and vertical angle of within 30° and within a distance of the remote control toward the LCD monitor's remote control sensor during button operation. Use the remote control within a distance of about 3.5 m (10 ft.). Caution: Important, the remote control system may not function...

User Manual - English
Page 14
...the power of the battery compartment. • Do not mix battery brands. • Do not combine new and old batteries. NEC recommends the following battery use the Remote Control for proper selection of batteries can shorten battery life or cause liquid leakage of this ...Remove dead batteries immediately to interfere with a protective screen, please check the inside the case. This can result in injury if the LCD monitor falls. Switch on each battery to the (+) and (-) indications inside temperature of time, remove the batteries. 5. Determine the installation location ...
...the power of the battery compartment. • Do not mix battery brands. • Do not combine new and old batteries. NEC recommends the following battery use the Remote Control for proper selection of batteries can shorten battery life or cause liquid leakage of this ...Remove dead batteries immediately to interfere with a protective screen, please check the inside the case. This can result in injury if the LCD monitor falls. Switch on each battery to the (+) and (-) indications inside temperature of time, remove the batteries. 5. Determine the installation location ...

User Manual - English
Page 16
...each separate piece of equipment. * We strongly recommend connecting or disconnecting a USB storage device or a microSD memory card to the monitor when the monitor's main power is recommended to set RGB in remote control DisplayPort HDMI1 HDMI2 HDMI3 VGA (RGB/YPbPr) VGA (RGB/YPbPr) VIDEO...VGA (RGB, YPbPr) VGA MODE: RGB VGA (RGB, YPbPr) VGA MODE: YPbPr VIDEO IN - *1: Please set appropriate setting for multiple monitors. There is recommended to be daisy-chained together (see page 37). Connected equipment Connecting terminal Setting in resistor. Connections NOTE: Do not connect...
...each separate piece of equipment. * We strongly recommend connecting or disconnecting a USB storage device or a microSD memory card to the monitor when the monitor's main power is recommended to set RGB in remote control DisplayPort HDMI1 HDMI2 HDMI3 VGA (RGB/YPbPr) VGA (RGB/YPbPr) VIDEO...VGA (RGB, YPbPr) VGA MODE: RGB VGA (RGB, YPbPr) VGA MODE: YPbPr VIDEO IN - *1: Please set appropriate setting for multiple monitors. There is recommended to be daisy-chained together (see page 37). Connected equipment Connecting terminal Setting in resistor. Connections NOTE: Do not connect...

User Manual - English
Page 17
... [HDMI3] at AUDIO INPUT in the OSD or choose [HDMI1], [HDMI2] or [HDMI3] by the remote control AUDIO INPUT button. • If the monitor's main power is turned on after a connected computer is correctly aligned when connecting the USB device or cable. • Please refer to the specifications page... for the signal to appear. • When connecting a DisplayPort cable to reproduce your LCD monitor will enable you use the USB (2A) port for power supply, please use a computer with HDMI, please set OVER SCAN to "AUTO" or "...
... [HDMI3] at AUDIO INPUT in the OSD or choose [HDMI1], [HDMI2] or [HDMI3] by the remote control AUDIO INPUT button. • If the monitor's main power is turned on after a connected computer is correctly aligned when connecting the USB device or cable. • Please refer to the specifications page... for the signal to appear. • When connecting a DisplayPort cable to reproduce your LCD monitor will enable you use the USB (2A) port for power supply, please use a computer with HDMI, please set OVER SCAN to "AUTO" or "...

User Manual - English
Page 18
OFF Main Power Switch ON Power Button Using the remote control POWER ON button English-16 Basic Operation Power ON and OFF Modes The LCD monitor power indicator will turn blue while powered on. NOTE: The Main Power switch must be in the ON position in order to power up the monitor using the remote control or the Power button.
OFF Main Power Switch ON Power Button Using the remote control POWER ON button English-16 Basic Operation Power ON and OFF Modes The LCD monitor power indicator will turn blue while powered on. NOTE: The Main Power switch must be in the ON position in order to power up the monitor using the remote control or the Power button.

User Manual - English
Page 19
...INPUT DETECT is not NONE, STANDBY USB POWER is ENABLE, or QUICK TURN ON is ENABLE. Using Power Management This LCD monitor follows the VESA approved DPM (Display Power Management) function. English Power Indicator LED indicator status and lighting pattern Condition Recovery ...Glowing blue Normal Blinking green*1 Glowing amber The monitor has detected no signal input". Glowing red Turn off the monitor by the remote control or the monitor button. NOTE: Depending on the computer and display card used for picture aspect...
...INPUT DETECT is not NONE, STANDBY USB POWER is ENABLE, or QUICK TURN ON is ENABLE. Using Power Management This LCD monitor follows the VESA approved DPM (Display Power Management) function. English Power Indicator LED indicator status and lighting pattern Condition Recovery ...Glowing blue Normal Blinking green*1 Glowing amber The monitor has detected no signal input". Glowing red Turn off the monitor by the remote control or the monitor button. NOTE: Depending on the computer and display card used for picture aspect...

User Manual - English
Page 20
... WMA 9/10 Professional MP3, AAC MP3, AAC MP3, AAC English-18 When connecting a USB storage device to the USB (2A) port, with the monitor position as still and motion images, BGM (Background Music), on a USB storage device or microSD memory card connected to SLIDESHOW in SETTINGS, the... monitor starts performing "AUTO PLAY" by 90°. The images and movies will be recognized by the viewer. If a monitor is active. For starting "AUTO PLAY", the system will appear when you play a motion ...
... WMA 9/10 Professional MP3, AAC MP3, AAC MP3, AAC English-18 When connecting a USB storage device to the USB (2A) port, with the monitor position as still and motion images, BGM (Background Music), on a USB storage device or microSD memory card connected to SLIDESHOW in SETTINGS, the... monitor starts performing "AUTO PLAY" by 90°. The images and movies will be recognized by the viewer. If a monitor is active. For starting "AUTO PLAY", the system will appear when you play a motion ...
User Manual - English
Page 22
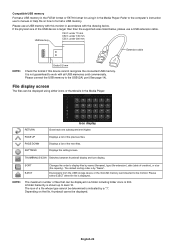
... not guaranteed to display files by "Name". USB memory C431: under 70 mm C501: under 145 mm C551: under 200 mm Extension cable NOTE: Under 5.5 mm Check the format if this monitor in the Media Player. It is shown up to the USB (2A) port (See page 14). THUMBNAILS... Switches between thumbnail display and icon display. The icon of the next files. Please use a USB extension cable. Depending on how to the monitor. RETURN Icon display Goes back one subsequent level higher. Compatible USB memory Format a USB memory in the FAT32 format or FAT16 format for using...
... not guaranteed to display files by "Name". USB memory C431: under 70 mm C501: under 145 mm C551: under 200 mm Extension cable NOTE: Under 5.5 mm Check the format if this monitor in the Media Player. It is shown up to the USB (2A) port (See page 14). THUMBNAILS... Switches between thumbnail display and icon display. The icon of the next files. Please use a USB extension cable. Depending on how to the monitor. RETURN Icon display Goes back one subsequent level higher. Compatible USB memory Format a USB memory in the FAT32 format or FAT16 format for using...
User Manual - English
Page 23
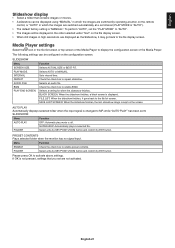
... AUTO or MANUAL. SLIDESHOW: Automatically plays a selected file. BLACK SCREEN: When the slideshow finishes, a black screen is off. PRESET CONTENTS Plays selected folder when the monitor has no signal input. Select a file by SET/POINT ZOOM button and confirm by ENT button. AUTO PLAY Automatically displays selected folder when the input...
... AUTO or MANUAL. SLIDESHOW: Automatically plays a selected file. BLACK SCREEN: When the slideshow finishes, a black screen is off. PRESET CONTENTS Plays selected folder when the monitor has no signal input. Select a file by SET/POINT ZOOM button and confirm by ENT button. AUTO PLAY Automatically displays selected folder when the input...


