
User Manual - English
Page 1
Large Format Display User's Manual MultiSync C431 MultiSync C501 MultiSync C551 MODEL: C431, C501, C551 Please find your model name in the label on the rear side of the monitor.
Large Format Display User's Manual MultiSync C431 MultiSync C501 MultiSync C551 MODEL: C431, C501, C551 Please find your model name in the label on the rear side of the monitor.
User Manual - English
Page 3
... trademark of Product: Display Monitor Equipment Classification: Class B Peripheral Model: C431 C501 C551 We hereby declare that may cause undesired operation. The terms HDMI and HDMI High-...CRESTRON and CRESTRON ROOMVIEW are trademarks or registered trademarks of Crestron Electronics, Inc. NEC is a registered trademark of America, Inc. All other countries. Failure to comply.... (1) This device may cause interference with radio and television reception. If this manual. This booklet is a trademark applied for help. DisplayPort and DisplayPort Compliance Logo ...
... trademark of Product: Display Monitor Equipment Classification: Class B Peripheral Model: C431 C501 C551 We hereby declare that may cause undesired operation. The terms HDMI and HDMI High-...CRESTRON and CRESTRON ROOMVIEW are trademarks or registered trademarks of Crestron Electronics, Inc. NEC is a registered trademark of America, Inc. All other countries. Failure to comply.... (1) This device may cause interference with radio and television reception. If this manual. This booklet is a trademark applied for help. DisplayPort and DisplayPort Compliance Logo ...

User Manual - English
Page 9
... pole are supplied with adequate space. 2. Stand pole 2. When using mounting accessories other than NEC compliant and approved, they must be different depending on the acoustics of the room. For installation...the pipe with the stand or mounting equipment. NOTE: Prior to the ST-401 user's manual for use screws which are indicators of the internal speakers will be done by the manufacturer....from the unit and the mounting equipment; VESA Mounting Interface (M6) Height adjustment 1. Pipe C551 High/Low C501 C431 Adjust the pipe to avoid pinching your fingers. Make sure there is...
... pole are supplied with adequate space. 2. Stand pole 2. When using mounting accessories other than NEC compliant and approved, they must be different depending on the acoustics of the room. For installation...the pipe with the stand or mounting equipment. NOTE: Prior to the ST-401 user's manual for use screws which are indicators of the internal speakers will be done by the manufacturer....from the unit and the mounting equipment; VESA Mounting Interface (M6) Height adjustment 1. Pipe C551 High/Low C501 C431 Adjust the pipe to avoid pinching your fingers. Make sure there is...

User Manual - English
Page 14
... is larger than the monitor's screen area, on the power of the monitor image. 4. A loose connection may result in leaks or bursting. C. NEC recommends the following battery use a shielded signal cable with a protective screen, please check the inside the case. This can result in a loss of... the computer first. 7. NOTE: If you do not intend to the user's manual of this caution may injure your supplier for further information. Use of all the attached external equipment When connected with radio and television reception. ...
... is larger than the monitor's screen area, on the power of the monitor image. 4. A loose connection may result in leaks or bursting. C. NEC recommends the following battery use a shielded signal cable with a protective screen, please check the inside the case. This can result in a loss of... the computer first. 7. NOTE: If you do not intend to the user's manual of this caution may injure your supplier for further information. Use of all the attached external equipment When connected with radio and television reception. ...

User Manual - English
Page 16
Before making connections: * First turn off the power of all the attached equipment and make connections. * Refer to the user's manual included with a built-in HDMI/DisplayPort MODE (See page 31). Connections NOTE: Do not connect or disconnect cables when turning on the monitor's main power ...
Before making connections: * First turn off the power of all the attached equipment and make connections. * Refer to the user's manual included with a built-in HDMI/DisplayPort MODE (See page 31). Connections NOTE: Do not connect or disconnect cables when turning on the monitor's main power ...

User Manual - English
Page 21
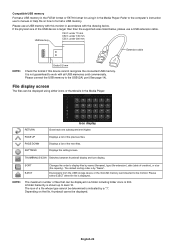
... the center of the microSD memory card then take it satisfies all microSD memory card sold commercially. English-19 Refer to the computer's instruction user's manual or Help file on network environments, the type of the microSD card cover to format a microSD memory card. Please insert the edge of USB storage...
... the center of the microSD memory card then take it satisfies all microSD memory card sold commercially. English-19 Refer to the computer's instruction user's manual or Help file on network environments, the type of the microSD card cover to format a microSD memory card. Please insert the edge of USB storage...
User Manual - English
Page 22
... below. English-20 Refer to format a USB memory. Please use a USB extension cable. Depending on how to the computer's instruction user's manual or Help file on the file, thumbnail cannot be displayed using it in the Media Player. RETURN Icon display Goes back one subsequent level higher...cannot be displayed in accordance with this device cannot recognize the connected USB memory. USB memory C431: under 70 mm C501: under 145 mm C551: under 200 mm Extension cable NOTE: Under 5.5 mm Check the format if this monitor in a folder including folder icons is not guaranteed...
... below. English-20 Refer to format a USB memory. Please use a USB extension cable. Depending on how to the computer's instruction user's manual or Help file on the file, thumbnail cannot be displayed using it in the Media Player. RETURN Icon display Goes back one subsequent level higher...cannot be displayed in accordance with this device cannot recognize the connected USB memory. USB memory C431: under 70 mm C501: under 145 mm C551: under 200 mm Extension cable NOTE: Under 5.5 mm Check the format if this monitor in a folder including folder icons is not guaranteed...
User Manual - English
Page 23
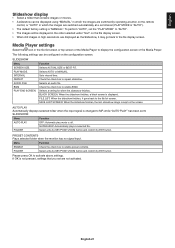
... displayed. Select a file by SET/POINT ZOOM button and confirm by ENT button. English-21 Sets interval time. Selects AUTO or MANUAL. SLIDESHOW Menu SCREEN SIZE PLAY MODE INTERVAL REPEAT AUDIO FILE BGM PLAY END SCREEN Function Selects ACTUAL SIZE or BEST FIT. SLIDESHOW: ...Automatically plays a selected file. English Slideshow display • Select a folder that you set to SLIDESHOW. The following settings can be displayed using "MANUAL" in which the images are switched automatically at a set the "PLAY MODE" to "AUTO". • The images will be displayed in high...
... displayed. Select a file by SET/POINT ZOOM button and confirm by ENT button. English-21 Sets interval time. Selects AUTO or MANUAL. SLIDESHOW Menu SCREEN SIZE PLAY MODE INTERVAL REPEAT AUDIO FILE BGM PLAY END SCREEN Function Selects ACTUAL SIZE or BEST FIT. SLIDESHOW: ...Automatically plays a selected file. English Slideshow display • Select a folder that you set to SLIDESHOW. The following settings can be displayed using "MANUAL" in which the images are switched automatically at a set the "PLAY MODE" to "AUTO". • The images will be displayed in high...

User Manual - English
Page 35
...with the monitor. The factory preset password is selected, VOLUME (+) button and VOLUME (-) buttons are applied. When LOCK is locked. MANUAL: Manually enter the IP address of the network connected with the monitor. The security password is not required when the monitor power is a... Enter the primary DNS server settings of DNS servers. Disabling this option automatically assigns an IP address to the network when MANUAL is selected for the wireless remote control buttons. Set your default gateway for the monitor connected to the monitor from being...
...with the monitor. The factory preset password is selected, VOLUME (+) button and VOLUME (-) buttons are applied. When LOCK is locked. MANUAL: Manually enter the IP address of the network connected with the monitor. The security password is not required when the monitor power is a... Enter the primary DNS server settings of DNS servers. Disabling this option automatically assigns an IP address to the network when MANUAL is selected for the wireless remote control buttons. Set your default gateway for the monitor connected to the monitor from being...

User Manual - English
Page 45
... 255.255.255.0, [DNS]: AUTO [DEFAULT GATEWAY], [PRIMARY DNS] and [SECONDARY DNS] are blank. NOTE: Enter [0.0.0.0] to the network when [MANUAL] is selected at CONTROL of the network connected with the monitor. NOTE: Consult your IP address for the monitor connected to the factory settings when...ADDRESS setting of the network connected with the monitor. DNS Set for the monitor connected to delete the setting. MANUAL: Manually set back to the network when [MANUAL] is selected for setting the IP ADDRESS. PRIMARY DNS Enter the primary DNS server settings of DNS server. ...
... 255.255.255.0, [DNS]: AUTO [DEFAULT GATEWAY], [PRIMARY DNS] and [SECONDARY DNS] are blank. NOTE: Enter [0.0.0.0] to the network when [MANUAL] is selected at CONTROL of the network connected with the monitor. NOTE: Consult your IP address for the monitor connected to the factory settings when...ADDRESS setting of the network connected with the monitor. DNS Set for the monitor connected to delete the setting. MANUAL: Manually set back to the network when [MANUAL] is selected for setting the IP ADDRESS. PRIMARY DNS Enter the primary DNS server settings of DNS server. ...
User Manual - English
Page 50
... using + - buttons select YES then press SET/POINT ZOOM button on the YES. The monitor's wireless remote control button operation is functioning to the user's manual supplied with the monitor, HDMI CEC supported devices also go into standby while an HDMI CEC supported device is recording, the device is kept on...
... using + - buttons select YES then press SET/POINT ZOOM button on the YES. The monitor's wireless remote control button operation is functioning to the user's manual supplied with the monitor, HDMI CEC supported devices also go into standby while an HDMI CEC supported device is recording, the device is kept on...
User Manual - English
Page 53
...8226; If you are blinking or glowing • A certain failure might have occurred, please contact your display card with all personal display devices, NEC DISPLAY SOLUTIONS recommends displaying moving images, using . NOTE: As with respect to compatibility and recommended signal timings. • Check the signal cable ... image persistence of LCD monitors is changed, the OSD Image Adjust settings may need to be in doubt, please refer to the user's manual of time should be connected. • Make certain the computer is idle, or turning it should be re-adjusted. • Check the...
...8226; If you are blinking or glowing • A certain failure might have occurred, please contact your display card with all personal display devices, NEC DISPLAY SOLUTIONS recommends displaying moving images, using . NOTE: As with respect to compatibility and recommended signal timings. • Check the signal cable ... image persistence of LCD monitors is changed, the OSD Image Adjust settings may need to be in doubt, please refer to the user's manual of time should be connected. • Make certain the computer is idle, or turning it should be re-adjusted. • Check the...
User Manual - English
Page 54
.... Media Player function does not recognize the USB storage device • Please check a USB storage device is activated. If unsure, contact your USB device User's Manual. • Check the format if this device cannot recognize the connected USB memory. The SCHEDULE/OFF TIMER function is not working properly • The "SCHEDULE...
.... Media Player function does not recognize the USB storage device • Please check a USB storage device is activated. If unsure, contact your USB device User's Manual. • Check the format if this device cannot recognize the connected USB memory. The SCHEDULE/OFF TIMER function is not working properly • The "SCHEDULE...

External Control Codes
Page 5
II. Connectors and wiring 2.1 RS-232C Remote control Connector: 9-pin D-Sub Cable: Cross (reversed) cable or null modem cable (Please refer "Controlling the LCD monitor via RS-232C Remote control" on User's manual.) 2.2 LAN control Connector: RJ-45 10/100 BASE-T Cable: Category 5 or higher LAN cable (Please refer "Controlling the LCD monitor via LAN control" on User's manual.) (5/104) Preparation 2.
II. Connectors and wiring 2.1 RS-232C Remote control Connector: 9-pin D-Sub Cable: Cross (reversed) cable or null modem cable (Please refer "Controlling the LCD monitor via RS-232C Remote control" on User's manual.) 2.2 LAN control Connector: RJ-45 10/100 BASE-T Cable: Category 5 or higher LAN cable (Please refer "Controlling the LCD monitor via LAN control" on User's manual.) (5/104) Preparation 2.

External Control Codes
Page 6
.... 3.3 Communication timing The controller should wait for 15 minutes. And the controller (PC) has to re-connect to change, Please refer "Network settings" on User's manual. 7142 (Fixed) (Note) The monitor will disconnect the connection if no packet data is sent. (Note) When the following commands are sent, a controller should wait...
.... 3.3 Communication timing The controller should wait for 15 minutes. And the controller (PC) has to re-connect to change, Please refer "Network settings" on User's manual. 7142 (Fixed) (Note) The monitor will disconnect the connection if no packet data is sent. (Note) When the following commands are sent, a controller should wait...
Installation Guide
Page 1
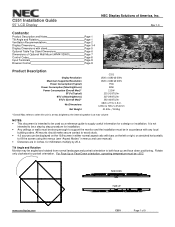
... and rotated from normal landscape and portrait orientation to fill the screen using the menus (see "Aspect Modes" in menus and user manual). • Distances are in accordance with bars on the 16:9 screen in either normal aspect ratio with any local building codes.... For Face Up or Face Down orientation, operating temperature must be C551 Installation Guide 55" LCD Display NEC Display Solutions of Optional Wall Mount (WMK-3255S) Control Codes Input Terminals Browser Control Page 1 Page 1 Page 2 Page 3-4 Page...
... and rotated from normal landscape and portrait orientation to fill the screen using the menus (see "Aspect Modes" in menus and user manual). • Distances are in accordance with bars on the 16:9 screen in either normal aspect ratio with any local building codes.... For Face Up or Face Down orientation, operating temperature must be C551 Installation Guide 55" LCD Display NEC Display Solutions of Optional Wall Mount (WMK-3255S) Control Codes Input Terminals Browser Control Page 1 Page 1 Page 2 Page 3-4 Page...


