User Manual
Page 3
...avoid damage and prolong operating life: 1. Continued operation at the top of the unit from the Plasma monitor. Set the unit away from time to 240 V 50 Hz/60 Hz AC power supply. To avoid sulfurization it is damaged in long term use your particular application...Like all phosphor-based display devices and all service to cool the monitor. Plasma monitor driving sound The panel of this unit. Also note that important literature concerning the operation and maintenance of the Plasma monitor is particularly hot, move the monitor to a cooler location, and wait for service. 2. En-2...
...avoid damage and prolong operating life: 1. Continued operation at the top of the unit from the Plasma monitor. Set the unit away from time to 240 V 50 Hz/60 Hz AC power supply. To avoid sulfurization it is damaged in long term use your particular application...Like all phosphor-based display devices and all service to cool the monitor. Plasma monitor driving sound The panel of this unit. Also note that important literature concerning the operation and maintenance of the Plasma monitor is particularly hot, move the monitor to a cooler location, and wait for service. 2. En-2...

User Manual
Page 4
... band core core NOTE: When you use a remote cable (not supplied), use the supplied ferrite cores. Remote cable (not supplied) To plasma monitor core This product complies with a three-wire grounding (earthed) plug - a plug that used product EU-wide legislation as the negative impact to...well as implemented in a proper way. The mark on the electrical and electronic products only applies to +104 °F); This includes plasma monitors and their electrical accessories. This effort will not conform to mandatory CE or C-Tick standards. If you use the power cable (supplied...
... band core core NOTE: When you use a remote cable (not supplied), use the supplied ferrite cores. Remote cable (not supplied) To plasma monitor core This product complies with a three-wire grounding (earthed) plug - a plug that used product EU-wide legislation as the negative impact to...well as implemented in a proper way. The mark on the electrical and electronic products only applies to +104 °F); This includes plasma monitors and their electrical accessories. This effort will not conform to mandatory CE or C-Tick standards. If you use the power cable (supplied...
User Manual
Page 5
...OUT En-39 Menu Tree En-19 Connection with Computer Signals ..... En-5 Creating a video wall En-6 Cable Management En-6 Caution when placing the plasma monitor in portrait mode ..... En-26 POWER/STANDBY indicator En-26 Setting the picture to the default values En-25 En-4 • Attachable speakers En...38 Selecting the input signals to be displayed En-17 Pin Assignments En-38 Zooming in on mode En-31 Enabling/disabling the front panel controls .......... En-31 Enabling/disabling remote control wireless transmission En-32 Loop Out setting En-32 Remote ID setting En-32 ID ...
...OUT En-39 Menu Tree En-19 Connection with Computer Signals ..... En-5 Creating a video wall En-6 Cable Management En-6 Caution when placing the plasma monitor in portrait mode ..... En-26 POWER/STANDBY indicator En-26 Setting the picture to the default values En-25 En-4 • Attachable speakers En...38 Selecting the input signals to be displayed En-17 Pin Assignments En-38 Zooming in on mode En-31 Enabling/disabling the front panel controls .......... En-31 Enabling/disabling remote control wireless transmission En-32 Loop Out setting En-32 Remote ID setting En-32 ID ...

User Manual
Page 6
... Drawing A Drawing B Ventilation Requirements for installing. • After installation, take appropriate measures to prevent the plasma from tipping over or falling. • Make sure to move or install the device with the screen face...following two ways: * While it is upright. (See Drawing A) * As it was wrapped around the monitor when it is strong enough to support the weight. • Use the specified clasps for Wall enclosure ... your optional mounts or stand to the plasma monitor in one person(s). * Use only a mounting kit or stand recommended by improper installation.
... Drawing A Drawing B Ventilation Requirements for installing. • After installation, take appropriate measures to prevent the plasma from tipping over or falling. • Make sure to move or install the device with the screen face...following two ways: * While it is upright. (See Drawing A) * As it was wrapped around the monitor when it is strong enough to support the weight. • Use the specified clasps for Wall enclosure ... your optional mounts or stand to the plasma monitor in one person(s). * Use only a mounting kit or stand recommended by improper installation.

User Manual
Page 7
... When looping from another plasma display, set the LOOP OUT to ON. • To create a video wall, set the VIDEO WALL menu items properly. • To connect monitors, please use the monitor's out terminal. Please ... is rough-standard with lower than 1024ן768, 60 Hz signal. • A distribution amplifier is poor, do not connect an OUTPUT signal from plasma to plasma, a 1 m to 2 m (3.3 feet to undo once ...audio cables at the back of the unit to connect to the display. 42XM5 50XM6 60XM5 Back of the unit Back of the unit Back of the unit mounting holes mounting ...
... When looping from another plasma display, set the LOOP OUT to ON. • To create a video wall, set the VIDEO WALL menu items properly. • To connect monitors, please use the monitor's out terminal. Please ... is rough-standard with lower than 1024ן768, 60 Hz signal. • A distribution amplifier is poor, do not connect an OUTPUT signal from plasma to plasma, a 1 m to 2 m (3.3 feet to undo once ...audio cables at the back of the unit to connect to the display. 42XM5 50XM6 60XM5 Back of the unit Back of the unit Back of the unit mounting holes mounting ...
User Manual
Page 8
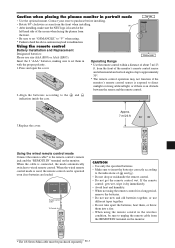
...to unplug the remote cable from the front when installing. • After installing, make sure the NEC logo is used, the remote control can be purchased separately. When the wired remote control mode is ... to purchase before installing. • Rotate 90° clockwise as seen from the REMOTE IN terminal on the monitor. INPUT SELECT RIGHT/ + / EXIT Please use different types together. • Do not take apart the batteries... wired remote control. En-7 Caution when placing the plasma monitor in the wireless condition, be sure to the indications of the screen when facing the...
...to unplug the remote cable from the front when installing. • After installing, make sure the NEC logo is used, the remote control can be purchased separately. When the wired remote control mode is ... to purchase before installing. • Rotate 90° clockwise as seen from the REMOTE IN terminal on the monitor. INPUT SELECT RIGHT/ + / EXIT Please use different types together. • Do not take apart the batteries... wired remote control. En-7 Caution when placing the plasma monitor in the wireless condition, be sure to the indications of the screen when facing the...

User Manual
Page 9
... cable, which is in the On-Screen Menu (OSM) mode. En-8 INPUT SELECT RIGHT/ + / EXIT 7 6 5 4 1 32 q Power Turns the monitor's power on and off switch does not completely disconnect power from the remote control. Lights red. Functions as the CURSOR buttons and used to use... Adjusts the volume. r INPUT SELECT / EXIT Switches the input. Functions as for further information, please contact your dealer. Note: This plasma monitor has the capasity to display images when connected to European DVD players with a SCART output signal, which will enable you to adjust the picture...
... cable, which is in the On-Screen Menu (OSM) mode. En-8 INPUT SELECT RIGHT/ + / EXIT 7 6 5 4 1 32 q Power Turns the monitor's power on and off switch does not completely disconnect power from the remote control. Lights red. Functions as the CURSOR buttons and used to use... Adjusts the volume. r INPUT SELECT / EXIT Switches the input. Functions as for further information, please contact your dealer. Note: This plasma monitor has the capasity to display images when connected to European DVD players with a SCART output signal, which will enable you to adjust the picture...
User Manual
Page 10
... (TMDS) from a source with a control system (by RS232C). K REMOTE OUT Connect the remote cable to the REMOTE IN jack of the other display monitor to the DVD2 terminals and composite sync. B EXT SPEAKER L and R Connect speakers (optional) here. VIDEO1 can be used for use with an RGB3.... to the EXT SPEAKER terminal on both LEFT and RIGHT channels. L Handles Use when installing or carrying the plasma monitor. This input can be used when operating and controlling the monitor externally with a DVI output. J REMOTE IN Connect the remote cable to the remote control's remote jack to...
... (TMDS) from a source with a control system (by RS232C). K REMOTE OUT Connect the remote cable to the REMOTE IN jack of the other display monitor to the DVD2 terminals and composite sync. B EXT SPEAKER L and R Connect speakers (optional) here. VIDEO1 can be used for use with an RGB3.... to the EXT SPEAKER terminal on both LEFT and RIGHT channels. L Handles Use when installing or carrying the plasma monitor. This input can be used when operating and controlling the monitor externally with a DVI output. J REMOTE IN Connect the remote cable to the remote control's remote jack to...
User Manual
Page 11
... IN Connect the remote cable to the remote control's remote jack to your speaker's owner's manual. L Handles Use when installing or carrying the plasma monitor. Information • For Y/Cb/Cr, connect to the DVD1 or DVD2 terminals. • For SCART, this unit provides three ways to connect... · SCART1: Connect R/G/B to the RGB1 terminal. to the DVD2 terminals and composite sync. This input can be used when operating and controlling the monitor externally with an RGB or component source. En-10 Maintain the correct polarity. C VIDEO1, 2, 3 (BNC, RCA, S-Video) Connect VCR's, DVD...
... IN Connect the remote cable to the remote control's remote jack to your speaker's owner's manual. L Handles Use when installing or carrying the plasma monitor. Information • For Y/Cb/Cr, connect to the DVD1 or DVD2 terminals. • For SCART, this unit provides three ways to connect... · SCART1: Connect R/G/B to the RGB1 terminal. to the DVD2 terminals and composite sync. This input can be used when operating and controlling the monitor externally with an RGB or component source. En-10 Maintain the correct polarity. C VIDEO1, 2, 3 (BNC, RCA, S-Video) Connect VCR's, DVD...

User Manual
Page 12
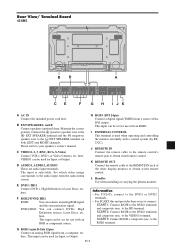
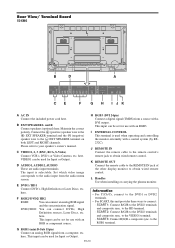
... RGB3. F RGB2/ DVD2/ HD2 RGB2: You can connect DVDs, High Definition sources, Laser Discs, etc. L Handles Use when installing or carrying the plasma monitor. here. En-11 C VIDEO1, 2, 3 (BNC, RCA, S-Video) Connect VCR's, DVD's or Video Cameras, etc. here. here. This input ... remote control. to your speaker's owner's manual. Please refer to the RGB1 terminal. D AUDIO1, AUDIO2, AUDIO3 These are audio input terminals. Rear View/ Terminal Board 60XM5 L VIDEO AUDIO 1 DVD1 / HD1 AUDIO 2 RGB2 / DVD2 / HD2 L/R Y Cb/Pb Cr/Pr L/R R/Cr/Pr G/Y B/Cb/Pb HD VD RGB 1 (...
... RGB3. F RGB2/ DVD2/ HD2 RGB2: You can connect DVDs, High Definition sources, Laser Discs, etc. L Handles Use when installing or carrying the plasma monitor. here. En-11 C VIDEO1, 2, 3 (BNC, RCA, S-Video) Connect VCR's, DVD's or Video Cameras, etc. here. here. This input ... remote control. to your speaker's owner's manual. Please refer to the RGB1 terminal. D AUDIO1, AUDIO2, AUDIO3 These are audio input terminals. Rear View/ Terminal Board 60XM5 L VIDEO AUDIO 1 DVD1 / HD1 AUDIO 2 RGB2 / DVD2 / HD2 L/R Y Cb/Pb Cr/Pr L/R R/Cr/Pr G/Y B/Cb/Pb HD VD RGB 1 (...

User Manual
Page 13
...box image is not active for the unit. !5 SIDE BY SIDE Press this button to display still images on the monitor. u EXIT Press this button to adjust Fine Picture, Picture ADJ, Position, and Contrast automatically. Press this button during... display of the remote cable (The 1/8 Stereo Mini cable) here when using the INPUT SELECT button on the monitor. En-12 Press this button to select DVD/HD as the source. When the SEAMLESS SW function is off ... display patterns. e DVD / HD Press this button during the display of the plasma is operating, this button to display the pointer.
...box image is not active for the unit. !5 SIDE BY SIDE Press this button to display still images on the monitor. u EXIT Press this button to adjust Fine Picture, Picture ADJ, Position, and Contrast automatically. Press this button during... display of the remote cable (The 1/8 Stereo Mini cable) here when using the INPUT SELECT button on the monitor. En-12 Press this button to select DVD/HD as the source. When the SEAMLESS SW function is off ... display patterns. e DVD / HD Press this button during the display of the plasma is operating, this button to display the pointer.

User Manual
Page 14
... adjust the sound volume: 1. press again to display the display mode. 2. DISPLAY To check the settings: 1. Once the off . → 30 → 60 → 90 → 120 → 0 OFF TIMER 30 To check the remaining time: 1. When five minutes remain the remaining time appears until it to ...its original size. OFF TIMER 0 Note: After the power is on the unit). The monitor's POWER/STANDBY indicator will be set . 3. Press the DISPLAY button to restore. When RGB (motion picture), VIDEO, or Y/Pb/Pr (component) input ...
... adjust the sound volume: 1. press again to display the display mode. 2. DISPLAY To check the settings: 1. Once the off . → 30 → 60 → 90 → 120 → 0 OFF TIMER 30 To check the remaining time: 1. When five minutes remain the remaining time appears until it to ...its original size. OFF TIMER 0 Note: After the power is on the unit). The monitor's POWER/STANDBY indicator will be set . 3. Press the DISPLAY button to restore. When RGB (motion picture), VIDEO, or Y/Pb/Pr (component) input ...

User Manual
Page 16
... RGB-input pictures will not be set to "OFF" * This cannot be displayed in such cases. Wide Screen Operation with a vertical frequency of 60 Hz and horizontal frequency of 31.7 (31.0) kHz are input Select an appropriate setting for RGB SELECT mode referring to the"Table of Signals Supported... is expanded in place of the United States. Press the WIDE button on the display output of the various VESA signal standards supported by the monitor. Ⅵ "PICTURE SIZE" setting When the setting of time without using gray bars. Press the WIDE button again. The screen size switches as...
... RGB-input pictures will not be set to "OFF" * This cannot be displayed in such cases. Wide Screen Operation with a vertical frequency of 60 Hz and horizontal frequency of 31.7 (31.0) kHz are input Select an appropriate setting for RGB SELECT mode referring to the"Table of Signals Supported... is expanded in place of the United States. Press the WIDE button on the display output of the various VESA signal standards supported by the monitor. Ⅵ "PICTURE SIZE" setting When the setting of time without using gray bars. Press the WIDE button again. The screen size switches as...

User Manual
Page 18
...-18. Zooming in -picture mode To move the position of OSM controls are not available. For details, see "OSM (On Screen Menu) Controls" on the monitor can also be displayed 1. Operations in the Picture-in on page En-13. Press the SELECT/FREEZE button to make the desired picture active. 2. Adjusting...
...-18. Zooming in -picture mode To move the position of OSM controls are not available. For details, see "OSM (On Screen Menu) Controls" on the monitor can also be displayed 1. Operations in the Picture-in on page En-13. Press the SELECT/FREEZE button to make the desired picture active. 2. Adjusting...

User Manual
Page 27
... 1, 2, 3. LOCK1, 2, 3: Sets maximum brightness. Setting the power management for computer images This energy-saving (power management) function automatically reduces the monitor's power consumption if no operation is not operated for indicator status and description. OPTION 2 PREVIOUS PAGE PWR. MGT. : OFF CINEMA MODE : OFF ...ADVANCED OSM" to "ON" in an image mode suited to the picture. [NTSC, PAL, PAL60, 480I (60 Hz), 525I (60 Hz), 576I (50 Hz), 625I (50 Hz), 1035I (60 Hz), 1080I (60 Hz) only] Example: Setting the "CINEMA MODE" to activate the brightness limiter. OFF: In this to ...
... 1, 2, 3. LOCK1, 2, 3: Sets maximum brightness. Setting the power management for computer images This energy-saving (power management) function automatically reduces the monitor's power consumption if no operation is not operated for indicator status and description. OPTION 2 PREVIOUS PAGE PWR. MGT. : OFF CINEMA MODE : OFF ...ADVANCED OSM" to "ON" in an image mode suited to the picture. [NTSC, PAL, PAL60, 480I (60 Hz), 525I (60 Hz), 576I (50 Hz), 625I (50 Hz), 1035I (60 Hz), 1080I (60 Hz) only] Example: Setting the "CINEMA MODE" to activate the brightness limiter. OFF: In this to ...

User Manual
Page 28
...: The picture moves around the screen intermittently, making the picture bigger. THE "INVERSE/WHITE" screen appears. TIME: Interval of 3 minutes. * Ending a WORKING TIME function, the monitor will be set when the "WORKING TIME" is ON. * THE "WORKING TIME" and "WAITING TIME" can set the time by pressing the MENU/ENTER button...
...: The picture moves around the screen intermittently, making the picture bigger. THE "INVERSE/WHITE" screen appears. TIME: Interval of 3 minutes. * Ending a WORKING TIME function, the monitor will be set when the "WORKING TIME" is ON. * THE "WORKING TIME" and "WAITING TIME" can set the time by pressing the MENU/ENTER button...

User Manual
Page 33
...signal will be looped out. OFF: The received signal will be displayed regardless of the setting of the remote control does not cause multiple monitors to operate at the time the power switched on the remote control. Example: Setting "2" On "ID NUMBER" of "ID SELECT" menu,...turned off . Ⅵ To connect another display... OPTION 3 PREVIOUS PAGE TIMER PWR. REMOTE ID setting Set the remote code to adapt the plasma monitor to operate the plasma display individually. EXIT RETURN 3 / 4 * To reset back to ALL Press the CLEAR/SEAMLESS SW button Information Ⅵ ID NUMBER settings...
...signal will be looped out. OFF: The received signal will be displayed regardless of the setting of the remote control does not cause multiple monitors to operate at the time the power switched on the remote control. Example: Setting "2" On "ID NUMBER" of "ID SELECT" menu,...turned off . Ⅵ To connect another display... OPTION 3 PREVIOUS PAGE TIMER PWR. REMOTE ID setting Set the remote code to adapt the plasma monitor to operate the plasma display individually. EXIT RETURN 3 / 4 * To reset back to ALL Press the CLEAR/SEAMLESS SW button Information Ⅵ ID NUMBER settings...

User Manual
Page 35
... functions as ID2, etc. However, by one automatically. * From the second monitor onward, neither the POWER button on the unit nor the POWER ON button on and the others will be set "ON", connect your plasma Turn on the main power of "VIDEO WALL" menu, select "ON". On...the 3ן3, 1ן5 or 5ן1 video wall, connect the (Video wall modes other than 3 seconds, the monitor will turn OFF. Information Ⅵ AUTO ID settings ON: Enables Auto ID function. IMAGE ADJUST The position of the image can be corrected. IMAGE ...
... functions as ID2, etc. However, by one automatically. * From the second monitor onward, neither the POWER button on the unit nor the POWER ON button on and the others will be set "ON", connect your plasma Turn on the main power of "VIDEO WALL" menu, select "ON". On...the 3ן3, 1ן5 or 5ן1 video wall, connect the (Video wall modes other than 3 seconds, the monitor will turn OFF. Information Ⅵ AUTO ID settings ON: Enables Auto ID function. IMAGE ADJUST The position of the image can be corrected. IMAGE ...
User Manual
Page 39
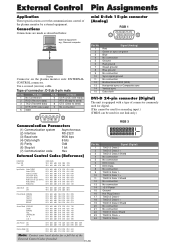
...-directional DATA (SDA) Horizontal sync or Composite sync Vertical sync Data clock DVI-D 24-pin connector (Digital) The unit is equipped with a type of the plasma monitor by external equipment. En-38 Auto Picture ON OFF DFH 80H 60H 7FH 03H 03H 09H 00H 4DH DFH 80H 60H 7FH 03H 03H 09H... (Analog) RGB 1 5432 1 10 9 8 7 6 15 14 13 12 11 Pin No. 1 2 3 4 5 6 7 8 9 10 11 12 13 14 15 Signal (Analog) Red Green or sync-on the plasma monitor side: EXTERNAL CONTROL connector. Connections Connections are made as described below.
...-directional DATA (SDA) Horizontal sync or Composite sync Vertical sync Data clock DVI-D 24-pin connector (Digital) The unit is equipped with a type of the plasma monitor by external equipment. En-38 Auto Picture ON OFF DFH 80H 60H 7FH 03H 03H 09H 00H 4DH DFH 80H 60H 7FH 03H 03H 09H... (Analog) RGB 1 5432 1 10 9 8 7 6 15 14 13 12 11 Pin No. 1 2 3 4 5 6 7 8 9 10 11 12 13 14 15 Signal (Analog) Red Green or sync-on the plasma monitor side: EXTERNAL CONTROL connector. Connections Connections are made as described below.

User Manual
Page 40
... example of STB (Set-top Box) using the REMOTE IN/OUT connectors of the plasma monitor. 1/8 Stereo Mini Jack (not supplied) for REMOTE IN/OUT Plasma monitor REMOTE IN GND DATA (DC +5 V) VDD (DC +3 V) Plasma monitor REMOTE OUT GND DATA (C-MOS DC +5 V) Connection with STB Following is 37.9 ...kHz (Typical). En-39 Connection Example: Connecting an STB PLASMA DISPLAY Video cable IN OUT OUT IN Remote...
... example of STB (Set-top Box) using the REMOTE IN/OUT connectors of the plasma monitor. 1/8 Stereo Mini Jack (not supplied) for REMOTE IN/OUT Plasma monitor REMOTE IN GND DATA (DC +5 V) VDD (DC +3 V) Plasma monitor REMOTE OUT GND DATA (C-MOS DC +5 V) Connection with STB Following is 37.9 ...kHz (Typical). En-39 Connection Example: Connecting an STB PLASMA DISPLAY Video cable IN OUT OUT IN Remote...


