60XM5 IG
Page 1
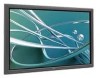
... Systems Division Rev 1.0 Product Description Type: Plasma Display Resolution: 1365x768 Aspect Ratio: 16:9 Color Correction: NEC AccuCrimson (in inches, for installation. 60XM5 Installation Guide 60" Plasma Display Contents: Product Description and Notes Ventilation Requirements Display Dimensions Front, Top, Bottom & Right Side Rear Display Dimensions w/Optional Speakers and Stand Optional Speakers and Stand Dimensions __ Dimensions w/Optional Wall...
... Systems Division Rev 1.0 Product Description Type: Plasma Display Resolution: 1365x768 Aspect Ratio: 16:9 Color Correction: NEC AccuCrimson (in inches, for installation. 60XM5 Installation Guide 60" Plasma Display Contents: Product Description and Notes Ventilation Requirements Display Dimensions Front, Top, Bottom & Right Side Rear Display Dimensions w/Optional Speakers and Stand Optional Speakers and Stand Dimensions __ Dimensions w/Optional Wall...
60XM5 IG
Page 5
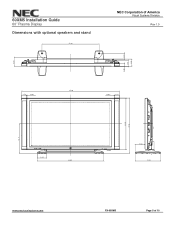
60XM5 Installation Guide 60" Plasma Display Dimensions with optional speakers and stand 37.90 NEC Corporation of America Visual Systems Division Rev 1.0 3.80 4.80 3.80 1.80 3.50 (0.02) 65.00 (0.02) 3.50 6.00 19.7" 34.60 37.10 6.40 44.00 LED&IR 6.00 17.00 www.necvisualsystems.com PX-60XM5 Page 5 of 10
60XM5 Installation Guide 60" Plasma Display Dimensions with optional speakers and stand 37.90 NEC Corporation of America Visual Systems Division Rev 1.0 3.80 4.80 3.80 1.80 3.50 (0.02) 65.00 (0.02) 3.50 6.00 19.7" 34.60 37.10 6.40 44.00 LED&IR 6.00 17.00 www.necvisualsystems.com PX-60XM5 Page 5 of 10
60XM5 IG
Page 6
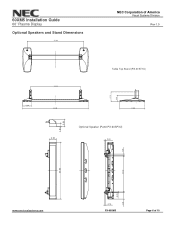
60XM5 Installation Guide 60" Plasma Display Optional Speakers and Stand Dimensions 37.90 NEC Corporation of America Visual Systems Division Rev 1.0 Table Top Stand (PX-61ST1U) 33.50 6.74 4.39 6.40 44.00 17.00 1.80 3.80 Optional Speaker (Part# PX-60SP3U) 3.50 0.50 1.20 22.10 34.60 0.20 4.20 www.necvisualsystems.com 0.70 PX-60XM5 Page 6 of 10
60XM5 Installation Guide 60" Plasma Display Optional Speakers and Stand Dimensions 37.90 NEC Corporation of America Visual Systems Division Rev 1.0 Table Top Stand (PX-61ST1U) 33.50 6.74 4.39 6.40 44.00 17.00 1.80 3.80 Optional Speaker (Part# PX-60SP3U) 3.50 0.50 1.20 22.10 34.60 0.20 4.20 www.necvisualsystems.com 0.70 PX-60XM5 Page 6 of 10

60XM5 IG
Page 9
60XM5 Installation Guide 60" Plasma Display Connections NEC Corporation of America Visual Systems Division Rev 1.0 Located at bottom of 10 Speaker Connections www.necvisualsystems.com AC Inlet PX-60XM5 Page 9 of display Control Buttons Power Button Ext.
60XM5 Installation Guide 60" Plasma Display Connections NEC Corporation of America Visual Systems Division Rev 1.0 Located at bottom of 10 Speaker Connections www.necvisualsystems.com AC Inlet PX-60XM5 Page 9 of display Control Buttons Power Button Ext.
User Manual
Page 5
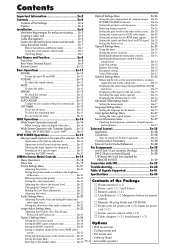
...the screen at the same time .. En-5 Creating a video wall En-6 Cable Management En-6 Caution when placing the plasma monitor in the picture En-21 Setting the color temperature En-21 Contents of the Package Adjusting the color to the desired...External Control Codes (Reference En-38 Selecting the input signals to the default values En-25 En-4 • Attachable speakers En-28 Setting the picture size for the menus En-37 To check the remaining time En-13 Color System ...-17 Pin Assignments En-38 Zooming in on mode En-31 Enabling/disabling the front panel controls ..........
...the screen at the same time .. En-5 Creating a video wall En-6 Cable Management En-6 Caution when placing the plasma monitor in the picture En-21 Setting the color temperature En-21 Contents of the Package Adjusting the color to the desired...External Control Codes (Reference En-38 Selecting the input signals to the default values En-25 En-4 • Attachable speakers En-28 Setting the picture size for the menus En-37 To check the remaining time En-13 Color System ...-17 Pin Assignments En-38 Zooming in on mode En-31 Enabling/disabling the front panel controls ..........
User Manual
Page 10
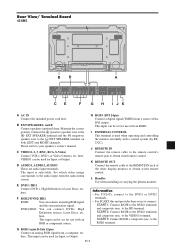
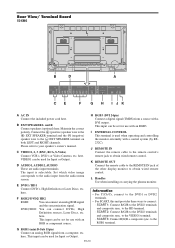
...Use when installing or carrying the plasma monitor. G RGB1 (mini D-Sub 15pin) Connect an analog RGB signal from the audio menu screen. En-9 Maintain the correct polarity. Connect the (positive) speaker wire to the EXT SPEAKER terminal and the (negative) speaker wire to the RGB1 terminal. ...here. VIDEO1 can be used for Input or Output. DVD2/ HD2: You can connect an analog RGB signal and the syncronization signal. to your speaker's owner's manual. Please refer to the VIDEO1 terminal. · SCART3: Connect R/G/B + composite sync. E DVD1 / HD1 Connect DVD's, High...
...Use when installing or carrying the plasma monitor. G RGB1 (mini D-Sub 15pin) Connect an analog RGB signal from the audio menu screen. En-9 Maintain the correct polarity. Connect the (positive) speaker wire to the EXT SPEAKER terminal and the (negative) speaker wire to the RGB1 terminal. ...here. VIDEO1 can be used for Input or Output. DVD2/ HD2: You can connect an analog RGB signal and the syncronization signal. to your speaker's owner's manual. Please refer to the VIDEO1 terminal. · SCART3: Connect R/G/B + composite sync. E DVD1 / HD1 Connect DVD's, High...
User Manual
Page 11
... remote control's remote jack to the RGB1 terminal. to obtain wired remote control. E DVD1 / HD1 Connect DVD's, High Definition or Laser Discs, etc. B EXT SPEAKER L and R Connect speakers (optional) here. I JK A AC IN Connect the included power cord here. K REMOTE OUT Connect the remote cable to the REMOTE IN jack of the... terminal is selectable. here. F RGB2/ DVD2/ HD2 RGB2: You can connect DVDs, High Definition sources, Laser Discs, etc. L Handles Use when installing or carrying the plasma monitor.
... remote control's remote jack to the RGB1 terminal. to obtain wired remote control. E DVD1 / HD1 Connect DVD's, High Definition or Laser Discs, etc. B EXT SPEAKER L and R Connect speakers (optional) here. I JK A AC IN Connect the included power cord here. K REMOTE OUT Connect the remote cable to the REMOTE IN jack of the... terminal is selectable. here. F RGB2/ DVD2/ HD2 RGB2: You can connect DVDs, High Definition sources, Laser Discs, etc. L Handles Use when installing or carrying the plasma monitor.

User Manual
Page 12
... speaker wire to the EXT SPEAKER terminal and the (negative) speaker wire to the RGB1 terminal. E DVD1 / HD1 Connect DVD's, High Definition or Laser Discs, etc. F RGB2/ DVD2/ HD2 RGB2: You can connect DVDs, High Definition sources, Laser Discs, etc. L Handles Use when installing or carrying the plasma ... output. The input is used for use with a control system (by RS232C). This input can be set for Input or Output. Rear View/ Terminal Board 60XM5 L VIDEO AUDIO 1 DVD1 / HD1 AUDIO 2 RGB2 / DVD2 / HD2 L/R Y Cb/Pb Cr/Pr L/R R/Cr/Pr G/Y B/Cb/Pb HD VD RGB 1 (IN/OUT) ...
... speaker wire to the EXT SPEAKER terminal and the (negative) speaker wire to the RGB1 terminal. E DVD1 / HD1 Connect DVD's, High Definition or Laser Discs, etc. F RGB2/ DVD2/ HD2 RGB2: You can connect DVDs, High Definition sources, Laser Discs, etc. L Handles Use when installing or carrying the plasma ... output. The input is used for use with a control system (by RS232C). This input can be set for Input or Output. Rear View/ Terminal Board 60XM5 L VIDEO AUDIO 1 DVD1 / HD1 AUDIO 2 RGB2 / DVD2 / HD2 L/R Y Cb/Pb Cr/Pr L/R R/Cr/Pr G/Y B/Cb/Pb HD VD RGB 1 (IN/OUT) ...

User Manual
Page 41
...monitor. • Operate the computer (move the monitor to a cooler location and wait for 60 minutes. If the room where the monitor is installed is caused by closing curtains, pointing the.... Poor picture with RGB signal input. It indicates that the power supply circuit, plasma display panel, temperature sensor, or one or more fans have been damaged. Picture appears but... • Increase the volume. • Press the remote control's MUTE button. • Connect the speakers properly. • Set AUDIO INPUT on screen. See *2. *1 Overheat protector If the monitor becomes too ...
...monitor. • Operate the computer (move the monitor to a cooler location and wait for 60 minutes. If the room where the monitor is installed is caused by closing curtains, pointing the.... Poor picture with RGB signal input. It indicates that the power supply circuit, plasma display panel, temperature sensor, or one or more fans have been damaged. Picture appears but... • Increase the volume. • Press the remote control's MUTE button. • Connect the speakers properly. • Set AUDIO INPUT on screen. See *2. *1 Overheat protector If the monitor becomes too ...


