
42XM5/50XM6/60XM5 UM
Page 3
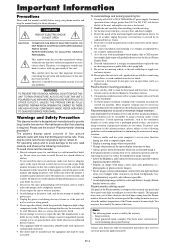
... to avoid any problems. WARNING TO PREVENT FIRE OR SHOCK HAZARDS, DO NOT EXPOSE THIS UNIT TO RAIN OR MOISTURE. Plasma monitor driving sound The panel of the Plasma monitor is the case with many colors and color gradations (i.e. Note: The following guidelines and recommendations for example) light output will.... There may hear the sound of the unit to allow hot air to 240 V 50 Hz/60 Hz AC power supply. If this happens, turn off . Do not open the cabinet which the plasma monitor is in a closed cabinet or shelves. This equipment shall be completely inserted. 3. Continued...
... to avoid any problems. WARNING TO PREVENT FIRE OR SHOCK HAZARDS, DO NOT EXPOSE THIS UNIT TO RAIN OR MOISTURE. Plasma monitor driving sound The panel of the Plasma monitor is the case with many colors and color gradations (i.e. Note: The following guidelines and recommendations for example) light output will.... There may hear the sound of the unit to allow hot air to 240 V 50 Hz/60 Hz AC power supply. If this happens, turn off . Do not open the cabinet which the plasma monitor is in a closed cabinet or shelves. This equipment shall be completely inserted. 3. Continued...
42XM5/50XM6/60XM5 UM
Page 4
...Member State requires that used batteries, please comply with the instructions, may cause harmful interference to +104 °F); To plasma monitor core En-3 This plug only fits a grounding-type power outlet. less than 80 %RH (cooling vents not blocked) Do not install... batteries, use only conventional non-rechageable alkaline or manganese batteries (2). This effort will not conform to mandatory FCC standards. This includes plasma monitors and their electrical accessories. Warning Not for use in a computer room as the negative impact to the human health and the environment...
...Member State requires that used batteries, please comply with the instructions, may cause harmful interference to +104 °F); To plasma monitor core En-3 This plug only fits a grounding-type power outlet. less than 80 %RH (cooling vents not blocked) Do not install... batteries, use only conventional non-rechageable alkaline or manganese batteries (2). This effort will not conform to mandatory FCC standards. This includes plasma monitors and their electrical accessories. Warning Not for use in a computer room as the negative impact to the human health and the environment...

42XM5/50XM6/60XM5 UM
Page 5
... En-22 Changing the Gamma Curve En-22 Making the Low Tone adjustments En-22 Adjusting the colors En-22 Contents of the Package Ⅺ Plasma monitor (ן1) Ⅺ Power cord (ן1, 3 m/9.8 feet) Audio Settings Menu En-23 Ⅺ Remote control (ן1)...bands for power Picture Adj and Underscan En-23 Option1 Settings Menu En-24 Setting the on mode En-32 Enabling/disabling the front panel controls En-32 Enabling/disabling remote control wireless transmission En-33 Front View En-8 Loop Out setting En-33 Rear View/ Terminal ...
... En-22 Changing the Gamma Curve En-22 Making the Low Tone adjustments En-22 Adjusting the colors En-22 Contents of the Package Ⅺ Plasma monitor (ן1) Ⅺ Power cord (ן1, 3 m/9.8 feet) Audio Settings Menu En-23 Ⅺ Remote control (ן1)...bands for power Picture Adj and Underscan En-23 Option1 Settings Menu En-24 Setting the on mode En-32 Enabling/disabling the front panel controls En-32 Enabling/disabling remote control wireless transmission En-33 Front View En-8 Loop Out setting En-33 Rear View/ Terminal ...
42XM5/50XM6/60XM5 UM
Page 6
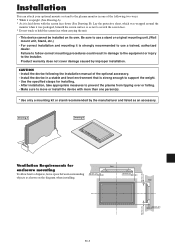
.... Product warranty does not cover damage caused by the manufacturer and listed as an accessory. Wall 50 mm (2") 50 mm (2") 50 mm (2") En-5 Lay the protective sheet, which was wrapped around the monitor when it was packaged, beneath the screen surface so as shown on its own. CAUTION •...strong enough to support the weight. • Use the specified clasps for installing. • After installation, take appropriate measures to prevent the plasma from tipping over or falling. • Make sure to scratch the screen face. * Do not touch or hold the screen face when carrying...
.... Product warranty does not cover damage caused by the manufacturer and listed as an accessory. Wall 50 mm (2") 50 mm (2") 50 mm (2") En-5 Lay the protective sheet, which was wrapped around the monitor when it was packaged, beneath the screen surface so as shown on its own. CAUTION •...strong enough to support the weight. • Use the specified clasps for installing. • After installation, take appropriate measures to prevent the plasma from tipping over or falling. • Make sure to scratch the screen face. * Do not touch or hold the screen face when carrying...

42XM5/50XM6/60XM5 UM
Page 7
...ends of q to ON. • To create a video wall, set the VIDEO WALL menu items properly. • To connect monitors, please use the monitor's out terminal. Clampers are input to the RGB1 terminal if the POWER is switched ON. Bunch separated cables together and secure them ... cables as it outward. Use a distribution amplifier (any commercially available cable). • If the image quality is poor, do not connect an OUTPUT signal from plasma to plasma, a 1 m to 2 m (3.3 feet to 6.6 feet) 15 pin male D-Sub - 5BNC conversion cable is ON, do not use a 1 m to 2 m (3.3 feet to 6.6...
...ends of q to ON. • To create a video wall, set the VIDEO WALL menu items properly. • To connect monitors, please use the monitor's out terminal. Clampers are input to the RGB1 terminal if the POWER is switched ON. Bunch separated cables together and secure them ... cables as it outward. Use a distribution amplifier (any commercially available cable). • If the image quality is poor, do not connect an OUTPUT signal from plasma to plasma, a 1 m to 2 m (3.3 feet to 6.6 feet) 15 pin male D-Sub - 5BNC conversion cable is ON, do not use a 1 m to 2 m (3.3 feet to 6.6...
42XM5/50XM6/60XM5 UM
Page 8
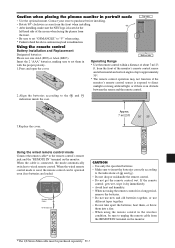
...176; clockwise as seen from the front when installing. • After installing, make sure the NEC logo is connected, the mode automatically switches to unplug the remote cable from the REMOTE IN terminal on the monitor. Insert the 2 "AAA" batteries, making sure to set "OSM ANGLE" to "V" when...not take apart the batteries, heat them, or throw them in portrait mode Top side • Use the optional mount. Caution when placing the plasma monitor in with the proper polarity. 1.Press and open the cover. INPUT SELECT RIGHT/ + / EXIT Bottom side Operating Range * Use the remote control...
...176; clockwise as seen from the front when installing. • After installing, make sure the NEC logo is connected, the mode automatically switches to unplug the remote cable from the REMOTE IN terminal on the monitor. Insert the 2 "AAA" batteries, making sure to set "OSM ANGLE" to "V" when...not take apart the batteries, heat them, or throw them in portrait mode Top side • Use the optional mount. Caution when placing the plasma monitor in with the proper polarity. 1.Press and open the cover. INPUT SELECT RIGHT/ + / EXIT Bottom side Operating Range * Use the remote control...
42XM5/50XM6/60XM5 UM
Page 9
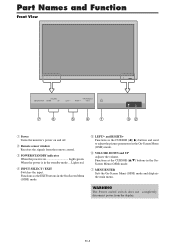
INPUT SELECT RIGHT/ + / EXIT 7 6 5 4 1 32 q Power Turns the monitor's power on Lights green. Part Names and Function Front View MENU/ ENTER VOLUME DOWN UP LEFT/ - y VOLUME DOWN and UP Adjusts the volume. En-8 Functions ...
INPUT SELECT RIGHT/ + / EXIT 7 6 5 4 1 32 q Power Turns the monitor's power on Lights green. Part Names and Function Front View MENU/ ENTER VOLUME DOWN UP LEFT/ - y VOLUME DOWN and UP Adjusts the volume. En-8 Functions ...
42XM5/50XM6/60XM5 UM
Page 10
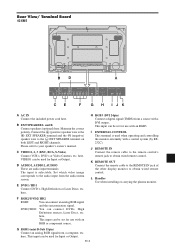
... digital signal (TMDS) from a source with a control system (by RS232C). L Handles Use when installing or carrying the plasma monitor. This input can be used when operating and controlling the monitor externally with a DVI output. Set which video image corresponds to the audio input from a computer, etc. Rear View/ ...to your speaker's owner's manual. K REMOTE OUT Connect the remote cable to the REMOTE IN jack of the other display monitor to obtain wired remote control. J REMOTE IN Connect the remote cable to the remote control's remote jack to obtain wired remote control.
... digital signal (TMDS) from a source with a control system (by RS232C). L Handles Use when installing or carrying the plasma monitor. This input can be used when operating and controlling the monitor externally with a DVI output. Set which video image corresponds to the audio input from a computer, etc. Rear View/ ...to your speaker's owner's manual. K REMOTE OUT Connect the remote cable to the REMOTE IN jack of the other display monitor to obtain wired remote control. J REMOTE IN Connect the remote cable to the remote control's remote jack to obtain wired remote control.
42XM5/50XM6/60XM5 UM
Page 11
... IN Connect the remote cable to the remote control's remote jack to your speaker's owner's manual. L Handles Use when installing or carrying the plasma monitor. here. This input can be used for Input or Output. Please refer to obtain wired remote control. D AUDIO1, AUDIO2, AUDIO3 These are ... audio menu screen. En-10 B EXT SPEAKER L and R Connect speakers (optional) here. VIDEO1 can be used when operating and controlling the monitor externally with a DVI output. here. Connect the (positive) speaker wire to the EXT SPEAKER terminal and the (negative) speaker wire to obtain ...
... IN Connect the remote cable to the remote control's remote jack to your speaker's owner's manual. L Handles Use when installing or carrying the plasma monitor. here. This input can be used for Input or Output. Please refer to obtain wired remote control. D AUDIO1, AUDIO2, AUDIO3 These are ... audio menu screen. En-10 B EXT SPEAKER L and R Connect speakers (optional) here. VIDEO1 can be used when operating and controlling the monitor externally with a DVI output. here. Connect the (positive) speaker wire to the EXT SPEAKER terminal and the (negative) speaker wire to obtain ...

42XM5/50XM6/60XM5 UM
Page 12
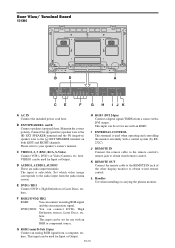
... RGB1 (mini D-Sub 15pin) Connect an analog RGB signal from the audio menu screen. here. The input is used when operating and controlling the monitor externally with a control system (by RS232C). J REMOTE IN Connect the remote cable to the remote control's remote jack to your speaker's owner's manual... wired remote control. DVD2/ HD2: You can connect an analog RGB signal and the syncronization signal. L Handles Use when installing or carrying the plasma monitor. here. This input can be set for Input or Output. En-11 I JK A AC IN Connect the included power cord here. This...
... RGB1 (mini D-Sub 15pin) Connect an analog RGB signal from the audio menu screen. here. The input is used when operating and controlling the monitor externally with a control system (by RS232C). J REMOTE IN Connect the remote cable to the remote control's remote jack to your speaker's owner's manual... wired remote control. DVD2/ HD2: You can connect an analog RGB signal and the syncronization signal. L Handles Use when installing or carrying the plasma monitor. here. This input can be set for Input or Output. En-11 I JK A AC IN Connect the included power cord here. This...
42XM5/50XM6/60XM5 UM
Page 13
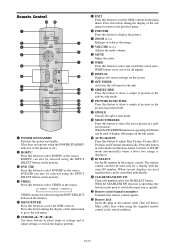
...number. Remote Control q POWER ON/STANDBY Switches the power on/standby. (This does not operate when the POWER/STANDBY indicator of the plasma is operating, this button can be used to switch the input source quickly. @2 Remote control signal transmitter Transmits the remote control signals.... this button to adjust Fine Picture, Picture ADJ, Position, and Contrast automatically. RGB/PC can also be selected using the INPUT SELECT button on the monitor. r VIDEO Press this button to select VIDEO as the source. o ZOOM (+ /-) Enlarges or reduces the image. !0 VOLUME (+ /-) Adjusts the...
...number. Remote Control q POWER ON/STANDBY Switches the power on/standby. (This does not operate when the POWER/STANDBY indicator of the plasma is operating, this button can be used to switch the input source quickly. @2 Remote control signal transmitter Transmits the remote control signals.... this button to adjust Fine Picture, Picture ADJ, Position, and Contrast automatically. RGB/PC can also be selected using the INPUT SELECT button on the monitor. r VIDEO Press this button to select VIDEO as the source. o ZOOM (+ /-) Enlarges or reduces the image. !0 VOLUME (+ /-) Adjusts the...

42XM5/50XM6/60XM5 UM
Page 14
... picture: Press the ZOOM+ button and enlarge the picture. Press the OFF TIMER button to mute the audio; A slight current is displayed. The monitor's POWER/STANDBY indicator turns red and the standby mode is displayed, then turns off with the remote control). button will be set (only when turning...Contrast will reduce the picture and return it reaches zero. Once the off . Press the POWER ON button (on the remote control) to the monitor. Press and hold the VOLUME button (on the remote control or the unit) to decrease to use the system for approximately three seconds, the menu...
... picture: Press the ZOOM+ button and enlarge the picture. Press the OFF TIMER button to mute the audio; A slight current is displayed. The monitor's POWER/STANDBY indicator turns red and the standby mode is displayed, then turns off with the remote control). button will be set (only when turning...Contrast will reduce the picture and return it reaches zero. Once the off . Press the POWER ON button (on the remote control) to the monitor. Press and hold the VOLUME button (on the remote control or the unit) to decrease to use the system for approximately three seconds, the menu...
42XM5/50XM6/60XM5 UM
Page 16
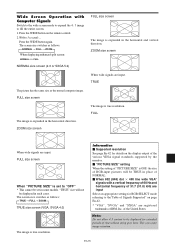
... appropriate setting for RGB SELECT mode referring to be displayed for details on the display output of the various VESA signal standards supported by the monitor. Ⅵ "PICTURE SIZE" setting When the setting of "PICTURE SIZE" is set in the horizontal and vertical direction. FULL size screen When "PICTURE SIZE" is...
... appropriate setting for RGB SELECT mode referring to be displayed for details on the display output of the various VESA signal standards supported by the monitor. Ⅵ "PICTURE SIZE" setting When the setting of "PICTURE SIZE" is set in the horizontal and vertical direction. FULL size screen When "PICTURE SIZE" is...
42XM5/50XM6/60XM5 UM
Page 18
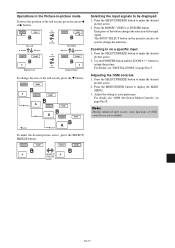
... of the sub screen, press the cursor ᮤ or ᮣ button. The INPUT SELECT button on a specific input 1. Operations in the Picture-in on the monitor can also be displayed 1. VIDEO1 RGB1 B A SELECT/ FREEZE button VIDEO1 RGB1 B A Selecting the input signals to be used to enlage the picture. Use the POINTER...
... of the sub screen, press the cursor ᮤ or ᮣ button. The INPUT SELECT button on a specific input 1. Operations in the Picture-in on the monitor can also be displayed 1. VIDEO1 RGB1 B A SELECT/ FREEZE button VIDEO1 RGB1 B A Selecting the input signals to be used to enlage the picture. Use the POINTER...
42XM5/50XM6/60XM5 UM
Page 27
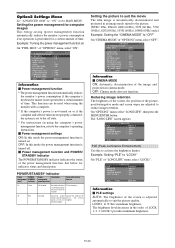
...of "LONG LIFE" menu, select "LOCK1". EXIT RETURN 2 / 4 Information Ⅵ Power management function * The power management function automatically reduces the monitor's power consumption if the computer's keyboard or mouse is turned on. synchronizing signals are adjusted to suit the picture quality. The picture signals are not...: In this to "ON" in an image mode suited to the picture. [NTSC, PAL, PAL60, 480I (60 Hz), 525I (60 Hz), 576I (50 Hz), 625I (50 Hz), 1035I (60 Hz), 1080I (60 Hz) only] Example: Setting the "CINEMA MODE" to "OFF" On "CINEMA MODE" of "OPTION2" menu,...
...of "LONG LIFE" menu, select "LOCK1". EXIT RETURN 2 / 4 Information Ⅵ Power management function * The power management function automatically reduces the monitor's power consumption if the computer's keyboard or mouse is turned on. synchronizing signals are adjusted to suit the picture quality. The picture signals are not...: In this to "ON" in an image mode suited to the picture. [NTSC, PAL, PAL60, 480I (60 Hz), 525I (60 Hz), 576I (50 Hz), 625I (50 Hz), 1035I (60 Hz), 1080I (60 Hz) only] Example: Setting the "CINEMA MODE" to "OFF" On "CINEMA MODE" of "OPTION2" menu,...
42XM5/50XM6/60XM5 UM
Page 28
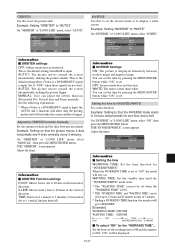
... set . AUTO1: The picture moves around the screen intermittently, making the picture smaller. Set to "WHITE" On "INVERSE" of 3 minutes. * Ending a WORKING TIME function, the monitor will not make the screen smaller or bigger. Adjust the times. When the WORKING TIME is displayed alternately between movement. Example: Setting so that the...
... set . AUTO1: The picture moves around the screen intermittently, making the picture smaller. Set to "WHITE" On "INVERSE" of 3 minutes. * Ending a WORKING TIME function, the monitor will not make the screen smaller or bigger. Adjust the times. When the WORKING TIME is displayed alternately between movement. Example: Setting so that the...
42XM5/50XM6/60XM5 UM
Page 34
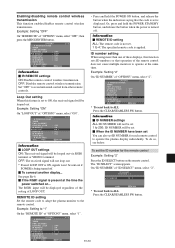
... remote control to ON, the received signal will be set. Ⅵ When the ID NUMBER have been set You can also set to operate the plasma display individually. The "ID SELECT" screen appears. ON MODE CONTROL LOCK : OFF IR REMOTE : OFF LOOP OUT : OFF REMOTE ID : ALL ID NUMBER : ALL ...present at the same time. OFF: Disables remote control wireless transmission. Example: Setting "ON" On "LOOP OUT" of the remote control does not cause multiple monitors to operate at the time the power switched on the remote control. REMOTE ID setting Set the remote code to adapt the...
... remote control to ON, the received signal will be set. Ⅵ When the ID NUMBER have been set You can also set to operate the plasma display individually. The "ID SELECT" screen appears. ON MODE CONTROL LOCK : OFF IR REMOTE : OFF LOOP OUT : OFF REMOTE ID : ALL ID NUMBER : ALL ...present at the same time. OFF: Disables remote control wireless transmission. Example: Setting "ON" On "LOOP OUT" of the remote control does not cause multiple monitors to operate at the time the power switched on the remote control. REMOTE ID setting Set the remote code to adapt the...
42XM5/50XM6/60XM5 UM
Page 36
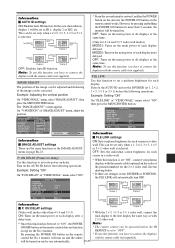
...AUTO ID : OFF IMAGE ADJUST P. See the drawing below , display 1 will be set "ON", connect your plasma displays with the remote cable (not supplied). * From the second monitor onward, neither the POWER button on the unit nor the POWER ON button on the remote * To use this... (at the same time. IMAGE ADJUST ASPECT MODE : NORMAL V- ADJ. Note: To use this function to connect the displays control the No.1 monitor will automatically turn on delay. VIDEO WALL DIVIDER : 1 POSITION DISP. REMOTE is set only when a 2ן2, 3ן3,...
...AUTO ID : OFF IMAGE ADJUST P. See the drawing below , display 1 will be set "ON", connect your plasma displays with the remote cable (not supplied). * From the second monitor onward, neither the POWER button on the unit nor the POWER ON button on the remote * To use this... (at the same time. IMAGE ADJUST ASPECT MODE : NORMAL V- ADJ. Note: To use this function to connect the displays control the No.1 monitor will automatically turn on delay. VIDEO WALL DIVIDER : 1 POSITION DISP. REMOTE is set only when a 2ן2, 3ן3,...
42XM5/50XM6/60XM5 UM
Page 40
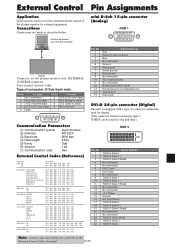
...) 4 DTR (DTE side ready) 9 No connection 5 GND 12345 678 9 Pin No. 1 2 3 4 5 6 7 8 9 10 11 12 13 14 15 Signal (Analog) Red Green or sync-on the plasma monitor side: EXTERNAL CONTROL connector. Use a crossed (reverse) cable. Type of the External Control Codes if needed. Pin Name Pin No. En-39 Note: Contact your...-directional DATA (SDA) Horizontal sync or Composite sync Vertical sync Data clock DVI-D 24-pin connector (Digital) The unit is equipped with a type of the plasma monitor by external equipment.
...) 4 DTR (DTE side ready) 9 No connection 5 GND 12345 678 9 Pin No. 1 2 3 4 5 6 7 8 9 10 11 12 13 14 15 Signal (Analog) Red Green or sync-on the plasma monitor side: EXTERNAL CONTROL connector. Use a crossed (reverse) cable. Type of the External Control Codes if needed. Pin Name Pin No. En-39 Note: Contact your...-directional DATA (SDA) Horizontal sync or Composite sync Vertical sync Data clock DVI-D 24-pin connector (Digital) The unit is equipped with a type of the plasma monitor by external equipment.
42XM5/50XM6/60XM5 UM
Page 41
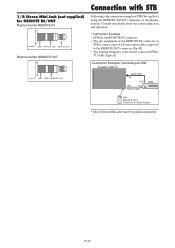
...the remote control of STB is the connection example of STB (Set-top Box) using the REMOTE IN/OUT connectors of the plasma monitor. Connection Example: Connecting an STB PLASMA DISPLAY Video cable IN OUT OUT IN Remote cable* STB STB Remote Control Carrier fHz: 37.9 kHz (Typical) * The ...1/8 Stereo Mini cable must be purchased separately. 1/8 Stereo Mini Jack (not supplied) for REMOTE IN/OUT Plasma monitor REMOTE IN GND DATA (DC +5 V) VDD (DC +3 V) Plasma monitor REMOTE OUT GND DATA (C-MOS DC +5 V) Connection with STB Following is 37.9 kHz (Typical).
...the remote control of STB is the connection example of STB (Set-top Box) using the REMOTE IN/OUT connectors of the plasma monitor. Connection Example: Connecting an STB PLASMA DISPLAY Video cable IN OUT OUT IN Remote cable* STB STB Remote Control Carrier fHz: 37.9 kHz (Typical) * The ...1/8 Stereo Mini cable must be purchased separately. 1/8 Stereo Mini Jack (not supplied) for REMOTE IN/OUT Plasma monitor REMOTE IN GND DATA (DC +5 V) VDD (DC +3 V) Plasma monitor REMOTE OUT GND DATA (C-MOS DC +5 V) Connection with STB Following is 37.9 kHz (Typical).


