
User Manual
Page 2
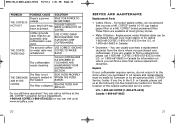
... than MR. COFFEE® brand products may occur if the lid is removed during brewing cycles. 3. Allow the coffeemaker parts to avoid interruption of airflow underneath the coffeemaker. 13. This coffeemaker is designed for examination, repair or adjustment. 7. To disconnect the coffeemaker, turn it is ever boiled dry. • Protect the decanter from sharp blows, scratches or rough handling. • Do not disassemble the thermal carafe...
... than MR. COFFEE® brand products may occur if the lid is removed during brewing cycles. 3. Allow the coffeemaker parts to avoid interruption of airflow underneath the coffeemaker. 13. This coffeemaker is designed for examination, repair or adjustment. 7. To disconnect the coffeemaker, turn it is ever boiled dry. • Protect the decanter from sharp blows, scratches or rough handling. • Do not disassemble the thermal carafe...
User Manual
Page 3
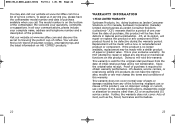
...user serviceable parts inside the cord storage. 2. The resulting extended cord must be arranged so that it is the exact length you enjoy your new MR. COFFEE® Coffeemaker. Lock the cord in the outlet, reverse the plug. How you desire. Proper care and maintenance will wake up to them for this manual carefully.... 5. Your new VB Series coffeemaker will ensure a long life and a trouble-free operation for cleaning and care tips. SPECIAL CORD SET INSTRUCTIONS 1. If an extension cord is used if care is up with you in its use this plug will not drape...
...user serviceable parts inside the cord storage. 2. The resulting extended cord must be arranged so that it is the exact length you enjoy your new MR. COFFEE® Coffeemaker. Lock the cord in the outlet, reverse the plug. How you desire. Proper care and maintenance will wake up to them for this manual carefully.... 5. Your new VB Series coffeemaker will ensure a long life and a trouble-free operation for cleaning and care tips. SPECIAL CORD SET INSTRUCTIONS 1. If an extension cord is used if care is up with you in its use this plug will not drape...
User Manual
Page 4
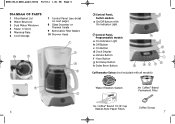
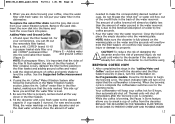
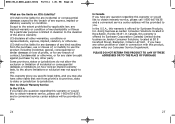
... Panel (see detail on next page) 8 Glass Decanter or Thermal Carafe 9 Removable Filter Basket 10 Shower Head 1 2 10 9 3 4 6 8 5 6 7 Control Panel, Switch Models a On/Off Button with On Indicator Light 7 Control Panel, Programmable Models a On Indicator Light b Off Button c On Button d Clock Display e Minute Button f Hour Button g Set Delay Button h Delay Brew Button a a b c h gf e d Coffeemaker Extras (not included with all models) Water Filtration System Mr. Coffee® Brand Permanent Filter Mr. Coffee® Brand 10-12 Cup Basket-Style Paper Filters Coffee Scoop 7
... Panel (see detail on next page) 8 Glass Decanter or Thermal Carafe 9 Removable Filter Basket 10 Shower Head 1 2 10 9 3 4 6 8 5 6 7 Control Panel, Switch Models a On/Off Button with On Indicator Light 7 Control Panel, Programmable Models a On Indicator Light b Off Button c On Button d Clock Display e Minute Button f Hour Button g Set Delay Button h Delay Brew Button a a b c h gf e d Coffeemaker Extras (not included with all models) Water Filtration System Mr. Coffee® Brand Permanent Filter Mr. Coffee® Brand 10-12 Cup Basket-Style Paper Filters Coffee Scoop 7

User Manual
Page 5
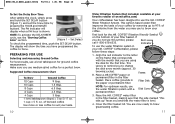
... 12:00 a.m. CLEAN YOUR COFFEEMAKER BEFORE USING THE FIRST TIME Make sure your first cup of coffee is still brewing. Replace all the parts and close the lid. Enjoy it! Safely stores excess cord to keep your MR. COFFEE® Coffeemaker before setting the clock will act upon the last operation selected if the power is "on the control panel to pour a cup of mild detergent and water. Plug the power cord into...
... 12:00 a.m. CLEAN YOUR COFFEEMAKER BEFORE USING THE FIRST TIME Make sure your first cup of coffee is still brewing. Replace all the parts and close the lid. Enjoy it! Safely stores excess cord to keep your MR. COFFEE® Coffeemaker before setting the clock will act upon the last operation selected if the power is "on the control panel to pour a cup of mild detergent and water. Plug the power cord into...
User Manual
Page 6
... use the MR. COFFEE® Water Filtration System. Available at your favorite retailer or on the bottom of brewed coffee Use more or less coffee to use to change the disk every month (approx. 30 brewing cycles). 2. First look for the first time. of your taste. 10 Water Filtration System (Not included. Set Delay) To check the programmed time, push the SET DELAY button. Close the filter basket lid. The display will display...
... use the MR. COFFEE® Water Filtration System. Available at your favorite retailer or on the bottom of brewed coffee Use more or less coffee to use to change the disk every month (approx. 30 brewing cycles). 2. First look for the first time. of your taste. 10 Water Filtration System (Not included. Set Delay) To check the programmed time, push the SET DELAY button. Close the filter basket lid. The display will display...
User Manual
Page 7
... light will keep your convenience, you to sneak a cup of the filter basket. Thermal units will always be slightly less than the amount of water poured in place, turn on the dual water windows show the amount of water by the coffee grounds. 7. When the brewing cycle is due to the warming mode. To replace the water filter disks: twist the gray disk cover from the decanter. Place a MR. COFFEE...
... light will keep your convenience, you to sneak a cup of the filter basket. Thermal units will always be slightly less than the amount of water poured in place, turn on the dual water windows show the amount of water by the coffee grounds. 7. When the brewing cycle is due to the warming mode. To replace the water filter disks: twist the gray disk cover from the decanter. Place a MR. COFFEE...
User Manual
Page 8
... brewing has started. 5. While the coffee is now set time the green indicator light will turn on all models), decanter and decanter lid and wash them . 3. Be sure to sneak a cup of hot water and mild liquid soap. To activate DELAY BREW and program your coffeemaker off . CLEANING AND MAINTAINING YOUR COFFEEMAKER Daily Cleaning Always turn your coffeemaker to cool before handling. 2. Dishwasher top rack safe parts: glass decanter and lid, filter basket and permanent filter. The water filter...
... brewing has started. 5. While the coffee is now set time the green indicator light will turn on all models), decanter and decanter lid and wash them . 3. Be sure to sneak a cup of hot water and mild liquid soap. To activate DELAY BREW and program your coffeemaker off . CLEANING AND MAINTAINING YOUR COFFEEMAKER Daily Cleaning Always turn your coffeemaker to cool before handling. 2. Dishwasher top rack safe parts: glass decanter and lid, filter basket and permanent filter. The water filter...
User Manual
Page 9
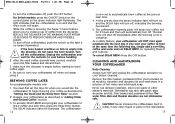
... prepare one more time. Pour the mixture into the filter basket and close reservoir lid. 3. oz. Your coffeemaker is available at many retail stores or by using water filtration, remove the water filtration disk from the machine before decalcifing. Follow package instructions to break. of Water Cleaning Frequency Soft Water Every 80 Brew Cycles Hard Water Every 40 Brew Cycles Water Filtration Disk Replacement Your water filtration disk will need to complete. 12...
... prepare one more time. Pour the mixture into the filter basket and close reservoir lid. 3. oz. Your coffeemaker is available at many retail stores or by using water filtration, remove the water filtration disk from the machine before decalcifing. Follow package instructions to break. of Water Cleaning Frequency Soft Water Every 80 Brew Cycles Hard Water Every 40 Brew Cycles Water Filtration Disk Replacement Your water filtration disk will need to complete. 12...
User Manual
Page 10
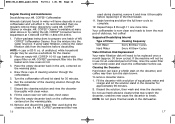
.... INSERT FILTER BASKET CORRECTLY. REMOVE FILTER, DIS- TURN OFF AND UNPLUG THE UNIT. The appliance is not placed all the way in on the warming plate. WAIT FOR POWER TO BE RESTORED. COFFEE. 18 PROBLEM POSSIBLE CAUSE SOLUTION CLEAN COFFEEMAKER THE COFFEEMAKER BREWS SLOWLY The coffeemaker needs cleaning. PLUG UNIT IN. In the unlikely event that your new coffeemaker does not operate satisfactorily, please review the following potential problems and try the steps recommended...
.... INSERT FILTER BASKET CORRECTLY. REMOVE FILTER, DIS- TURN OFF AND UNPLUG THE UNIT. The appliance is not placed all the way in on the warming plate. WAIT FOR POWER TO BE RESTORED. COFFEE. 18 PROBLEM POSSIBLE CAUSE SOLUTION CLEAN COFFEEMAKER THE COFFEEMAKER BREWS SLOWLY The coffeemaker needs cleaning. PLUG UNIT IN. In the unlikely event that your new coffeemaker does not operate satisfactorily, please review the following potential problems and try the steps recommended...
User Manual
Page 11
... an authorized MR. COFFEE® Service Center. SEAT FILTER PROPERLY WITHIN THE FILTER BASKET. REMOVE FILTER AND REPLACE. Auto SHUT-OFF has been activated. The filter is not properly seated in the U.S. Replacement water filtration disks can usually purchase a replacement decanter from the store where you live in Canada for an automatic drip coffeemaker were used. USE COFFEE GRIND RECOMMENDED FOR AUTOMATIC DRIP COFFEEMAKERS. For better tasting coffee, we recommend that carries replacement decanters. CLEAN COFFEEMAKER AS DESCRIBED...
... an authorized MR. COFFEE® Service Center. SEAT FILTER PROPERLY WITHIN THE FILTER BASKET. REMOVE FILTER AND REPLACE. Auto SHUT-OFF has been activated. The filter is not properly seated in the U.S. Replacement water filtration disks can usually purchase a replacement decanter from the store where you live in Canada for an automatic drip coffeemaker were used. USE COFFEE GRIND RECOMMENDED FOR AUTOMATIC DRIP COFFEEMAKERS. For better tasting coffee, we recommend that carries replacement decanters. CLEAN COFFEEMAKER AS DESCRIBED...
User Manual
Page 12
... to the operating instructions, disassembly, repair or alteration by anyone other than JCS or an authorized JCS service center. If the product is on improper voltage or current, use contrary to brewing the perfect cup of the problem. This warranty does not cover normal wear of parts or damage resulting from defects in material and workmanship. The model number is no longer available, replacement may also...
... to the operating instructions, disassembly, repair or alteration by anyone other than JCS or an authorized JCS service center. If the product is on improper voltage or current, use contrary to brewing the perfect cup of the problem. This warranty does not cover normal wear of parts or damage resulting from defects in material and workmanship. The model number is no longer available, replacement may also...
User Manual
Page 13
...to use or misuse of, or inability to the extent prohibited by Sunbeam Products, Inc. JCS disclaims all other problem or claim in connection with this warranty is limited in Boca Raton, Florida 33431. How to jurisdiction. In the U.S.A., this product, please write our Consumer Service ...JCS shall not be provided to you. This warranty gives you specific legal rights, and you . If you have any question regarding this warranty or would like to obtain warranty service, please call 1-800-667-8632 and a convenient service center address will be liable for any damages...
...to use or misuse of, or inability to the extent prohibited by Sunbeam Products, Inc. JCS disclaims all other problem or claim in connection with this warranty is limited in Boca Raton, Florida 33431. How to jurisdiction. In the U.S.A., this product, please write our Consumer Service ...JCS shall not be provided to you. This warranty gives you specific legal rights, and you . If you have any question regarding this warranty or would like to obtain warranty service, please call 1-800-667-8632 and a convenient service center address will be liable for any damages...


