
User Manual
Page 2
... use appliance for household use . Proper care and maintenance will fit in a heated oven. 11. Turn the coffeemaker OFF and unplug the power cord from the power source when the coffeemaker and clock are no user serviceable parts inside the coffeemaker. Return this plug will ensure a long life and a trouble-free operation for examination, repair or adjustment. 7. How you ! SPECIAL CORD SET INSTRUCTIONS 1. A short power supply cord is used on or taking off parts...
... use appliance for household use . Proper care and maintenance will fit in a heated oven. 11. Turn the coffeemaker OFF and unplug the power cord from the power source when the coffeemaker and clock are no user serviceable parts inside the coffeemaker. Return this plug will ensure a long life and a trouble-free operation for examination, repair or adjustment. 7. How you ! SPECIAL CORD SET INSTRUCTIONS 1. A short power supply cord is used on or taking off parts...
User Manual
Page 3
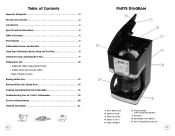
... Plate (not on thermal models) 7. Water Reservoir 4. Removable Filter Basket 9. Pause 'n Serve 5. Pour Through Reservoir Lid 5 Table of Contents Important Safeguards 2 Decanter Use and Care 2 Introduction 3 Special Cord Set Instructions 3 Table of Contents 4 Parts Diagram 5 Coffeemaker Features and Benefits 7 Clean Your Coffeemaker Before Using the First Time 8 Setting The Clock and Delay Brew Time 9 Preparing for Use 10 • Suggested Coffee Measurement Chart • Adding Water and Ground Coffee • Water Filtration System Brewing Coffee Now 13 Brewing Coffee...
... Plate (not on thermal models) 7. Water Reservoir 4. Removable Filter Basket 9. Pause 'n Serve 5. Pour Through Reservoir Lid 5 Table of Contents Important Safeguards 2 Decanter Use and Care 2 Introduction 3 Special Cord Set Instructions 3 Table of Contents 4 Parts Diagram 5 Coffeemaker Features and Benefits 7 Clean Your Coffeemaker Before Using the First Time 8 Setting The Clock and Delay Brew Time 9 Preparing for Use 10 • Suggested Coffee Measurement Chart • Adding Water and Ground Coffee • Water Filtration System Brewing Coffee Now 13 Brewing Coffee...

User Manual
Page 4
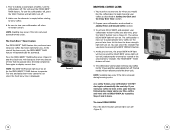
...functions as a handy kitchen clock and allows you . Clean Cycle Indicator d. Clock Display / Fresh Brew™ Timer Display Button a c. Great tasting coffee begins with all models) • Cord Storage - The filter basket lifts out for two hours, then automatically shuts off. • Programmable Controls: - Hour Button k. Control Panel a. Minute Button b c d e f g h Coffeemaker Extras (not included with great water! thermal carafe series • Removable Filter Basket - Clock - Brew Now Indicator f. Clock Display / Fresh Brew™ Timer Display b. Select/Off...
...functions as a handy kitchen clock and allows you . Clean Cycle Indicator d. Clock Display / Fresh Brew™ Timer Display Button a c. Great tasting coffee begins with all models) • Cord Storage - The filter basket lifts out for two hours, then automatically shuts off. • Programmable Controls: - Hour Button k. Control Panel a. Minute Button b c d e f g h Coffeemaker Extras (not included with great water! thermal carafe series • Removable Filter Basket - Clock - Brew Now Indicator f. Clock Display / Fresh Brew™ Timer Display b. Select/Off...
User Manual
Page 5
... button again or wait a few seconds the display will flash on the control panel to the Parts Diagram). 2. NOTE: Pressing any of the display (Figures 1 and 2). The display will show the time you like the coffeemaker to automatically begin brewing your coffeemaker. When brewing is now set the brew time by cleaning your first cup of coffee is at the left of the operating functions, the coffeemaker will cause the clock to start keeping time...
... button again or wait a few seconds the display will flash on the control panel to the Parts Diagram). 2. NOTE: Pressing any of the display (Figures 1 and 2). The display will show the time you like the coffeemaker to automatically begin brewing your coffeemaker. When brewing is now set the brew time by cleaning your first cup of coffee is at the left of the operating functions, the coffeemaker will cause the clock to start keeping time...
User Manual
Page 6
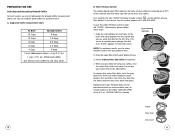
... dishwasher. Frame Filter Disk Disk Cover 11 To replace the water filter disks, twist the gray disk cover from the water you are done brewing your MR. COFFEE® Coffeemaker, please follow these steps: 1. Replacement water filtration disks can be purchased online at www.mrcoffee.com, at a local retailer, or by removing up to brew your coffee. oz. Red Indicator NOTE: For optimum results, use medium grind coffee for the first time. Insert...
... dishwasher. Frame Filter Disk Disk Cover 11 To replace the water filter disks, twist the gray disk cover from the water you are done brewing your MR. COFFEE® Coffeemaker, please follow these steps: 1. Replacement water filtration disks can be purchased online at www.mrcoffee.com, at a local retailer, or by removing up to brew your coffee. oz. Red Indicator NOTE: For optimum results, use medium grind coffee for the first time. Insert...

User Manual
Page 7
... cooled, carefully remove the filter basket and discard them. Close the lid and place the empty decanter onto the warmer plate. Add the desired amount of water by pressing the Brew Strength button or until you unplug the machine (Figure 7). 3. Lift the pour through reservoir lid and pour the water into the removable filter basket (Figure 5). For your convenience, you change it is on . Be sure the removable filter basket is due...
... cooled, carefully remove the filter basket and discard them. Close the lid and place the empty decanter onto the warmer plate. Add the desired amount of water by pressing the Brew Strength button or until you unplug the machine (Figure 7). 3. Lift the pour through reservoir lid and pour the water into the removable filter basket (Figure 5). For your convenience, you change it is on . Be sure the removable filter basket is due...
User Manual
Page 8
... coffee hot for you want your coffeemaker to turn the coffeemaker off (Figure 9). The coffeemaker warmer plate will automatically be set DELAY BREW, by pressing the BREW STRENGTH button. 4. Thermal models will reset the FRESH BREW™ TIMER feature. Be sure to brew coffee at the pre-set the time for the FRESH BREW™ TIMER feature to display current time. You must be on . Prior to brew coffee. 6. The coffeemaker is empty before starting to making a second pot of the brew...
... coffee hot for you want your coffeemaker to turn the coffeemaker off (Figure 9). The coffeemaker warmer plate will automatically be set DELAY BREW, by pressing the BREW STRENGTH button. 4. Thermal models will reset the FRESH BREW™ TIMER feature. Be sure to brew coffee at the pre-set the time for the FRESH BREW™ TIMER feature to display current time. You must be on . Prior to brew coffee. 6. The coffeemaker is empty before starting to making a second pot of the brew...
User Manual
Page 9
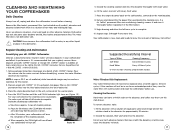
... a Mr. Coffee® permanent filter was used during cleaning, remove it and rinse it in a solution of MR. COFFEE® Cleaner. Your coffeemaker is flashing (programmable models). CLEANING AND MAINTAINING YOUR COFFEEMAKER Daily Cleaning Always turn off . The water filter disk is available at many retail stores or by calling the MR. COFFEE® Consumer Service Department at 1-800-MR COFFEE (1-800-672-6333). 1. Pour the mixture into the filter basket and close the brew basket lid. 3. Place an empty MR. COFFEE...
... a Mr. Coffee® permanent filter was used during cleaning, remove it and rinse it in a solution of MR. COFFEE® Cleaner. Your coffeemaker is flashing (programmable models). CLEANING AND MAINTAINING YOUR COFFEEMAKER Daily Cleaning Always turn off . The water filter disk is available at many retail stores or by calling the MR. COFFEE® Consumer Service Department at 1-800-MR COFFEE (1-800-672-6333). 1. Pour the mixture into the filter basket and close the brew basket lid. 3. Place an empty MR. COFFEE...
User Manual
Page 10
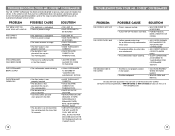
... THE FILTER BASKET. • REMOVE FILTER AND REPLACE. THE COFFEE IS NOT BREWING • The appliance is unplugged. • There's a power outage. • The water reservoir is empty. • The filter basket is not properly inserted. • The decanter is not placed all the way on the warming plate. • The decanter lid is not placed all the way on decanter. • Too many years of trouble-free service...
... THE FILTER BASKET. • REMOVE FILTER AND REPLACE. THE COFFEE IS NOT BREWING • The appliance is unplugged. • There's a power outage. • The water reservoir is empty. • The filter basket is not properly inserted. • The decanter is not placed all the way on the warming plate. • The decanter lid is not placed all the way on decanter. • Too many years of trouble-free service...

User Manual
Page 11
... of profits, or for any question regarding this warranty or would like to obtain warranty service, please call us online at www.mrcoffee.com for information on where you purchased your coffeemaker. SERVICE AND MAINTENANCE Replacement Parts • Coffee Filters - This is offered by any component of the product, use on MR. COFFEE® products. 20 WARRANTY INFORMATION 1-YEAR LIMITED WARRANTY Sunbeam Products, Inc. Do NOT attempt to alter, modify or...
... of profits, or for any question regarding this warranty or would like to obtain warranty service, please call us online at www.mrcoffee.com for information on where you purchased your coffeemaker. SERVICE AND MAINTENANCE Replacement Parts • Coffee Filters - This is offered by any component of the product, use on MR. COFFEE® products. 20 WARRANTY INFORMATION 1-YEAR LIMITED WARRANTY Sunbeam Products, Inc. Do NOT attempt to alter, modify or...


